2001 BMW 330Ci COUPE jump start
[x] Cancel search: jump startPage 12 of 203

Contents
Repairs
Advanced technology
Technical data
Replacement procedures:
Onboard tool kit152
Windshield wiper blades152
Lamps and bulbs152
Changing a wheel159
Battery162
Fuses166
Microfilter/Activated-charcoal
filter166
In case of electrical
malfunction:
Fuel filler door167
Sliding/tilt sunroof167
Assistance, giving and
receiving:
Jump-starting168
Towing the vehicle169Adaptive Transmission Control
(ATC)174
Airbags175
Automatic Stability Control plus
Traction (ASC+T)/Dynamic
Stability Control (DSC)175
Radio reception176
Safety belt tensioner176
Interior rearview mirror with
automatic dimming
feature177
Rain sensor178
Tire Pressure Control (RDC)179
Self-diagnostics180
Xenon lamps181Engine data184
Dimensions185
Weights186
Capacities187
Electrical system188
V-belts188
Page 69 of 203

69n
IndexDataTechnologyRepairsCar careControlsOverview
Automatic transmission with Steptronic
*
In the following situations, the Step-
tronic "thinks" for you in the manual
mode:
>In order to prevent the engine from
overrevving, the transmission shifts
automatically to the next higher gear
just before the engine speed cutoff
point.
>If you do not do anything to inter-
vene, it will automatically downshift
at lower speeds.
>In the kickdown mode, the transmis-
sion shifts down to the lowest gear
which is possible, depending on the
engine speed.
>Depending on the situation Ñ when
driving in adverse winter conditions,
for example Ñ you may also start out
in 2nd or 3rd gear.
Possible displays
P R N D SD M1 M2 M3 M4 M5
Electronic transmission control
module
If the indicator lamp comes on,
there is a malfunction in the
transmission system.
46cus005
Bring the vehicle to a stop. Move the
transmission selector lever to "P." Set
the parking brake and turn the engine
off (ignition key to position 0).
Wait a few seconds, then start the
engine.
If the indicator lamp goes out after a
few seconds, normal transmission
performance has been restored. You
may continue to drive as usual.
If the indicator lamp does not go out,
you can place the selector lever in all
positions. However, the vehicle will now
only operate in 3rd and 4th gear.
If this happens, avoid extreme engine
loads and consult the nearest BMW
center.
Do not work in the engine
compartment when a drive gear
(forward or reverse) is engaged. If you
do this, the vehicle could move.<
For towing or jump-starting, refer to the
information beginning on page 168.
Page 113 of 203

113n
IndexDataTechnologyRepairsCar careControlsOverview
Brakes:
Do not drive with your foot resting
on the brake pedal. Even light but
consistent pedal pressure can lead to
high temperatures, brake wear, and
possibly to brake failure.
Aquaplaning:
When driving on wet or slushy roads,
reduce vehicle speed. If you do not, a
wedge of water may form between the
tires and the road surface. This
phenomenon is referred to as aqua-
planing or hydroplaning. It is character-
ized by a partial or complete loss of
contact between the tires and the road
surface. The ultimate results are loss of
steering and braking control.
Driving through water:
Do not drive through water on the road
if it is deeper than 1 foot (30 cm), and
then only at walking speed. Otherwise,
the vehicle's engine, the electrical
systems and the transmission may be
damaged.
Rear window shelf:
Never use it to store heavy or hard
objects, otherwise, occupants could
be injured if the vehicle is braked hard.
Clothes hooks:
When suspending clothing from the
hooks, be sure that they will not
obstruct the driver's vision. Do not hang
heavy objects on the hooks. If you do
so, they could cause personal injury
during braking or evasive maneuvers.
It is designed for use with unleaded fuel
only. Even minute quantities of lead
would be enough to permanently
damage both the catalytic converter
and the system oxygen sensor.
To ensure efficient, trouble-free engine
operation and to avoid potential
damage:
>Be sure to comply with the scheduled
maintenance requirements.
>Fill the fuel tank well before it is
empty.
>Tow-start only when the engine is
cold. If you attempt to tow-start with
a warm engine, unburned residual
fuel in the catalytic converter could
ignite and cause damage. It is better
to jump-start the vehicle with outside
assistance.
>Avoid other situations in which the
fuel is not burned, or burns incom-
pletely, such as engaging the starter
frequently or for extended periods, or
repeated start attempts in which the
engine does not start (stopping and
restarting an engine which is running
properly does not present a problem).
Never allow the engine to run with
any of the spark plug cables discon-
nected.
Driving notes Catalytic converter
Page 133 of 203

133n
IndexDataTechnologyRepairsCar careControlsOverview
Engine compartment Ð BMW 325Ci, 330Ci1 Brake fluid reservoir138
2 Dipstick for the engine oil135
3 Coolant expansion tank137
4 Engine oil filler neck135
5 Reservoir for the headlamp
* and
windshield washer system134
6 Auxiliary terminal for jump
starting168
Page 151 of 203

Overview
Controls and features
Operation, care
and maintenance
Owner service procedures
Technical data
Index Advanced technology
151n
IndexDataTechnologyRepairsCar careControlsOverview
Replacement procedures:
Onboard tool kit152
Windshield wiper blades152
Lamps and bulbs152
Changing a wheel159
Battery163
Fuses166
Microfilter/Activated-charcoal
filter166
In case of electrical
malfunction:
Fuel filler door167
Sliding/tilt sunroof167
Assistance, giving and
receiving:
Jump-starting168
Towing the vehicle169
Repairs
Page 168 of 203

168n
Do not use spray starter fluids.
If the battery is discharged, the engine
can be started with the use of two
jumper cables and the battery of
another vehicle. Use only jumper cables
with fully insulated grips on the terminal
clamps.
Do not touch the parts conducting
electrical current while the engine
is running. Failure to comply with this
creates a risk of fatal injury.<
Carefully comply with the following
instructions to avoid personal injury or
damage to one or both vehicles:
1 Be sure that the battery on the
support vehicle is also rated at
12 volts, and that the capacities of
the two batteries (Ah) are roughly
comparable (printed on casing).
2 Leave your battery connected to the
vehicle electrical system.
3 Make sure that there is no contact
between the bodywork of the two
vehicles Ð this creates a risk of short
circuits.
4 Start by connecting the jumper cable
from the positive terminal of the
support vehicle to the positive
terminal connector located in your
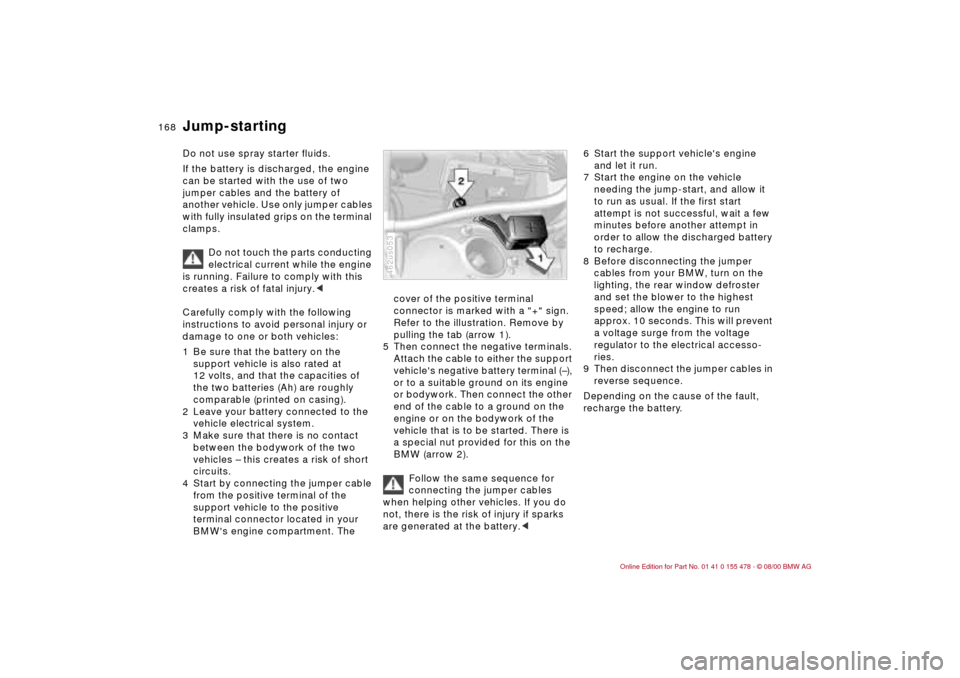
BMW's engine compartment. The
cover of the positive terminal
connector is marked with a "+" sign.
Refer to the illustration. Remove by
pulling the tab (arrow 1).
5 Then connect the negative terminals.
Attach the cable to either the support
vehicle's negative battery terminal (Ð),
or to a suitable ground on its engine
or bodywork. Then connect the other
end of the cable to a ground on the
engine or on the bodywork of the
vehicle that is to be started. There is
a special nut provided for this on the
BMW (arrow 2).
Follow the same sequence for
connecting the jumper cables
when helping other vehicles. If you do
not, there is the risk of injury if sparks
are generated at the battery.<462us053
6 Start the support vehicle's engine
and let it run.
7 Start the engine on the vehicle
needing the jump-start, and allow it
to run as usual. If the first start
attempt is not successful, wait a few
minutes before another attempt in
order to allow the discharged battery
to recharge.
8 Before disconnecting the jumper
cables from your BMW, turn on the
lighting, the rear window defroster
and set the blower to the highest
speed; allow the engine to run
approx. 10 seconds. This will prevent
a voltage surge from the voltage
regulator to the electrical accesso-
ries.
9 Then disconnect the jumper cables in
reverse sequence.
Depending on the cause of the fault,
recharge the battery.
Jump-starting
Page 195 of 203

Everything from A to Z
195n
IndexDataTechnologyRepairsCar careControlsOverview
Interior motion
sensor36,43
Interior rearview mirror53
automatic dimming
feature53,177
Interlock63
Intermittent wipe70 J
Jack159
Jump-starting168 K
Key Memory54
Keys32
with remote control32 L
Lamp switch87
Lamps152
LAMPS ON warning87
Lashing eyes108
LATCH attachment of the
child seat60
Leather care145
Length185
License plate lamp, bulb
replacement157
Lift the floor panel up and
hook it41 Light switch87
Light-alloy wheel127
Lighter105
Loads, securing108
Load-securing devices108
Louvers90,96
Low beams87
bulb replacement153
Lug bolts161
Lug wrench160
Luggage compartment41
capacity186
floor mat41
remote control37
secure separately39
Luggage compartment
lamps, bulb
replacement158
Luggage compartment
lid39
emergency release39
Luggage compartment
lighting39
Luggage rack109
Lumbar support49
M
M+S tires126
Maintenance76
Malfunction displays77
Manual transmission66 Manually controlled
recirculated-air99
Memory51
MFL (Multi-function steering
wheel)24
Microfilter93,166
Mirror memory51
Mirrors52
Mobile phones121
Modifications,
technical6,148
Multi-function steering
wheel (MFL)24
N
Navigation system, refer to
the Onboard Monitor
Owner's Manual
Neckrest48 O
OBD interface socket149
Obstruction protection44
Odometer75
Oil
additives135
capacity187
consumption135
dipstick135
quality136
specifications136
viscosity136 Oil change intervals, refer to
the Service and Warranty
Information Booklet/
Warranty and Service
Guide Booklet
Oil filter change187
Oil level
check135
indicator lamp20
Oil pressure, indicator
lamp20
OILSERVICE76
Onboard tool kit152
Opening and closing
from the inside38
from the outside34
Outside temperature
display78
P
Paint blemishes142
Paint, care142
Paintwork
minor repairs143
waxing143
Park Distance Control
(PDC)81
Parking aid81
Parking brake65
Parking lamps88
Parking, winter120