2001 BMW 330Ci COUPE ECO mode
[x] Cancel search: ECO modePage 3 of 203

Congratulations, and thank you for choosing a BMW.
Thorough familiarity with your vehicle will provide you with enhanced control and
security when you drive it. We therefore have this request:
Read this Owner's Manual to get summarized information, before you start out in
your new BMW. It contains important data and instructions intended to assist you in
gaining maximum use and satisfaction from the unique range of technical features
on your BMW. The manual also contains information on care and maintenance
designed to enhance operating safety and contribute to maintaining the value of
your vehicle throughout an extended service life.
This Owner's Manual should be considered a permanent part of this vehicle. It
should stay with the vehicle when sold to provide the next owner with important
operating, safety and maintenance information.
This manual is supplemented by a Service and Warranty Information Booklet
(US models) or a Warranty and Service Guide Booklet (Canadian models).
We recommend that you read this publication thoroughly.
Your BMW is covered by the following warranties:
Ð New Vehicle Limited Warranty
Ð Limited Warranty Rust Perforation
Ð Federal Emissions System Defect Warranty
Ð Federal Emissions Performance Warranty
Ð California Emission Control System Limited Warranty
Detailed information about these warranties is listed in the Service and Warranty
Information Booklet (US models) or in the Warranty and Service Guide Booklet
(Canadian models).
We wish you an enjoyable driving experience.
BMW AG
Page 21 of 203

21n
IndexDataTechnologyRepairsCar careControlsOverview
Indicator and warning lampsRed and yellow: continue driving
cautiously
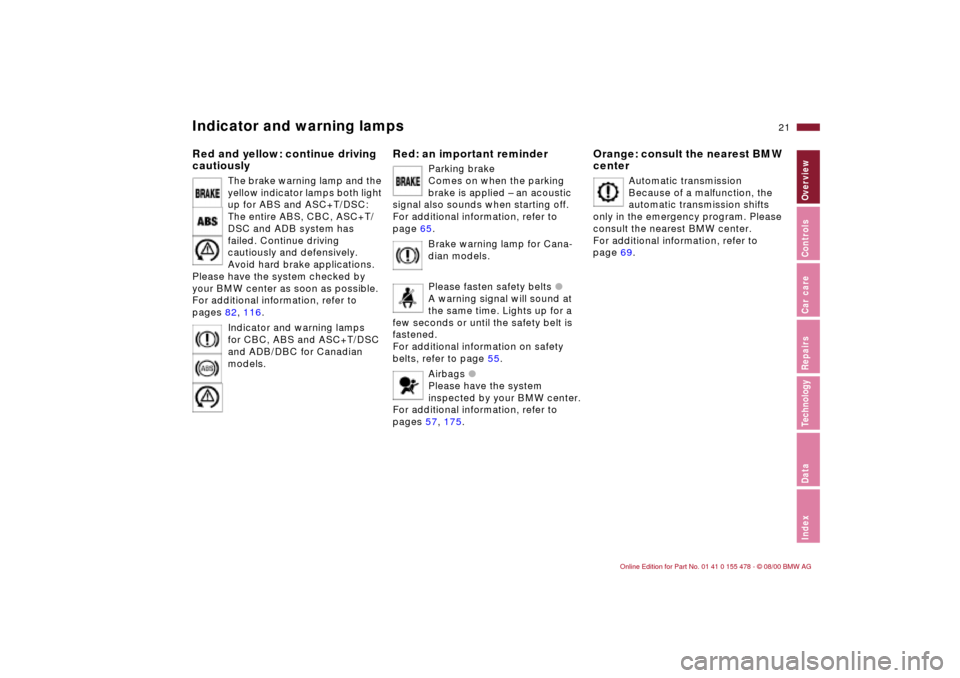
The brake warning lamp and the
yellow indicator lamps both light
up for ABS and ASC+T/DSC:
The entire ABS, CBC, ASC+T/
DSC and ADB system has
failed. Continue driving
cautiously and defensively.
Avoid hard brake applications.
Please have the system checked by
your BMW center as soon as possible.
For additional information, refer to
pages 82, 116.
Indicator and warning lamps
for CBC, ABS and ASC+T/DSC
and ADB/DBC for Canadian
models.
Red: an important reminder
Parking brake
Comes on when the parking
brake is applied Ð an acoustic
signal also sounds when starting off.
For additional information, refer to
page 65. Brake warning lamp for Cana-
dian models.
Please fasten safety belts l
A warning signal will sound at
the same time. Lights up for a
few seconds or until the safety belt is
fastened.
For additional information on safety
belts, refer to page 55.
Airbags l
Please have the system
inspected by your BMW center.
For additional information, refer to
pages 57, 175.
Orange: consult the nearest BMW
center
Automatic transmission
Because of a malfunction, the
automatic transmission shifts
only in the emergency program. Please
consult the nearest BMW center.
For additional information, refer to
page 69.
Page 37 of 203

37n
IndexDataTechnologyRepairsCar careControlsOverview
Opening and closing Ð from the outsideTo open the luggage
compartment lidPress button 3.
The luggage compartment lid will open
slightly, regardless of whether the lid
was previously locked or unlocked.
Before and after a trip, be sure
that the luggage compartment lid
was not opened unintentionally.<46cde058
Panic-Mode (triggering alarm)By pressing button 3 for two to
five seconds, the alarm can be sounded
in the event of danger, if it has been
armed ahead of time.
Pressing on button 1 will turn the alarm
off.
The LED (light-emitting diode) will light
up briefly whenever you press on the
individual buttons.Non-BMW systemsThe proper functioning of the remote
control system may be affected by
other devices or equipment operating in
the immediate vicinity of your vehicle.
If this should occur, you can still open
and close the vehicle using the master
key in either the door or luggage
compartment locks.
For US owners onlyThe transmitter and receiver units
comply with part 15 of the FCC (Federal
Communication Commission) regula-
tions. Operation is governed by the
following:
FCC ID: LX8EWS
LX8FZVS
LX8FZVE
Compliance statement:
This device complies with part 15 of the
FCC Rules. Operation is subject to the
following two conditions:
>This device may not cause harmful
interference, and
>this device must accept any interfer-
ence received, including interference
that may cause undesired operation.
Any unauthorized modifications or
changes to these devices could
void the user's authority to operate this
equipment.<
Page 45 of 203

45n
IndexDataTechnologyRepairsCar careControlsOverview
Sliding/tilt sunroof
*
Exercise care when closing the
sliding/tilt sunroof and keep it in
your field of vision until it is completely
closed. Failure to do so can result in
injuries.
Remove the key from the ignition lock
and close the doors when you leave the
vehicle so that children cannot operate
the sunroof and possibly injure them-
selves.<
Avoid low air pressure or drafts in the
passenger compartment whenever the
sunroof is open or up by keeping the
vent outlets on the instrument panel
open, and if necessary, by increasing
the air supply. Refer to page 92 or 99.
If the sunroof is completely open, air
disturbances may be caused in the
vehicle when you are driving at higher
speeds. Close the roof as far as neces-
sary until this natural phenomenon
ceases.
To operate the door lock or the remote
control by using the convenience oper-
ating mode, refer to page 34 or 36.
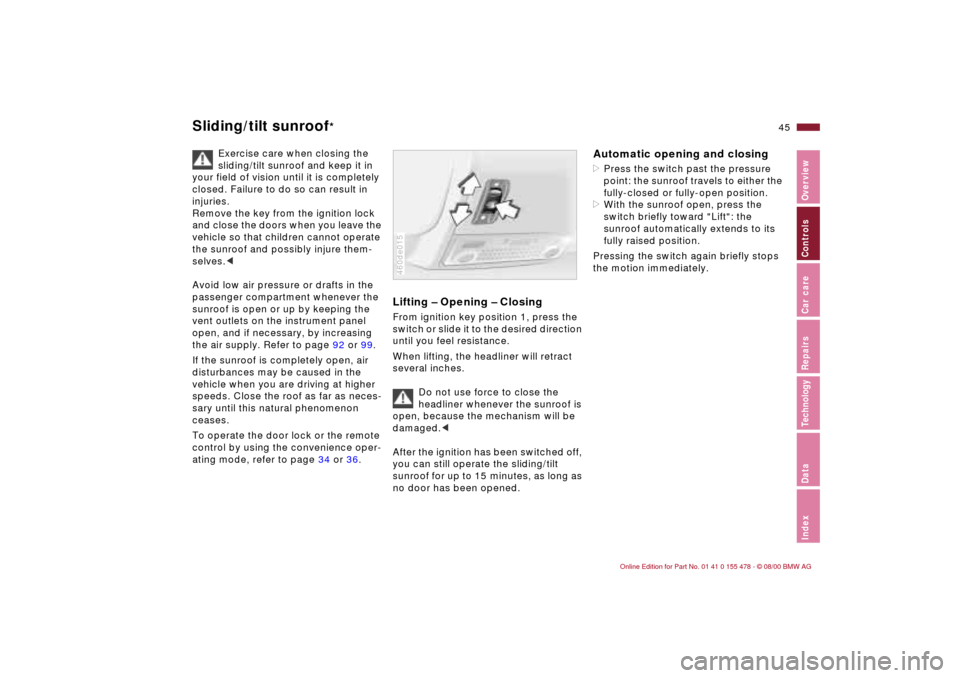
Lifting Ð Opening Ð ClosingFrom ignition key position 1, press the
switch or slide it to the desired direction
until you feel resistance.
When lifting, the headliner will retract
several inches.
Do not use force to close the
headliner whenever the sunroof is
open, because the mechanism will be
damaged.<
After the ignition has been switched off,
you can still operate the sliding/tilt
sunroof for up to 15 minutes, as long as
no door has been opened.460de015
Automatic opening and closing>Press the switch past the pressure
point: the sunroof travels to either the
fully-closed or fully-open position.
>With the sunroof open, press the
switch briefly toward "Lift": the
sunroof automatically extends to its
fully raised position.
Pressing the switch again briefly stops
the motion immediately.
Page 53 of 203

53n
IndexDataTechnologyRepairsCar careControlsOverview
MirrorsYou can also adjust the mirrors manu-
ally by pressing against the outer edges
of their lenses.
The mirror on the passenger's
side features a lens with a more
convex surface than the mirror installed
on the driver's side. When estimating
the distance between yourself and
other traffic, bear in mind that the
objects reflected in the mirror are closer
than they appear. Estimations of the
distance to following traffic should
therefore not be regarded as precise.
position 2.
Interior rearview mirror To reduce glare from vehicles behind
you when you are driving at night, tilt
the mirror by turning the button.Lighted vanity mirror
*
Fold down the sun visor and slide the
cover panel to the side as required.
The mirror lamps operate from ignition
key position 1.Sun visorsThese can be folded down toward the
windshield or swiveled out against the
side window.463us011
Interior rearview mirror with
automatic dimming feature
*
By responding to the effects of ambient
light and the glare from following traffic,
this mirror automatically dims through
an infinitely-variable range.
The mirror switches to its clear,
undimmed mode whenever the trans-
mission is placed in reverse gear
(selector lever in "Reverse").
To ensure that the mirror continues to
operate properly, keep the two photo-
cells clean and unobstructed. One
photocell (arrow) is in the mirror glass,
while the other is offset somewhat on
the other side of the mirror.
For an explanation of the electro-
chromic technology used in this mirror,
refer to page 177.460de020
Page 64 of 203

64n
Starting the engine Switching off the engine Do not press the accelerator pedal
while starting the engine.
Do not actuate the starter for too
short a time, but do not actuate it
for more than approx. 20 seconds.
Release the ignition key immediately
when the engine starts.
Do not allow the engine to warm up by
leaving it running while the vehicle
remains stationary. Instead, begin
driving immediately at a moderate
engine speed.<
If the engine does not start on the first
attempt (if it is very cold or hot, for
instance):
>Press the accelerator pedal halfway
down while engaging the starter.
Cold starts at very low temperatures,
starting at about +57 (Ð156) and
at high altitudes above 3,300 ft
(1,000 meters):
>On the first start attempt, engage the
starter for a longer period (approx.
10 seconds).
>Press the accelerator pedal halfway
down while engaging the starter.
Engine idle speed is controlled by the
engine computer system. Increased
speeds at start-up are normal and
should decrease as the engine warms
up. If engine speed does not decrease,
service is required.
To prevent the battery from
discharging, always deactivate
electrical devices that are not in
use. Switch the ignition off when the
vehicle is not being driven.Turn the ignition key to position 1 or 0.
Do not remove the ignition key
while the vehicle is still moving.
If you did so, the steering lock would
engage when the steering wheel is
turned.
Whenever you leave the vehicle, always
remove the ignition key and lock the
steering wheel.
Vehicles with manual transmission:
Always apply the parking brake when
parking on slopes and inclined
surfaces, since placing the shift lever in
1st gear or reverse may not provide
adequate resistance to rolling.
Vehicles with automatic transmission:
Place the selector lever in "Park."<
Page 65 of 203

65n
IndexDataTechnologyRepairsCar careControlsOverview
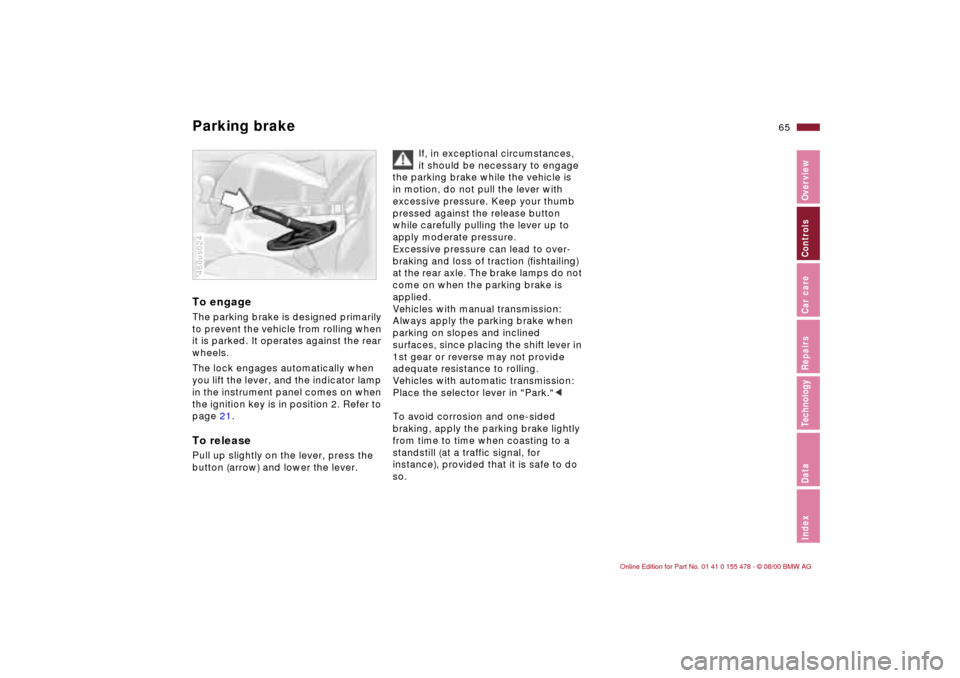
Parking brake To engageThe parking brake is designed primarily
to prevent the vehicle from rolling when
it is parked. It operates against the rear
wheels.
The lock engages automatically when
you lift the lever, and the indicator lamp
in the instrument panel comes on when
the ignition key is in position 2. Refer to
page 21.To releasePull up slightly on the lever, press the
button (arrow) and lower the lever.460us024
If, in exceptional circumstances,
it should be necessary to engage
the parking brake while the vehicle is
in motion, do not pull the lever with
excessive pressure. Keep your thumb
pressed against the release button
while carefully pulling the lever up to
apply moderate pressure.
Excessive pressure can lead to over-
braking and loss of traction (fishtailing)
at the rear axle. The brake lamps do not
come on when the parking brake is
applied.
Vehicles with manual transmission:
Always apply the parking brake when
parking on slopes and inclined
surfaces, since placing the shift lever in
1st gear or reverse may not provide
adequate resistance to rolling.
Vehicles with automatic transmission:
Place the selector lever in "Park."<
To avoid corrosion and one-sided
braking, apply the parking brake lightly
from time to time when coasting to a
standstill (at a traffic signal, for
instance), provided that it is safe to do
so.
Page 67 of 203

67n
IndexDataTechnologyRepairsCar careControlsOverview
Automatic transmission with Steptronic
*
You have the option of driving with a
normal automatic transmission or
switching to manual.
When you move the selector lever from
the "D" position to the left into the M/S
range, the performance-oriented shift
programs of the automatic transmission
are engaged. As soon as you even
begin to move the selector lever toward
the "+" or tap "Ð", Steptronic shifts the
gear and manual operation becomes
active. Whenever you want to use the
automatic mode again, move the
selector lever to the right into posi-
tion "D."
The automatic transmission with Step-
tronic is equipped with Adaptive Trans-
mission Control (ATC). ATC reacts with
precision to your individual driving style
and the current driving conditions. It is
for this reason that various shift
programs are used.
You will find additional information
about ATC in the chapter called
"Advanced Technology" on page 174.
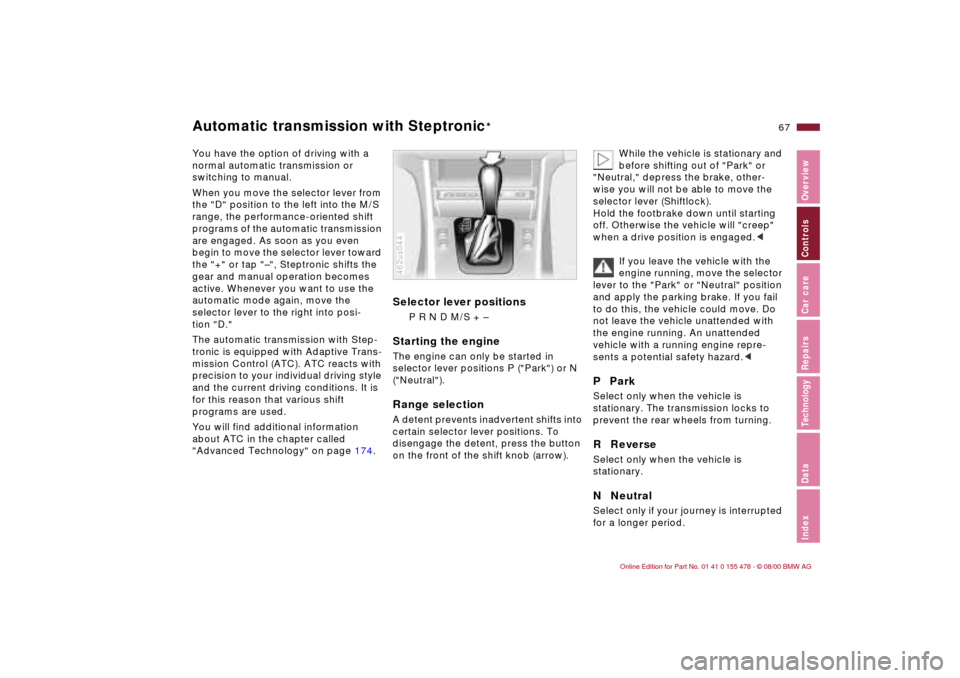
Selector lever positions
P R N D M/S + Ð
Starting the engineThe engine can only be started in
selector lever positions P ("Park") or N
("Neutral").Range selectionA detent prevents inadvertent shifts into
certain selector lever positions. To
disengage the detent, press the button
on the front of the shift knob (arrow).462us044
While the vehicle is stationary and
before shifting out of "Park" or
"Neutral," depress the brake, other-
wise you will not be able to move the
selector lever (Shiftlock).
Hold the footbrake down until starting
off. Otherwise the vehicle will "creep"
when a drive position is engaged.<
If you leave the vehicle with the
engine running, move the selector
lever to the "Park" or "Neutral" position
and apply the parking brake. If you fail
to do this, the vehicle could move. Do
not leave the vehicle unattended with
the engine running. An unattended
vehicle with a running engine repre-
sents a potential safety hazard.<
P ParkSelect only when the vehicle is
stationary. The transmission locks to
prevent the rear wheels from turning.R ReverseSelect only when the vehicle is
stationary.N NeutralSelect only if your journey is interrupted
for a longer period.