2001 BMW 325i TOURING jump start
[x] Cancel search: jump startPage 12 of 203

Contents
Owner service procedures
Advanced technology
Technical data
Replacement procedures:
Onboard tool kit152
Windshield wiper blades152
Lamps and bulbs153
Changing a wheel159
Battery162
Fuses164
Microfilter/Activated-charcoal
filter165
In case of electrical
malfunction:
Fuel filler door166
Sliding/Tilt sunroof166
Tailgate166
Assistance, giving and
receiving:
Jump-starting167
Towing the vehicle168Airbags172
Adaptive Transmission Control
(ATC)173
Automatic Stability Control plus
Traction (ASC+T)/Dynamic
Stability Control (DSC)173
Radio reception174
Four-wheel drive175
Safety belt tensioner175
Interior rearview mirror with
automatic dimmer176
Rain sensor177
Tire Pressure Control (RDC)178
Self-diagnostics179
Xenon lamps180Engine data184
Dimensions185
Weights186
Capacities187
Electrical system188
Drive belts188
Page 67 of 203

67n
IndexDataTechnologyRepairsCar careControlsOverview
Automatic transmission with Steptronic
*
In the following situations, the Step-
tronic "thinks" for you in the manual
mode:
>In order to prevent engine over-
speeding, the transmission shifts
automatically to the next higher gear
shortly before the engine speed
cutoff point.
>At low speeds, the transmission
shifts down automatically Ð you do
not have to act.
>In the "kickdown" mode, the trans-
mission shifts down to the lowest
gear possible, depending
on the engine speed.
>Depending on the situation Ð when
driving in adverse winter conditions,
for example Ð you may also start out
in 2nd or 3rd gear.
Available displays
P R N D SD M1 M2 M3 M4 M5460us143
Electronic transmission control
module
If the indicator lamp comes on,
there is a malfunction in the
transmission system.
Bring the vehicle to a stop, select trans-
mission position "P," set the parking
brake and turn the engine off (ignition
key to position 0).
Wait a few seconds, then start the
engine. If the indicator lamp goes out
after a few seconds, normal transmis-
sion performance has been restored.
Drive off normally.
If the indicator lamp does not go out,
all selector lever positions can still be
selected, however in the forward posi-
tions the vehicle has limited perfor-
mance, as it drives only in 3
rd and 4
th
gear.
If this happens, avoid extreme engine
loads and consult the nearest BMW
center.
Do not perform service operations
in the engine compartment with
a drive position engaged. If you do so,
the vehicle could move.<
For towing, tow-starting or jump-
starting the vehicle, refer to the infor-
mation beginning on page 167.
Page 133 of 203

133n
IndexDataTechnologyRepairsCar careControlsOverview
Engine compartment Ð BMW 325i, 325xi1 Brake fluid reservoir138
2 Engine oil dipstick135
3 Coolant expansion tank137
4 Engine oil filler neck135
5 Reservoir for the headlamp
* and
windshield washer system134
6 Auxiliary terminal for jump
starting167
Page 151 of 203

Overview
Controls and features
Operation, care
and maintenance
Owner service procedures
Technical data
Index Advanced technology
151n
IndexDataTechnologyRepairsCar careControlsOverview
Replacement procedures:
Onboard tool kit152
Windshield wiper blades152
Lamps and bulbs153
Changing a wheel159
Battery162
Fuses164
Microfilter/Activated-charcoal
filter165
In case of electrical
malfunction:
Fuel filler door166
Sliding/Tilt sunroof166
Tailgate166
Assistance, giving and
receiving:
Jump-starting167
Towing the vehicle168
Repairs
Page 167 of 203

167n
IndexDataTechnologyRepairsCar careControlsOverview
Do not use spray starter fluids to start
the engine.
If the battery is drained, the engine can
be started using two jumper cables and
another vehicle's battery. Use only
jumper cables with fully insulated grips
on the terminal clamps.
Do not touch the parts conducting
current while the engine is
running. Failure to comply with this
creates a risk of fatal injury.<
Carefully comply with the following
instructions to avoid personal injury or
damage to one or both vehicles:
1 Be sure that the battery on the
support vehicle is also rated at
12 volts, and that the capacities of
the two batteries (Ah) are roughly
comparable (printed on casing)
2 Leave the drained battery connected
to the vehicle's electrical system
3 Make sure that there is no contact
between the bodywork of the two
vehicles Ð short circuit risk!
4 Start by connecting the jumper cable
from the positive terminal of the
support vehicle to the positive
terminal connector located in your
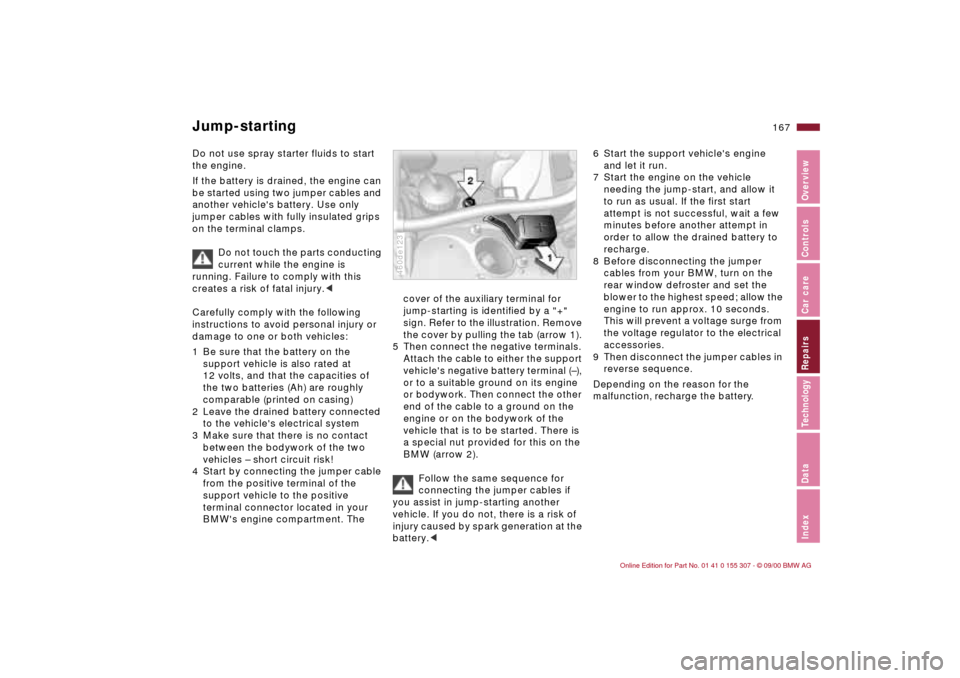
BMW's engine compartment. The
cover of the auxiliary terminal for
jump-starting is identified by a "+"
sign. Refer to the illustration. Remove
the cover by pulling the tab (arrow 1).
5 Then connect the negative terminals.
Attach the cable to either the support
vehicle's negative battery terminal (Ð),
or to a suitable ground on its engine
or bodywork. Then connect the other
end of the cable to a ground on the
engine or on the bodywork of the
vehicle that is to be started. There is
a special nut provided for this on the
BMW (arrow 2).
Follow the same sequence for
connecting the jumper cables if
you assist in jump-starting another
vehicle. If you do not, there is a risk of
injury caused by spark generation at the
battery.<460de123
6 Start the support vehicle's engine
and let it run.
7 Start the engine on the vehicle
needing the jump-start, and allow it
to run as usual. If the first start
attempt is not successful, wait a few
minutes before another attempt in
order to allow the drained battery to
recharge.
8 Before disconnecting the jumper
cables from your BMW, turn on the
rear window defroster and set the
blower to the highest speed; allow the
engine to run approx. 10 seconds.
This will prevent a voltage surge from
the voltage regulator to the electrical
accessories.
9 Then disconnect the jumper cables in
reverse sequence.
Depending on the reason for the
malfunction, recharge the battery.
Jump-starting
Page 194 of 203

Everything from A to ZFolding rear backrest108
Footbrake118
Footwell lamps88
bulb replacement158
Four-wheel drive175
Front fog lamps, bulb
replacement155
Front seat adjustment46
Frost protection,
radiator137
Fuel28
consumption77
consumption display74
gauge74
preparation184
quality28
Fuel filler door
releasing following an
electrical malfunction166
Fuel reserve indicator
lamp74
Fuel tank capacity187
Fuel tank gauge74
Functional status179
Fuses164 G
Gasoline28
Gasoline gauge74
Gasoline quality28
Glove compartment101 Glove compartment lamp,
bulb replacement158
Gross vehicle weight186
H
Handbrake63
Hands-free system103
Hazard warning flashers26
Hazard warning triangle26
Head restraint47
Headlamp covers,
care141,153
Headlamp flasher88
Headlamp washer
system70,134,187
Heated seats100
Heating, rapid94
Heavy loads110
Height185
HiFi system101
High beams23,68,88
bulb replacement153
High Performance Synthetic
Oils136
High-mount brake lamp157
Hood release130
Horn17
Hubcap160
Hydraulic Brake assistant,
refer to DBC118
I
Ice warning76
Icy roads76,121
Identification, tires127
Ignition key32,35
Ignition lock61
Imprint4
Indicator lamps20
Inflation pressure28,124
monitoring85,178
INSPECTION74
Installation child restraint
systems60
Instrument cluster18
Instrument lighting87
Interaxle tire rotation126
Interface socket for Onboard
Diagnostics149
Interference, cellular
phone123
Interior lamps36,88
bulb replacement158
remote control36
Interior motion sensor41
Interior rearview mirror51
automatic dimming
feature52,176
Interlock61
Intermittent wipe68
J
Jack159
Jump-starting167 K
Key32,35
Key Memory52 L
Lamps and bulbs153
Lashing eyes110
LATCH attachment of the
child seat58
Leather care145
Length185
License plate lamp
bulb replacement157
Light switch87
Light-alloy wheels129
Lighter104
Load-securing devices110
Louvers90,96
Low beam headlamps87
bulb replacement153
Lug bolts160
Lug wrench159