2001 BMW 320i tow
[x] Cancel search: towPage 93 of 211
93n
IndexDataTechnologyRepairsCar careControlsOverview
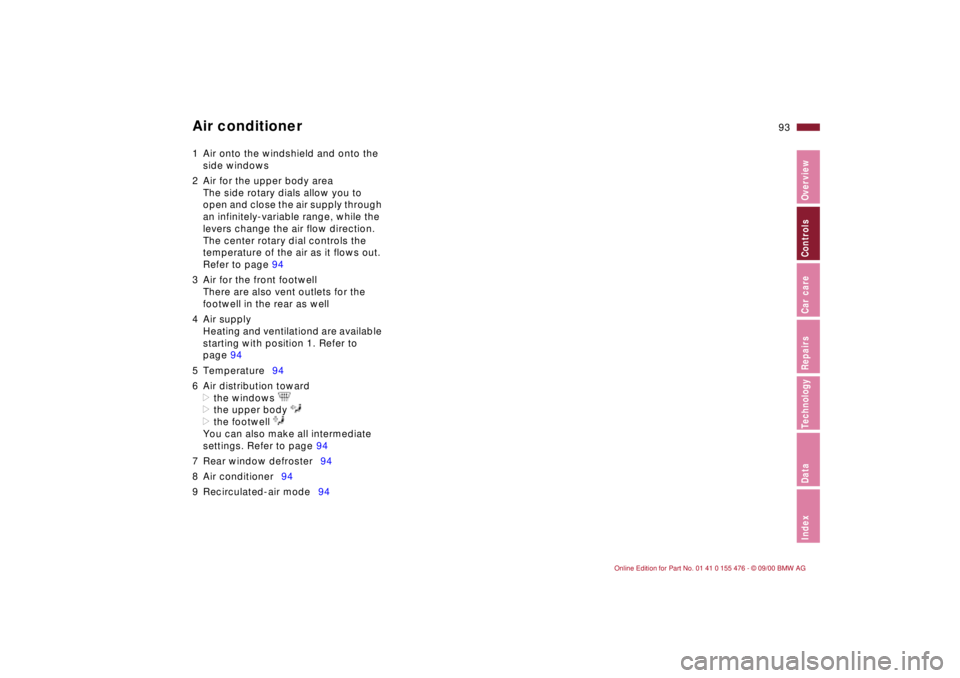
Air conditioner1 Air onto the windshield and onto the
side windows
2 Air for the upper body area
The side rotary dials allow you to
open and close the air supply through
an infinitely-variable range, while the
levers change the air flow direction.
The center rotary dial controls the
temperature of the air as it flows out.
Refer to page 94
3 Air for the front footwell
There are also vent outlets for the
footwell in the rear as well
4 Air supply
Heating and ventilationd are available
starting with position 1. Refer to
page 94
5 Temperature94
6 Air distribution toward
>the windows
>the upper body
>the footwell
You can also make all intermediate
settings. Refer to page 94
7 Rear window defroster94
8 Air conditioner94
9 Recirculated-air mode94
Page 94 of 211
94n
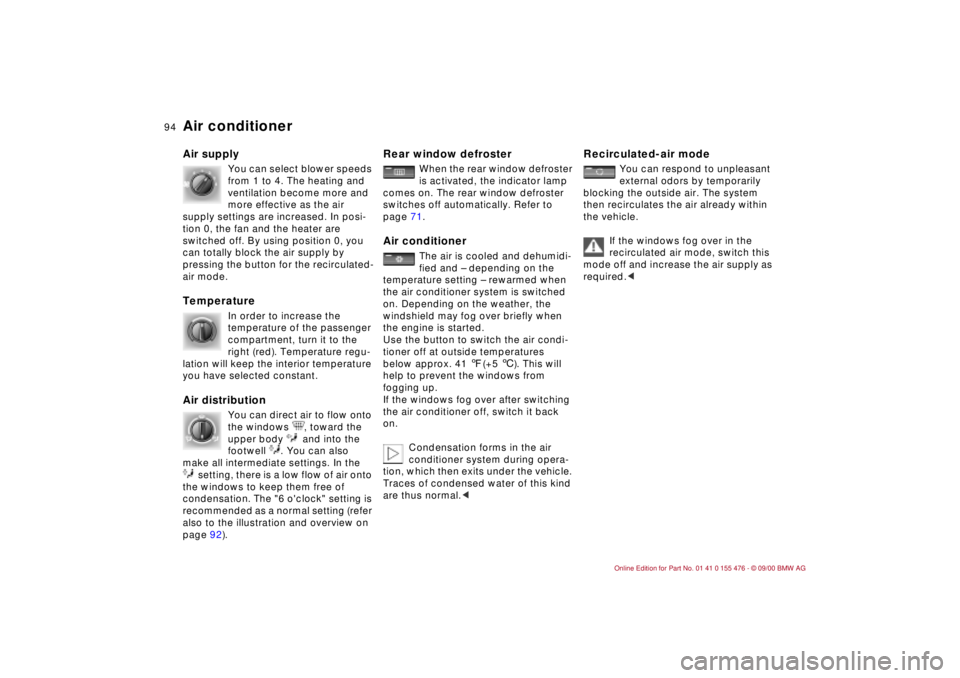
Air conditionerAir supply
You can select blower speeds
from 1 to 4. The heating and
ventilation become more and
more effective as the air
supply settings are increased. In posi-
tion 0, the fan and the heater are
switched off. By using position 0, you
can totally block the air supply by
pressing the button for the recirculated-
air mode.
Temperature
In order to increase the
temperature of the passenger
compartment, turn it to the
right (red). Temperature regu-
lation will keep the interior temperature
you have selected constant.
Air distribution
You can direct air to flow onto
the windows , toward the
upper body and into the
footwell . You can also
make all intermediate settings. In the
setting, there is a low flow of air onto
the windows to keep them free of
condensation. The "6 o'clock" setting is
recommended as a normal setting (refer
also to the illustration and overview on
page 92).
Rear window defroster
When the rear window defroster
is activated, the indicator lamp
comes on. The rear window defroster
switches off automatically. Refer to
page 71.
Air conditioner
The air is cooled and dehumidi-
fied and Ð depending on the
temperature setting Ð rewarmed when
the air conditioner system is switched
on. Depending on the weather, the
windshield may fog over briefly when
the engine is started.
Use the button to switch the air condi-
tioner off at outside temperatures
below approx. 41 7(+5 6). This will
help to prevent the windows from
fogging up.
If the windows fog over after switching
the air conditioner off, switch it back
on.
Condensation forms in the air
conditioner system during opera-
tion, which then exits under the vehicle.
Traces of condensed water of this kind
are thus normal.<
Recirculated-air mode
You can respond to unpleasant
external odors by temporarily
blocking the outside air. The system
then recirculates the air already within
the vehicle.
If the windows fog over in the
recirculated air mode, switch this
mode off and increase the air supply as
required.<
Page 99 of 211
99n
IndexDataTechnologyRepairsCar careControlsOverview
Automatic climate control
*
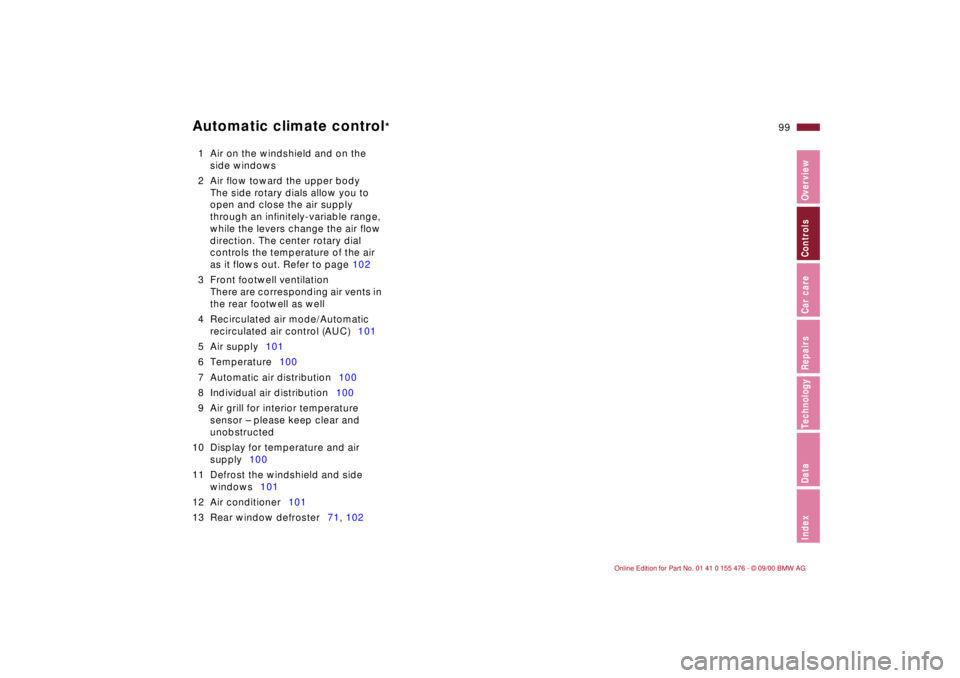
1 Air on the windshield and on the
side windows
2 Air flow toward the upper body
The side rotary dials allow you to
open and close the air supply
through an infinitely-variable range,
while the levers change the air flow
direction. The center rotary dial
controls the temperature of the air
as it flows out. Refer to page 102
3 Front footwell ventilation
There are corresponding air vents in
the rear footwell as well
4 Recirculated air mode/Automatic
recirculated air control (AUC)101
5 Air supply101
6 Temperature100
7 Automatic air distribution100
8 Individual air distribution100
9 Air grill for interior temperature
sensor Ð please keep clear and
unobstructed
10 Display for temperature and air
supply100
11 Defrost the windshield and side
windows101
12 Air conditioner101
13 Rear window defroster71, 102
Page 100 of 211
100n
Automatic climate control
*
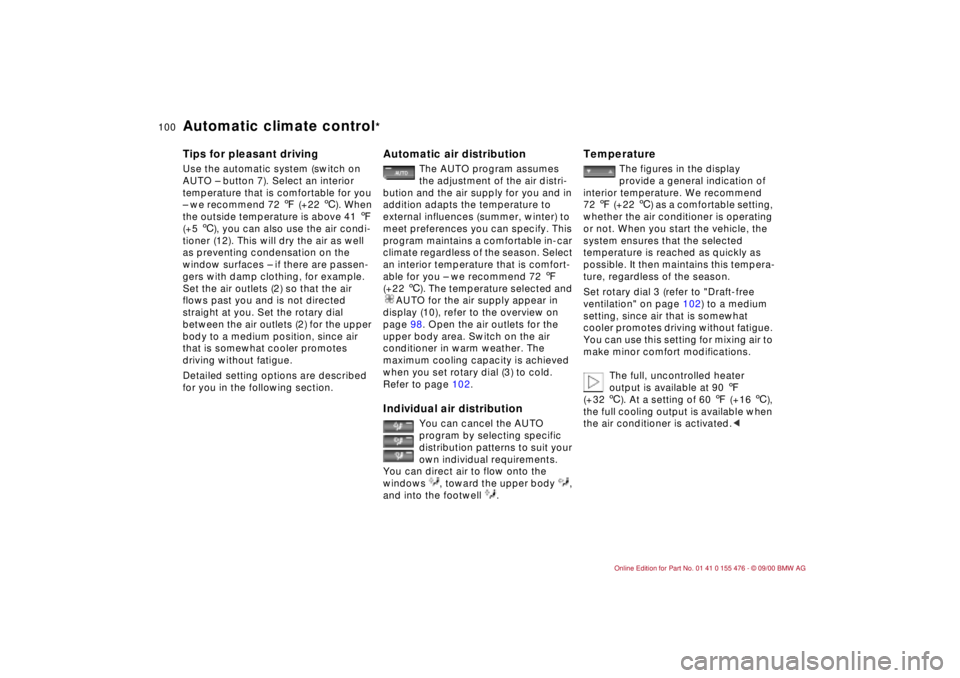
Tips for pleasant drivingUse the automatic system (switch on
AUTO Ð button 7). Select an interior
temperature that is comfortable for you
Ð we recommend 72 7 (+22 6). When
the outside temperature is above 41 7
(+5 6), you can also use the air condi-
tioner (12). This will dry the air as well
as preventing condensation on the
window surfaces Ð if there are passen-
gers with damp clothing, for example.
Set the air outlets (2) so that the air
flows past you and is not directed
straight at you. Set the rotary dial
between the air outlets (2) for the upper
body to a medium position, since air
that is somewhat cooler promotes
driving without fatigue.
Detailed setting options are described
for you in the following section.
Automatic air distribution
The AUTO program assumes
the adjustment of the air distri-
bution and the air supply for you and in
addition adapts the temperature to
external influences (summer, winter) to
meet preferences you can specify. This
program maintains a comfortable in-car
climate regardless of the season. Select
an interior temperature that is comfort-
able for you Ð we recommend 72 7
(+22 6). The temperature selected and
AUTO for the air supply appear in
display (10), refer to the overview on
page 98. Open the air outlets for the
upper body area. Switch on the air
conditioner in warm weather. The
maximum cooling capacity is achieved
when you set rotary dial (3) to cold.
Refer to page 102.
Individual air distribution
You can cancel the AUTO
program by selecting specific
distribution patterns to suit your
own individual requirements.
You can direct air to flow onto the
windows , toward the upper body ,
and into the footwell .
Temperature
The figures in the display
provide a general indication of
interior temperature. We recommend
72 7 (+22 6) as a comfortable setting,
whether the air conditioner is operating
or not. When you start the vehicle, the
system ensures that the selected
temperature is reached as quickly as
possible. It then maintains this tempera-
ture, regardless of the season.
Set rotary dial 3 (refer to "Draft-free
ventilation" on page 102) to a medium
setting, since air that is somewhat
cooler promotes driving without fatigue.
You can use this setting for mixing air to
make minor comfort modifications.
The full, uncontrolled heater
output is available at 90 7
(+32 6). At a setting of 60 7 (+16 6),
the full cooling output is available when
the air conditioner is activated.<
Page 112 of 211
112n
Cargo loadingStowing cargo If you are transporting a load in your
BMW:
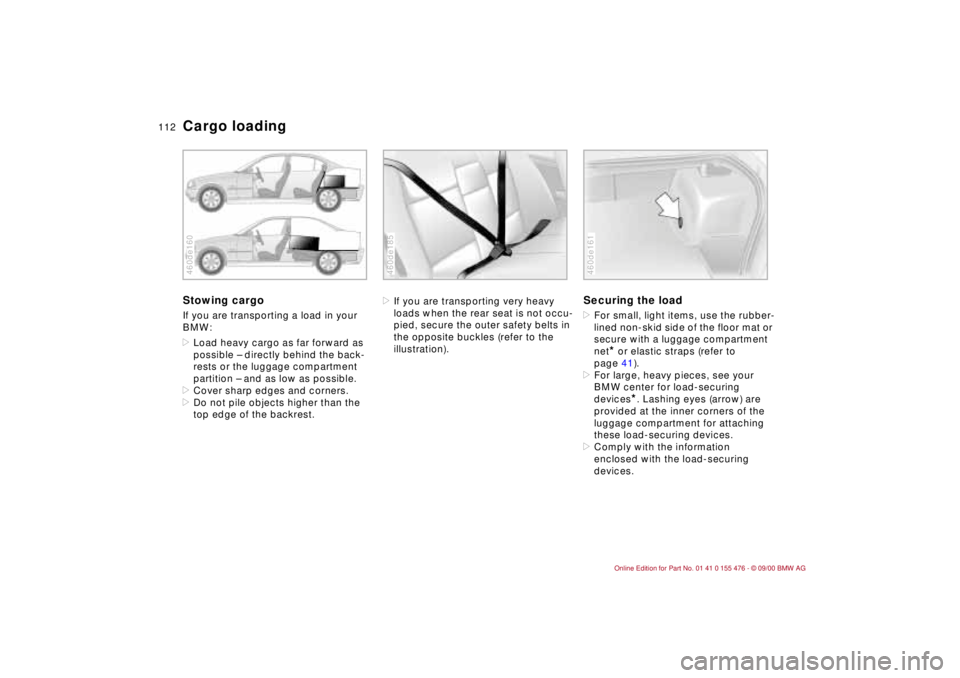
>Load heavy cargo as far forward as
possible Ð directly behind the back-
rests or the luggage compartment
partition Ð and as low as possible.
>Cover sharp edges and corners.
>Do not pile objects higher than the
top edge of the backrest.460de160
>If you are transporting very heavy
loads when the rear seat is not occu-
pied, secure the outer safety belts in
the opposite buckles (refer to the
illustration).460de185
Securing the load >For small, light items, use the rubber-
lined non-skid side of the floor mat or
secure with a luggage compartment
net
* or elastic straps (refer to
page 41).
>For large, heavy pieces, see your
BMW center for load-securing
devices
*. Lashing eyes (arrow) are
provided at the inner corners of the
luggage compartment for attaching
these load-securing devices.
>Comply with the information
enclosed with the load-securing
devices.
460de161
Page 116 of 211
116n
To ensure that your vehicle provides
maximum economy throughout a long
service life, we request that you comply
with the following recommendations.
Engine and differentialUp to 1,200 miles (2,000 km):
Drive at varying engine speeds and
road speeds, but do not exceed
4,500 RPM or a road speed of 100 mph
(160 km/h) during this initial period.
Obey your local and state maximum
speed limits.
Do not apply full throttle and avoid
pressing the accelerator beyond the
kickdown point.
After 1,200 miles (2,000 km), you can
gradually increase the engine speed or
road speed.
Follow the same break-in procedure if
either the engine or the differential is
replaced in the future.
TiresDue to technical factors associated
with their manufacture, tires do not
achieve their full traction potential until
an initial break-in period has elapsed.
For this reason, drive cautiously during
the first 200 miles (300 km).
Obey your local and state maximum
speed limits.
When the vehicle is operated on
wet or slushy roads, a wedge of
water may form between the tire and
the road surface. This phenomenon is
referred to as aquaplaning, or hydro-
planing, and can lead to partial or
complete loss of traction, vehicle
control and braking effectiveness.
Reduce your speed on wet roads.<
Brake systemBrake pads and disks do not attain their
optimal wear patterns until after approx.
300 miles (500 km).
To break-in the separate parking brake
drums, apply the parking brake lightly
when coasting to a standstill (at a traffic
signal, for instance), provided that
traffic conditions allow you to do so.
To avoid corrosion, repeat this proce-
dure from time to time.
The brake lamps do not come on
when the parking brake is set.
Vacuum for the brake system servo unit
on your BMW is available only when the
engine is running. When you move the
vehicle with the engine off Ð when
towing, for example Ð substantially
higher levels of pedal force will be
required to brake the vehicle.
(500 km). Engage the gears carefully
during the break-in period.
Break-in procedures
Page 117 of 211
117n
IndexDataTechnologyRepairsCar careControlsOverview
Brakes:
Do not drive with your foot resting
on the brake pedal. Even light but
consistent pedal pressure can lead to
high temperatures, brake wear, and
possibly to brake failure.
Aquaplaning:
Reduce your speed when you drive on
wet or slushy roads. If you do not, a
wedge of water can form between the
tires and the road surface. This
phenomenon is referred to as aqua-
planing or hydroplaning. It is character-
ized by a partial or complete loss of
contact between the tires and the road
surface. The ultimate results are loss of
steering and braking control.
Driving through water:
Do not drive through water that is
deeper than 1 foot (30 cm). If you must
drive through water accumulations up
to that depth, drive only at walking
speed. Driving at a faster speed could
cause damage to the engine, the elec-
trical systems and the transmission.
Package tray:
Never use the rear window shelf to
store heavy or bulky objects. If you do
so, such objects could pose the risk of
injury to vehicle occupants during
braking or evasive maneuvers or in a
crash.
Clothes hooks:
When suspending clothing from the
hooks, be sure that they will not
obstruct the driver's vision. Do not hang
heavy objects on the hooks. If you do
so, such objects could pose the risk of
personal injury during braking or
evasive maneuvers.
use with unleaded fuel only.
Even minute quantities of lead would be
enough to permanently damage both
the catalytic converter and the system
oxygen sensor.
To ensure efficient, trouble-free engine
operation and avoid potential damage:
>Be sure to comply with the scheduled
maintenance requirements.
>Fill the fuel tank well before it is
empty.
>Tow-start only when the engine is
cold. If you attempt to tow-start with
a warm engine, unburned residual
fuel in the catalytic converter could
ignite and cause damage. It is better
to jump-start the vehicle with outside
assistance.
>Avoid other situations in which the
fuel is not burned, or burns incom-
pletely, such as engaging the starter
frequently or for extended periods, or
repeated start attempts in which the
engine does not start (stopping and
restarting an engine which is running
properly does not present a problem).
Never allow the engine to run with
any of the spark plug cables discon-
nected.
Driving notes Catalytic converter
Page 125 of 211
125n
IndexDataTechnologyRepairsCar careControlsOverview
Information for your safetyThe factory-approved radial tires are
matched to the vehicle and have been
selected to provide optimum safety and
driving comfort on your vehicle.
It is not merely the tire's service life, but
also driving comfort and Ð above all else
Ð driving safety that depend on the
condition of the tires and the mainte-
nance of the specified tire pressure.
Incorrect inflation pressure is a frequent
cause of tire damage. It also signifi-
cantly influences the roadholding ability
of your BMW.
Check tire inflation pressures
regularly Ð include the space-
saver spare tire or spare tire Ð at least
twice a month and before beginning a
longer trip (refer to page 29). If this is
not done, incorrect tire pressures can
cause driving instability and tire
damage, ultimately resulting in an acci-
dent.<
Tire tread Ð Tire damageInspect your tires frequently for tread
wear, signs of damage and for foreign
objects lodged in the tread. Check the
tread depth.
Tread depth should not be allowed to
go below 0.12 in (3 mm), even though
the legally specified minimum tread
depth is only 0.063 in (1.6 mm). At a
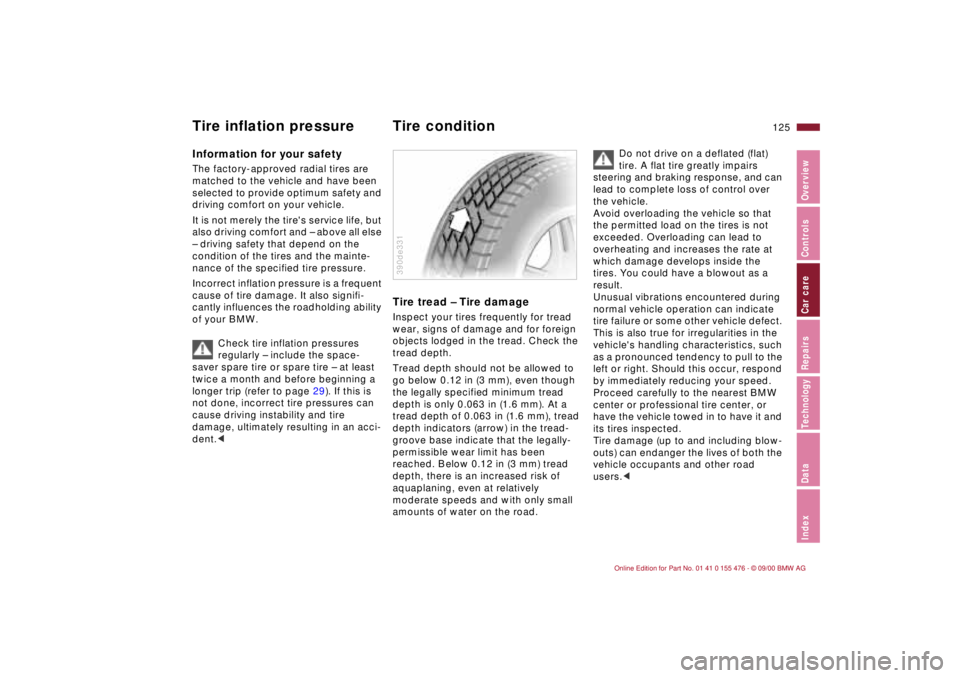
tread depth of 0.063 in (1.6 mm), tread
depth indicators (arrow) in the tread-
groove base indicate that the legally-
permissible wear limit has been
reached. Below 0.12 in (3 mm) tread
depth, there is an increased risk of
aquaplaning, even at relatively
moderate speeds and with only small
amounts of water on the road.390de331
Do not drive on a deflated (flat)
tire. A flat tire greatly impairs
steering and braking response, and can
lead to complete loss of control over
the vehicle.
Avoid overloading the vehicle so that
the permitted load on the tires is not
exceeded. Overloading can lead to
overheating and increases the rate at
which damage develops inside the
tires. You could have a blowout as a
result.
Unusual vibrations encountered during
normal vehicle operation can indicate
tire failure or some other vehicle defect.
This is also true for irregularities in the
vehicle's handling characteristics, such
as a pronounced tendency to pull to the
left or right. Should this occur, respond
by immediately reducing your speed.
Proceed carefully to the nearest BMW
center or professional tire center, or
have the vehicle towed in to have it and
its tires inspected.
Tire damage (up to and including blow-
outs) can endanger the lives of both the
vehicle occupants and other road
users.<
Tire inflation pressure Tire condition