Page 190 of 333

The Braking System
Your Acura is equipped with disc brakes at all four wheels. A powerassist helps reduce the effort needed
on the brake pedal. The ABS helps
you retain steering control when
braking very hard.
Put your foot on the brake pedal only
when you intend to brake. Resting
your foot on the pedal keeps the
brakes applied lightly, causing them
to build up heat. Heat build-up can
reduce how well your brakes work. It also keeps your brake lights on all
the time, confusing drivers behind
you.
Constant application of the brakes
when going down a long hill builds up heat and reduces their effective-
ness. Use the engine to assist the
brakes by downshifting to a lower gear and taking your foot off the
accelerator pedal.
Check your brakes after driving
through deep water. Apply the
brakes moderately to see if they feel
normal. If not, apply them gently and
frequently until they do. Since a longer distance is needed to stop
with wet brakes, be extra cautious and alert in your driving. Brake Wear Indicators
All four brakes have audible brake
wear indicators.
When the brake pads need replacing,
you will hear a distinctive metallic "screeching" sound when you apply
the brakes. If you do not have the
brake pads replaced, they will begin screeching all the time.
Your brakes may sometimes squeal or squeak when you apply them
lightly. Do not confuse this with the
brake wear indicators. They make a
very audible "screeching."
Driving
Page 192 of 333

The Braking System
Important Safety Reminders
ABS does not reduce the time or distance it takes to stop the car, it
only helps with steering controlduring braking. You should always
maintain a safe following distance
from other vehicles.
ABS will not prevent a skid that results from changing direction
abruptly, such as trying to take a corner too fast or making a sudden
lane change. Always drive at a safe,
prudent speed for the road and
weather conditions.
ABS cannot prevent a loss of stability. Always steer moderately
when you are braking hard. Severe or sharp steering wheel movement
can still cause your car to veer into
oncoming traffic or off the road. A vehicle with ABS may require a
longer distance to stop on loose or
uneven surfaces, such as gravel or snow, than a vehicle without anti-
lock. Slow down and allow a greater distance between vehicles under
those conditions.
ABS Indicator
U.S. indicator shown
The ABS is self-checking. If anything goes wrong, the ABS indicator on
the instrument panel comes on (see page 56 ). This means the anti-lock function of the braking system has
shut down. The brakes still work like
a conventional system without anti-
lock, providing normal stopping ability. You should have the dealer
inspect your car as soon as possible
if this light stays on after you start
the engine, or comes on whiledriving.
DrivingCONTINUED
ABS INDICATOR*
Page 202 of 333
Towing a Trailer
Trailer Lights
Your vehicle has a trailer lighting connector located in the trunk by the
left taillight. To use the connector,
undo the fastener on the left side of
the trunk lining. Refer to the drawing in this page for the wiring
color code and purpose of each pin.
If you use a converter, you can get
the connector and pins that mate
with the connector in your vehicle
from your Acura dealer.
Since lighting and wiring vary in
trailer type and brand, you should also have a qualified mechanic installa suitable connector between the
vehicle and the trailer.
RIGHT TURN SIGNAL
(GREEN/YELLOW)BRAKE LIGHT
(GREEN/WHITE)
TAILLIGHT
(RED/BLACK)
CONTINUED
Driving
GROUND
(BLACK)
BACK-UP LIGHT
(GREEN/BLACK)
LEFT TURN SIGNAL
(PINK/BLUE)
Page 203 of 333

Towing a Trailer
Additional Trailer Equipment
Many states and Canadian provinces
require special outside mirrors when
towing a trailer. Even if they don't,
you should install special mirrors if
you cannot clearly see behind you, or if the trailer creates a blind spot.
Ask your trailer sales or rental agency if any other items are
recommended or required for your
towing situation.
Pre-Tow Checklist
When preparing to tow, and before driving away, be sure to check the
following:
The vehicle has been properlyserviced, and the tires, brakes,
suspension, and cooling system
are in good operating condition.
All weights and loads are within limits (see pages 196 and 197 ). The hitch, safety chains, and any
other attachments are secure. All items on and in the trailer are
properly secured and cannot shift
while you drive. The lights and brakes on your
vehicle and the trailer are workingproperly. Your vehicle tires and spare are
properly inflated (see page 244 ),and the trailer tires and spare are
inflated as recommended by thetrailer maker.
Driving
Page 206 of 333

Maintenance
This section explains why it is important to keep your car well
maintained and to follow basic
maintenance safety precautions.
This section also includes Maintenance Schedules for normal
driving and severe driving conditions,
a Maintenance Record, and instruc-
tions for simple maintenance tasks
you may want to take care of
yourself.
If you have the skills and tools to per-
form more complex maintenance
tasks on your Acura, you may want
to purchase the Service Manual. See
page 319 for information on how to obtain a copy, or see your Acura
dealer.
Maintenance Safety....................... 204
Important Safety Precautions.. 205
Maintenance Schedule.................. 206
Required Maintenance Record.... 213 Owner Maintenance Checks........ 215
Fluid Locations............................... 216
Engine Oil...................................... 217
Adding Oil................................... 217
Recommended Oil.................... 217
Synthetic Oil.............................. 218
Additives.................................... 218
Changing the Oil and Filter...... 219
Cooling System.............................. 221 Adding Engine Coolant............. 221Replacing Engine Coolant........ 223
Windshield Washers..................... 227
Automatic Transmission Fluid..... 228 Differential Oil.............................. 229
Brake Fluid.................................... 230
Brake System............................. 230
Power Steering............................... 230
Hood Latch.................................... 231
Air Cleaner Element...................... 231 Spark Plugs..................................... 233
Replacement.............................. 233
Specifications............................ 236
Battery............................................ 236
Wiper Blades.................................. 239
Air Conditioning System............... 241
Air Conditioning Filter.................. 242
Drive Belts...................................... 242
Timing Belt..................................... 243
Tires................................................ 243
Inflation..................................... 243
Inspection................................... 245
Maintenance............................... 246
Tire Rotation.............................. 246
Replacing Tires and Wheels .... 247
Wheels and Tires....................... 248
Winter Driving........................... 248
Snow Tires............................ 249
Tire Chains.............................
249
Lights.............................................. 250 Replacing Bulbs......................... 252
Storing Your Car............................
261
Maintenance
Page 218 of 333
Owner Maintenance Checks
You should check the following items at the specified intervals. If
you are unsure of how to perform any check, turn to the page given. Engine oil level — Check every
time you fill the fuel tank. See page 171.
Engine coolant level — Check the
radiator reserve tank every time
you fill the fuel tank. See page 172 .
Windshield washer fluid — Check the level in the reservoir monthly.
If weather conditions cause you to
use the washers frequently, check
the reservoir each time you stop
for fuel. See page 227 . Automatic transmission — Check
the fluid level monthly. See page
228.
Brakes — Check the fluid level
monthly. See page 230 . Tires — Check the tire pressure
monthly. Examine the tread for
wear and foreign objects. See page
245.
Lights — Check the operation of
the headlights, parking lights,
taillights, high-mount brake light,
turn signals, brake lights, and
license plate lights monthly. See
page 250.
Maintenance
Page 254 of 333
Lights
Check the following: Headlights (low and high beam)
Fog lights
Parking lights
Taillights
Brake lights
Turn signals Back-up lights
Hazard light function License plate light
Side marker lights
High-mount brake light
Daytime running lights (Canadian
models)
If you find any bulbs are burned out,
replace them as soon as possible.
Refer to the chart on page 303 to
determine what type of replacement
bulb is needed.
Maintenance
HIGH-MOUNT BRAKE LIGHT
TURN SIGNAL LIGHT
LICENSE PLATE
LIGHTS
STOP/TAIL LIGHTS
BACK-UP LIGHT
Page 260 of 333
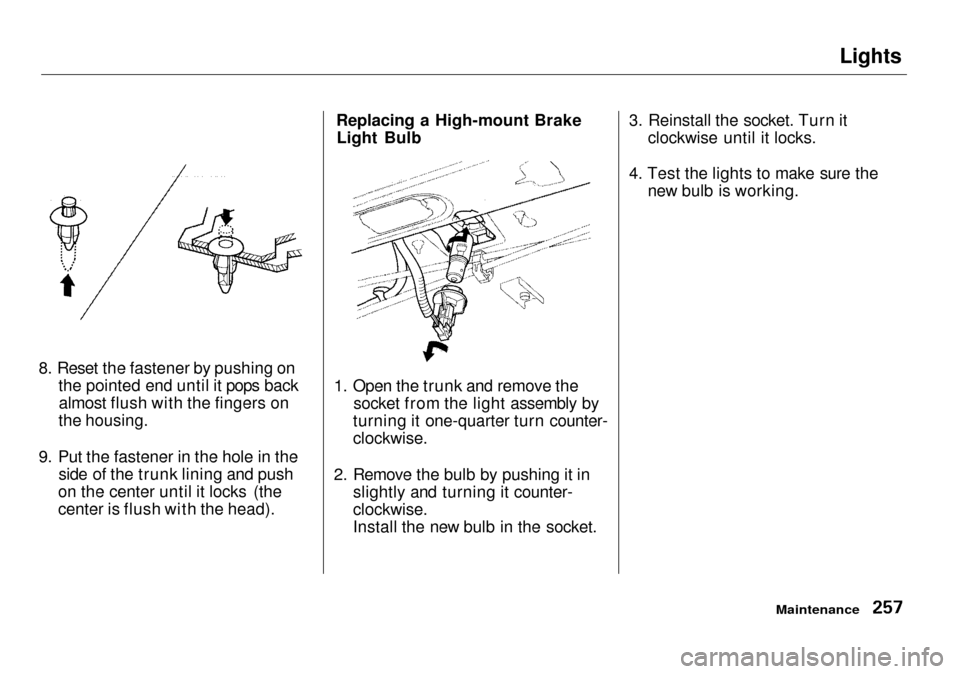
Lights
8. Reset the fastener by pushing on the pointed end until it pops backalmost flush with the fingers on
the housing.
9. Put the fastener in the hole in the side of the trunk lining and push
on the center until it locks (the
center is flush with the head). Replacing a High-mount Brake
Light Bulb
1. Open the trunk and remove the socket from the light assembly by
turning it one-quarter turn counter-
clockwise.
2. Remove the bulb by pushing it in slightly and turning it counter-
clockwise.
Install the new bulb in the socket. 3. Reinstall the socket. Turn it
clockwise until it locks.
4. Test the lights to make sure the new bulb is working.
Maintenance