Page 87 of 149
RADIO PRE-EQUIPMENT*III-5
72
Positions and functions of the connectors A1 : Ñ A2 : ÑA3 : ÑA4 : (+) Accessories.
A5 : ÑA6 : (+) Sidelamps.
A7 : (+) Permanent.
A8 : Earth.
B1 : ÑB2 : ÑB3 : (+) RH front speaker.
B4 : (Ð) RH front speaker.
B5 : (+) LH front speaker.
B6 : (Ð) LH front speaker.
B7 : ÑB8 : Ñ Fitting loud speakers Locations are provided in each front
door. Consult your dealer in the case of vehicles fitted with manual windupwindows. Aerial For optimum radio reception, the angle of the aerial should matchthat of the windscreen.
Radio connections Remove the storage bin to gain access to the wiring and connec-tions allowing the audio system,loudspeakers and aerial wire to beconnected.
* According to model or country
Protection fuses (under the dashboard)F1 - F19 - F25
Page 110 of 149
FUSES*89V- 2
Fuse box There are two fuse boxes, one below the dashboard and one under the bonnet. Fuses under the dashboard
To gain access to the dashboard fuses (to the left of the driver), turn the but- ton on the cover a quarter turn. Replacing a fuse Before replacing a fuse, it is essential to find the cause of the incident and to
rectify it. The fuse identification numbers are indicated inside the fuse box. The fuses positions which are not numbered are for spare fuses. Replace a blown fuse with one of the same rating (the same colour). Use the special tool Aprovided in the fuse housing.
* According to model or country Good
Faulty
Tool A
Page 111 of 149
TABLE OF FUSES
(According to model or country)V- 2
90
Fuses under the dashboard
Number Rating Functions
F1 10 A Audio system (supply)
F2 5 A Ignition + position - Speed sensor - PCPU - Instrument panel warning lamps
F3 15 A Stop lamp - Cruise control
F4 10 A Rear RH tailgate lamp - Front LH sidelamp - Headlamp adjustment
F5 10 A Air conditioning - Electric front windows - Air blower - Pressostat
F6 15 A Heated rear window & heated seats
F7 20 A Horn
F8 SHUNT Ñ
F9 5 A Headlamp washer - Front RH sidelamp - Number plate lighting - Rear LH lamp
F10 30 A Unused
F11 30 A Unused
F12 10 A ABS control unit Ð Reversing lamps Ð Diagnostic socket Ð Auto gearbox
F13 30 A Unused
F14 5 A PCPU
Page 118 of 149
REPLACING BULBS*97V- 3
Beware
The halogen bulbs should not be changed until they have been off for a few minutes (risk of serious burns). Do not touch the new bulb directly withyour fingers; use a lint-free cloth. After replacing a bulb, check the correct operation of the lighting and signalling.
Headlamps Removal:
Remove the rubber cover and dis-connect the wiring connector.Release the spring clips.
Withdraw the bulb from its housing in the reflector. Refitting: Proceed in the reverse order to refit. Sidelamps Disconnect the lamp next to the headlamp.Rotate by a quarter of a turn.Remove the bulb.Protection fuses (under the dashboard)F4 - F9 - F19
(under the bonnet)
F3 - F4 - F7 - F8 (with ABS)
F2 - F3 - F12 - F13 (without ABS)
* According to specification
Page 119 of 149
REPLACING BULBS*V- 3
98
Direction indicator lamps Open the bonnet, release the lamp by pressing the clip. Draw the lampforward to remove. Disconnect by pressing the springclip on the connector
Turn the bulb holder by an eighth of a turn and pull out. Reconnect and refit the lamp, enga- ging the fingers in their guides.Side repeater direction indicator* Push the lamp towards the front to unclip it and pull towards you.
Turn the bulb holder a quarter of a turn.
* According to model or country
Protection fuses (under the dashboard)F26 - F30
Page 121 of 149

REPLACING BULBS*V- 3
100
BEWARE
The halogen bulbs should not be changed until they have been off for a few minutes (risk of serious burns). Do not touch the new bulb di- rectly with your fingers; use a lint-free cloth.
After replacing a bulb, check the correct operation of the lighting and signalling.
Badly adjusted headlamps are dangerous. Correct headlamp adjust- ment requires precision and must be carried out by a member of the dealer network in a suitably equipped workshop. Having replaced a headlamp bulb, have the alignment checked.
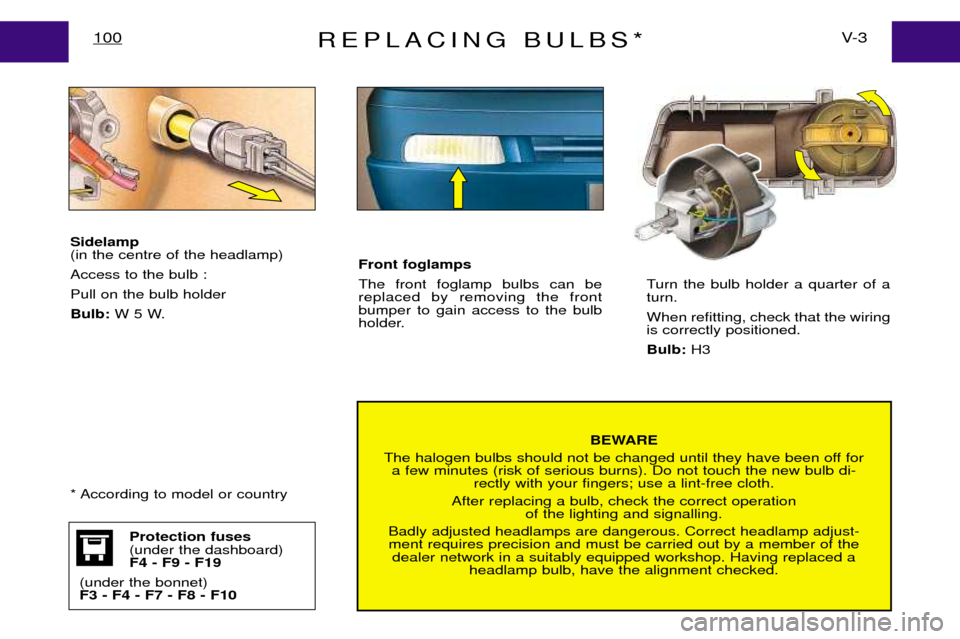
Sidelamp (in the centre of the headlamp) Access to the bulb :Pull on the bulb holderBulb:
W 5 W. Turn the bulb holder a quarter of a turn. When refitting, check that the wiring is correctly positioned. Bulb:
H3
Protection fuses (under the dashboard)F4 - F9 - F19
(under the bonnet)F3 - F4 - F7 - F8 - F10
Front foglamps The front foglamp bulbs can be replaced by removing the frontbumper to gain access to the bulb
holder.
* According to model or country
Page 122 of 149
REPLACING BULBS*101V- 3
Direction indicator lamps Pull on the ring 1to detach the
spring.Push the unit forwards Disconnect and turn the bulb holder by an eighth of a turn and pull out. Replace the bulb.Reconnect and refit the lamp in its housing, engaging the fingers intheir guides then secure it by pulling
and attaching the spring retainer. Bulb:
PY 21 W.
1
* According to model or country
Protection fuses (under the dashboard)F30
Page 123 of 149
REPLACING BULBSV- 3
102
Identify the failed bulb. Unscrew the two screws at the rear of the lamp (inside the vehicle). Remove the lamp and disconnect it. Squeeze the retaining lugs of the bulb holder torelease it from the lamp.
Rear lamp cluster Bulbs
1 Stop lamps and sidelamps
2 Direction indicators
3 Reversing lamps
4 Foglamp
Protection fuses (under the dashboard)F4 - F9 - F12 -F18 - F26 - F30
1
2
3
4
1
2
3
4