Page 27 of 107

Y O U R 1 0 6 I N D E TA I L28
GENERAL FUNCTIONS On / off
With the ignition key in the ACCESSORIES or IGNITION position, press the "M"button to switch the set on or off.
ANTI-THEFT SYSTEM
The first time you use the set following disconnection of the set or the battery, you must enter the confidential code which was given to you on handover of your vehicle. Entering the code Switch the set on. The display shows "CODE"then the set changes over to code request mode and "- - - -"is displayed.
Enter your four-digitcode number using buttons "1"to "6" .
For example : if your code is 5345 press buttons "5", "3" , "4" and "5"in turn.
When the fourth number has been entered correctly, the radio starts automatically.
Error in entering the code
If an error is made when entering one of the first three digits, do not continue the operation and switch off the radio to prevent blocking it. Each incorrect code entry will result in the set being blocked for a period of from 5 seconds to 30 minutes, after
the 7th incorrect entry.
To unblock the set, leave it switched on during the waiting period. When "- - - -"is displayed, you can enter the
code again.
If the set is switched off during the waiting period, this waiting period will restart when the set is switched on again. After 14 incorrect code entries, the radio will be permanently blocked and the message "END"will be displayed.
ADJUSTING THE SOUND Adjusting the volume
Turn the "M"button to increase or decrease the volume of the set.
If the radio overheats, the volume will reduce. Note: If you have a car-phone fitted with a ÒmuteÓsignal output connected to the set, the set will automatically
change to ÒmuteÓwhen the car-phone is used.
06-05-2002
Page 36 of 107

Y O U R 1 0 6 I N D E TA I L38
GENERAL FUNCTIONS On / off
With the ignition key in the ACCESSORIES or IGNITION position, press the "M"button to switch the set on or off.
The set can operate for 30 minutes without switching the ignition on. ANTI-THEFT SYSTEM
The first time you use the set following disconnection of the set or the battery, you must enter the confidential code which was given to you on handover of your vehicle. Entering the code Switch the set on. The display shows "CODE" then the set changes over to code request mode and "- - - -" is displayed.
Enter your four-digitcode number using buttons "1" to "6" .
For example: : if your code is 5345 press buttons "5", "3" , "4" and "5"in turn.
When the fourth number has been entered correctly, the radio starts automatically.
Error in entering the code
If an error is made when entering one of the first three digits, do not continue the operation and switch off the radio to prevent blocking it. Each incorrect code entry will result in the set being blocked for a period of from 5 seconds to 30 minutes, after
the 7th incorrect entry.
To unblock the set, leave it switched on during the waiting period. When "- - - -"is displayed, you can enter the
code again.
If the set is switched off during the waiting period, this waiting period will restart when the set is switched on again. After 14 incorrect code entries, the radio will be permanently blocked and the message ÒENDÓwill be displayed.
ADJUSTING THE SOUND Adjusting the volume
Turn the "M"button to increase or decrease the volume of the set.
If the radio overheats, the volume will reduce. Note: If you have a car-phone fitted with a ÒmuteÓsignal output connected to the set, the set will automatically
change to ÒmuteÓwhen the car-phone is used.
06-05-2002
Page 47 of 107

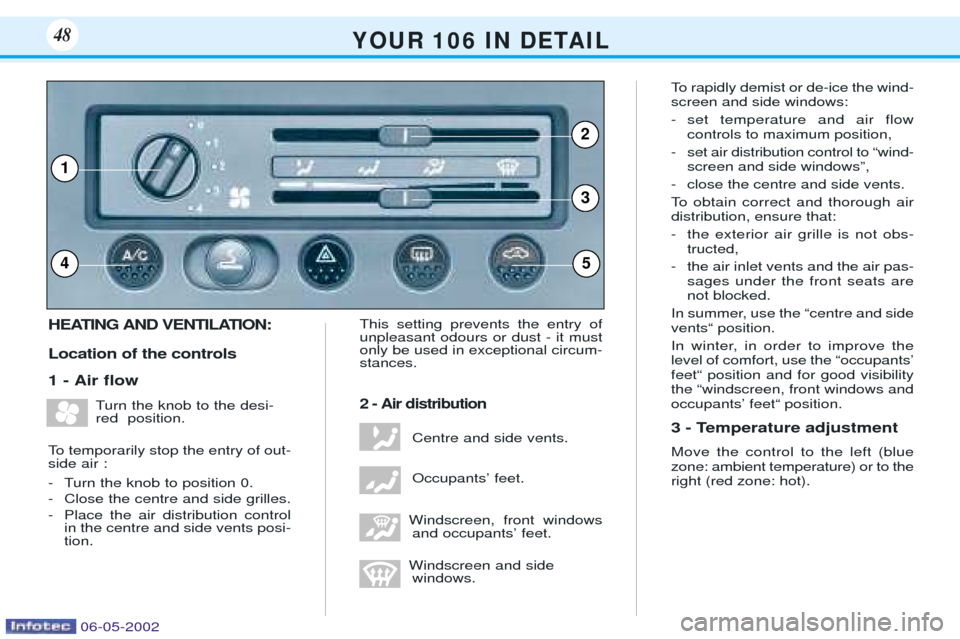
HEATING AND VENTILATION: Location of the controls 1 - Air ßowTurn the knob to the desi- red position.
To temporarily stop the entry of out-side air :
- Turn the knob to position 0.
- Close the centre and side grilles.
- Place the air distribution control in the centre and side vents posi- tion. This setting prevents the entry ofunpleasant odours or dust - it mustonly be used in exceptional circum-stances.
2 - Air distribution
Centre and side vents. OccupantsÕ feet.
Windscreen, front windows and occupantsÕ feet.
Windscreen and side windows. To rapidly demist or de-ice the wind- screen and side windows:
- set temperature and air flow
controls to maximum position,
- set air distribution control to Òwind- screen and side windowsÓ,
- close the centre and side vents.
To obtain correct and thorough air distribution, ensure that:
- the exterior air grille is not obs- tructed,
- the air inlet vents and the air pas- sages under the front seats are not blocked.
In summer, use the Òcentre and sideventsÒ position.
In winter, in order to improve the level of comfort, use the ÒoccupantsÕfeetÒ position and for good visibilitythe Òwindscreen, front windows andoccupantsÕ feetÒ position.
3 - Temperature adjustment Move the control to the left (blue zone: ambient temperature) or to theright (red zone: hot).
Y O U R 1 0 6 I N D E TA I L48
54
1
3
2
06-05-2002
Page 49 of 107

Front head restraints Height adjustment: slide the head restraint. The adjustment is correct when the upper edge of the head restraint isat the same height as the top of thehead. This adjustment avoidsexcessive movement of the headrearwards, in cases of rear impact. Adjustment of angle*: tilt the head restraint.
To remove the head restraint: posi- tion it at maximum height, press thetwo lugs then remove the headrestraint.
Warning:never drive with the head
restraints removed; they must be in place and correctly adjusted.
Adjustment of front seats Forwards/backwards adjustment: lift control
1, slide the seat, then let go to lock.
Adjustment of seat back:push control 2rearwards to obtain the required angle.
Access to rear seats: (3 doors)raise control 3or push control 2towards the front.
Tilt the back of the seat, then pull the seat forward.
The position of the seats is memorised*. To put them back as they were before, you need only return them to the original position.
The storage compartment for the handbook and Warranty book is located under the front right-hand seat*. * According to speciÞcation
Y O U R 1 0 6 I N D E TA I L50
13
2
06-05-2002
Page 50 of 107
Rear seats
To tilt the seat:
Ð Pull the rear of the seat 1and tilt it against the front seats.
Ð Place the seat-belt in the hook 2(3-door) or on the top of the seat-back 4
(5-door).
Ð Unlock the seat-back by using the controls 3on the sides.
Ð Tilt the seat-back 4.
To remove the rear seat cushions , tilt the seat cushion to 45¡ and remove it.
To replace the seat cushion: position it on the front Þxing brackets and lower it to the normal position. When folding the rear seats, always start with the seat cushion, never the seat back (risk of damage).
Rear head restraints* These have one position (high) for when they are in use and anotherposition (low) for storing. They areremovable.
To lower, press the lug.
To remove, pull upwards as far as the stop and press the lug.
Warning:
never drive with the head
restraints removed; they must be in place and correctly adjusted. * According to speciÞcation.
Y O U R 1 0 6 I N D E TA I L51
2134
06-05-2002
Page 51 of 107
IsoÞx mounting* The IsoÞx mountings available on the two rear seats* allow for the ins-tallation of special child seats** ,
approved by UTAC for PEUGEOTvehicles and marketed within thenetwork. The fixings are available as an accessory and must be Þtted by an
approved PEUGEOT dealer. The locks incorporated in the child seat fit onto the mounting andensure quick, reliable and safeinstallation of the seats. Thecombined use of the seat belt iscompulsory for a forward-facing
child seat. The forward-facing position is per-
mitted in the rear. For maximum safety, it is
essential
to adjust the corresponding frontseat to the intermediate longitudinalposition, seat back upright. Follow the instructions for Þtting the child seat in the leafletprovided when the child seat ispurchased.
* According to speciÞcation.
** Available during the model year
Y O U R 1 0 6 I N D E TA I L52
06-05-2002
Page 52 of 107

Y O U R 1 0 6 I N D E TA I L53
Never leave a child in a vehicle which isexposed to the sun andhas the windowsclosed.
To protect young children fromthe sun, Þt sunblinds to the rearwindows. Never leave the keys in the
reach of children inside the car. Strap children into their child seats even on short journeys.
Observe the precautions concer-ning the passenger airbag.
123
1
2
3
Child seats
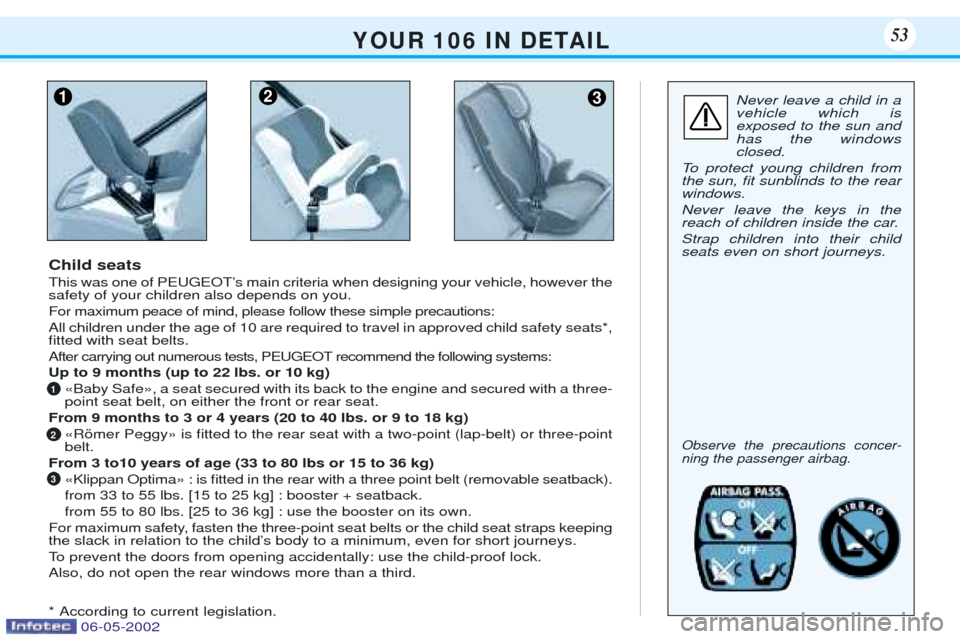
This was one of PEUGEOTÕs main criteria when designing your vehicle, however the safety of your children also depends on you. For maximum peace of mind, please follow these simple precautions:All children under the age of 10 are required to travel in approved child safety seats*, Þtted with seat belts. After carrying out numerous tests, PEUGEOT recommend the following systems: Up to 9 months (up to 22 lbs. or 10 kg) ÇBaby SafeÈ, a seat secured with its back to the engine and secured with a three- point seat belt, on either the front or rear seat.
From 9 months to 3 or 4 years (20 to 40 lbs. or 9 to 18 kg) ÇRšmer PeggyÈ is Þtted to the rear seat with a two-point (lap-belt) or three-pointbelt.
From 3 to10 years of age (33 to 80 lbs or 15 to 36 kg)
ÇKlippan OptimaÈ : is Þtted in the rear with a three point belt (removable seatback). from 33 to 55 lbs. [15 to 25 kg] : booster + seatback.from 55 to 80 lbs. [25 to 36 kg] : use the booster on its own.
For maximum safety, fasten the three-point seat belts or the child seat straps keeping
the slack in relation to the childÕs body to a minimum, even for short journeys.
To prevent the doors from opening accidentally: use the child-proof lock.Also, do not open the rear windows more than a third. * According to current legislation.
06-05-2002
Page 54 of 107

Key position There are four positions of the ignition key in the lock: "S" Stop: ignition is off.
"A" Accessories: ignition is off but
accessories can operate. The battery charge warning lamp lights. "M" Run: ignition on. The following
warning lamps light:
- low engine oil pressure,
- coolant temperature,
- battery charge,
- pre-heater (DIESEL),
- handbrake, low brake ßuid,
- engine diagnostics*, - ABS* (lights for 3 seconds, the
warning lamp should always go out when the vehicle speed isover 8 m.p.h. [12 km/h]),
- Airbag*, the warning lamp lights for six seconds, then goes out.
"D" Starter: starts the engine.
The following warning lamps go out:
- low engine oil pressure,
- battery charge,
- engine diagnostics*. Starting Unlock the steering
Turn the steering wheel gently
while turning the key. Before starting it is advisable to: Press the clutch pedal while opera- ting the starter to aid starting of theengine. * According to speciÞcation
Y O U R 1 0 6 I N D E TA I L55
06-05-2002