Page 23 of 103

INSTRUMENT AND CONTROL FUNCTIONS
3-9
3
EAU00134
Lights switch
Turning the light switch to “ ”,
turns on the auxiliary light, meter lights
and taillight. Turning the light switch to
“ ” turns the headlight on also.
EAU00138
Engine stop switch
The engine stop switch is a safety de-
vice for use in an emergency such as
when the motorcycle overturns or if
trouble occurs in the throttle system.
Turn the switch to “ ” to start the en-
gine. In case of emergency, turn the
switch to “ ” to stop the engine.
EAU00141
Start switch “ ”
The starter motor cranks the engine
when pushing the start switch.
EC000005
CAUTION:@ See starting instructions prior to
starting the engine. @
EAU00153
Clutch leverThe clutch lever is located on the left
handlebar. It is equipped with a clutch
lever adjusting dial and a clutch switch,
which is integrated into the ignition cir-
cuit cut-off system. (Refer to the engine
starting procedures for a description of
this system.)
To disengage the clutch, pull the clutch
lever toward the handlebar. To engage
the clutch, release the lever. The lever
should be pulled rapidly and released
slowly for smooth clutch operation.
1. Engine stop switch
2. Lights switch
3. Start switch “ ”
1. Lever position adjusting dial
2. Arrow mark
a. Lever distance
E_4sv_Functions.fm Page 9 Tuesday, August 31, 1999 3:42 PM
Page 24 of 103

INSTRUMENT AND CONTROL FUNCTIONS
3-10
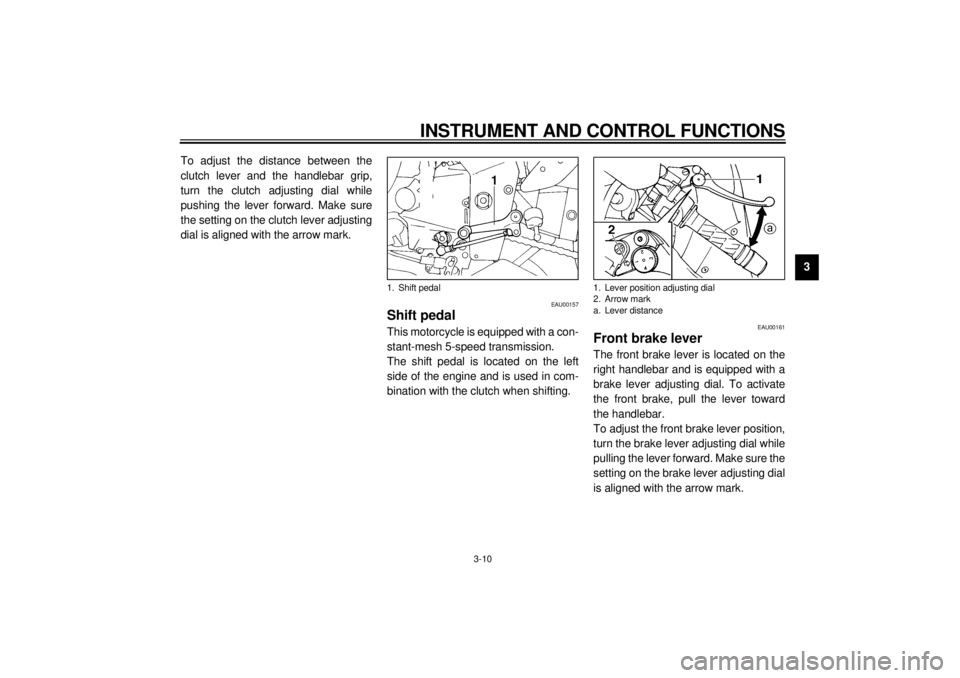
3 To adjust the distance between the
clutch lever and the handlebar grip,
turn the clutch adjusting dial while
pushing the lever forward. Make sure
the setting on the clutch lever adjusting
dial is aligned with the arrow mark.
EAU00157
Shift pedalThis motorcycle is equipped with a con-
stant-mesh 5-speed transmission.
The shift pedal is located on the left
side of the engine and is used in com-
bination with the clutch when shifting.
EAU00161
Front brake leverThe front brake lever is located on the
right handlebar and is equipped with a
brake lever adjusting dial. To activate
the front brake, pull the lever toward
the handlebar.
To adjust the front brake lever position,
turn the brake lever adjusting dial while
pulling the lever forward. Make sure the
setting on the brake lever adjusting dial
is aligned with the arrow mark.
1. Shift pedal
1. Lever position adjusting dial
2. Arrow mark
a. Lever distance
E_4sv_Functions.fm Page 10 Tuesday, August 31, 1999 3:42 PM
Page 44 of 103

OPERATION AND IMPORTANT RIDING POINTS
5-4
5
EAU01258
Starting a warm engineThe starter (choke) is not required
when the engine is warm.
EC000046
CAUTION:@ See the “Engine break-in” section
prior to operating the motorcycle for
the first time. @
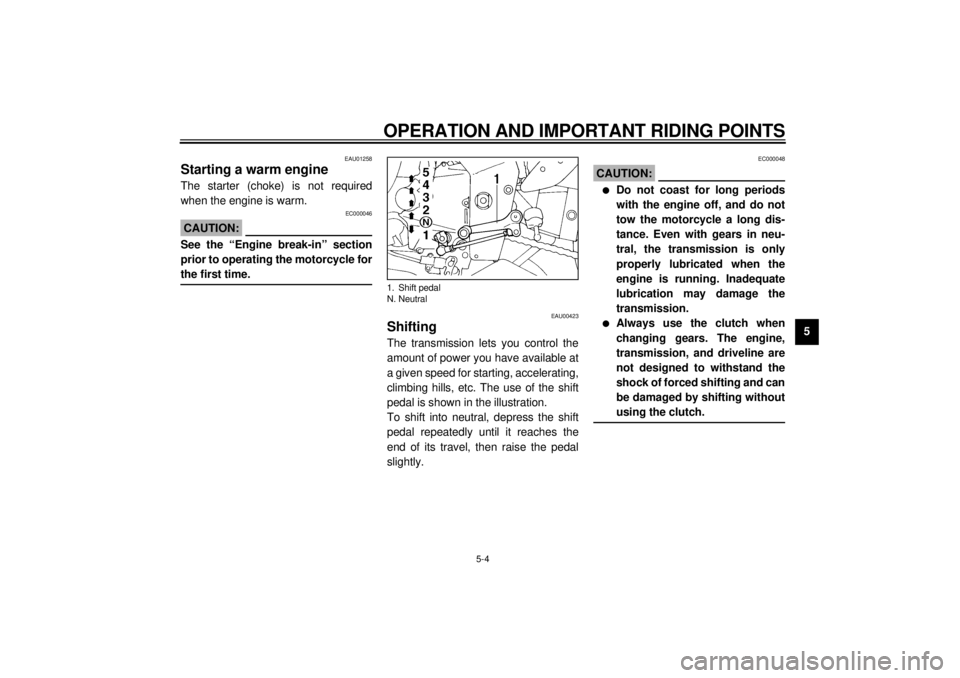
EAU00423
ShiftingThe transmission lets you control the
amount of power you have available at
a given speed for starting, accelerating,
climbing hills, etc. The use of the shift
pedal is shown in the illustration.
To shift into neutral, depress the shift
pedal repeatedly until it reaches the
end of its travel, then raise the pedal
slightly.
EC000048
CAUTION:@ l
Do not coast for long periods
with the engine off, and do not
tow the motorcycle a long dis-
tance. Even with gears in neu-
tral, the transmission is only
properly lubricated when the
engine is running. Inadequate
lubrication may damage the
transmission.
l
Always use the clutch when
changing gears. The engine,
transmission, and driveline are
not designed to withstand the
shock of forced shifting and can
be damaged by shifting without
using the clutch.
@
1. Shift pedal
N. Neutral
E_4sv_Operation.fm Page 4 Tuesday, August 31, 1999 3:45 PM
Page 57 of 103

PERIODIC MAINTENANCE AND MINOR REPAIR
6-9
6
EAU01765*
Engine oilOil level inspection
1. Place the motorcycle on a level
place and hold it in an upright posi-
tion. Warm up the engine for seve-
ral minutes.NOTE:@ Be sure the motorcycle is positioned
straight up when checking the oil level.
A slight tilt toward the side can result in
false readings. @
2. With the engine stopped, check
the oil level through the level win-
dow located at the lower part of
the right side crankcase cover.NOTE:@ Wait a few minutes until the oil level
settles before checking. @3. The oil level should be between
maximum and minimum marks. If
the level is low, fill the engine with
sufficient oil to reach the specified
level.Engine oil and oil filter cartridge re-
placement
1. Remove cowling A. (See page 6-5
for removal and installation proce-
dures.)
2. Warm up the engine for several
minutes.
3. Stop the engine. Place an oil pan
under the engine and remove the
oil filler cap.
4. Remove the drain bolt and drain
the oil.
1. Oil level window
2. Maximum level mark
3. Minimum level mark
1. Engine oil filler cap
1. Engine oil drain boltLeft side view
E_4sv_Periodic.fm Page 9 Tuesday, August 31, 1999 3:45 PM
Page 84 of 103

PERIODIC MAINTENANCE AND MINOR REPAIR
6-36
6
Engine overheating
EW000070
WARNING
@ Do not remove the radiator cap when the engine and radiator are hot. Scalding hot fluid and steam may be blown
out under pressure, which could cause serious injury. Open the radiator cap as follows. Wait until the engine has
cooled. Remove the radiator cap stopper by removing the screw. Place a thick rag like a towel over the radiator cap
and slowly rotate the cap counterclockwise to the detent. This procedure allows any residual pressure to escape.
When the hissing sound has stopped, press down on the cap while turning counterclockwise and remove it. @NOTE:@ If it is difficult to get the recommended coolant, tap water can be temporarily used, provided that it is changed to the recom-
mended coolant as soon as possible. @
Wait until the
engine has cooled.
Check the coolant level in the
reservoir tank and/or radiator.
Level is OK.Level is low, check the
cooling system for leakage.
No
leakage.Leakage.
Ask a Yamaha dealer to inspect
and repair the cooling system.Add coolant. (See NOTE.)
Restart the engine. If the engine overheats again, ask a
Yamaha dealer to inspect and repair the cooling system.
E_4sv_Periodic.fm Page 36 Tuesday, August 31, 1999 3:45 PM