2000 YAMAHA YZF1000 battery
[x] Cancel search: batteryPage 16 of 103

INSTRUMENT AND CONTROL FUNCTIONS
3-2
3
EAU00048
P (Parking)
The steering is locked in this position,
and the taillight and auxiliary light come
on but all other circuits are off. The key
can be removed in this position.
To use the parking position, first lock
the steering, then turn the key to “P”.
Do not use this position for an extend-
ed length of time as the battery may
discharge.
EAU00056
Indicator lights
EAU00057
Turn indicator light “ ”
This indicator flashes when the turn
switch is moved to the left or right.
EAU00061
Neutral indicator light “ ”
This indicator comes on when the
transmission is in neutral.
EAU00063
High beam indicator light “ ”
This indicator comes on when the
headlight high beam is used.
EAU01313
Oil level indicator light “ ”
This indicator comes on when the oil
level is low. This light circuit can be
checked by the procedure on page 3-3.
EC000000
CAUTION:@ Do not run the motorcycle until you
know it has sufficient engine oil. @NOTE:@ Even if the oil is filled to the specified
level, the indicator light may flicker
when riding on a slope or during sud-
den acceleration or deceleration, but
this is normal. @
1. Neutral indicator light “ ”
2. Oil level indicator light “ ”
3. Fuel indicator light “ ”
4. Turn indicator light “ ”
5. High beam indicator light “ ”
E_4sv_Functions.fm Page 2 Tuesday, August 31, 1999 3:42 PM
Page 48 of 103

6
PERIODIC MAINTENANCE AND MINOR REPAIR
Tool kit................................................................... 6-1
Periodic maintenance and lubrication ................... 6-2
Cowling removal and installation .......................... 6-5
Cowling A.............................................................. 6-5
Cowling B.............................................................. 6-5
Cowling C ............................................................. 6-6
Spark plugs........................................................... 6-7
Engine oil .............................................................. 6-9
Coolant ............................................................... 6-11
Air filter ............................................................... 6-12
Carburetor adjustment ........................................ 6-14
Idle speed adjustment ........................................ 6-15
Throttle cable free play inspection ...................... 6-15
Valve clearance adjustment ................................ 6-16
Tires .................................................................... 6-16
Wheels................................................................ 6-19
Brake light switch adjustment ............................. 6-19
Checking the front and rear brake pads.............. 6-20
Inspecting the brake fluid level............................ 6-21
Brake fluid replacement ...................................... 6-22
Drive chain slack check ...................................... 6-23Drive chain slack adjustment ............................. 6-23
Drive chain lubrication........................................ 6-24
Cable inspection and lubrication ........................ 6-24
Brake and shift pedal lubrication ........................ 6-24
Brake and clutch lever lubrication ...................... 6-25
Sidestand lubrication.......................................... 6-25
Rear suspension lubrication............................... 6-25
Front fork inspection ........................................... 6-26
Steering inspection ............................................ 6-26
Wheel bearings .................................................. 6-27
Battery................................................................ 6-27
Fuse replacement .............................................. 6-28
Headlight bulb replacement ............................... 6-29
Tail/brake light bulb replacement ........................ 6-30
Turn signal light bulb replacement...................... 6-30
Front wheel removal ........................................... 6-31
Front wheel installation ...................................... 6-31
Rear wheel removal ........................................... 6-32
Rear wheel installation ....................................... 6-33
Troubleshooting .................................................. 6-34
Troubleshooting chart......................................... 6-35
E_4sv_PeriodicTOC.fm Page 1 Tuesday, August 31, 1999 3:45 PM
Page 75 of 103

PERIODIC MAINTENANCE AND MINOR REPAIR
6-27
6
EAU01144
Wheel bearingsIf there is play in the front or rear wheel
hub or if the wheel does not turn
smoothly, have a Yamaha dealer in-
spect the wheel bearings.
EAU00800
BatteryThis motorcycle is equipped with a
sealed-type battery. Therefore it is not
necessary to check the electrolyte or fill
the battery with distilled water.l
If the battery seems to have dis-
charged, consult a Yamaha deal-
er.
l
If the motorcycle is equipped with
optional electrical accessories, the
battery tends to discharge more
quickly, so be sure to recharge it
periodically.
EC000101
CAUTION:@ Never try to remove the sealing caps
of the battery cells. The battery will
be damaged. @
EW000116
WA R N I N G
@ Battery electrolyte is poisonous and
dangerous, causing severe burns,
etc. It contains sulfuric acid. Avoid
contact with skin, eyes or clothing.
ANTIDOTE:l
EXTERNAL: Flush with water.
l
INTERNAL: Drink large quanti-
ties of water or milk. Follow with
milk of magnesia, beaten egg,
or vegetable oil. Call a physi-
cian immediately.
l
EYES: Flush with water for
15 minutes and get prompt
medical attention.
Batteries produce explosive gases.
Keep sparks, flame, cigarettes etc.,
away. Ventilate when charging or
using in an enclosed space. Always
shield your eyes when working near
batteries.
KEEP OUT OF REACH OF CHIL-
DREN.
@
E_4sv_Periodic.fm Page 27 Tuesday, August 31, 1999 3:45 PM
Page 76 of 103

PERIODIC MAINTENANCE AND MINOR REPAIR
6-28
6 Battery storage
When the motorcycle is not used for a
month or longer, remove the battery,
fully charge it and store it in a cool, dry
place.
EC000102
CAUTION:@ l
Completely recharge the bat-
tery before storing. Storing a
discharged battery can cause
permanent battery damage.
l
Use a battery charger designed
for a sealed-type (MF) battery.
Using a conventional battery
charger will cause battery dam-
age. If you do not have a sealed-
type battery charger, contact
your Yamaha dealer.
l
Always make sure the connec-
tions are correct when reinstall-
ing the battery.
@
EAU00820
Fuse replacementOne fuse box is located under the rid-
er’s seat and the other is located be-
hind cowling B. (See page 6-5.) If any
fuse is blown, turn off the main switch
and the switch of the circuit in question.
Install a new fuse of specified amper-
age. Turn on the switches and see if
the electrical device operates. If the
fuse immediately blows again, consult
a Yamaha dealer.
EC000103
CAUTION:@ Do not use fuses of higher amper-
age rating than those recommend-
ed. Substitution of a fuse of
improper rating can cause extensive
electrical system damage and pos-
sibly a fire. @
1. Headlight fuse
2. Ignition fuse
3. Signaling system fuse
4. Fan fuse (´ 2)
5. Spare fuse (´ 3)
1. Main fuse
2. Spare fuse
E_4sv_Periodic.fm Page 28 Tuesday, August 31, 1999 3:45 PM
Page 83 of 103

PERIODIC MAINTENANCE AND MINOR REPAIR
6-35
6
EAU02990*
Troubleshooting chart
EW000125
WARNING
@ Never check the fuel system while smoking or in the vicinity of an open flame. @
Check if there is fuel
in the fuel tank.1. Fuel
Enough fuel.
No fuel.
Go to compression check.
Supply fuel.
Engine doesn’t start, go to compression check.
Use the electric starter.2. Compression
There is compression.
No compression.
Go to ignition check.
Ask a Yamaha dealer to
inspect.
Remove spark plugs
and check electrodes.3. Ignition
Wet.
Dry.
Wipe clean with dry cloth and correct
spark gap or replace spark plugs.
Ask a Yamaha dealer to inspect.
Engine doesn’t start, ask a Yamaha
dealer to inspect.Engine doesn’t start, go to battery
check.Open throttle half-way and start
the engine.
Use the electric starter.4. Battery
Engine turns over
quickly.
Engine turns over
slowly.
Battery good.Check connections or
recharge.
E_4sv_Periodic.fm Page 35 Tuesday, August 31, 1999 3:45 PM
Page 91 of 103

MOTORCYCLE CARE AND STORAGE
7-5
7a. Remove the spark plug caps and
spark plugs.
b. Pour a teaspoonful of engine oil
into each spark plug bore.
c. Install the spark plug caps onto the
spark plugs and place the spark
plugs on the cylinder head so that
the electrodes are grounded. (This
will limit sparking during the next
step.)
d. Turn the engine over several times
with the starter. (This will coat the
cylinder walls with oil.)
e. Remove the spark plug caps from
the spark plugs, install the spark
plugs and then the spark plug
caps.
EWA00003
WARNING
@ When turning the engine over, be
sure to ground the spark plug elec-
trodes to prevent damage or injury
from sparking. @
6. Lubricate all control cables and
the pivoting points of all levers and
pedals as well as of the sidestand/
centerstand.
7. Check and, if necessary, correct
the tire air pressure, then raise the
motorcycle so that both of its
wheels are off the ground. Alterna-
tively, turn the wheels a little every
month in order to prevent the tires
from becoming degraded in one
spot.
8. Cover up the muffler outlet with a
plastic bag to prevent moisture
from entering.9. Remove the battery and fully
charge it. Store it in a cool, dry
place and recharge it once a
month. Do not store the battery in
an excessively cold or warm place
(less than 0 °C or more than
30 °C). For more information, see
“Battery storage” in the chapter
“PERIODIC MAINTENANCE AND
MINOR REPAIRS”.
NOTE:@ Make any necessary repairs before
storing the motorcycle. @
E_4sv_Cleaning.fm Page 5 Tuesday, August 31, 1999 3:47 PM
Page 95 of 103

SPECIFICATIONS
8-3
8
Maximum load* 196 kg
Air pressure (cold tire)
up to 90 kg load*
Front 250 kPa (2.50 kg/cm
2, 2.50 bar)
Rear 250 kPa (2.50 kg/cm2, 2.50 bar)
90 kg load ~ maximum load*
Front 290 kPa (2.90 kg/cm2, 2.90 bar)
Rear 290 kPa (2.90 kg/cm2, 2.90 bar)
High speed riding
Front 290 kPa (2.90 kg/cm2, 2.90 bar)
Rear 290 kPa (2.90 kg/cm2, 2.90 bar)
* Load is total weight of cargo, rider, passenger and accessories.
Wheels
Fr on t
Ty p e C a s t
Size 17 ´ MT 3.50
Rear
Ty p e C a s t
Size 17 ´ MT 5.50
Brakes
Fr on t
Type Dual disc brake
Operation Right hand operation
Fluid DOT 4Rear
Type Single disc brake
Operation Right foot operation
Fluid DOT 4
Suspension
Fr on t
Ty p e Te l e s c o p i c f o r k
Inner tube outer
diameter 48 mm
Rear
Type Swingarm (link suspension)
Shock absorbers
Front Coil spring/oil damper
Rear Coil spring/gas-oil damper
Wheel travel
Front 120 mm
Rear 120 mm
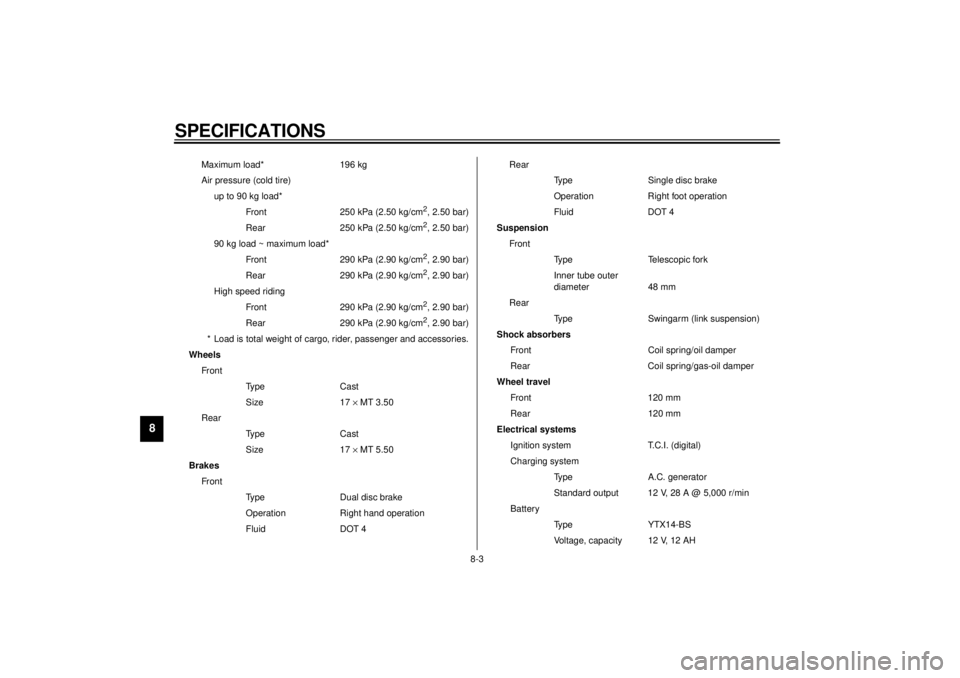
Electrical systems
Ignition system T.C.I. (digital)
Charging system
Type A.C. generator
Standard output 12 V, 28 A @ 5,000 r/min
Battery
Type YTX14-BS
Voltage, capacity 12 V, 12 AH
E_4sv_Spec.fm Page 3 Tuesday, August 31, 1999 3:47 PM
Page 101 of 103

10-INDEXAAir filter ..................................................6-12BBattery ................................................... 6-27
Brake and clutch lever lubrication........... 6-25
Brake and shift pedal lubrication ............ 6-24
Brake fluid replacement ......................... 6-22
Brake light switch adjustment ................. 6-19CCable inspection and lubrication ............ 6-24
Carburetor adjustment ...........................6-14
Care.........................................................7-1
Checking the front and rear brake
pads ....................................................6-20
Clutch lever .............................................. 3-9
Controls/Instruments ................................2-3
Coolant ..................................................6-11
Coolant temperature gauge ..................... 3-7
Cowling A ................................................6-5
Cowling B ................................................6-5
Cowling C ................................................6-6
Cowling removal and installation .............. 6-5DDiagnosis device......................................3-7
Dimmer switch .........................................3-8
Drive chain lubrication ............................6-24
Drive chain slack adjustment..................6-23
Drive chain slack check.......................... 6-23EEngine break-in........................................ 5-5
Engine oil ................................................. 6-9
Engine stop switch................................... 3-9
EXUP (EXhaust Ultimate Powervalve)... 3-19FFront brake lever ................................... 3-10
Front fork adjustment............................. 3-15
Front fork inspection .............................. 6-26
Front wheel installation .......................... 6-31
Front wheel removal .............................. 6-31
Fuel ....................................................... 3-12
Fuel indicator circuit check....................... 3-5
Fuel indicator light ................................... 3-4
Fuel tank breather hose
(for Germany only) .............................. 3-13
Fuel tank cap ......................................... 3-11
Fuse replacement.................................. 6-28GGive safety the right of way ..................... 1-1HHandlebar switches ................................. 3-8
Dimmer switch ................................... 3-8
Engine stop switch ............................. 3-9
Horn switch ........................................ 3-8
Lights switch ...................................... 3-9
Pass switch ........................................ 3-8
Start switch ........................................ 3-9
Turn signal switch .............................. 3-8
Headlight bulb replacement ................... 6-29
Helmet holder ........................................ 3-14
High beam indicator light ......................... 3-2
Horn switch ............................................. 3-8
IIdentification number records ...................9-1
Idle speed adjustment ............................6-15
Indicator lights ..........................................3-2
Fuel indicator light...............................3-4
High beam indicator light ....................3-2
Neutral indicator light ..........................3-2
Oil level indicator light .........................3-2
Turn indicator light ..............................3-2
Inspecting the brake fluid level ...............6-21KKey identification number .........................9-1LLeft view...................................................2-1
Lights switch ............................................3-9
Luggage strap holders ...........................3-19MMain switch/steering lock .........................3-1
Model label ..............................................9-2NNeutral indicator light ...............................3-2OOil level indicator circuit check .................3-3
Oil level indicator light ..............................3-2PParking.....................................................5-6
Pass switch ..............................................3-8
Periodic maintenance and lubrication .......6-2
Pre-operation check list............................. 4-1
E_4svIX.fm Page 1 Tuesday, August 31, 1999 3:49 PM