Page 74 of 103

PERIODIC MAINTENANCE AND MINOR REPAIR
6-26
6
EAU02939
Front fork inspectionVisual check
EW000115
WARNING
@ Securely support the motorcycle so
there is no danger of it falling over. @Check for scratches or damage on the
inner tube and excessive oil leakage
from the front fork.
Operation check
1. Place the motorcycle on a level
place.
2. Hold the motorcycle in an upright
position and apply the front brake.
3. Push down hard on the handle-
bars several times and check if the
fork rebounds smoothly.
EC000098
CAUTION:@ If any damage or unsmooth move-
ment is found with the front fork,
consult a Yamaha dealer. @
EAU00794
Steering inspectionPeriodically inspect the condition of the
steering. Worn out or loose steering
bearings may be dangerous. Place a
stand under the engine to raise the
front wheel off the ground. Hold the
lower end of the front forks and try to
move them forward and backward. If
any free play can be felt, ask a Yamaha
dealer to inspect and adjust the steer-
ing. Inspection is easier if the front
wheel is removed.
EW000115
WA R N I N G
@ Securely support the motorcycle so
there is no danger of it falling over. @
E_4sv_Periodic.fm Page 26 Tuesday, August 31, 1999 3:45 PM
Page 78 of 103

PERIODIC MAINTENANCE AND MINOR REPAIR
6-30
6
EC000105
CAUTION:@ Avoid touching the glass part of a
bulb. Keep it free from oil; other-
wise, the transparency of the glass,
life of the bulb, and luminous flux
will be adversely affected. If oil gets
on a bulb, thoroughly clean it with a
cloth moistened with alcohol or lac-
quer thinner. @4. Install the bulb holder cover and
reconnect the headlight connec-
tors. If the headlight beam adjust-
ment is necessary, ask a Yamaha
dealer to make that adjustment.
EAU01823*
Tail/brake light bulb
replacement1. Remove the passenger seat. (See
page 3-14 for seat removal and in-
stallation procedures.)
2. To remove the socket, turn it coun-
terclockwise.
3. To remove the defective bulb, turn
it counterclockwise.
4. Push a new bulb into the socket
and turn it clockwise.
5. Install the socket and turn it clock-
wise.
6. Install the passenger seat.
EAU01095
Turn signal light bulb
replacement1. Remove the screw and the lens.
2. Remove the defective bulb by
pushing it inward and turning it
counterclockwise.
3. Install a new bulb by pushing it in-
ward and turning it clockwise.
4. Install the lens and tighten the
screw.
1. Don’t touch
1. Screw
E_4sv_Periodic.fm Page 30 Tuesday, August 31, 1999 3:45 PM
Page 79 of 103

PERIODIC MAINTENANCE AND MINOR REPAIR
6-31
6
EAU01252*
Front wheel removal
EW000122
WARNING
@ l
It is advisable to have a Yamaha
dealer service the wheel.
l
Securely support the motor-
cycle so there is no danger of it
falling over.
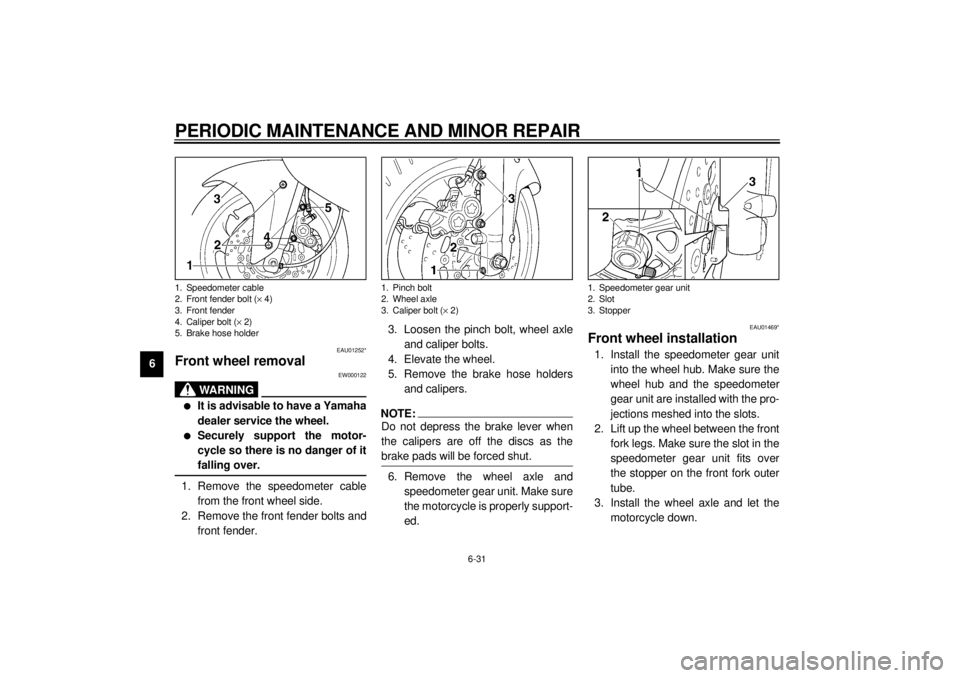
@1. Remove the speedometer cable
from the front wheel side.
2. Remove the front fender bolts and
front fender.3. Loosen the pinch bolt, wheel axle
and caliper bolts.
4. Elevate the wheel.
5. Remove the brake hose holders
and calipers.
NOTE:@ Do not depress the brake lever when
the calipers are off the discs as the
brake pads will be forced shut. @6. Remove the wheel axle and
speedometer gear unit. Make sure
the motorcycle is properly support-
ed.
EAU01469*
Front wheel installation1. Install the speedometer gear unit
into the wheel hub. Make sure the
wheel hub and the speedometer
gear unit are installed with the pro-
jections meshed into the slots.
2. Lift up the wheel between the front
fork legs. Make sure the slot in the
speedometer gear unit fits over
the stopper on the front fork outer
tube.
3. Install the wheel axle and let the
motorcycle down.
1. Speedometer cable
2. Front fender bolt (´ 4)
3. Front fender
4. Caliper bolt (´ 2)
5. Brake hose holder
1. Pinch bolt
2. Wheel axle
3. Caliper bolt (´ 2)
1. Speedometer gear unit
2. Slot
3. Stopper
E_4sv_Periodic.fm Page 31 Tuesday, August 31, 1999 3:45 PM
Page 80 of 103

PERIODIC MAINTENANCE AND MINOR REPAIR
6-32
6 4. Install the calipers, caliper bolts
and brake hose holders. Make
sure there is enough gap between
the brake pads before installing
the calipers onto the brake discs.
5. Tighten the wheel axle, pinch bolt
and caliper bolts to the specified
torques.
6. Push down hard on the handle-
bars several times to check for
proper fork operation.
7. Install the speedometer cable.
8. Install the front fender and bolts.
EAU01247*
Rear wheel removal
EW000122
WA R N I N G
@ l
It is advisable to have a Yamaha
dealer service the wheel.
l
Securely support the motor-
cycle so there is no danger of it
falling over.
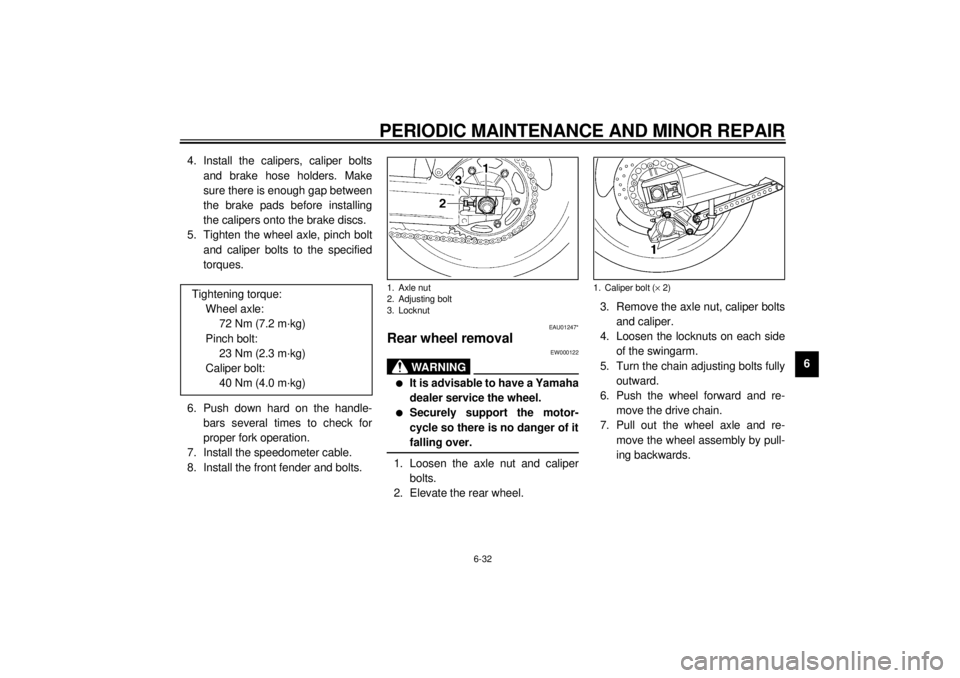
@1. Loosen the axle nut and caliper
bolts.
2. Elevate the rear wheel.3. Remove the axle nut, caliper bolts
and caliper.
4. Loosen the locknuts on each side
of the swingarm.
5. Turn the chain adjusting bolts fully
outward.
6. Push the wheel forward and re-
move the drive chain.
7. Pull out the wheel axle and re-
move the wheel assembly by pull-
ing backwards. Tightening torque:
Wheel axle:
72 Nm (7.2 m·kg)
Pinch bolt:
23 Nm (2.3 m·kg)
Caliper bolt:
40 Nm (4.0 m·kg)1. Axle nut
2. Adjusting bolt
3. Locknut
1. Caliper bolt (´ 2)
E_4sv_Periodic.fm Page 32 Tuesday, August 31, 1999 3:45 PM
Page 81 of 103
PERIODIC MAINTENANCE AND MINOR REPAIR
6-33
6
NOTE:@ l
Do not depress the brake pedal
when the caliper is off the disc as
the brake pads will be forced shut.
l
You do not have to disassemble
the chain in order to remove or in-
stall the rear wheel.
@
EAU01246*
Rear wheel installation1. Install the wheel assembly, caliper
bracket and insert the axle.
2. Install and adjust the drive chain.
(See page 6-23 for details about
adjusting the drive chain slack.)
3. Install the axle nut and let the
motorcycle down.
4. Install the caliper and caliper bolts.
Make sure there is enough gap
between the brake pads before in-
stalling the caliper onto the brake
disc.
5. Tighten the axle nut and caliper
bolts to the specified torques.1. Caliper bracket
Tightening torque:
Axle nut:
150 Nm (15.0 m·kg)
Caliper bolt:
40 Nm (4.0 m·kg)
E_4sv_Periodic.fm Page 33 Tuesday, August 31, 1999 3:45 PM
Page 88 of 103

MOTORCYCLE CARE AND STORAGE
7-2
7
ECA00010
CAUTION:@ l
Avoid using strong acidic wheel
cleaners, especially on spoked
wheels. If you do use such
products for hard-to-remove
dirt, do not leave it on any long-
er than instructed, then thor-
oughly rinse it off with water,
immediately dry the area and
apply a corrosion protection
spray.
l
Improper cleaning can damage
windshields, cowlings, panels
and other plastic parts. Use
only a soft, clean cloth or
sponge with mild detergent and
water to clean plastic.
l
Do not use any harsh chemical
products on plastic parts. Be
sure to avoid using cloths or
sponges which have been in
contact with strong or abrasive
cleaning products, solvent or
thinner, fuel (gasoline), rust re-
movers or inhibitors, brake flu-
id, antifreeze or electrolyte.
l
Do not use high-pressure wash-
ers or steam-jet cleaners since
they cause water seepage and
deterioration in the following ar-
eas: seals (of wheel bearings,
swingarm bearings, forks and
brakes), electric components
(couplers, connectors, instru-
ments, switches and lights),
breather hoses and vents.
l
For motorcycles equipped with
a windshield: Do not use strong
cleaners or hard sponges as
they will cause dulling or
scratching. Some cleaning
compounds for plastic may
leave scratches on the wind-
shield. Test the product on a
small hidden part of the wind-
shield to make sure they do not
leave any marks. If the wind-
shield is scratched, use a quali-
ty plastic polishing compound
after washing.
@After riding in the rain, near the sea oron salt-sprayed roadsSince sea salt or salt sprayed on the
roads in the winter are extremely corro-
sive in combination with water, carry
out the following steps after each ride
in the rain, near the sea or on salt-
sprayed roads. (Salt sprayed in the
winter may remain on the roads well
into spring.)
E_4sv_Cleaning.fm Page 2 Tuesday, August 31, 1999 3:47 PM
Page 89 of 103

MOTORCYCLE CARE AND STORAGE
7-3
71. Clean your motorcycle with cold
water and soap after the engine
has cooled down.
ECA00012
CAUTION:@ Do not use warm water since it in-
creases the corrosive action of the
salt. @2. Be sure to apply a corrosion pro-
tection spray on all (even chrome-
and nickel-plated) metal surfaces
to prevent corrosion.After cleaning
1. Dry the motorcycle with a chamois
or an absorbing cloth.
2. Immediately dry the drive chain
and lubricate it to prevent it from
rusting.
3. Use a chrome polish to shine
chrome, aluminum and stainless-
steel parts, including the exhaust
system. (Even the thermally in-
duced discoloring of stainless-
steel exhaust systems can be re-
moved through polishing.)
4. To prevent corrosion, it is recom-
mended to apply a corrosion pro-
tection spray on all (even chrome-
and nickel-plated) metal surfaces.
5. Use spray oil as a universal clean-
er to remove any remaining dirt.
6. Touch up minor paint damage
caused by stones, etc.
7. Wax all painted surfaces.
8. Let the motorcycle dry completely
before storing it or covering it.
EWA00001
WA R N I N G
@ Make sure that there is no oil or wax
on the brakes and tires. If neces-
sary, clean the brake discs and lin-
ings with a regular brake disc
cleaner or acetone, and wash the
tires with warm water and mild soap.
Then, carefully test the motorcycle
for its braking performance and cor-
nering behavior. @
E_4sv_Cleaning.fm Page 3 Tuesday, August 31, 1999 3:47 PM
Page 95 of 103

SPECIFICATIONS
8-3
8
Maximum load* 196 kg
Air pressure (cold tire)
up to 90 kg load*
Front 250 kPa (2.50 kg/cm
2, 2.50 bar)
Rear 250 kPa (2.50 kg/cm2, 2.50 bar)
90 kg load ~ maximum load*
Front 290 kPa (2.90 kg/cm2, 2.90 bar)
Rear 290 kPa (2.90 kg/cm2, 2.90 bar)
High speed riding
Front 290 kPa (2.90 kg/cm2, 2.90 bar)
Rear 290 kPa (2.90 kg/cm2, 2.90 bar)
* Load is total weight of cargo, rider, passenger and accessories.
Wheels
Fr on t
Ty p e C a s t
Size 17 ´ MT 3.50
Rear
Ty p e C a s t
Size 17 ´ MT 5.50
Brakes
Fr on t
Type Dual disc brake
Operation Right hand operation
Fluid DOT 4Rear
Type Single disc brake
Operation Right foot operation
Fluid DOT 4
Suspension
Fr on t
Ty p e Te l e s c o p i c f o r k
Inner tube outer
diameter 48 mm
Rear
Type Swingarm (link suspension)
Shock absorbers
Front Coil spring/oil damper
Rear Coil spring/gas-oil damper
Wheel travel
Front 120 mm
Rear 120 mm
Electrical systems
Ignition system T.C.I. (digital)
Charging system
Type A.C. generator
Standard output 12 V, 28 A @ 5,000 r/min
Battery
Type YTX14-BS
Voltage, capacity 12 V, 12 AH
E_4sv_Spec.fm Page 3 Tuesday, August 31, 1999 3:47 PM