Page 32 of 442
1 - 3
GEN
INFO
IMPORTANT INFORMATION
EC130000
IMPORTANT INFORMATION
EC131002
PREPARATION FOR REMOVAL AND
DISASSEMBLY
1. Remove all dirt, mud, dust, and foreign
material before removal and disassem-
bly.
2. Use proper tools and cleaning equip-
ment. Refer to “SPECIAL TOOLS” sec-
tion.
3. When disassembling the machine, keep
mated parts together. They include
gears, cylinders, pistons, and other
mated parts that have been “mated”
through normal wear. Mated parts must
be reused as an assembly or replaced.
4. During the machine disassembly, clean
all parts and place them in trays in the
order of disassembly. This will speed up
assembly time and help assure that all
parts are correctly reinstalled.
5. Keep away from fire.
EC132000
ALL REPLACEMENT PARTS
1. We recommend to use Yamaha genuine
parts for all replacements. Use oil and/or
grease recommended by Yamaha for
assembly and adjustment.
Page 144 of 442

3 - 8
INSP
ADJ
ENGINE OIL LEVEL INSPECTION
4. Check:
lOil level
Oil level should be between maximum
a and minimum b marks.
Oil level is low ® Add oil to proper
level.
NOTE:
When inspecting the oil level, do not screw the
dipstick into the oil tank. Insert the gauge
lightly.
(For USA and CDN)
CAUTION:
lDo not add any chemical additives.
Engine oil also lubricates the clutch and
additives could cause clutch slippage.
lDo not allow foreign material to enter the
crankcase.
Recommended oil:
At –10 ˚C (10 ˚F) or higher :
Yamalube 4 (10W-30) or SAE
10W-30 type SE motor oil
At 5 ˚C (40 ˚F) or higher õ:
Yamalube 4 (20W-40) or SAE
20W-40 type SE motor oil
(Except for USA and CDN)
CAUTION:
lDo not add any chemical additives or use
oils with a grade of CD a or higher.
lDo not use oils labeled “ENERGY CON-
SERVING II” b or higher. Engine oil also
lubricates the clutch and additives could
cause clutch slippage.
lDo not allow foreign materials to enter the
crankcase.
Recommended oil:
Refer to the following chart for
selection of oils which are suited
to the atmospheric temperatures.
Recommended engine oil classi-
fication:
API STANDARD:
API “SE” or higher grade
(Designed primarily for motor-
cycles)
Page 370 of 442

5 - 18
CHASFRONT FORK
HANDLING NOTE
NOTE:
The front fork requires careful attention. So it is
recommended that the front fork be main-
tained at the dealers.
CAUTION:
To prevent an accidental explosion of air,
the following instructions should be
observed:
The front fork with a built-in piston rod has
a very sophisticated internal construction
and is particularly sensitive to foreign
material.
Use enough care not to allow any foreign
material to come in when the oil is replaced
or when the front fork is disassembled and
reassembled.
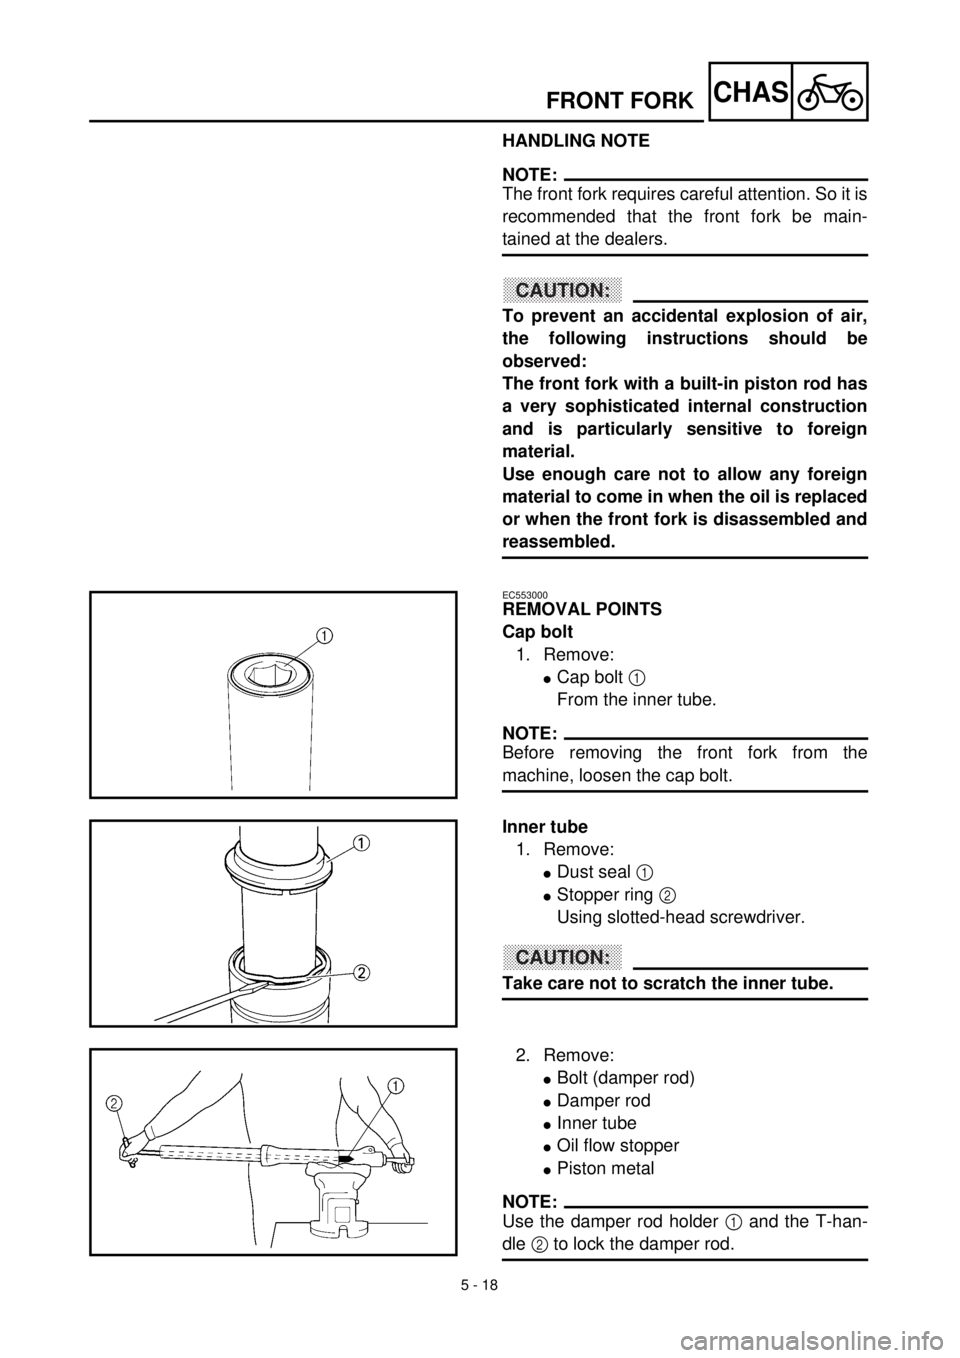
EC553000
REMOVAL POINTS
Cap bolt
1. Remove:
lCap bolt 1
From the inner tube.
NOTE:
Before removing the front fork from the
machine, loosen the cap bolt.
Inner tube
1. Remove:
lDust seal 1
lStopper ring 2
Using slotted-head screwdriver.
CAUTION:
Take care not to scratch the inner tube.
2. Remove:
lBolt (damper rod)
lDamper rod
lInner tube
lOil flow stopper
lPiston metal
NOTE:
Use the damper rod holder 1 and the T-han-
dle 2 to lock the damper rod.
Page 380 of 442
5 - 23
CHASFRONT FORK
9. Compress the front fork fully.
10. Fill:
lFront fork oil 1
CAUTION:
lBe sure to use recommended fork oil. If
other oils are used, they may have an
excessively adverse effect on the front
fork performance.
lNever allow foreign materials to enter the
front fork.
Recommended oil:
Fork oil 10W or equivalent
Quantity (each front fork leg):
159 cm
3
(5.60 Imp oz, 5.38 US oz)
11. After filling, pump the inner tube slowly
up and down more than 10 times to dis-
tribute the fork oil.
12. Measure:
lOil level a
Out of specification ® Adjust.
Standard oil level:
122 mm (4.80 in)
From the top of the inner tube,
with the inner tube fully com-
pressed, and without the fork
spring.
13. Install:
lFork spring
lWasher
lSpacer
lCap bolt 1
lDust boot
NOTE:
Temporarily tighten the cap bolt.