2000 YAMAHA TTR125 oil pressure
[x] Cancel search: oil pressurePage 69 of 442

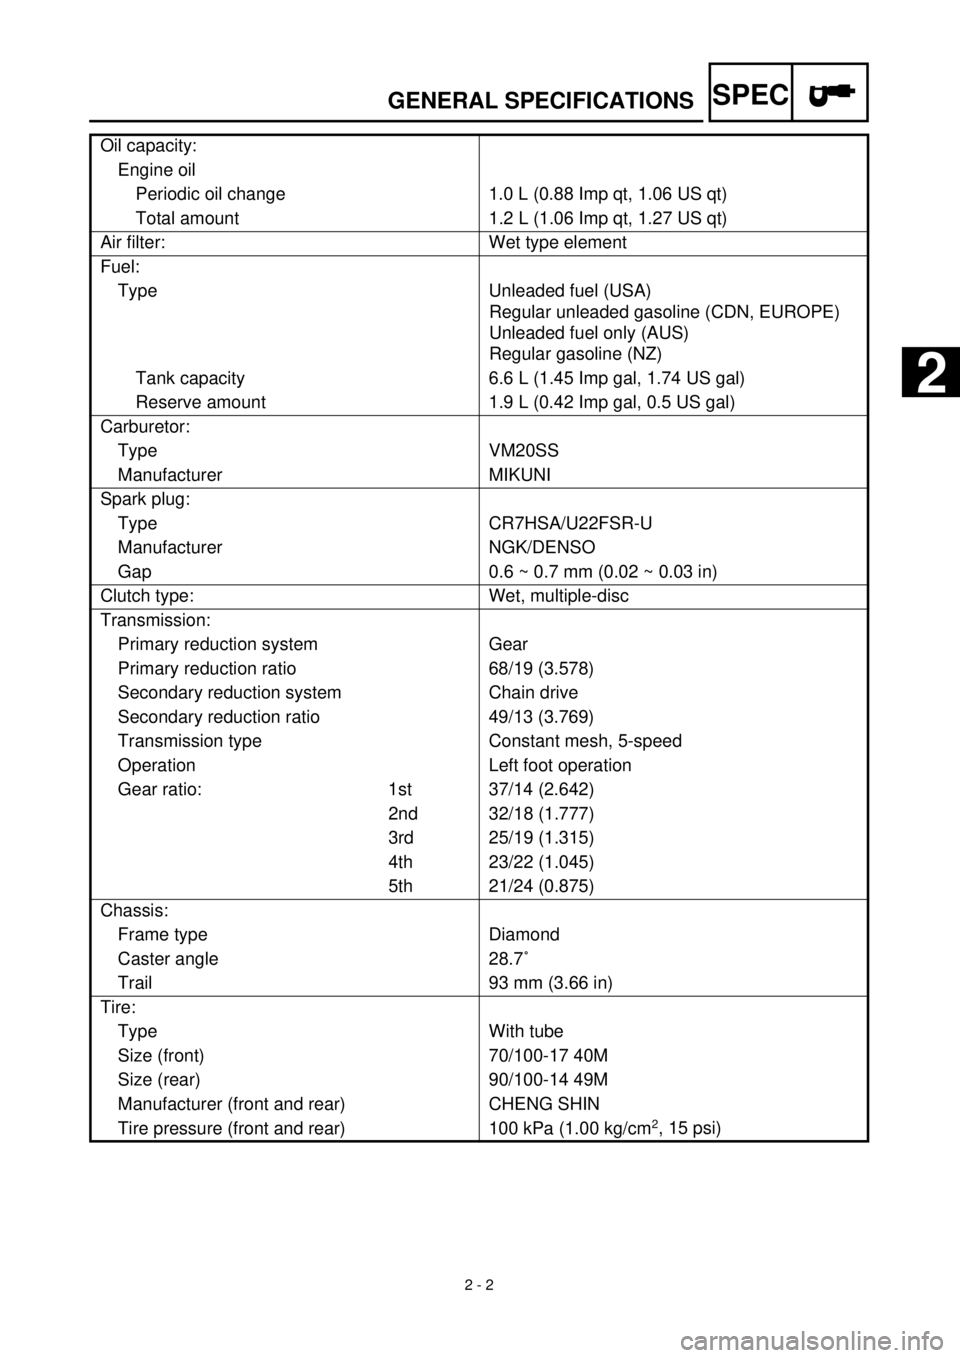
SPEC
2 - 2
GENERAL SPECIFICATIONS
Oil capacity:
Engine oil
Periodic oil change 1.0 L (0.88 Imp qt, 1.06 US qt)
Total amount 1.2 L (1.06 Imp qt, 1.27 US qt)
Air filter: Wet type element
Fuel:
Type Unleaded fuel (USA)
Regular unleaded gasoline (CDN, EUROPE)
Unleaded fuel only (AUS)
Regular gasoline (NZ)
Tank capacity 6.6 L (1.45 Imp gal, 1.74 US gal)
Reserve amount 1.9 L (0.42 Imp gal, 0.5 US gal)
Carburetor:
Type VM20SS
Manufacturer MIKUNI
Spark plug:
Type CR7HSA/U22FSR-U
Manufacturer NGK/DENSO
Gap 0.6 ~ 0.7 mm (0.02 ~ 0.03 in)
Clutch type: Wet, multiple-disc
Transmission:
Primary reduction system Gear
Primary reduction ratio 68/19 (3.578)
Secondary reduction system Chain drive
Secondary reduction ratio 49/13 (3.769)
Transmission type Constant mesh, 5-speed
Operation Left foot operation
Gear ratio: 1st 37/14 (2.642)
2nd 32/18 (1.777)
3rd 25/19 (1.315)
4th 23/22 (1.045)
5th 21/24 (0.875)
Chassis:
Frame type Diamond
Caster angle 28.7˚
Trail 93 mm (3.66 in)
Tire:
Type With tube
Size (front) 70/100-17 40M
Size (rear) 90/100-14 49M
Manufacturer (front and rear) CHENG SHIN
Tire pressure (front and rear) 100 kPa (1.00 kg/cm
2
, 15 psi)
2
Page 77 of 442

SPEC
2 - 10
MAINTENANCE SPECIFICATIONS
Part to be tightened Thread size Q’tyTightening torque
Nm m•kg ft•lb
Spark plug M10
´
1.0 1 13 1.3 9.4
Cylinder head bolt M8
´
1.25 4 22 2.2 16
Cylinder head bolt M6
´
1.0 2 10 1.0 7.2
Oil pressure check bolt M6
´
1.0 1 7 0.7 5.1
Cylinder head side cover M6
´
1.0 2 10 1.0 7.2
Tappet cover M45
´
1.5 2 18 1.8 13
Timing chain guide M6
´
1.0 1 10 1.0 7.2
Adjusting screw (valve) and locknut M5
´
0.5 2 8 0.8 5.8
Camshaft sprocket M8
´
1.25 1 20 2.0 14
Bearing plate cover (camshaft) M6
´
1.0 1 10 1.0 7.2
Timing chain tensioner cap bolt M8
´
1.25 1 8 0.8 5.8
Timing chain tensioner M6
´
1.0 2 10 1.0 7.2
Oil pump assembly M6
´
1.0 2 7 0.7 5.1
Oil pump cover M5
´
0.8 1 5 0.5 3.6
Engine oil drain bolt M12
´
1.5 1 20 2.0 14
Carburetor joint M6
´
1.0 2 10 1.0 7.2
Carburetor joint clamp (air filter) M4
´
0.7 1 2 0.2 1.4
Coasting enricher cover M4
´
0.7 2 2 0.2 1.4
Air filter case M6
´
1.0 3 7 0.7 5.1
Muffler M6
´
1.0 2 10 1.0 7.2
Muffler M10
´
1.25 1 60 6.0 43
Muffler guard M6
´
1.0 7 10 1.0 7.2
Spark arrester M6
´
1.0 3 10 1.0 7.2
Crankcase M6
´
1.0 10 10 1.0 7.2
Left crankcase cover M6
´
1.0 7 10 1.0 7.2
Drive sprocket cover M6
´
1.0 2 12 1.2 8.7
Right crankcase cover M6
´
1.0 9 10 1.0 7.2
Lead guide (CDI magneto lead) M6
´
1.0 1 7 0.7 5.1
Timing mark accessing screw M14
´
1.5 1 7 0.7 5.1
Crankshaft end accessing screw M32
´
1.5 1 7 0.7 5.1
Kickstarter crank M12
´
1.0 1 50 5.0 36
Primary drive gear M12
´
1.0 1 70 7.0 50
Clutch spring M5
´
0.8 4 6 0.6 4.3
Clutch boss M12
´
1.0 1 60 6.0 43
Adjusting screw (push rod) and locknut M6
´
1.0 1 8 0.8 5.8
Bearing plate cover (main axle) M6
´
1.0 2 7 0.7 5.1
Drive sprocket M5
´
0.8 2 6 0.6 4.3
Shift arm M6
´
1.0 1 10 1.0 7.2
Shift rod and shift pedal M6
´
1.0 1 7 0.7 5.1
Shift rod and shift arm M6
´
1.0 1 7 0.7 5.1
Shift pedal M6
´
1.0 1 12 1.2 8.7
Segment M6
´
1.0 1 12 1.2 8.7
Stopper lever M6
´
1.0 1 10 1.0 7.2
Page 79 of 442

SPEC
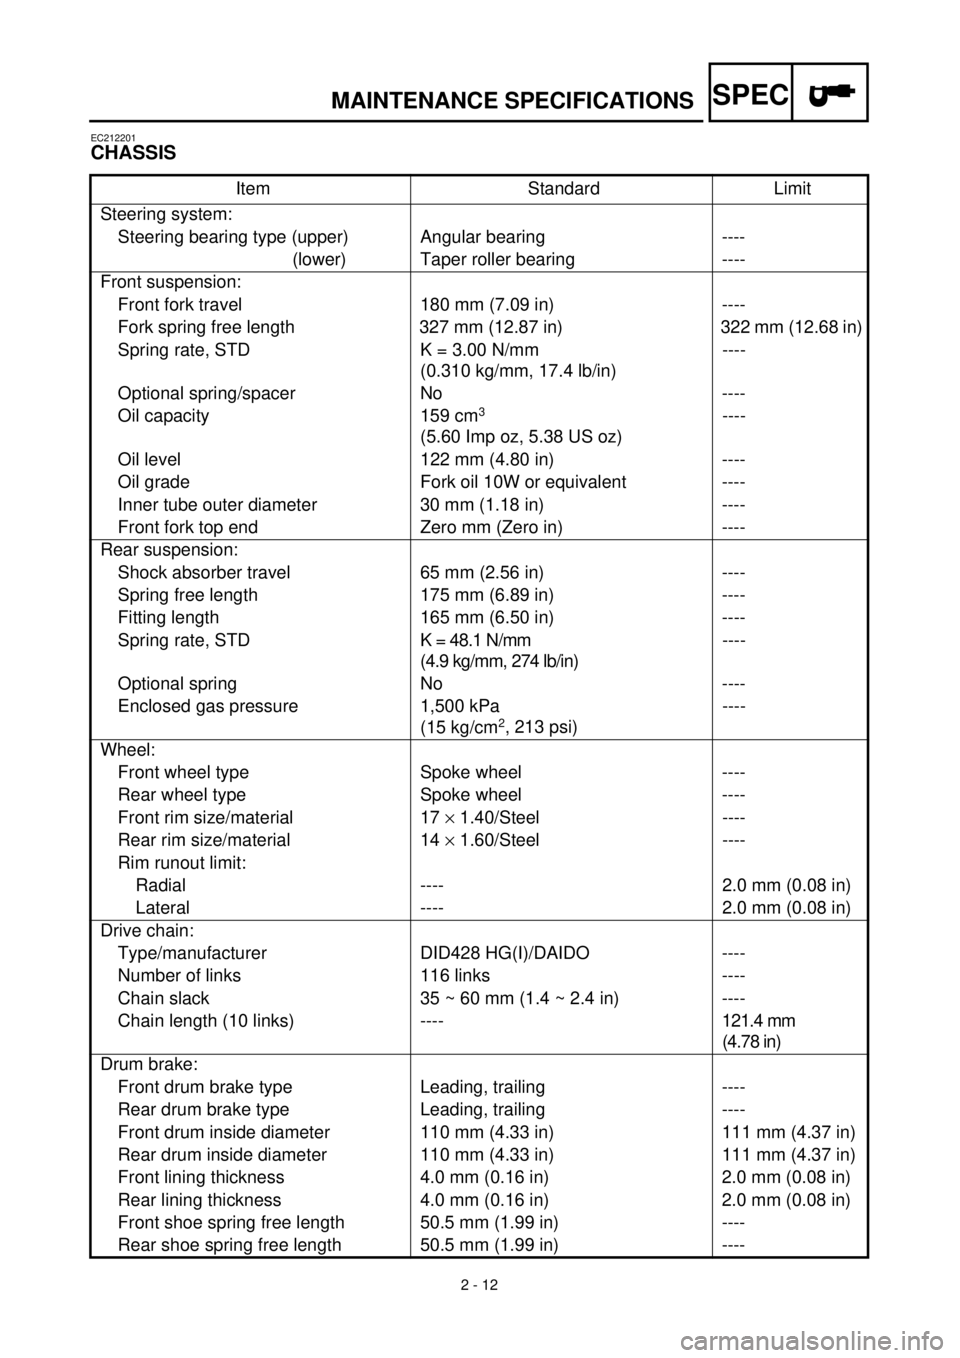
2 - 12
MAINTENANCE SPECIFICATIONS
EC212201
CHASSIS
Item Standard Limit
Steering system:
Steering bearing type (upper) Angular bearing ----
(lower) Taper roller bearing ----
Front suspension:
Front fork travel 180 mm (7.09 in) ----
Fork spring free length 327 mm (12.87 in) 322 mm (12.68 in)
Spring rate, STD K = 3.00 N/mm
(0.310 kg/mm, 17.4 lb/in)----
Optional spring/spacer No ----
Oil capacity 159 cm
3
(5.60 Imp oz, 5.38 US oz)----
Oil level 122 mm (4.80 in) ----
Oil grade Fork oil 10W or equivalent ----
Inner tube outer diameter 30 mm (1.18 in) ----
Front fork top end Zero mm (Zero in) ----
Rear suspension:
Shock absorber travel 65 mm (2.56 in) ----
Spring free length 175 mm (6.89 in) ----
Fitting length 165 mm (6.50 in) ----
Spring rate, STD K = 48.1 N/mm
(4.9 kg/mm, 274 lb/in)----
Optional spring No ----
Enclosed gas pressure 1,500 kPa
(15 kg/cm
2
, 213 psi)----
Wheel:
Front wheel type Spoke wheel ----
Rear wheel type Spoke wheel ----
Front rim size/material 17 ´ 1.40/Steel ----
Rear rim size/material 14 ´ 1.60/Steel ----
Rim runout limit:
Radial ---- 2.0 mm (0.08 in)
Lateral ---- 2.0 mm (0.08 in)
Drive chain:
Type/manufacturer DID428 HG(I)/DAIDO ----
Number of links 116 links ----
Chain slack 35 ~ 60 mm (1.4 ~ 2.4 in) ----
Chain length (10 links) ----121.4 mm
(4.78 in)
Drum brake:
Front drum brake type Leading, trailing ----
Rear drum brake type Leading, trailing ----
Front drum inside diameter 110 mm (4.33 in) 111 mm (4.37 in)
Rear drum inside diameter 110 mm (4.33 in) 111 mm (4.37 in)
Front lining thickness 4.0 mm (0.16 in) 2.0 mm (0.08 in)
Rear lining thickness 4.0 mm (0.16 in) 2.0 mm (0.08 in)
Front shoe spring free length 50.5 mm (1.99 in) ----
Rear shoe spring free length 50.5 mm (1.99 in) ----
Page 126 of 442

3 - 1
INSP
ADJ
MAINTENANCE INTERVALS
EC300000
REGULAR INSPECTION AND ADJUSTMENTS
MAINTENANCE INTERVALS
The following schedule is intended as a general guide to maintenance and lubrication. Bear in mind
that such factors as weather, terrain, geographical location, and individual usage will alter the
required maintenance and lubrication intervals. If you are a doubt as to what intervals to follow in
maintaining and lubricating your machine, consult your Yamaha dealer.
Dealer
NoteItem Checks and maintenance jobsInitial Every
10 hours
(1 month)60 hours
(6 months)120 hours
(12 months)
*
Fuel lineCheck fuel hoses for cracks or damage.
Replace if necessary.
Spark plugCheck condition.
Clean, regap or replace if necessary.
*
ValvesCheck valve clearance.
Adjust if necessary.
Air filter Clean or replace element if necessary.
*
CarburetorCheck engine idling speed and starter operation.
Adjust if necessary.
Exhaust systemsCheck for leakage.
Retighten if necessary.
Replace gasket if necessary.
Engine oilCheck oil level and vehicle for oil leakage.
Correct if necessary.
Change. (Warm engine before draining.)
ClutchCheck operation.
Adjust or replace cable.
*
Front brakeCheck operation.
Adjust brake lever free play and replace brake
shoes if necessary.Every ride
*
Rear brakeCheck operation.
Adjust brake pedal free play and replace brake
shoes if necessary.Every ride
*
WheelsCheck balance, runout, spoke tightness and for
damage.
Tighten spokes and rebalance, replace if
necessary.
*
TiresCheck tread depth and for damage.
Replace if necessary.
Check air pressure.
Correct if necessary.
*
Wheel bearingsCheck bearing for looseness or damage.
Replace if necessary.
*
SwingarmCheck swingarm pivoting point for play.
Correct if necessary.
Lubricate with lithium soap base grease.
Drive chainCheck chain slack.
Adjust if necessary. Make sure that the rear wheel
is properly aligned.
Clean and lubricate.Every ride
*
Steering bearingsCheck bearing play and steering for roughness.
Correct accordingly.
Lubricate with lithium soap base grease every 120
hours.
SidestandCheck operation.
Lubricate and repair if necessary.
3
3
Page 132 of 442

3 - 3
INSP
ADJ
PRE-OPERATION INSPECTION AND MAINTENANCE
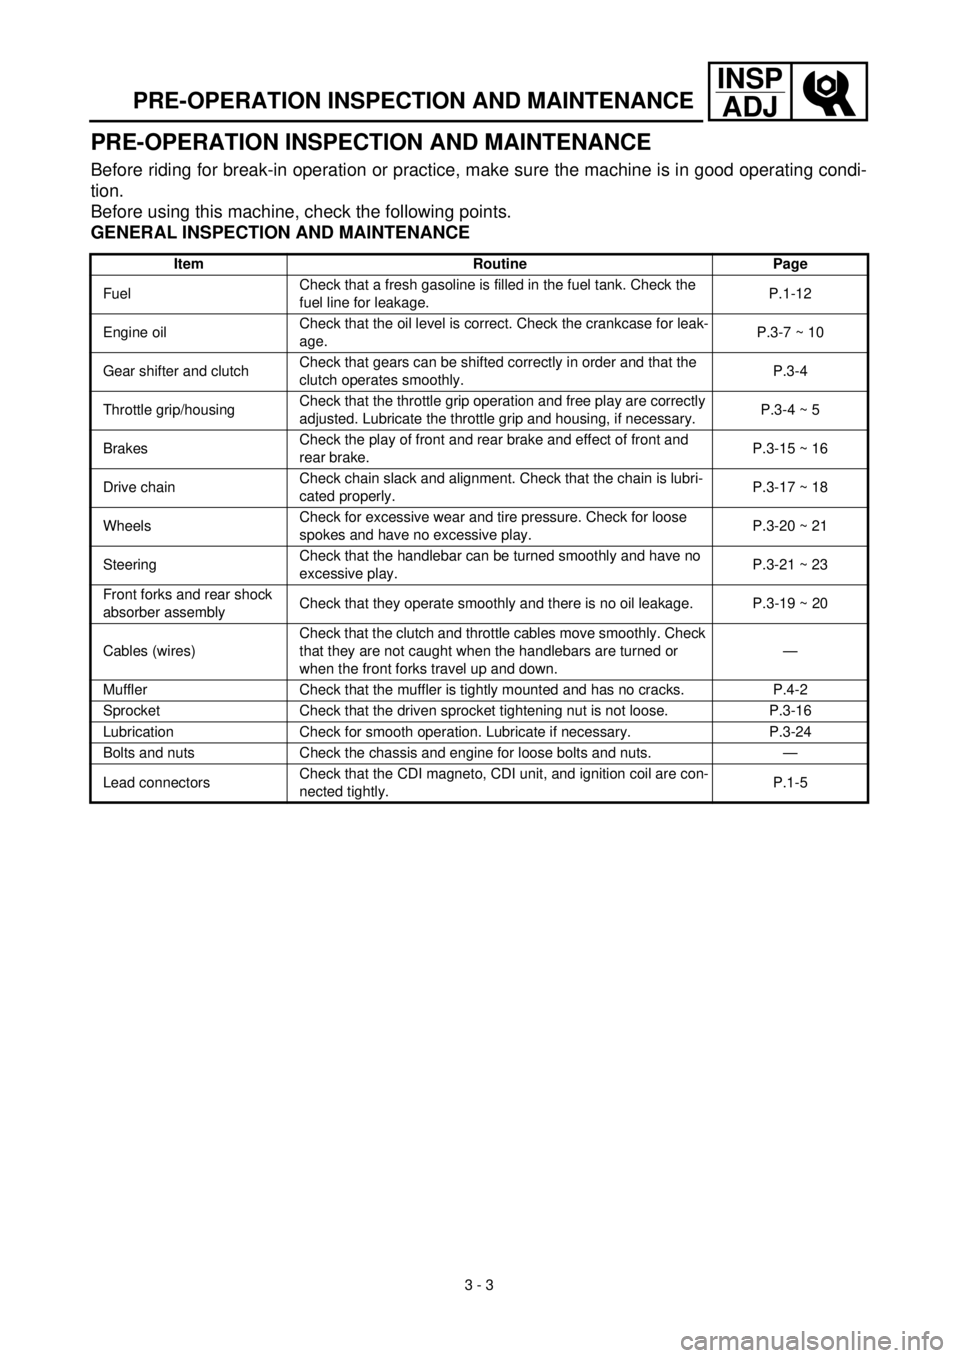
PRE-OPERATION INSPECTION AND MAINTENANCE
Before riding for break-in operation or practice, make sure the machine is in good operating condi-
tion.
Before using this machine, check the following points.
GENERAL INSPECTION AND MAINTENANCE
Item Routine Page
FuelCheck that a fresh gasoline is filled in the fuel tank. Check the
fuel line for leakage.P.1-12
Engine oilCheck that the oil level is correct. Check the crankcase for leak-
age.P.3-7 ~ 10
Gear shifter and clutchCheck that gears can be shifted correctly in order and that the
clutch operates smoothly.P.3-4
Throttle grip/housingCheck that the throttle grip operation and free play are correctly
adjusted. Lubricate the throttle grip and housing, if necessary.P.3-4 ~ 5
BrakesCheck the play of front and rear brake and effect of front and
rear brake.P.3-15 ~ 16
Drive chainCheck chain slack and alignment. Check that the chain is lubri-
cated properly.P.3-17 ~ 18
WheelsCheck for excessive wear and tire pressure. Check for loose
spokes and have no excessive play.P.3-20 ~ 21
SteeringCheck that the handlebar can be turned smoothly and have no
excessive play.P.3-21 ~ 23
Front forks and rear shock
absorber assemblyCheck that they operate smoothly and there is no oil leakage. P.3-19 ~ 20
Cables (wires)Check that the clutch and throttle cables move smoothly. Check
that they are not caught when the handlebars are turned or
when the front forks travel up and down.—
Muffler Check that the muffler is tightly mounted and has no cracks. P.4-2
Sprocket Check that the driven sprocket tightening nut is not loose. P.3-16
Lubrication Check for smooth operation. Lubricate if necessary. P.3-24
Bolts and nuts Check the chassis and engine for loose bolts and nuts. —
Lead connectorsCheck that the CDI magneto, CDI unit, and ignition coil are con-
nected tightly.P.1-5
Page 148 of 442

3 - 10
INSP
ADJOIL PRESSURE INSPECTION/PILOT AIR SCREW
ADJUSTMENT/ENGINE IDLING SPEED ADJUSTMENT
OIL PRESSURE INSPECTION
1. Check:
lOil pressure
Checking steps:
lSlightly loosen the oil pressure check bolt
1.
lStart the engine and keep it idling until oil
starts to seep from the oil pressure check
bolt. If no oil comes out after one minute,
turn the engine off so it will not seize.
lCheck oil passages and oil pump for dam-
age or leakage.
lStart the engine after solving the prob-
lem(s) and recheck the oil pressure.
lTighten the oil pressure check bolt.
T R..
Oil pressure check bolt:
7 Nm (0.7 m • kg, 5.1 ft • lb)
PILOT AIR SCREW ADJUSTMENT
1. Adjust:
lPilot air screw 1
Adjustment steps:
lScrew in the pilot air screw until it is lightly
seated.
lBack out by the specified number of turns.
Pilot air screw:
2-1/2 ~ 3-1/2 turns out (example)
NOTE:
To optimize the fuel flow at a smaller throt-
tle opening, each machine’s pilot air screw
has been individually set at the factory.
Before adjusting the pilot air screw, turn it in
fully and count the number of turns. Record
this number as the factory-set number of
turns out.
ENGINE IDLING SPEED ADJUSTMENT
1. Start the engine and thoroughly warm it
up.
2. Attach:
lInductive tachometer
To spark plug lead.
3. Adjust:
lEngine idling speed
Page 258 of 442

4 - 40
ENGCLUTCH AND PRIMARY DRIVEN GEAR
EC490000
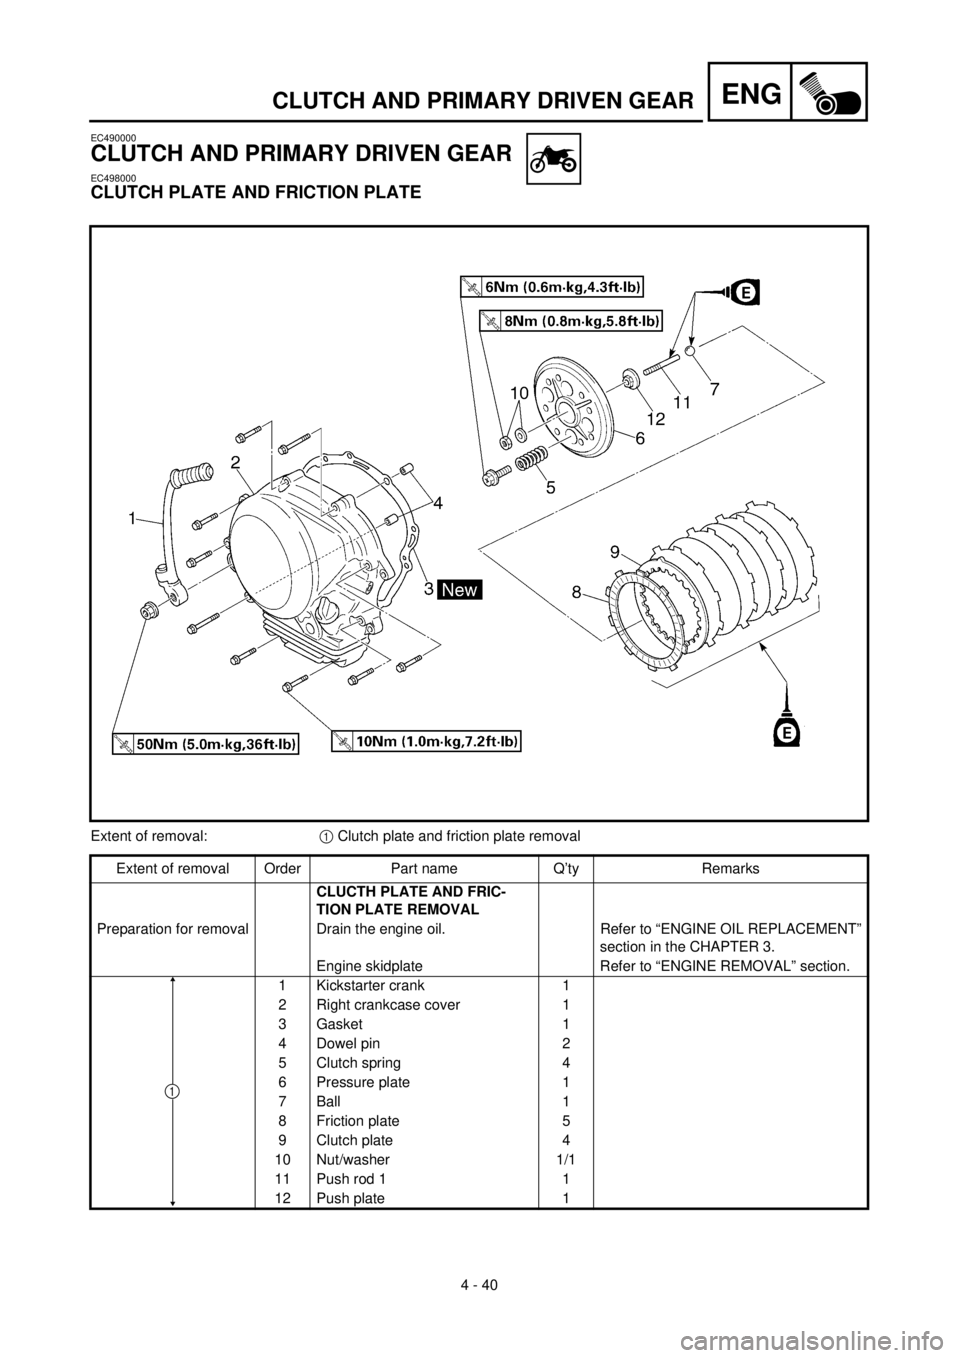
CLUTCH AND PRIMARY DRIVEN GEAR
EC498000
CLUTCH PLATE AND FRICTION PLATE
Extent of removal:1 Clutch plate and friction plate removal
Extent of removal Order Part name Q’ty Remarks
CLUCTH PLATE AND FRIC-
TION PLATE REMOVAL
Preparation for removal Drain the engine oil. Refer to “ENGINE OIL REPLACEMENT”
section in the CHAPTER 3.
Engine skidplate Refer to “ENGINE REMOVAL” section.
1 Kickstarter crank 1
2 Right crankcase cover 1
3 Gasket 1
4 Dowel pin 2
5 Clutch spring 4
6 Pressure plate 1
7 Ball 1
8 Friction plate 5
9 Clutch plate 4
10 Nut/washer 1/1
11 Push rod 1 1
12 Push plate 1
1
Page 272 of 442

4 - 47
ENGCLUTCH AND PRIMARY DRIVEN GEAR
5. Install:
lBall
NOTE:
Apply the engine oil on the ball.
6. Install:
lPush rod 1 1
lPush plate 2
lWasher 3
lNut (push rod 1) 4
7. Install:
lPressure plate 1
lClutch spring 2
lBolt (clutch spring) 3
NOTE:
lAlign the arrow mark a on the pressure
plate with the punched mark b on the clutch
boss.
lTighten the bolts in stage, using a crisscross
pattern.
T R..6 Nm (0.6 m · kg, 4.3 ft · lb)
8. Check:
lPush lever position
Push the push lever assembly in the
arrow direction and make sure that the
mach mark are aligned ® adjust.
aMatch mark on the push lever assembly
bMatch mark on the crankcase