Page 10 of 282
00 SIENNA(U)
4
1. Engine coolant temperature gauge
2. Tachometer
3. Service reminder indicators and
indicator lights4. Speedometer
5. Fuel gauge
6. Trip meter reset knob7. Odometer and two trip meters
Instrument cluster overview
�With tachometer
ProCarManuals.com
Page 11 of 282
00 SIENNA(U)
5
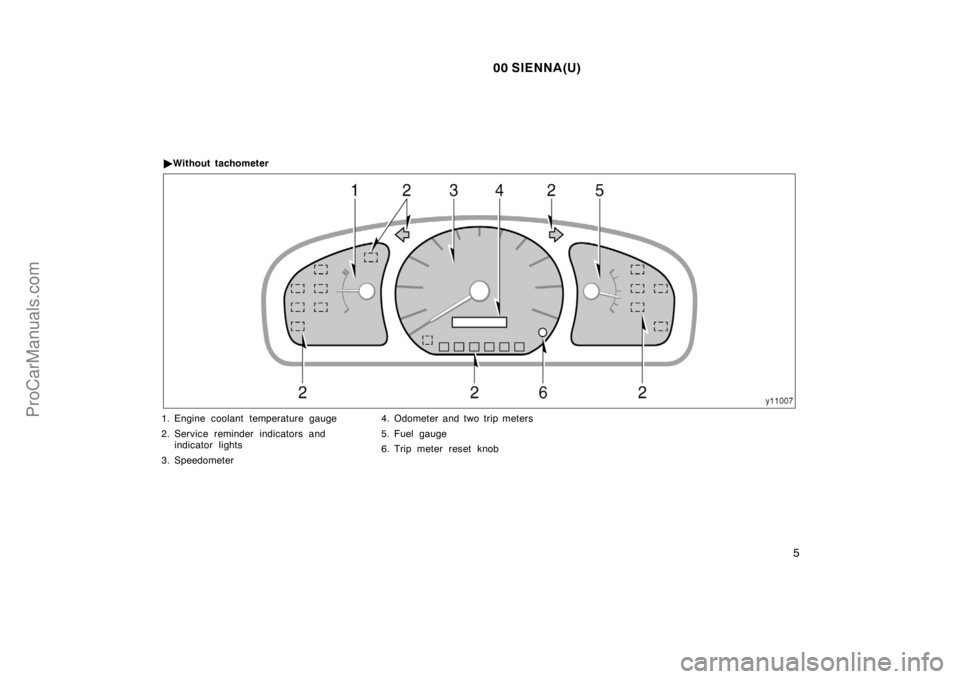
1. Engine coolant temperature gauge
2. Service reminder indicators and
indicator lights
3. Speedometer4. Odometer and two trip meters
5. Fuel gauge
6. Trip meter reset knob �Without tachometer
ProCarManuals.com
Page 126 of 282

120
Odometer and two trip meters
With tachometer
Without tachometer
This meter displays the odometer and
two trip meters.
1. Odometer—It shows the total distance
the vehicle has been dr")
00 SIENNA(U)
120
Odometer and two trip meters
With tachometer
Without tachometer
This meter displays the odometer and
two trip meters.
1. Odometer—It shows the total distance
the vehicle has been driven.
2. Two trip meters—They show two differ-
ent distances independently driven
since the last time each trip meter was
set to zero.
You can use one trip meter to calculate
the fuel economy and the other to
measure the distance on each trip. All
trip meter data is cancelled if the elec-
trical power source is disconnected.
3. Trip meter reset knob—It can reset the
two trip meters to zero, and also
change the meter display.
To change the meter display, quickly
push and release the knob. The meter
display changes in the order from the
odometer to trip meter A to trip meter
B, then back to the odometer each
time you push.
To reset the trip meter A to zero, dis-
play the meter A reading, then push
and hold the knob until the meter is
set to zero. The same process can be
applied for resetting the trip meter B.
(a) If parking brake
is off, stop and
check.
(b) Fasten driver ’s
seat belt.
(d) Stop and check.(type A)
(type B)
(instrument cluster—
indicator and buzzer)
(c) Fasten front
passenger ’s seat
belt.
(clock display—
indicator only) If the indicator or
buzzer comes on...
Do this.
Service reminder indicators
an d warn in g bu zzers
ProCarManuals.com
Page 228 of 282

222
—Reinstalling wheel ornament
Steel wheels
Aluminum wheels
10. Reinstall the wheel ornament.
1. Put the wheel ornament into position.
Steel wheel models, align the cutout of
the whee")
00 SIENNA(U)
222
—Reinstalling wheel ornament
Steel wheels
Aluminum wheels
10. Reinstall the wheel ornament.
1. Put the wheel ornament into position.
Steel wheel models, align the cutout of
the wheel ornament with the valve stem
as shown.
2. Then tap it firmly with the side or heel
of your hand to snap it into place.
CAUTION
Take due care in handling the orna-
ment to avoid unexpected personal
injury.
—After changing wheels
11. Check the air pressure of the re-
placed tire.
Adjust the air pressure to the specification
designed in Section 8. If the pressure is
lower, drive slowly to the nearest service
station and fill to the correct pressure.
Do not forget to reinstall the tire inflation
valve cap as dirt and moisture could get
into the valve core and possibly cause air
leakage. If the cap is missing, have a new
one put on as soon as possible.
12. Restow all the tools, jack and flat
tire securely.
As soon after changing wheels as pos-
sible, tighten the wheel nuts to the torque
specified in Section 8 with a torque
wrench and have a technician repair the
flat tire.
Vehicles with a spare tire of the same
size as the installed tires—
13. Push the tire pressure warning sys-
tem reset switch.
Initial adjustment of the tire pressure
warning system is necessary after you
have replaced your tires or wheels. See
“Tire pressure warning system” in Section
1−8.
ProCarManuals.com

4
1. Engine coolant temperature gauge
2. Tachometer
3. Service reminder indicators and
indicator lights4. Speedometer
5. Fuel gauge
6. Trip meter reset knob7. Odometer and two trip meter")