Page 219 of 282

00 SIENNA(U)
213
5. Start your engine in the normal way.
After starting, run it at about 2000 rpm
for several minutes with the accelerator
pedal lightly depressed.
6. Carefully disconnect the cables in the
exact reverse order: the negative cable
and then the positive cable.
7. Carefully dispose of the battery cover
cloths—they may now contain sulfuric
acid.
8. If removed, replace all the battery vent
plugs.
If the cause of your battery discharging is
not apparent (for example, lights left on),
you should have it checked.If your engine stalls while driving...
1. Reduce your speed gradually, keeping
a straight line. Move cautiously off the
road to a safe place.
2. Turn on your emergency flashers.
3. Try starting the engine again.
If the engine will not start, see “If your
vehicle will not start”.
CAUTION
If the engine is not running, the pow-
er assist for the brakes and steering
will not work so steering and braking
will be much harder than usual.
If your vehicle overheats
If your engine coolant temperature
gauge indicates overheating, if you ex-
perience a loss of power, or if you hear
a loud knocking or pinging noise, the
engine has probably overheated. You
should follow this procedure...
1. Pull safely off the road, stop the ve-
hicle and turn on your emergency
flashers. Put the transmission in “P”
and apply the parking brake. Turn off
the air conditioning if it is being used.
2. If coolant or steam is boiling out of the
radiator or reservoir, stop the engine.
Wait until the steam subsides before
opening the hood. If there is no coolant
boiling over or steam, leave the engine
running and make sure the electric
cooling fan is operating. If it is not,
turn the ignition off.
CAUTION
To help avoid personal injury, keep
the hood closed until there is no
stexam. Escaping steam or coolant is
a sign of very high pressure.
If your engine stalls while
driving
ProCarManuals.com
Page 242 of 282

00 SIENNA(U)
236
Lights
Make sure the headlights, stop lights, tail
lights, turn signal lights, and other lights
are all working. Check headlight aim.
Service reminder indicators and warning
buzzers
Check that all service reminder indicators
and warning buzzers function properly.
Steering wheel
Be alert for changes in steering condition,
such as hard steering or strange noise.
Seats
Check that all seat controls such as seat
adjusters, seatback recliner, etc. operate
smoothly and that all latches lock securely
in any position. Check that the head re-
straints move up and down smoothly and
that the locks hold securely in any latched
position. For folding−down rear seatbacks
and detachable rear seats, check that the
latches lock securely.
Seat belts
Check that the seat belt system such as
buckles, retractors and anchors operate
properly and smoothly. Make sure the belt
webbing is not cut, frayed, worn or dam-
aged.Accelerator pedal
Check the pedal for smooth operation and
uneven pedal effort or catching.
Brake pedal
Check the pedal for smooth operation and
that the pedal has the proper clearance.
Check the brake booster function.
Brakes
At a safe place, check that the brakes do
not pull to one side when applied.
Parking brake
Check that the pedal has the proper travel
and that, on a safe incline, your vehicle
is held securely with only the parking
brake applied.
Automatic transmission “Park” mecha-
nism
On a safe incline, check that your vehicle
is held securely with the selector lever in
“P” position and all brakes released.IN THE ENGINE COMPARTMENT
Items listed below should be checked
from time to time, e.g. each time when
refueling.
Washer fluid
Make sure there is sufficient fluid in the
tank. See Section 7−3 for additional infor-
mation.
Engine coolant level
Make sure the coolant level is between
the “FULL” and “LOW” lines on the see−
through reservoir when the engine is cold.
See Section 7−2 for additional information.
Battery electrolyte level
Make sure the electrolyte level of all bat-
tery cells is between upper and lower lev-
el lines on the case. Add only distilled
water when replenishing. See Section 7−3
for additional information.
Brake fluid level
Make sure the brake fluid level is correct.
See Section 7−2 for additional information.
Engine oil level
Check the level on the dipstick with the
engine turned off and the vehicle parked
on a level spot. See Section 7−2 for addi-
tional information.
ProCarManuals.com
Page 264 of 282

00 SIENNA(U)
258
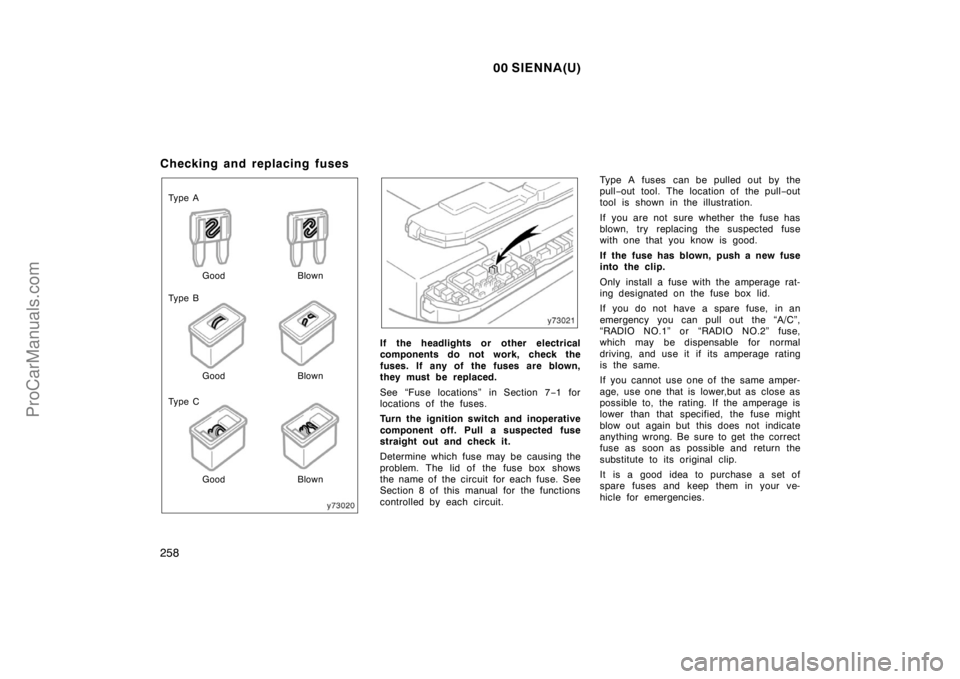
Checking and replacing fuses
Good Ty p e A
Ty p e B
Ty p e CGood Good Blown
Blown
Blown
If the headlights or other electrical
components do not work, check the
fuses. If any of the fuses are blown,
they must be replaced.
See “Fuse locations” in Section 7−1 for
locations of the fuses.
Turn the ignition switch and inoperative
component off. Pull a suspected fuse
straight out and check it.
Determine which fuse may be causing the
problem. The lid of the fuse box shows
the name of the circuit for each fuse. See
Section 8 of this manual for the functions
controlled by each circuit.Type A fuses can be pulled out by the
pull−out tool. The location of the pull−out
tool is shown in the illustration.
If you are not sure whether the fuse has
blown, try replacing the suspected fuse
with one that you know is good.
If the fuse has blown, push a new fuse
into the clip.
Only install a fuse with the amperage rat-
ing designated on the fuse box lid.
If you do not have a spare fuse, in an
emergency you can pull out the “A/C”,
“RADIO NO.1” or “RADIO NO.2” fuse,
which may be dispensable for normal
driving, and use it if its amperage rating
is the same.
If you cannot use one of the same amper-
age, use one that is lower,but as close as
possible to, the rating. If the amperage is
lower than that specified, the fuse might
blow out again but this does not indicate
anything wrong. Be sure to get the correct
fuse as soon as possible and return the
substitute to its original clip.
It is a good idea to purchase a set of
spare fuses and keep them in your ve-
hicle for emergencies.
ProCarManuals.com
Page 266 of 282
00 SIENNA(U)
260
Light bulbsBulb
No.WTy p e
HeadlightsHB260/55A
Parking, front turn
signal and side
marker lights115727/8B
Rear turn signal
lights115627B
Stop and tail lights115727/8B
Back−up lights92118C
License plate lights1685C
High mounted
stoplight92118C
Front personal lights—8D
Front interior light—8D
Rear personal lights—8D
Rear interior light—8D
Vanity mirror lights—3D
Door courtesy lights1943.8C
Luggage
compartment light—5D
A: HB2 halogen bulbs
B: Single end bulbs
C: Wedge base bulbs
D: Double end bulbs
—Headlights
1. Open the hood. Unplug the connec-
tor. Remove the rubber cover.
If the connector is tight, wiggle it.2. Release the bulb retaining spring
and remove the bulb. Install a new
bulb and the bulb retaining spring.
To install a bulb, align the tabs of the
bulb with the cutouts of the mounting
hole.
ProCarManuals.com
Page 267 of 282
00 SIENNA(U)
261
3. Install the rubber cover with the
“TOP” mark upward, and snuggle on
the boss. Then insert the connector.
Make sure the rubber cover fits snugly on
the connector and the headlight body.
Aiming is not necessary after replacing
the bulb. When aiming adjustment is nec-
essary, contact your Toyota dealer.Use a Phillips−head screwdriver.
—Parking, front turn signal
and side marker lights
ProCarManuals.com
Page 268 of 282
00 SIENNA(U)
262
Remove the bolts.a: Rear turn signal light
b: Stop and tail light
Left side of the vehicle
Right side of the vehicle
Remove the strap and handle.
—Rear turn signal and, stop
and tail lights—Stop and tail, and back−up
lights
ProCarManuals.com
Page 269 of 282
00 SIENNA(U)
263
a: Stop and tail light
b: Back−up light
—License plate lights
Use a Phillips−head screwdriver.
ProCarManuals.com
Page 274 of 282

00 SIENNA(U)
268
BATTERY
Open voltage
∗ at 20�C (68�F):
12.6—12.8 V Fully charged
12.2—12.4 V Half charged
11.8—12.0 V Discharged
∗: Voltage that is checked 20 minutes af-
ter the key is removed with all the
lights turned off
Charging rates:
5 A max.
AUTOMATIC TRANSAXLE
Automatic transmission
Fluid capacity (drain and refill),
L (qt., Imp. qt.):
Up to 3.5 (3.7, 3.1)
Fluid type:
Automatic transmission fluid D−ll or
DEXRON�III (DEXRON�II)
Differential
Fluid capacity L (qt., Imp. qt.):
0.8 (0.8, 0.7)
Fluid type:
Automatic transmission fluid D−II or
DEXRON�III (DEXRON�II)BRAKES
Minimum pedal clearance when depressed
with the pressure of 490 N (50 kgf, 110
lbf) with the engine running, mm (in.):
96 (3.8)
Pedal free play, mm (in.):
1—6 (0.04—0.24)
Pad wear limit, mm (in.):
1.0 (0.04)
Lining wear limit, mm (in.):
1.0 (0.04)
Parking brake adjustment when depressed
with the pressure of 294 N (30 kgf, 66
lbf):
3—5 clicks
Fluid type:
SAE J1703 or FMVSS No.116 DOT 3
STEERING
Wheel free play:
Less than 30 mm (1.2 in.)
Power steering fluid type:
Automatic transmission fluid DEXRON�II
or III
ProCarManuals.com