2000 TOYOTA LAND CRUISER wheel
[x] Cancel search: wheelPage 149 of 235
L/C 100_U171
2000 L/C 100 (OM60866U)
CAUTION
Do not overestimate the anti −lock
brake system: Although the anti −lock
brake system assists in providing ve-
hicle control, it is still important to
drive with all due care and maintain
a moderate speed and safe distance
from the vehicle in front of you, be-
cause there are limits to the vehicle
stability and effectiveness of steering
wheel operation even with the anti −
lock brake system on.
If tires grip performance exceeds its
capability, or if hydroplaning occurs
during high speed driving in the rain,
the anti −lock brake system does not
provide vehicle control.
Anti −lock brake system is not de-
signed to shorten the stopping dis-
tance: Always drive at the moderate
speed and maintain a safe distance
from the vehicle in front of you.
Compared with vehicles not fitted
with an anti −lock brake system, your
vehicle may require a longer stopping
distance in the following cases: � Driving on rough, gravel or snow −
covered roads.
� Driving with tire chains installed.
� Driving over the steps such as the
joints on the road.
� Driving on roads where the road
surface is pitted or has other differ-
ences in surface height.
Install all 4 tires of specified size at
designated pressure: The anti −lock
brake system detects vehicle speeds
using the speed sensors for respec-
tive wheels’ turning speeds. The use
of tires other than specified may fail
to detect the accurate turning speed,
resulting in a longer stopping dis-
tance.
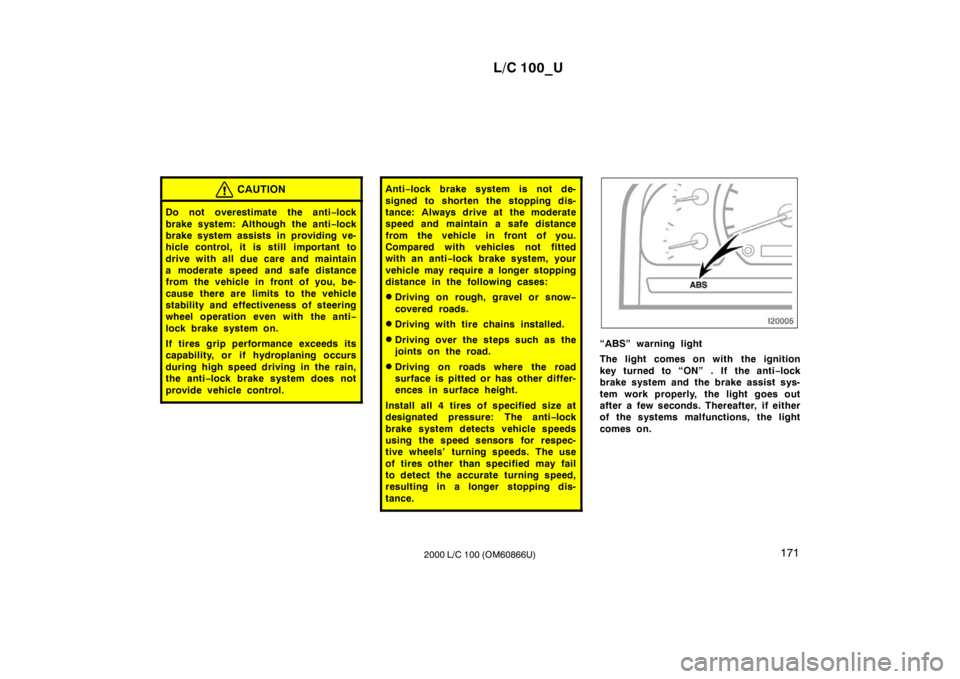
“ABS” warning light
The light comes on with the ignition
key turned to “ON” . If the anti −lock
brake system and the brake assist sys-
tem work properly, the light goes out
after a few seconds. Thereafter, if either
of the systems malfunctions, the light
comes on.
Page 150 of 235
L/C 100_U
172 2000 L/C 100 (OM60866U)
When the “ABS” warning light is on (and
the brake system warning light is off), the
anti
−lock brake system, the brake assist
system, the vehicle skid control system
and/or active traction control system do/
does not operate, but the brake system
still operates conventionally.
When the “ABS” warning light is on (and
the brake system warning light is off), the
anti −lock brake system does not operate
so that the wheels could lock up during
a sudden braking or braking on slippery
road surfaces.
If the following conditions occurs, this
indicates a malfunction somewhere in
the parts monitored by the warning
light system. Contact your Toyota deal-
er as soon as possible to service the
vehicle.
� The light does not come on with the
ignition key turned to “ON”, or remainson.
� The light comes on while driving.
If the light lit during driving goes out and
does not come on again, it is a normal
operation.
CAUTION
If the “ABS” warning light remains on
together with the brake system warn-
ing light, immediately stop your ve-
hicle at a safe place and contact your
Toyota dealer.
In this case, the vehicle may become
harder to control or skid during hard
braking or braking on slippery road
surfaces.
Either of the following conditions may
occur, but do not indicate the malfunc-
tion. � The light may stay on for about 60
seconds after the engine is started. It
is normal if it goes out after a while.
� Depressing the brake pedal repeatedly
may turn on the light. It is normal if it
goes off after a few seconds. DRUM
−IN −DISC TYPE PARKING BRAKE
SYSTEM
Your vehicle has a drum −in −disc type
parking brake system. This type of brake
system n eeds bedding −down of the brake
shoes periodically or whenever the parking
brake shoes and/or drums are replaced.
Have your Toyota dealer perform the bed-
ding −down.
BRAKE ASSIST SYSTEM
When you slam the brakes on, the
brake assist system judges as an emer-
gency stop and provides more powerful
braking for a driver who cannot hold
down the brake pedal firmly.
When you slam the brakes on, more pow-
erful braking will be applied. At this time,
you may hear a sound in the engine
compartment and feel the vibrations of the
brake pedal. This does not indicate a mal-
function.
The brake assist system becomes opera-
tive after the vehicle has accelerated to
a speed in excess of approximately 10
km/h (6 mph). It stops operating when the
vehicle decelerates to a speed below
approximately 5 km/h (3 mph).
Page 153 of 235
L/C 100_U175
2000 L/C 100 (OM60866U)
Limited
−slip differential
Some Toyotas are equipped with a lim-
ited −slip differential. If one of the rear
wheels begins to spin, the limited −slip dif-
ferential is designed to aid traction by
automatically transmitting driving force to
the other rear wheel. If you are not sure
whether your vehicle is equipped with one,
you can ask your Toyota dealer.
CAUTION
Do not start or run the engine while
your vehicle is supported by a jack.
The vehicle could be driven off the
jack and could pose a danger or re-
sult in serious injury.
NOTICE
Use only a spare tire of the same
size, construction and load capacity
as the original tires on your Toyota
because damage to the limited −slip
differential could possibly occur with
another tire type.
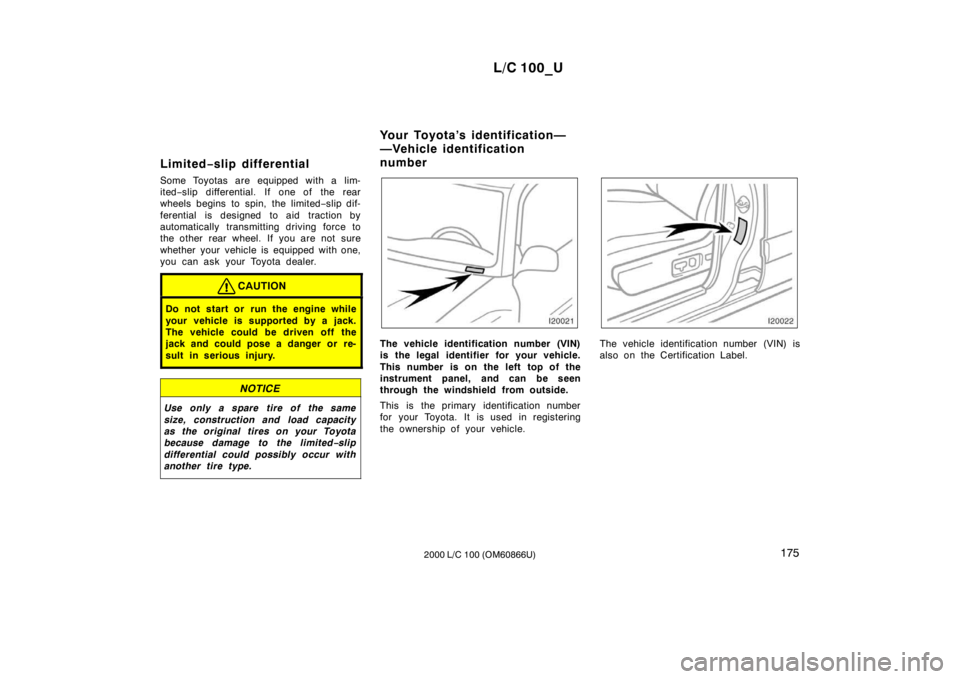
The vehicle identification number (VIN)
is the legal identifier for your vehicle.
This number is on the left top of the
instrument panel, and can be seen
through the windshield from outside.
This is the primary identification number
for your Toyota. It is used in registering
the ownership of your vehicle.The vehicle identification number (VIN) is
also on the Certification Label.
Your Toyota’s identification—
—Vehicle identification
number
Page 155 of 235
L/C 100_U177
2000 L/C 100 (OM60866U)
Types of tires
Determine what kind of tires your ve-
hicle is originally equipped with.
1. Summer tires
Summer tires are high −speed capability
tires best suited to highway driving under
dry conditions.
Since summer tires do not have the same
traction performance as snow tires, sum-
mer tires are inadequate for driving on
snow −covered or icy roads. For driving on
snow −covered or icy roads, we recom-
mend using snow tires. If installing snow
tires, be sure to replace all four tires.
2. All season tires
All season tires are designed to provide
better traction in snow and to be adequate
for driving in most winter conditions, as
well as for use all year round.
All season tires, however, do not have
adequate traction performance compared
with snow tires in heavy or loose snow.
Also, all season tires fall short in accel-
eration and handling performance
compared with summer tires in highway
driving.
CAUTION
� Do not mix summer and all season
tires on your vehicle as this can
cause dangerous handling charac-
teristics, resulting in loss of con-
trol.
� Do not use tire other than the
manufacturer ’s designated tires, and
never mix tires or wheels of the
sizes different from the originally
equipped tires and wheels.
Page 163 of 235
L/C 100_U199
2000 L/C 100 (OM60866U)
CAUTION
Do not attempt to remove the radiator
cap when the engine and radiator are
hot. Serious injury could result from
scalding hot fluid and steam blown
out under pressure.
7. After the engine coolant temperature
has cooled to normal, again check the
coolant level in the reservoir. If neces-
sary, bring it up to half full again. Seri-
ous coolant loss indicates a leak in the
system. You s hould have it checked as
soon as possible at your Toyota dealer. If you have a flat tire—
1. Reduce your speed gradually, keeping a straight line. Move cautiously off the
road to a safe place well away from
the traffic. Avoid stopping on the center
divider of a highway. Park on a level
spot with firm ground.
2. Stop the engine and turn on your emergency flashers.
3. Firmly set the parking brake and put the transmission in ”P”.
4. Have everyone get out of the vehicle on the side away from traffic.
5. Read the following instructions thor- oughly.
CAUTION
When jacking, be sure to observe the
following to reduce the possibility of
personal injury: �Follow jacking instructions.
� Do not put any part of your body
under the vehicle supported by the
jack. Personal injury may occur.
� Do not start or run the engine while
your vehicle is supported by the
jack.
�Stop the vehicle on a level firm
ground, firmly set the parking brake
and put the transmission in reverse.
Block the wheel diagonally opposite
to the one being changed if neces-
sary.
� Make sure to set the jack properly
in the jack point. Raising the ve-
hicle with jack improperly posi-
tioned will damage the vehicle or
may allow the vehicle to fall off the
jack and cause personal injury.
� Never get under the vehicle when
the vehicle is supported by the jack
alone.
� Use the jack only for lifting your
vehicle during wheel changing.
� Do not raise the vehicle with some-
one in the vehicle.
� When raising the vehicle, do not
put an object on or under the jack.
� Raise the vehicle only high enough
to remove and change the tire.
Page 166 of 235
L/C 100_U
202 2000 L/C 100 (OM60866U)
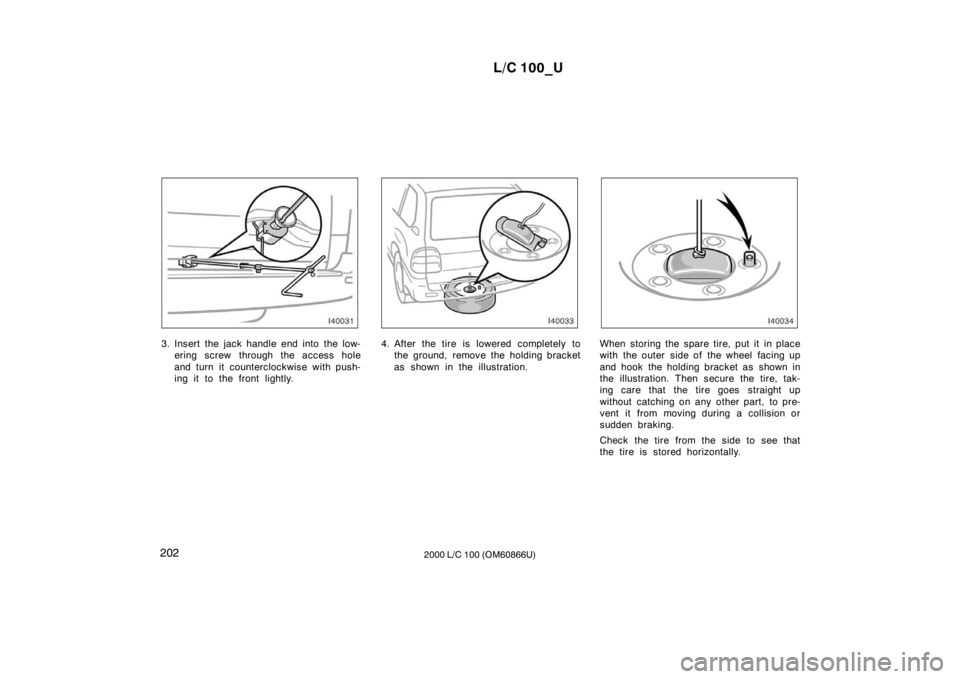
3. Insert the jack handle end into the low-
ering screw through the access hole
and turn it counterclockwise with push-
ing it to the front lightly.4. After the tire is lowered completely tothe ground, remove the holding bracket
as shown in the illustration.When storing the spare tire, put it in place
with the outer side of the wheel facing up
and hook the holding bracket as shown in
the illustration. Then secure the tire, tak-
ing care that the tire goes straight up
without catching on any other part, to pre-
vent it from moving during a collision or
sudden braking.
Check the tire from the side to see that
the tire is stored horizontally.
Page 167 of 235
L/C 100_U203
2000 L/C 100 (OM60866U)
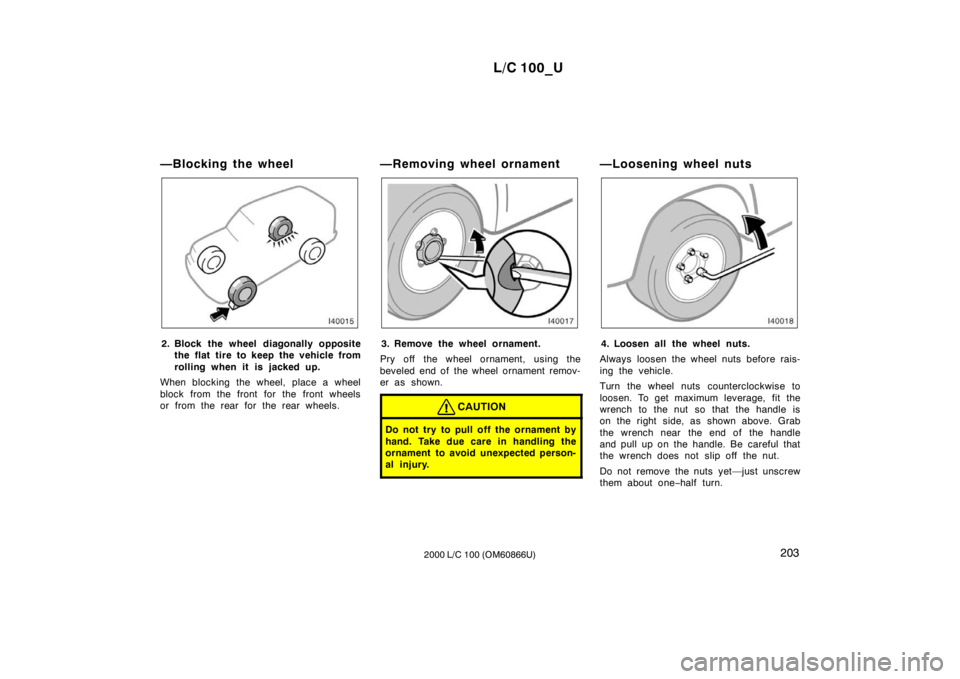
—Blocking the wheel
2. Block the wheel diagonally opposite
the flat tire to keep the vehicle from
rolling when it is j acked up.
When blocking the wheel, place a wheel
block from the front for the front wheels
or from the rear for the rear wheels. —Removing wheel ornament3. Remove the wheel ornament.
Pry off the wheel ornament, using the
beveled end of the wheel ornament remov-
er as shown.
CAUTION
Do not try to pull off the ornament by
hand. Take due care in handling the
ornament to avoid unexpected person-
al injury.
—Loosening wheel nuts
4. Loosen all the wheel nuts.
Always loosen the wheel nuts before rais-
ing the vehicle.
Turn the wheel nuts counterclockwise to
loosen. To get maximum leverage, fit the
wrench to the nut so that the handle is
on the right side, as shown above. Grab
the wrench near the end of the handle
and pull up on the handle. Be careful that
the wrench does not slip off the nut.
Do not remove the nuts yet—just unscrew
them about one −half turn.
Page 170 of 235
L/C 100_U
206 2000 L/C 100 (OM60866U)
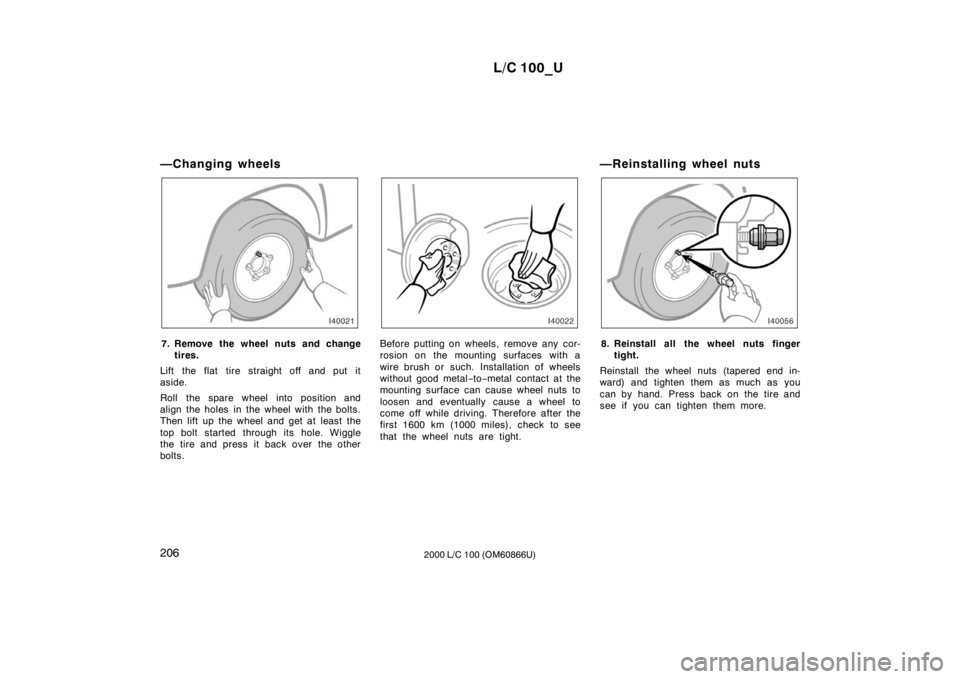
—Changing wheels
7. Remove the wheel nuts and change
tires.
Lift the flat tire straight off and put it
aside.
Roll the spare wheel into position and
align the holes in the wheel with the bolts.
Then lift up the wheel and get at least the
top bolt started through its hole. Wiggle
the tire and press it back over the other
bolts.Before putting on wheels, remove any cor-
rosion on the mounting surfaces with a
wire brush or such. Installation of wheels
without good metal −to −metal contact at the
mounting surface can cause wheel nuts to
loosen and eventually cause a wheel to
come off while driving. Therefore after the
first 1600 km (1000 miles), check to see
that the wheel nuts are tight. —Reinstalling wheel nuts8. Reinstall all the wheel nuts finger
tight.
Reinstall the wheel nuts (tapered end in-
ward) and tighten them as much as you
can by hand. Press back on the tire and
see if you can tighten them more.