2000 TOYOTA LAND CRUISER ignition
[x] Cancel search: ignitionPage 3 of 235
L/C 100_U3
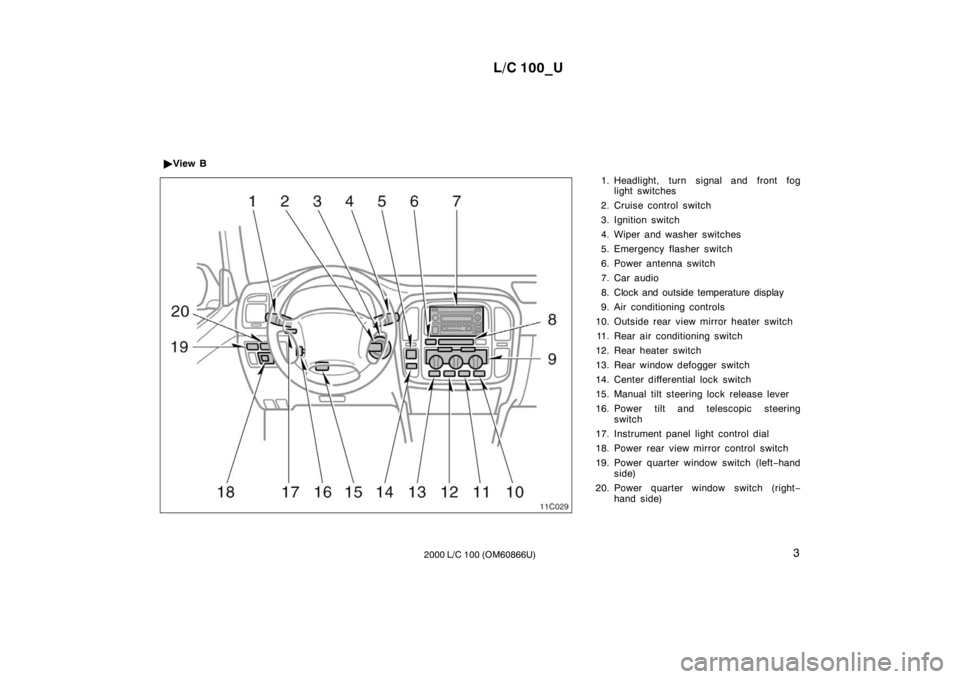
2000 L/C 100 (OM60866U) 1. Headlight, turn signal and front fog
light switches
2. Cruise control switch
3. Ignition switch
4. Wiper and washer switches
5. Emergency flasher switch
6. Power antenna switch
7. Car audio
8. Clock and outside temperature display
9. Air conditioning controls
10. Outside rear view mirror heater switch 11. Rear air conditioning switch
12. Rear heater switch
13. Rear window defogger switch
14. Center differential lock switch
15. Manual tilt steering lock release lever
16. Power tilt and telescopic steering switch
17. Instrument panel light control dial
18. Power rear view mirror control switch
19. Power quarter window switch (left −hand
side)
20. Power quarter window switch (right −
hand side)
�
View B
Page 31 of 235
L/C 100_U53
2000 L/C 100 (OM60866U)
NOTICE
Do not perform any of the following
changes without consulting your
Toyota dealer. Such changes can
interfere with proper operation of the
seat belt pretensioners in somecases. � Installation of electronic devices
such as a mobile two −way radio,
cassette tape player or compact
disc player
� Repairs on or near the front seat
belt retractor assemblies
� Modification of the suspension sys-
tem
� Modification of the front end struc-
ture
� Attachment of a grille guard (bull
bar, kangaroo bar, etc.), snowplow,
winches or any other equipment to
the front end
� Repairs made on or near the front
fenders, front end structure or con-
sole
This front seat belt pretensioner system
has a service reminder indicator to inform
the driver of operating problems. If either
of the following conditions occurs, this
indicates a malfunction of the airbags or
pretensioners. Contact your Toyota dealer
as soon as possible to service the
vehicle.
� The light does not come on when the
ignition key is turned to the ”ACC” or
”ON” position, or remains on.
� The light comes on or flashes while
driving.
� If either front seat belt does not retract
or can not be pulled out due to a
malfunction or activation of the preten-
sioner. �
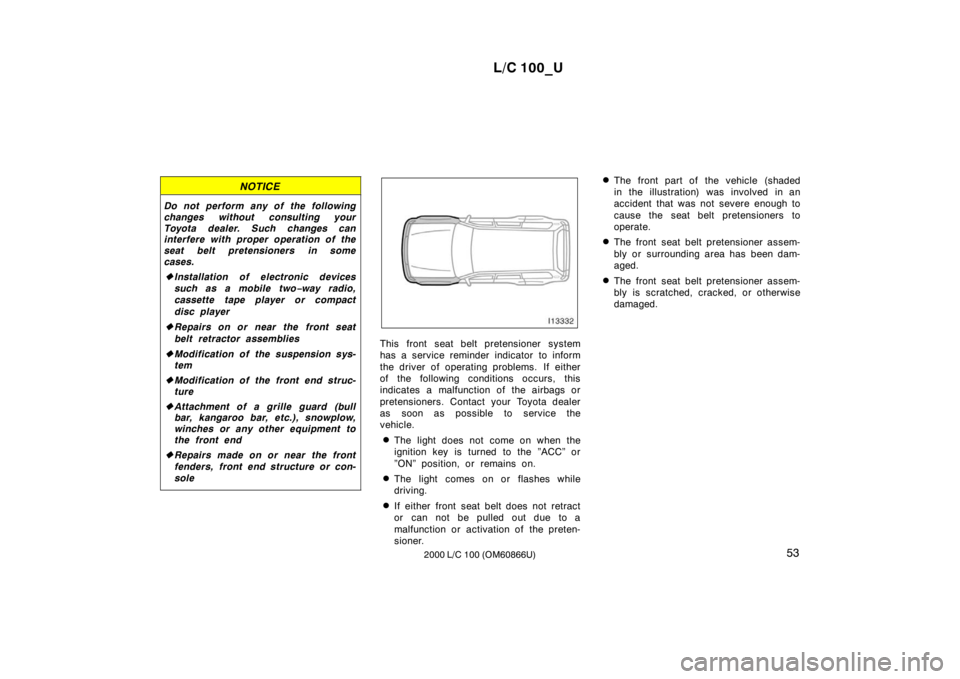
The front part of the vehicle (shaded
in the illustration) was involved in an
accident that was not severe enough to
cause the seat belt pretensioners to
operate.
� The front seat belt pretensioner assem-
bly or surrounding area has been dam- aged.
� The front seat belt pretensioner assem-
bly is scratched, cracked, or otherwise
damaged.
Page 38 of 235
L/C 100_U
60 2000 L/C 100 (OM60866U)
NOTICE
Do not perform any of the following
changes without consulting your
Toyota dealer. Such changes can
interfere with proper operation of the
SRS airbag system in some cases. �Installation of electronic devices
such as a mobile two −way radio,
cassette tape player or compact
disc player
� Modification of the suspension sys-
tem
� Modification of the front end struc-
ture
� Attachment of a grille guard (bull
bar, kangaroo bar, etc.), snowplow,
winches or any other equipment to
the front end
� Repairs made on or near the front
fenders, front end structure, con-
sole, steering column, steering
wheel or dashboard near the front
passenger airbag
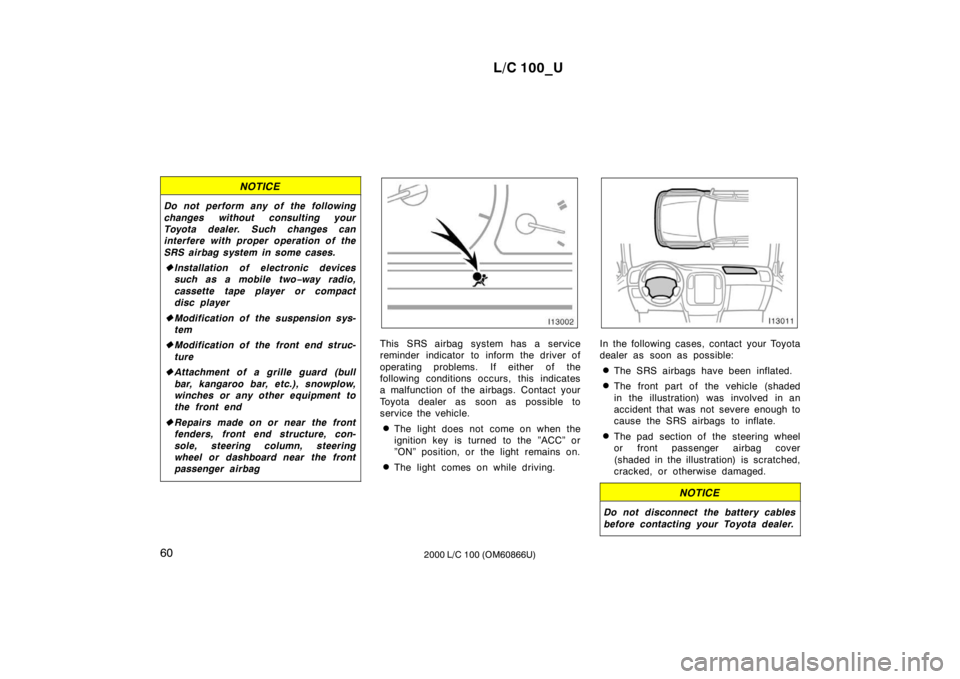
This SRS airbag system has a service
reminder indicator to inform the driver of
operating problems. If either of the
following conditions occurs, this indicates
a malfunction of the airbags. Contact your
Toyota dealer as soon as possible to
service the vehicle.
� The light does not come on when the
ignition key is turned to the ”ACC” or
”ON” position, or the light remains on.
� The light comes on while driving.In the following cases, contact your Toyota
dealer as soon as possible:
� The SRS airbags have been inflated.
� The front part of the vehicle (shaded
in the illustration) was involved in an
accident that was not severe enough to
cause the SRS airbags to inflate.
� The pad section of the steering wheel
or front passenger airbag cover
(shaded in the illustration) is scratched,
cracked, or otherwise damaged.
NOTICE
Do not disconnect the battery cables
before contacting your Toyota dealer.
Page 55 of 235
L/C 100_U77
2000 L/C 100 (OM60866U)
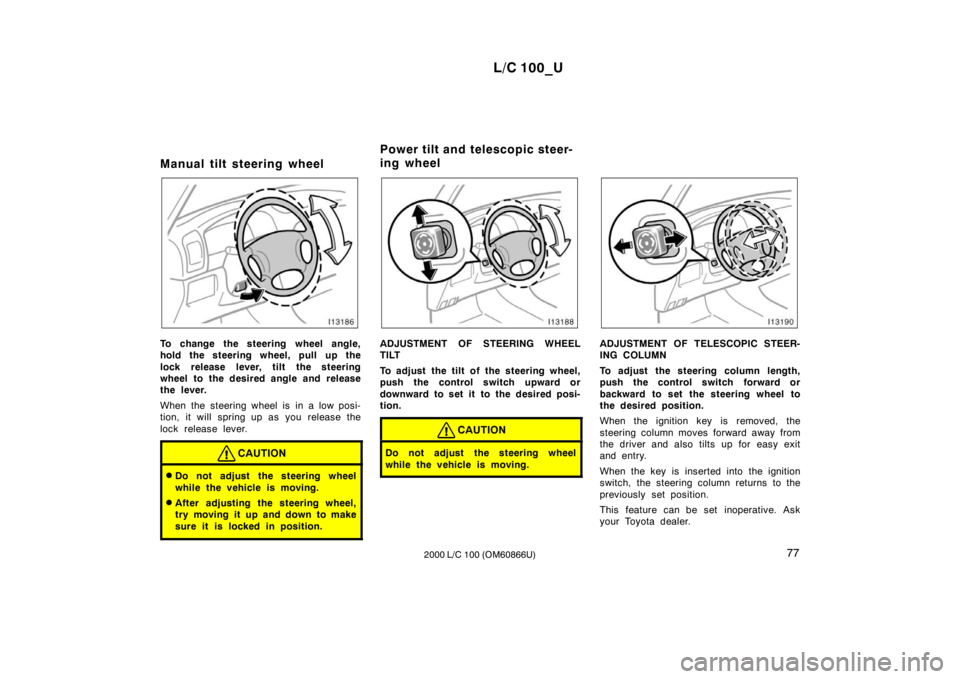
Manual tilt steering wheel
To change the steering wheel angle,
hold the steering wheel, pull up the
lock release lever, tilt the steering
wheel to the desired angle and release
the lever.
When the steering wheel is in a low posi-
tion, it will spring up as you release the
lock release lever.
CAUTION
�
Do not adjust the steering wheel
while the vehicle is moving.
� After adjusting the steering wheel,
try moving it up and down to make
sure it is locked in position.
ADJUSTMENT OF STEERING WHEEL
TILT
To adjust the tilt of the steering wheel,
push the control switch upward or
downward to set it to the desired posi-
tion.
CAUTION
Do not adjust the steering wheel
while the vehicle is moving.
ADJUSTMENT OF TELESCOPIC STEER-
ING COLUMN
To adjust the steering column length,
push the control switch forward or
backward to set the steering wheel to
the desired position.
When the ignition key is removed, the
steering column moves forward away from
the driver and also tilts up for easy exit
and entry.
When the key is inserted into the ignition
switch, the steering column returns to the
previously set position.
This feature can be set inoperative. Ask
your Toyota dealer.
Power tilt and telescopic steer-
ing wheel
Page 61 of 235

L/C 100_U83
2000 L/C 100 (OM60866U) OPERATION OF INSTRUMENTS AND
CONTROLS
Lights, Wipers and Defogger
Headlight and turn signals84
. . . . . . . . . . . . . . . . . . . . . . . . . . . . . . . . . . . .
Emergency flashers85
. . . . . . . . . . . . . . . . . . . . . . . . . . . . . . . . . . . . . . . . . .
Instrument panel light control86
. . . . . . . . . . . . . . . . . . . . . . . . . . . . . . . . .
Front fog lights86
. . . . . . . . . . . . . . . . . . . . . . . . . . . . . . . . . . . . . . . . . . . . . .
Interior lights87
. . . . . . . . . . . . . . . . . . . . . . . . . . . . . . . . . . . . . . . . . . . . . . . .
Personal lights88
. . . . . . . . . . . . . . . . . . . . . . . . . . . . . . . . . . . . . . . . . . . . . .
Center interior and personal lights88
. . . . . . . . . . . . . . . . . . . . . . . . . . . . .
Ignition switch light89
. . . . . . . . . . . . . . . . . . . . . . . . . . . . . . . . . . . . . . . . . .
Windshield wipers and washer90
. . . . . . . . . . . . . . . . . . . . . . . . . . . . . . . .
Rear window wiper and washer90
. . . . . . . . . . . . . . . . . . . . . . . . . . . . . . .
Rear window defogger91
. . . . . . . . . . . . . . . . . . . . . . . . . . . . . . . . . . . . . . .
Outside rear view mirror heaters 92 . . . . . . . . . . . . . . . . . . . . . . . . . . . . . . . SECTION
1− 4
Page 62 of 235
L/C 100_U
84 2000 L/C 100 (OM60866U)
Headlight and turn signals
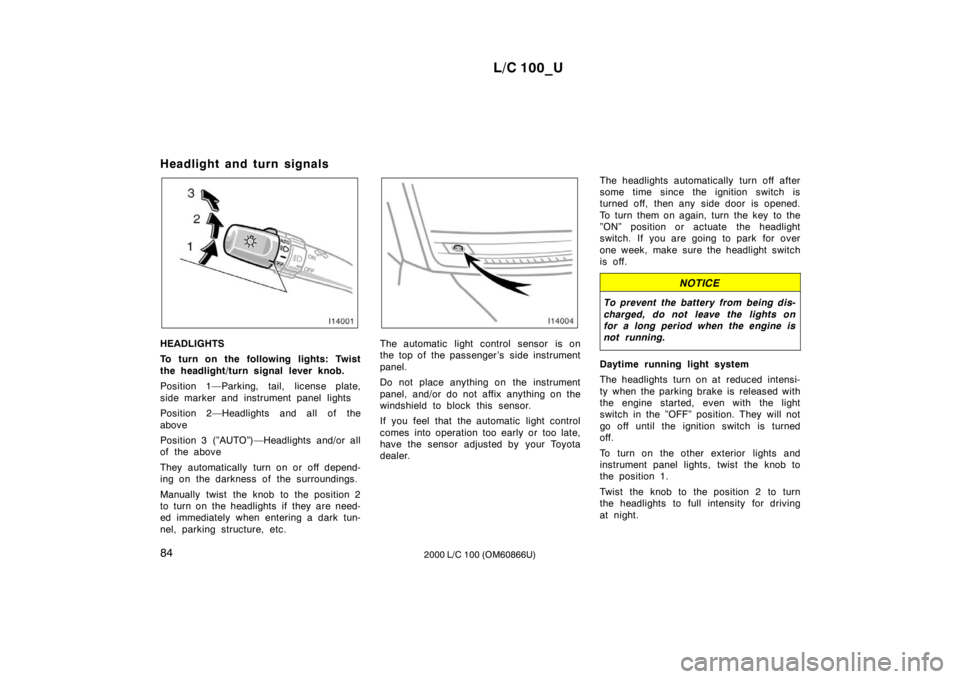
HEADLIGHTS
To turn on the following lights: Twist
the headlight/turn signal lever knob.
Position 1—Parking, tail, license plate,
side marker and instrument panel lights
Position 2—Headlights and all of the
above
Position 3 (”AUTO”)—Headlights and/or all
of the above
They automatically turn on or off depend-
ing on the darkness of the surroundings.
Manually twist the knob to the position 2
to turn on the headlights if they are need-
ed immediately when entering a dark tun-
nel, parking structure, etc.The automatic light control sensor is on
the top of the passenger ’s side instrument
panel.
Do not place anything on the instrument
panel, and/or do not affix anything on the
windshield to block this sensor.
If you feel that the automatic light control
comes into operation too early or too late,
have the sensor adjusted by your Toyota
dealer.
The headlights automatically turn off after
some time since the ignition switch is
turned off, then any side door is opened.
To turn them on again, turn the key to the
”ON” position or actuate the headlight
switch. If you are going to park for over
one week, make sure the headlight switch
is off.
NOTICE
To prevent the battery from being dis-
charged, do not leave the lights on
for a long period when the engine is
not running.
Daytime running light system
The headlights turn on at reduced intensi-
ty when the parking brake is released with
the engine started, even with the light
switch in the ”OFF” position. They will not
go off until the ignition switch is turned
off.
To turn on the other exterior lights and
instrument panel lights, twist the knob to
the position 1.
Twist the knob to the position 2 to turn
the headlights to full intensity for driving
at night.
Page 65 of 235
L/C 100_U87
2000 L/C 100 (OM60866U)
Interior lights
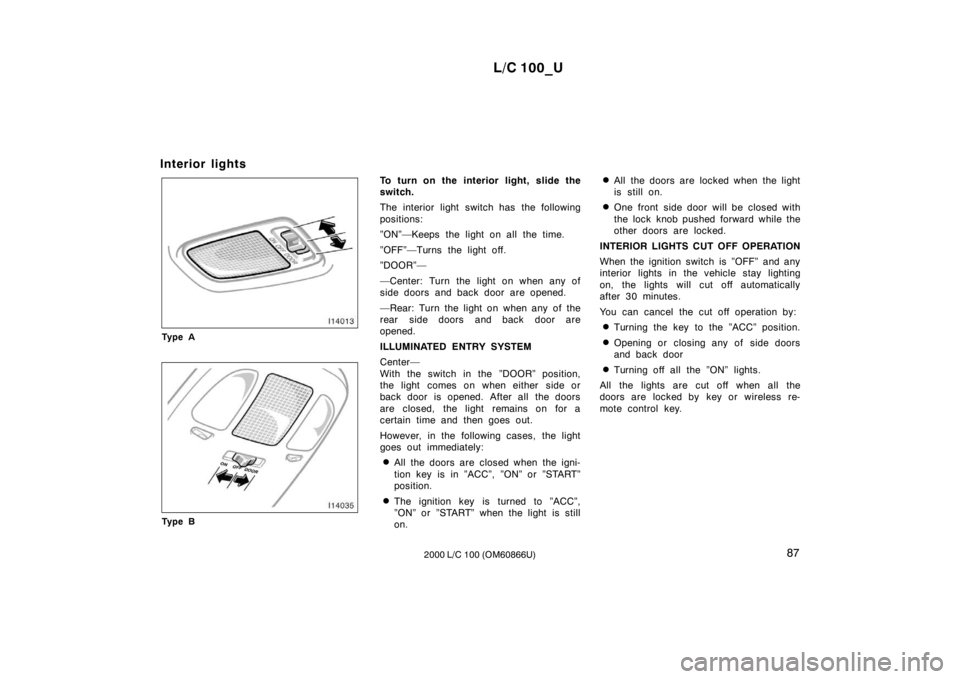
Ty p e A
Ty p e B
To turn on the interior light, slide the
switch.
The interior light switch has the following
positions:
”ON”—Keeps the light on all the time.
”OFF”—Turns the light off.
”DOOR”—
—Center: Turn the light on when any of
side doors and back door are opened.
—Rear: Turn the light on when any of the
rear side doors and back door areopened.
ILLUMINATED ENTRY SYSTEM
Center—
With the switch in the ”DOOR” position,
the light comes on when either side or
back door is opened. After all the doors
are closed, the light remains on for a
certain time and then goes out.
However, in the following cases, the light
goes out immediately:
� All the doors are closed when the igni-
tion key is in ”ACC”, ”ON” or ”START”
position.
� The ignition key is turned to ”ACC”,
”ON” or ”START” when the light is stillon. �
All the doors are locked when the light
is still on.
� One front side door will be closed with
the lock knob pushed forward while the
other doors are locked.
INTERIOR LIGHTS CUT OFF OPERATION
When the ignition switch is ”OFF” and any
interior lights in the vehicle stay lighting
on, the lights will cut off automatically
after 30 minutes.
You can cancel the cut off operation by: � Turning the key to the ”ACC” position.
� Opening or closing any of side doors
and back door
� Turning off all the ”ON” lights.
All the lights are cut off when all the
doors are locked by key or wireless re-
mote control key.
Page 66 of 235
L/C 100_U
88 2000 L/C 100 (OM60866U)
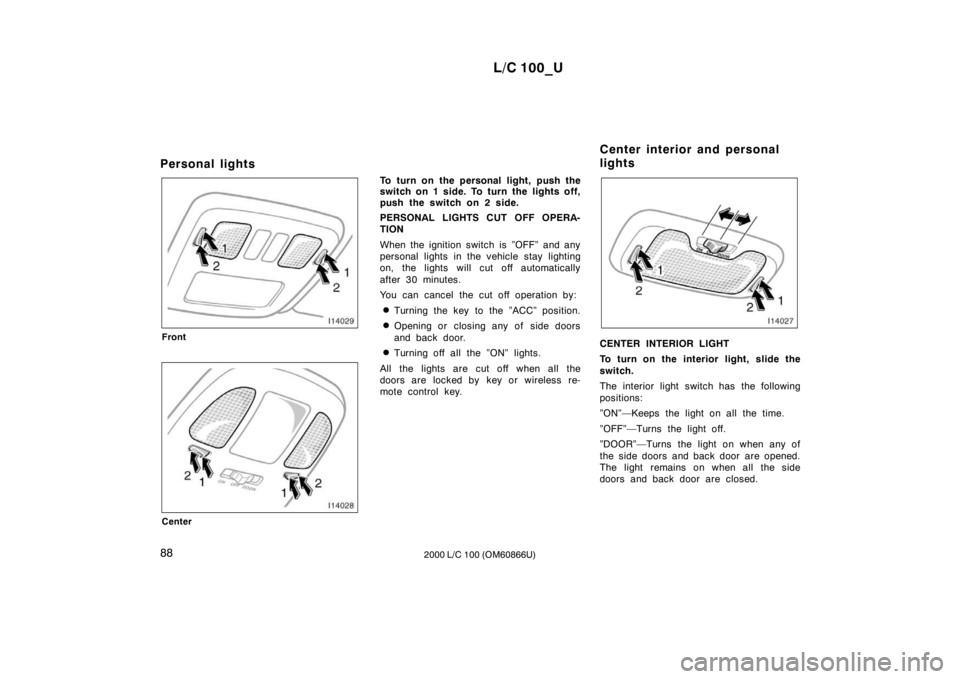
Personal lights
Front
Center
To turn on the personal light, push the
switch on 1 side. To turn the lights off,
push the switch on 2 side.
PERSONAL LIGHTS CUT OFF OPERA-
TION
When the ignition switch is ”OFF” and any
personal lights in the vehicle stay lighting
on, the lights will cut off automatically
after 30 minutes.
You can cancel the cut off operation by:
� Turning the key to the ”ACC” position.
� Opening or closing any of side doors
and back door.
� Turning off all the ”ON” lights.
All the lights are cut off when all the
doors are locked by key or wireless re-
mote control key.
CENTER INTERIOR LIGHT
To turn on the interior light, slide the
switch.
The interior light switch has the following
positions:
”ON”—Keeps the light on all the time.
”OFF”—Turns the light off.
”DOOR”—Turns the light on when any of
the side doors and back door are opened.
The light remains on when all the side
doors and back door are closed.
Center interior and personal
lights