Page 182 of 256
Celica_U
1812000 CELICA (OM20735U)
—Removing wheel ornament
Steel wheels
Aluminum wheels
3. Remove the wheel ornament.
Pry off the wheel ornament, using the
beveled end of the wheel nut wrench as
shown.
CAUTION
Do not try to pull off the ornament by
hand. Take due care in handling the
ornament to avoid unexpected person-
al injury.
—Loosening wheel nuts
4. Loosen all the wheel nuts.
Always loosen the wheel nuts before rais-
ing the vehicle.
Turn the wheel nuts counterclockwise to
loosen. To get maximum leverage, fit the
wrench to the nut so that the handle is
on the right side, as shown above. Grab
the wrench near the end of the handle
and pull up on the handle. Be careful that
the wrench does not slip off the nut.
Do not remove the nuts yet—just unscrew
them about one—half turn.
ProCarManuals.com
Page 183 of 256

Celica_U
1822000 CELICA (OM20735U)
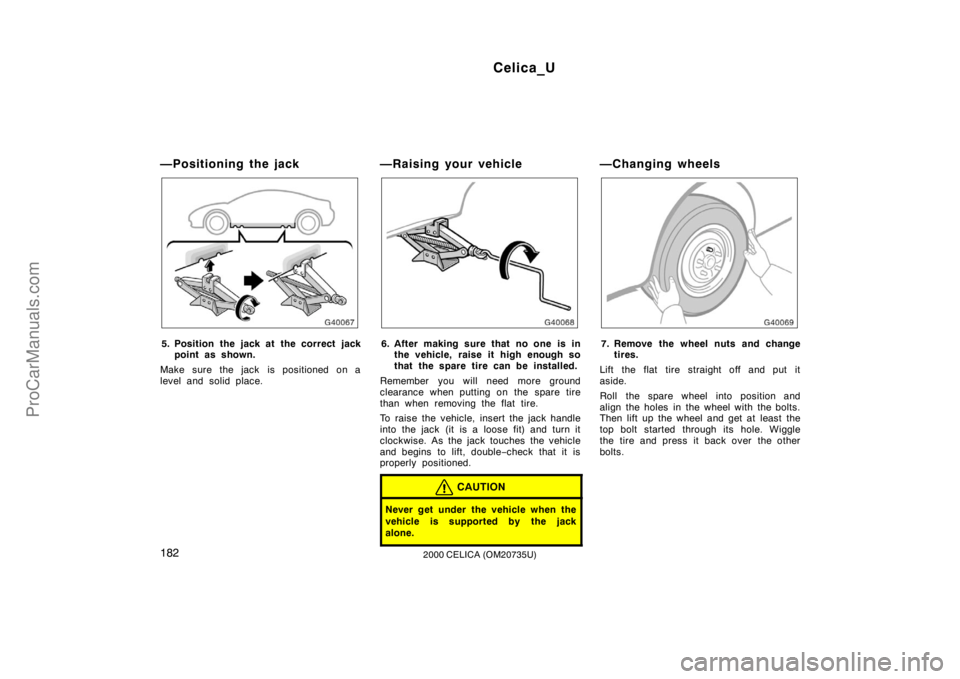
—Positioning the jack
5. Position the jack at the correct jackpoint as shown.
Make sure the jack is positioned on a
level and solid place.
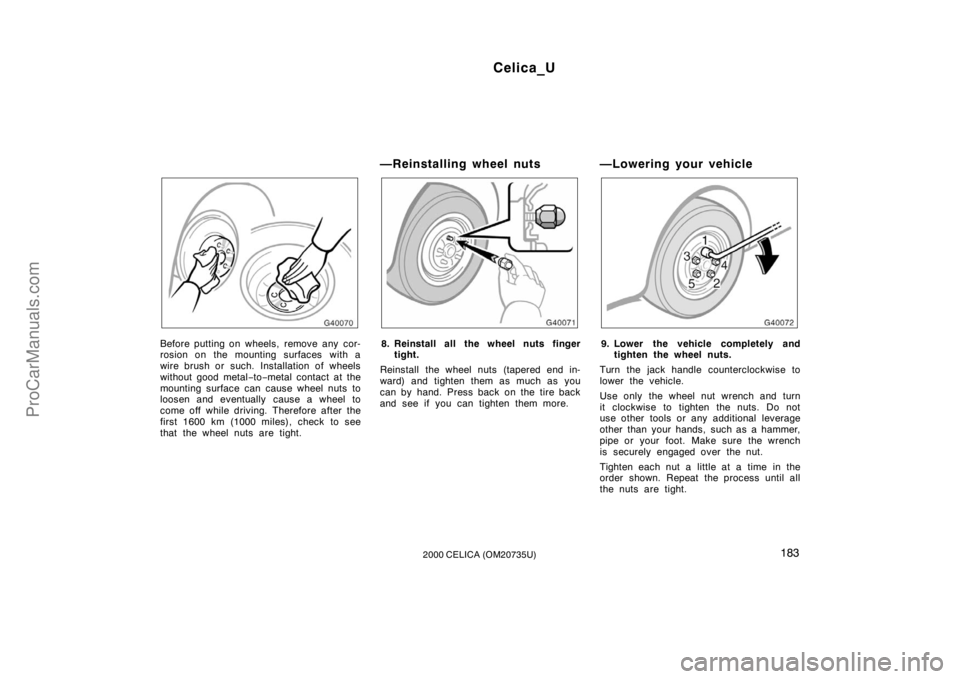
—Raising your vehicle
6. After making sure that no one is in the vehicle, raise it high enough so
that the spare tire can be installed.
Remember you will need more ground
clearance when putting on the spare tire
than when removing the flat tire.
To raise the vehicle, insert the jack handle
into the jack (it is a loose fit) and turn it
clockwise. As the jack touches the vehicle
and begins to lift, double −check that it is
properly positioned.
CAUTION
Never get under the vehicle when the
vehicle is supported by the jack
alone.
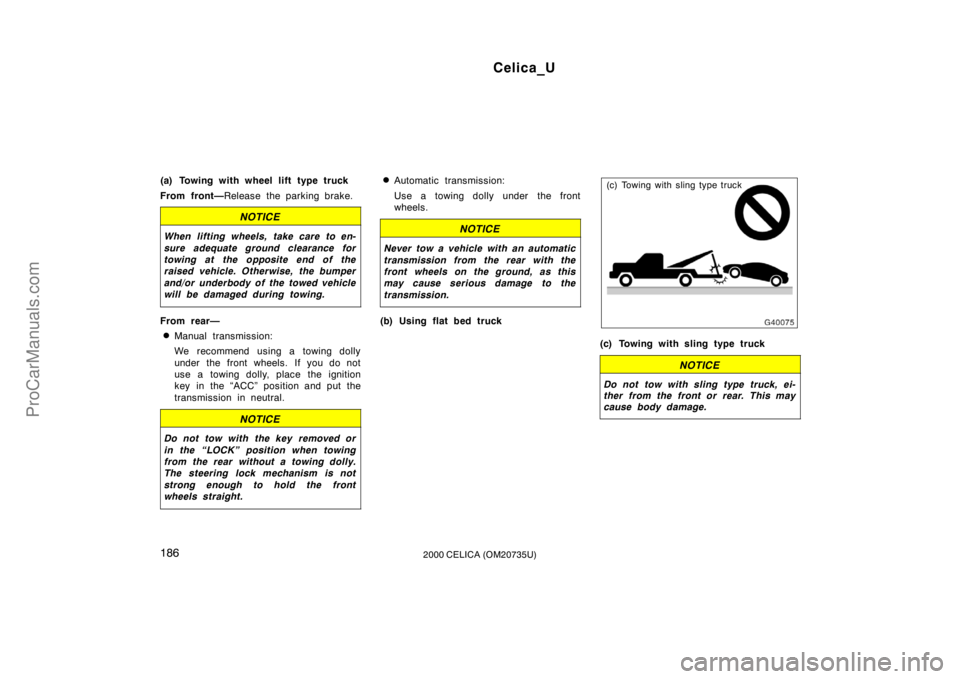
—Changing wheels
7. Remove the wheel nuts and change tires.
Lift the flat tire straight off and put it
aside.
Roll the spare wheel into position and
align the holes in the wheel with the bolts.
Then lift up the wheel and get at least the
top bolt started through its hole. Wiggle
the tire and press it back over the other
bolts.
ProCarManuals.com
Page 184 of 256

Celica_U
1832000 CELICA (OM20735U)
Before putting on wheels, remove any cor-
rosion on the mounting surfaces with a
wire brush or such. Installation of wheels
without good metal−to −metal contact at the
mounting surface can cause wheel nuts to
loosen and eventually cause a wheel to
come off while driving. Therefore after the
first 1600 km (1000 miles), check to see
that the wheel nuts are tight.
—Reinstalling wheel nuts
8. Reinstall all the wheel nuts finger tight.
Reinstall the wheel nuts (tapered end in-
ward) and tighten them as much as you
can by hand. Press back on the tire back
and see if you can tighten them more.
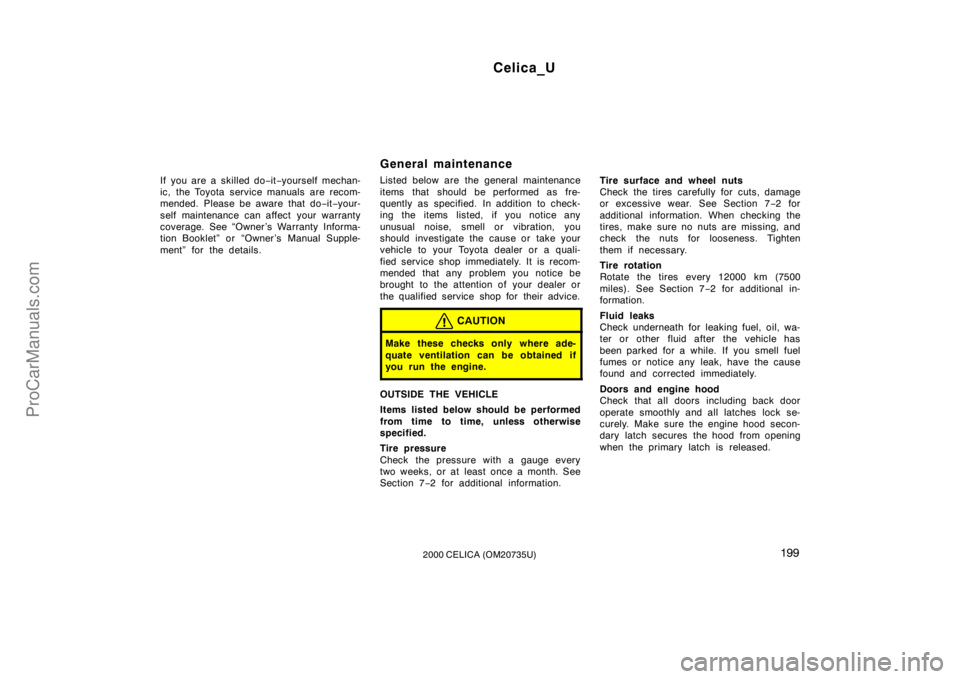
—Lowering your vehicle
9. Lower the vehicle completely and tighten the wheel nuts.
Turn the jack handle counterclockwise to
lower the vehicle.
Use only the wheel nut wrench and turn
it clockwise to tighten the nuts. Do not
use other tools or any additional leverage
other than your hands, such as a hammer,
pipe or your foot. Make sure the wrench
is securely engaged over the nut.
Tighten each nut a little at a time in the
order shown. Repeat the process until all
the nuts are tight.
ProCarManuals.com
Page 187 of 256

Celica_U
1862000 CELICA (OM20735U)
(a) Towing with wheel lift type truck
From front—Release the parking brake.
NOTICE
When lifting wheels, take care to en-
sure adequate ground clearance for
towing at the opposite end of the
raised vehicle. Otherwise, the bumper
and/or underbody of the towed vehicle
will be damaged during towing.
From rear—
�Manual transmission:
We recommend using a towing dolly
under the front wheels. If you do not
use a towing dolly, place the ignition
key in the “ACC” position and put the
transmission in neutral.
NOTICE
Do not tow with the key removed or
in the “LOCK” position when towing
from the rear without a towing dolly.
The steering lock mechanism is not
strong enough to hold the front
wheels straight.
�Automatic transmission:
Use a towing dolly under the front
wheels.
NOTICE
Never tow a vehicle with an automatic
transmission from the rear with the
front wheels on the ground, as this
may cause serious damage to the
transmission.
(b) Using flat bed truck
(c) Towing with sling type truck
(c) Towing with sling type truck
NOTICE
Do not tow with sling type truck, ei-
ther from the front or rear. This may
cause body damage.
ProCarManuals.com
Page 189 of 256
Celica_U
1882000 CELICA (OM20735U)
CAUTION
If the engine is not running, the pow-
er assist for the brakes and steering
will not work so steering and braking
will be much harder than usual.
If you cannot shift the selector lever
out of “P” position to other positions
even though the brake pedal is de-
pressed, use the shift lock override but-
ton as follows:1. Turn the ignition key to “LOCK” position. Make sure the parking
brake is on.
2. Pry up the cover with a flat −bladed
screwdriver or equivalent.3. Insert your finger into the hole to push down the shift lock override
button. You can shift out of “P”
position only while pushing the but-
ton.
4. Shift into “N” position.
5. Insert the cover.
6. Start the engine. For your safety, keep the brake pedal depressed.
Be sure to have the system checked by
your Toyota dealer as soon as possible.
If you cannot shift automatic
transmission selector lever
ProCarManuals.com
Page 190 of 256

Celica_U
1892000 CELICA (OM20735U)
If you lose your keys
You can purchase a new key at your
Toyota dealer if you can give them the
key number.
See the suggestion given in “Keys” in
Section 1−2.
If your keys are locked in the vehicle and
you cannot get a duplicate, many Toyota
dealers can still open the door for you,
using their special tools. If you must
break a window to get in, we suggest
breaking the smallest side window be-
cause it is the least expensive to replace.
Be extremely cautious to avoid cuts from
the glass. You can purchase a new wireless re-
mote control transmitter at your Toyota
dealer.
Have the registered identification numbers
of your transmitters deleted from your ve-
hicle by your Toyota dealer as soon as
possible to avoid the possibility of theft or
an accident. Then, have the identification
number of your new transmitter registered.
At the same time, you must bring all of
the remaining transmitters to have them
registered again as well.
You can use the wireless remote control
system with the new transmitter. Contact
your Toyota dealer for detailed information.
If you lose your wireless
remote control transmitter
ProCarManuals.com
Page 200 of 256

Celica_U
1992000 CELICA (OM20735U)
If you are a skilled do−it−yourself mechan-
ic, the Toyota service manuals are recom-
mended. Please be aware that do −it−your-
self maintenance can affect your warranty
coverage. See “Owner ’s Warranty Informa-
tion Booklet” or “Owner ’s Manual Supple-
ment” for the details.
General maintenance
Listed below are the general maintenance
items that should be performed as fre-
quently as specified. In addition to check-
ing the items listed, if you notice any
unusual noise, smell or vibration, you
should investigate the cause or take your
vehicle to your Toyota dealer or a quali-
fied service shop immediately. It is recom-
mended that any problem you notice be
brought to the attention of your dealer or
the qualified service shop for their advice.
CAUTION
Make these checks only where ade-
quate ventilation can be obtained if
you run the engine.
OUTSIDE THE VEHICLE
Items listed below should be performed
from time to time, unless otherwise
specified.
Tire pressure
Check the pressure with a gauge every
two weeks, or at least once a month. See
Section 7 −2 for additional information. Tire surface and wheel nuts
Check the tires carefully for cuts, damage
or excessive wear. See Section 7
−2 for
additional information. When checking the
tires, make sure no nuts are missing, and
check the nuts for looseness. Tighten
them if necessary.
Tire rotation
Rotate the tires every 12000 km (7500
miles). See Section 7 −2 for additional in-
formation.
Fluid leaks
Check underneath for leaking fuel, oil, wa-
ter or other fluid after the vehicle has
been parked for a while. If you smell fuel
fumes or notice any leak, have the cause
found and corrected immediately.
Doors and engine hood
Check that all doors including back door
operate smoothly and all latches lock se-
curely. Make sure the engine hood secon-
dary latch secures the hood from opening
when the primary latch is released.
ProCarManuals.com
Page 201 of 256

Celica_U
2002000 CELICA (OM20735U)
INSIDE THE VEHICLE
Items listed below should be checked
regularly, e.g. while performing periodic
services, cleaning the vehicle, etc.
Lights
Make sure the headlights, stop lights, tail
lights, turn signal lights, and other lights
are all working.
Service reminder indicators and warning
buzzers
Check that all service reminder indicators
and warning buzzers function properly.
Steering wheel
Be alert for changes in steering condition,
such as hard steering or strange noise.
Seats
Check that all front seat controls such as
seat adjusters, seatback recliner, etc. op-
erate smoothly and that all latches lock
securely in any position. For folding−down
rear seatbacks, check that the latches
lock securely.
Seat belts
Check that the seat belt system such as
buckles, retractors and anchors operate
properly and smoothly. Make sure the belt
webbing is not cut, frayed, worn or dam-
aged. Accelerator pedal
Check the pedal for smooth operation and
uneven pedal effort or catching.
Clutch pedal
Check the pedal for smooth operation.
Brake pedal
Check the pedal for smooth operation and
that the pedal has the proper clearance.
Check the brake booster function.
Brakes
At a safe place, check that the brakes do
not pull to one side when applied.
Parking brake
Check that the lever has the proper travel
and that, on a safe incline, your vehicle
is held securely with only the parking
brake applied.
Automatic transmission “Park” mecha-
nism
Check the lock release button of the se-
lector lever for proper and smooth opera-
tion. On a safe incline, check that your
vehicle is held securely with the selector
lever in “P” position and all brakes re-
leased.
IN THE ENGINE COMPARTMENT
Items listed below should be checked
from time to time, e.g. each time when
refueling.
Washer fluid
Make sure there is sufficient fluid in the
tank. See Section 7
−3 for additional infor-
mation.
Engine coolant level
Make sure the coolant level is between
the “FULL” and “LOW” lines on the see −
through reservoir when the engine is cold.
See Section 7 −2 for additional information.
Battery electrolyte level
Make sure the electrolyte level of all bat-
tery cells is between upper and lower lev-
el lines on the case. Add only distilled
water when replenishing. See Section 7 −3
for additional information.
Brake fluid level
Make sure the brake fluid level is correct.
See Section 7 −2 for additional information.
Engine oil level
Check the level on the dipstick with the
engine turned off and the vehicle parked
on a level spot. See Section 7 −2 for addi-
tional information.
ProCarManuals.com