Page 497 of 698
![SUZUKI SWIFT 2000 1.G RG413 Service Workshop Manual 6-128 ENGINE GENERAL INFORMATION AND DIAGNOSIS
TABLE B-7 RADIATOR FAN CONTROL SYSTEM CHECK
INSPECTION
1. Radiator fan relay No.1 3. Radiator fan relay No.3 [A] : Case of TYPE A is shown (See NOTE)
2. SUZUKI SWIFT 2000 1.G RG413 Service Workshop Manual 6-128 ENGINE GENERAL INFORMATION AND DIAGNOSIS
TABLE B-7 RADIATOR FAN CONTROL SYSTEM CHECK
INSPECTION
1. Radiator fan relay No.1 3. Radiator fan relay No.3 [A] : Case of TYPE A is shown (See NOTE)
2.](/manual-img/20/7606/w960_7606-496.png)
6-128 ENGINE GENERAL INFORMATION AND DIAGNOSIS
TABLE B-7 RADIATOR FAN CONTROL SYSTEM CHECK
INSPECTION
1. Radiator fan relay No.1 3. Radiator fan relay No.3 [A] : Case of TYPE A is shown (See NOTE)
2. Radiator fan relay No.2 4. Radiator fan [B] : Case of TYPE B is shown (See NOTE)
BATT
80A30A
15A
BLKBLU/WHT
ECM
BLK/ORN
BLK/ORNC42-1
C42-3
L+
L–
H– H+
BLU
C42 (31P) C41 (24P) G02 (17P)1 2 3 4 5 6 7 8 9
10 11 12 13 14 15 16 17 18 19 20 21
22 23 24 25 26 28 27 29 30 315 6
1 2 3 4 5 6 7
11 12
9 10 11 13 12 14 15 16
16 171 2
7 8
13 14 3 4
9 10
15 17 188
19 20 21 22 23 24
C41-18
GRN/RED [B]PPL/YEL [A]
BLK/RED
BLU/WHT
BLU/RED
BLK
BLU
BLU/BLK
PPL/YEL
BLU/REDBLK/YEL
BRN/WHT
1
2
34
G02-3 [A]
C41-9 [B]
NOTE:
For TYPE A and TYPE B, refer to NOTE in “ECM VOLTAGE VALUES TABLE” for applicable model.
Step Action Yes No
1 Check Fan Control System.
1) Connect scan tool to DLC with ignition switch OFF.
2) Start engine and select “DATA LIST” mode on scan
tool.
3) Warm up engine until coolant temp. is 97.5°C, 208°F or
higher and A/C switch turn OFF. (If engine coolant
temp. does not rise, check engine cooling system or
ECT sensor.) See Fig. 1.
Is radiator cooling fan started when engine coolant temp.
reached above temp.?Radiator cooling fan
control system is in
good condition.Go to Step 2.
2 Check Radiator Fan Relay and Its Circuit.
1) Check DTC and pending DTC with scan tool.
Is DTC P0480 displayed?Go to DTC P0480 Diag.
Flow Table.Go to Step 3.
3 Check Radiator Fan Relays.
1) Turn ignition switch OFF and remove radiator cooling
fan relays. (No.1 – No.3)
2) Check for proper connection to relay at terminals “c”
and “d”.
3) If OK, check that there is continuity between “c” and “d”
when battery is connected to terminals “a” and “b”. See
Fig. 2.
Is check result satisfactory?Go to Step 4. Replace radia-
tor fan relay(s).
Page 510 of 698

ENGINE MECHANICAL (M13 ENGINE) 6A1-9
VALVE LASH (CLEARANCE)
INSPECTION
1) Remove negative cable at battery.
2) Remove cylinder head cover referring to “CYLINDER HEAD
COVER”.
3) Remove right side engine cover if necessary.
4) Using 17 mm wrench, turn crankshaft pulley (1) clockwise
until cam lobes (2) become perpendicular to shim faces (3)
at valves “1” and “7” as shown in figure.
5) Check valve lashes with thickness gauge (4) according to
the following procedure.
a) Check valve lashes at valves “1” and “7”.
b) Turn camshafts by 90° (by turning crankshaft with wrench).
c) Make sure that cam lobes are perpendicular to shim faces
at valves to be checked (in this case, “3” and “8”), if not,
adjust it by turning crankshaft. Check valve lashes.
d) In the same manner as b) – c), check valve lashes at valves
“4” and “6”.
e) In the same manner as b) – c) again, check valve lashes at
valves “2” and “5”.
Valve clearance specification
If valve lash is out of specification, record valve lash and adjust it
to specification by replacing shim.
REPLACEMENT OF SHIM
1) Close the valve whose shim (2) is to be replaced by turning
crankshaft, then turn tappet (3) till its cut section (1) faces
inside as shown in figure.
2) Lift down the it valve by turning crankshaft to 180°.
3) Hold tappet at that position using special tool as follows.
a) Remove its housing bolts.When cold
(Coolant temperature
is 15 – 25°C
(59 – 77°F))When hot
(Coolant temperature
is 60 – 68°C
(140 – 154°F))
Intake 0.18 – 0.22 mm
(0.007 – 0.009 in.)0.21 – 0.27 mm
(0.008 – 0.011 in.)
Exhaust 0.28 – 0.32 mm
(0.011 – 0.013 in.)0.30 – 0.36 mm
(0.012 – 0.014 in.)
Page 517 of 698
6A1-16 ENGINE MECHANICAL (M13 ENGINE)
THROTTLE BODY AND INTAKE MANIFOLD
REMOVAL
1) Relieve fuel pressure according to fuel pressure relief proce-
dure described in Section 6.
2) Disconnect negative cable at battery.
3) Drain coolant by loosening drain plug (1).
1. Intake manifold 7. EVAP canister purge valve 13. Intake manifold mounting bolt (short) 19. Cushion
2. Intake manifold gasket 8. TP sensor 14. Intake manifold mounting bolt (long) 20. Fuel delivery pipe mounting bolt
3. Throttle body 9. IAC valve 15. EGR pipe gasket Tightening torque
4. Gasket 10. Fuel delivery pipe 16. O-Ring Do not reuse.
5. EGR pipe 11. Intake manifold stiffener 17. Grommet
6. MAP sensor 12. Intake manifold mounting nut 18. Injector assembly
WARNING:
To help avoid danger of being burned, do not remove
drain plug (1) and radiator cap while engine and radiator
are still hot. Scalding fluid and steam can be blown out
under pressure if plug and cap are taken off too soon.
Page 519 of 698
6A1-18 ENGINE MECHANICAL (M13 ENGINE)
11) Remove intake manifold (1) with throttle body (2) and EGR
pipe (3) from cylinder head, and then its gasket.
INSTALLATION
Reverse removal procedure for installation noting the followings.
Use new intake manifold gasket and EGR pipe gasket.
Tighten bolts (1) and nuts (2) to specified torque.
Tightening torque
Intake manifold bolts and nuts
(a) : 25 N·m (2.5 kg-m, 18.0 lb-ft)
Check to ensure that all removed parts are back in place.
Reinstall any necessary parts which have not been rein-
stalled.
Adjust accelerator cable play referring in Section 6E1.
Refill cooling system referring in Section 6B.
Upon completion of installation, turn ignition switch ON but
engine OFF and check for fuel leaks.
Finally, start engine and check for engine coolant leaks.
Page 546 of 698

ENGINE MECHANICAL (M13 ENGINE) 6A1-45
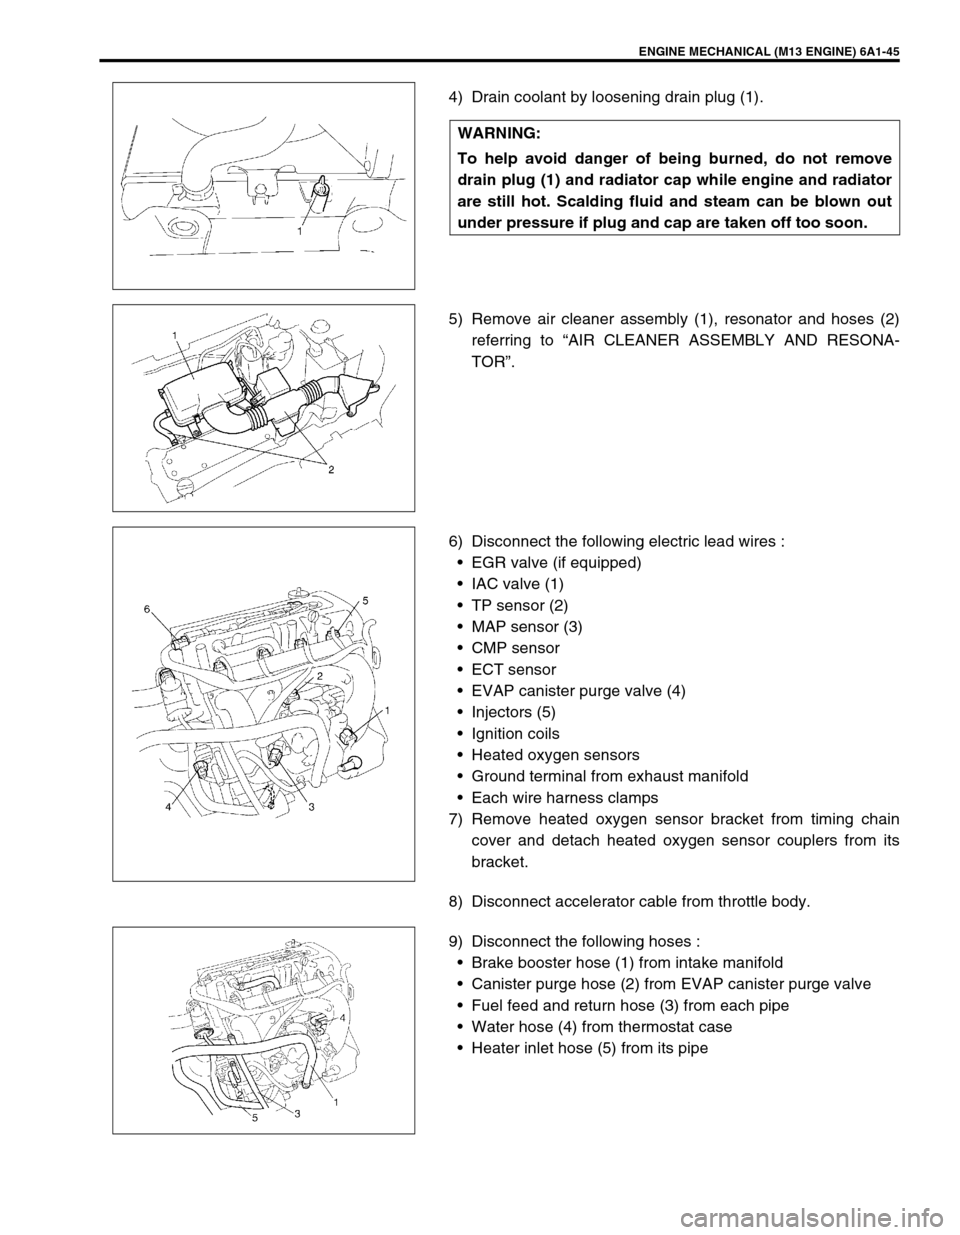
4) Drain coolant by loosening drain plug (1).
5) Remove air cleaner assembly (1), resonator and hoses (2)
referring to “AIR CLEANER ASSEMBLY AND RESONA-
TOR”.
6) Disconnect the following electric lead wires :
EGR valve (if equipped)
IAC valve (1)
TP sensor (2)
MAP sensor (3)
CMP sensor
ECT sensor
EVAP canister purge valve (4)
Injectors (5)
Ignition coils
Heated oxygen sensors
Ground terminal from exhaust manifold
Each wire harness clamps
7) Remove heated oxygen sensor bracket from timing chain
cover and detach heated oxygen sensor couplers from its
bracket.
8) Disconnect accelerator cable from throttle body.
9) Disconnect the following hoses :
Brake booster hose (1) from intake manifold
Canister purge hose (2) from EVAP canister purge valve
Fuel feed and return hose (3) from each pipe
Water hose (4) from thermostat case
Heater inlet hose (5) from its pipe WARNING:
To help avoid danger of being burned, do not remove
drain plug (1) and radiator cap while engine and radiator
are still hot. Scalding fluid and steam can be blown out
under pressure if plug and cap are taken off too soon.
Page 557 of 698

6A1-56 ENGINE MECHANICAL (M13 ENGINE)
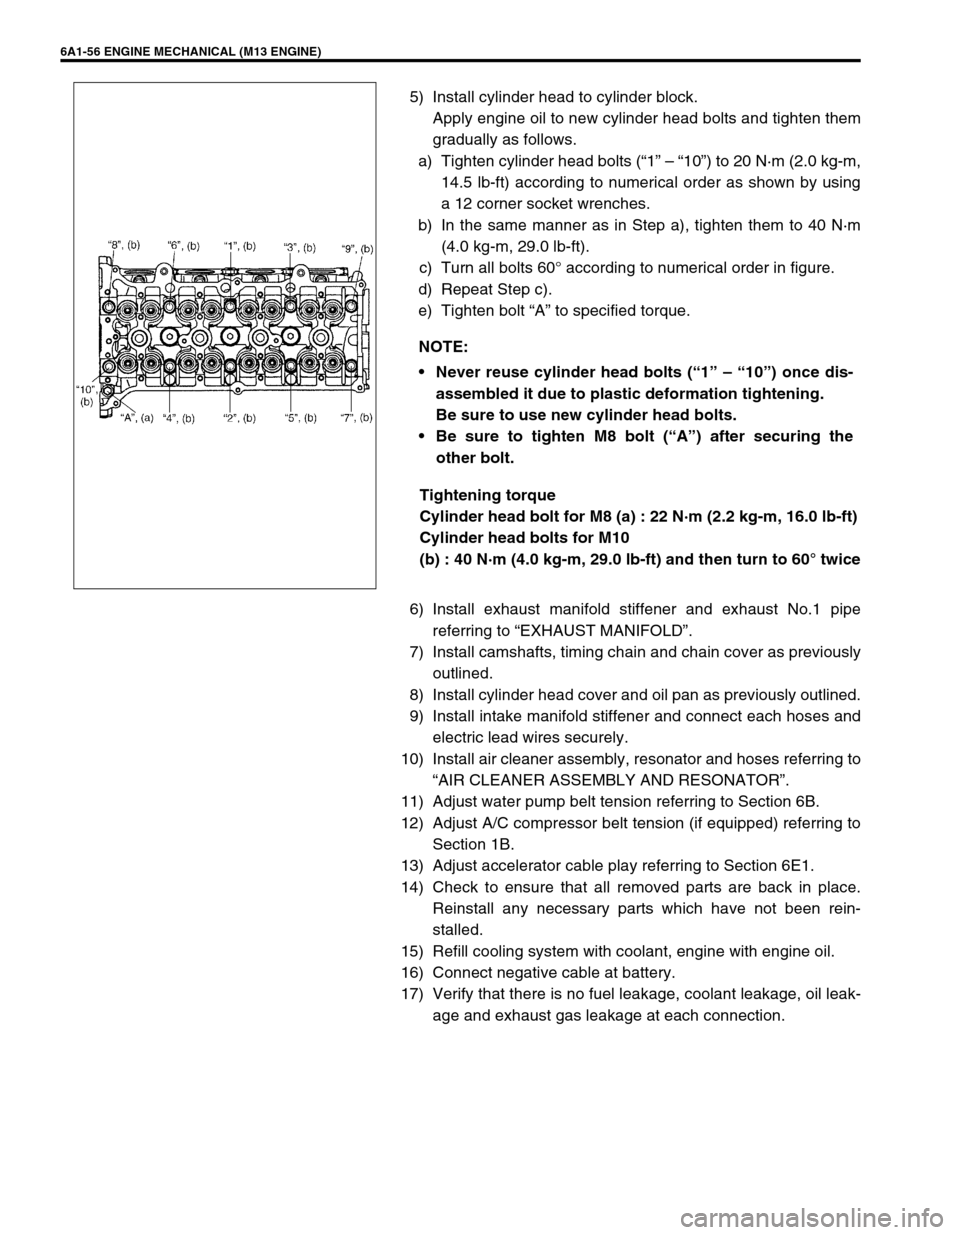
5) Install cylinder head to cylinder block.
Apply engine oil to new cylinder head bolts and tighten them
gradually as follows.
a) Tighten cylinder head bolts (“1” – “10”) to 20 N·m (2.0 kg-m,
14.5 lb-ft) according to numerical order as shown by using
a 12 corner socket wrenches.
b) In the same manner as in Step a), tighten them to 40 N·m
(4.0 kg-m, 29.0 lb-ft).
c) Turn all bolts 60° according to numerical order in figure.
d) Repeat Step c).
e) Tighten bolt “A” to specified torque.
Tightening torque
Cylinder head bolt for M8 (a) : 22 N·m (2.2 kg-m, 16.0 lb-ft)
Cylinder head bolts for M10
(b) : 40 N·m (4.0 kg-m, 29.0 lb-ft) and then turn to 60° twice
6) Install exhaust manifold stiffener and exhaust No.1 pipe
referring to “EXHAUST MANIFOLD”.
7) Install camshafts, timing chain and chain cover as previously
outlined.
8) Install cylinder head cover and oil pan as previously outlined.
9) Install intake manifold stiffener and connect each hoses and
electric lead wires securely.
10) Install air cleaner assembly, resonator and hoses referring to
“AIR CLEANER ASSEMBLY AND RESONATOR”.
11) Adjust water pump belt tension referring to Section 6B.
12) Adjust A/C compressor belt tension (if equipped) referring to
Section 1B.
13) Adjust accelerator cable play referring to Section 6E1.
14) Check to ensure that all removed parts are back in place.
Reinstall any necessary parts which have not been rein-
stalled.
15) Refill cooling system with coolant, engine with engine oil.
16) Connect negative cable at battery.
17) Verify that there is no fuel leakage, coolant leakage, oil leak-
age and exhaust gas leakage at each connection. NOTE:
Never reuse cylinder head bolts (“1” – “10”) once dis-
assembled it due to plastic deformation tightening.
Be sure to use new cylinder head bolts.
Be sure to tighten M8 bolt (“A”) after securing the
other bolt.
Page 558 of 698

ENGINE MECHANICAL (M13 ENGINE) 6A1-57
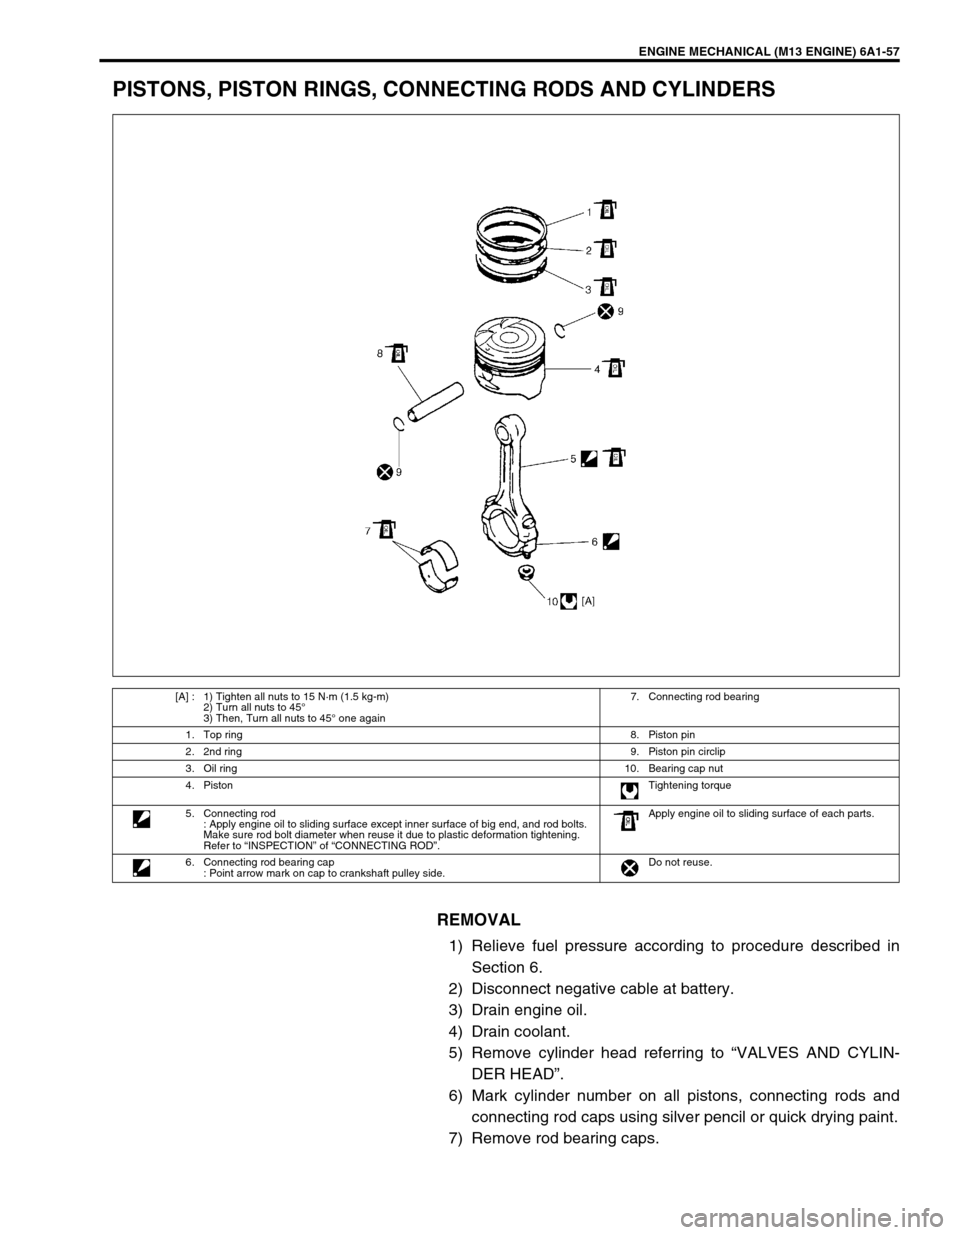
PISTONS, PISTON RINGS, CONNECTING RODS AND CYLINDERS
REMOVAL
1) Relieve fuel pressure according to procedure described in
Section 6.
2) Disconnect negative cable at battery.
3) Drain engine oil.
4) Drain coolant.
5) Remove cylinder head referring to “VALVES AND CYLIN-
DER HEAD”.
6) Mark cylinder number on all pistons, connecting rods and
connecting rod caps using silver pencil or quick drying paint.
7) Remove rod bearing caps.
[A] : 1) Tighten all nuts to 15 N·m (1.5 kg-m)
2) Turn all nuts to 45°
3) Then, Turn all nuts to 45° one again7. Connecting rod bearing
1. Top ring8. Piston pin
2. 2nd ring9. Piston pin circlip
3. Oil ring10. Bearing cap nut
4. PistonTightening torque
5. Connecting rod
: Apply engine oil to sliding surface except inner surface of big end, and rod bolts.
Make sure rod bolt diameter when reuse it due to plastic deformation tightening.
Refer to “INSPECTION” of “CONNECTING ROD”.Apply engine oil to sliding surface of each parts.
6. Connecting rod bearing cap
: Point arrow mark on cap to crankshaft pulley side.Do not reuse.
Page 567 of 698
6A1-66 ENGINE MECHANICAL (M13 ENGINE)
6) Reverse removal procedure for installation as previously out-
lined.
7) Adjust water pump belt tension referring to Section 6B.
8) Adjust A/C compressor belt tension (if equipped) referring to
Section 1B.
9) Adjust accelerator cable play referring to Section 6E1.
10) Check to ensure that all removed parts are back in place.
Reinstall any necessary parts which have not been rein-
stalled.
11) Refill cooling system with coolant engine with engine oil.
12) Connect negative cable at battery.
13) Verify that there is no fuel leakage, coolant leakage, oil leak-
age and exhaust gas leakage at each connection. NOTE:
Before installing bearing cap, make sure that checking
for connecting rod bolt deformation.
Refer to “INSPECTION” of “CONNECTING ROD”.