Page 196 of 327

4-38 Backing Up
Hold the bottom of the steering wheel with one hand.
Then, to move the trailer to the left, just move that
hand to the left. To move the trailer to the right, move
your hand to the right. Always back up slowly and,
if possible, have someone guide you.
Making Turns
NOTICE:
Making very sharp turns while trailering could
cause the trailer to come in contact with the
vehicle. Your vehicle could be damaged. Avoid
making very sharp turns while trailering.
When you're turning with a trailer, make wider turns than
normal. Do this so your trailer won't strike soft shoulders,
curbs, road signs, trees or other objects. Avoid jerky or
sudden maneuvers. Signal well in advance.
Turn Signals When Towing a Trailer
When you tow a trailer, your vehicle may need a different
turn signal flasher and/or extra wiring. Check with your
dealer. The arrows on your instrument panel will flash
whenever you signal a turn or lane change. Properly
hooked up, the trailer lamps will also flash, telling other
drivers you're about to turn, change lanes or stop.
When towing a trailer, the arrows on your instrument
panel will flash for turns even if the bulbs on the trailer
are burned out. Thus, you may think drivers behind
you are seeing your signal when they are not. It's
important to check occasionally to be sure the trailer
bulbs are still working.
Driving On Grades
Reduce speed and shift to a lower gear before you
start down a long or steep downgrade. If you don't shift
down, you might have to use your brakes so much that
they would get hot and no longer work well.
On a long uphill grade, shift down and reduce your
speed to around 45 mph (70 km/h) to reduce the
possibility of engine and transaxle overheating.
Page 217 of 327

5-19
If a Tire Goes Flat
It's unusual for a tire to ªblow outº while you're driving,
especially if you maintain your tires properly. If air goes
out of a tire, it's much more likely to leak out slowly.
But if you should ever have a ªblowout,º here are a few
tips about what to expect and what to do:
If a front tire fails, the flat tire will create a drag that
pulls the vehicle toward that side. Take your foot off
the accelerator pedal and grip the steering wheel firmly.
Steer to maintain lane position, and then gently brake
to a stop well out of the traffic lane.
A rear blowout, particularly on a curve, acts much like a
skid and may require the same correction you'd use in
a skid. In any rear blowout, remove your foot from
the accelerator pedal. Get the vehicle under control by
steering the way you want the vehicle to go. It may be
very bumpy and noisy, but you can still steer. Gently
brake to a stop
-- well off the road if possible.
If a tire goes flat, the next part shows how to use your
jacking equipment to change a flat tire safely.
Changing a Flat Tire
If a tire goes flat, avoid further tire and wheel damage
by driving slowly to a level place. Turn on your hazard
warning flashers.
CAUTION:
Changing a tire can cause an injury. The vehicle
can slip off the jack and roll over you or other
people. You and they could be badly injured.
Find a level place to change your tire. To help
prevent the vehicle from moving:
1. Set the parking brake firmly.
2. Put an automatic transaxle shift lever
in PARK (P), or shift a manual transaxle
to FIRST (1) or REVERSE (R).
3. Turn off the engine.
To be even more certain the vehicle won't move,
you can put blocks at the front and rear of the
tire farthest away from the one being changed.
That would be the tire on the other side of the
vehicle, at the opposite end.
Page 222 of 327
5-24
7. Remove any rust or dirt
from the wheel bolts,
mounting surfaces and
spare wheel.
CAUTION:
Rust or dirt on the wheel, or on the parts to
which it is fastened, can make the wheel nuts
become loose after a time. The wheel could come
off and cause an accident. When you change a
wheel, remove any rust or dirt from the places
where the wheel attaches to the vehicle. In an
emergency, you can use a cloth or a paper towel
to do this; but be sure to use a scraper or wire
brush later, if you need to, to get all the rust or
dirt off.
CAUTION:
Never use oil or grease on studs or nuts. If you
do, the nuts might come loose. Your wheel could
fall off, causing a serious accident.
8. Install the compact spare.
9. Replace the wheel nuts with the rounded end of the
nuts toward the wheel. Tighten each nut by hand
until the wheel is held against the hub.
Page 267 of 327

6-39
To reset (calibrate) the system: turn the ignition switch
to ON (engine not running). The RESET button is
located inside of the driver's side instrument fuse panel.
Press and release the RESET button. The CHANGE
OIL light will begin to flash. Press and release the
RESET button again. The CHANGE OIL light will go
off, and the LOW TIRE PRESSURE light will start
flashing. When the LOW TIRE PRESSURE light is
flashing, press and hold the RESET button until the
chime sounds. If the LOW TIRE PRESSURE light
doesn't go off, then see your dealer for service.
The system completes the calibration process
during driving.
The system normally takes 15 to 20 minutes of driving
in each of three speed ranges to ªlearnº tire pressures.
The speed ranges are 15 to 40 mph (25 to 65 km/h),
40 to 65 mph (65 to 105 km/h) and above 65 mph
(105 km/h). When learning is complete, the system will
alert you after 2
-8 minutes if a tire is 12 psi (83 kPa)
different from the other three tires. Detection thresholds
may be higher and detection times may be longer on
rough roads, curves and at high speeds. The system is
not capable of detection at speeds greater than
75 mph (120 km/h).
Tire Inspection and Rotation
Tires should be rotated every 6,000 to 8,000 miles
(10 000 to 13 000 km). Any time you notice unusual
wear, rotate your tires as soon as possible and check
wheel alignment. Also check for damaged tires or
wheels. See ªWhen It's Time for New Tiresº and
ªWheel Replacementº later in this section for
more information.
The purpose of regular rotation is to achieve more
uniform wear for all tires on the vehicle. The first rotation
is the most important. See ªScheduled Maintenance
Servicesº in the Index for scheduled rotation intervals.
When rotating your tires, always use the correct rotation
pattern shown here.
Page 268 of 327

6-40
Don't include the compact spare tire in your
tire rotation.
After the tires have been rotated, adjust the front and
rear inflation pressures as shown on the Tire
-Loading
Information label. Reset the LOW TIRE PRESSURE
light. Make certain that all wheel nuts are properly
tightened. See ªWheel Nut Torqueº in the Index.
CAUTION:
Rust or dirt on a wheel, or on the parts to which
it is fastened, can make wheel nuts become loose
after a time. The wheel could come off and cause
an accident. When you change a wheel, remove
any rust or dirt from places where the wheel
attaches to the vehicle. In an emergency, you can
use a cloth or a paper towel to do this; but be
sure to use a scraper or wire brush later,
if you need to, to get all the rust or dirt off.
(See ªChanging a Flat Tireº in the Index.)
When It's Time for New Tires
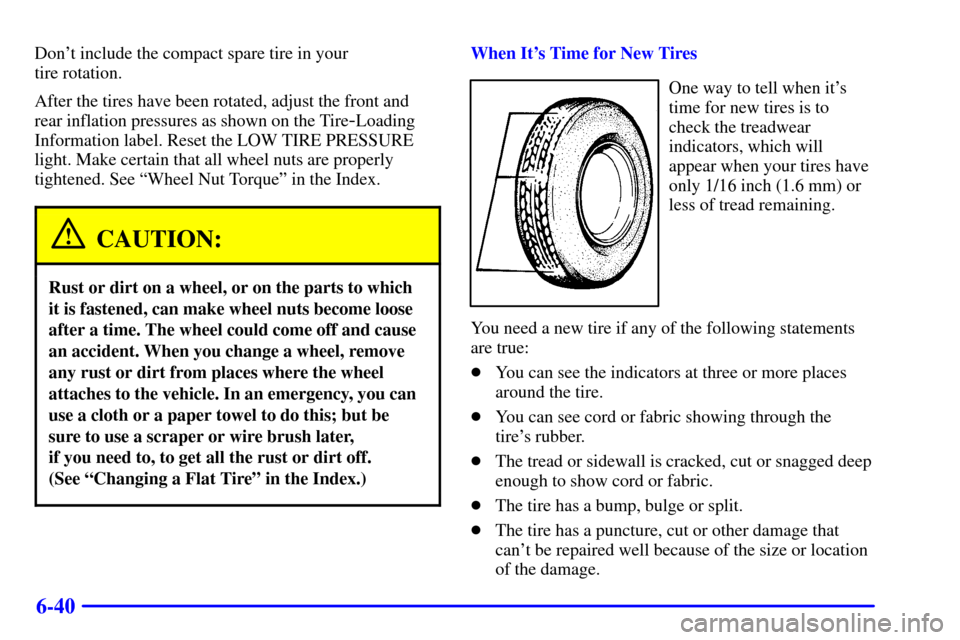
One way to tell when it's
time for new tires is to
check the treadwear
indicators, which will
appear when your tires have
only 1/16 inch (1.6 mm) or
less of tread remaining.
You need a new tire if any of the following statements
are true:
�You can see the indicators at three or more places
around the tire.
�You can see cord or fabric showing through the
tire's rubber.
�The tread or sidewall is cracked, cut or snagged deep
enough to show cord or fabric.
�The tire has a bump, bulge or split.
�The tire has a puncture, cut or other damage that
can't be repaired well because of the size or location
of the damage.