2000 NISSAN XTERRA heater
[x] Cancel search: heaterPage 121 of 263
CASSETTE TAPE OPERATION
Turn the ignition key to the ACC or ON
position, and carefully insert a cassette tape
into the tape door. The cassette tape auto-
matically pulls into the player. The word
TAPE illuminates in the display. If the radio
is already operating it automatically turns off
and the cassette tape begins to play.
CAUTION
Do not force the cassette tape into the
tape door. This could cause player
damage.
The cassette tape automatically changes
directions to play the other side when the
first side is complete.
Precautions on cassette player op-
eration
OTo maintain good quality sound,
NISSAN recommends using cassette
tapes of 60 minutes or shorter in
length.
OCassette tapes should be removed
from the player when not in use. Store
cassettes in their protective cases
and away from direct sunlight, heat,dust, moisture or magnetic sources.
ODirect sunlight can cause the cassette
to become deformed. The use of de-
formed cassettes may cause the cas-
sette to jam in the player.
ODo not use cassettes that have peel-
ing or loose labels. If used, the label
could jam in the player.
OIf a cassette has loose tape, insert a
pencil through one of the cassette
hubs and rewind the tape firmly.
Loose tape may cause jamming and
wavering sound quality.
OOver a period of time, the playback
head, capstan and pinch roller may
gather a tape coating residue as the
tape is played. This residue accumu-
lation can cause a weak or wavering
sound and should be removed peri-
odically with a head cleaning tape. If
the residue is not removed periodi-
cally, the player may need to be disas-
sembled for cleaning.
PLAY/STOP TAPE button
When thebutton is pushed with the
system turned off and a tape loaded, the
system comes on and the tape plays.The word TAPE illuminates.
When the
button is pushed with either
the radio or compact disc turned on and a
tape loaded, the compact disc or the radio
turns off and the tape plays.
While the tape is playing, pushing the
button stops tape play. Pushing the
button again resumes tape play.
FF (fast forward) and REW (rewind)
buttons
Push thebutton to fast forward the
tape. Push the
button to rewind the
tape. Either REW or FF illuminates in the
display. To stop the FF or REW function,
press the
,,orbuttons.
Automatic Program Search (APS)
SEEK/SCAN buttons
When thebutton is pushed while the
tape is being played, the tape runs quickly,
stops, then plays the next selection from the
beginning. Push the
button several times
to skip several selections. Each time the
button is pushed, the tape fast forwards one
additional selection. This number appears in
4-32Heater, air conditioner and audio systems
ZX
Page 122 of 263
the display window. The tape can be fast
forwarded through up to nine selections. (for
example: 7 in the display indicates that the
button has been pushed seven times to
skip forward through seven selections).
When the
button is pushed, the selection
being played starts again from the begin-
ning. Push the
button several times to
rewind several selections. Each time the
button is pushed, the tape rewinds back
one additional selection. The number of
selections skipped appears in the display
window as a negative number (for example:
-7 in the display indicates that the
button
has been pushed seven times to rewind
back through seven selections). To stop
APS
or, press thebutton.
Either the FF or REW illuminates in the
display when the
(REW) or(FF) but-
ton is pushed.
The system searches for the blank intervals
between selections. If there is a blank inter-
val within one selection or there is no inter-
val between selections, the system may not
stop in the desired or expected location.
SIDE button
Push thebutton to change the tape side
while the tape is being played.
The cassette tape automatically changes
directions to play the other side when the
first side is complete.
Dolby NR (noise reduction)
Push thebutton for Dolby NR encoded
tapes to reduce high frequency tape noise.
The
indicator illuminates in the display.
Dolby NR is manufactured under license
from Dolby Laboratories Licensing Corpora-
tion. DOLBY NR and the double-D symbol
are trademarks of Dolby Laboratories Li-
censing Corporation.
Metal or chrome tape usage
The cassette player is automatically set to
high performance play when playing a metal
or chrome cassette tape.
TAPE EJECT button
Push thebutton to eject an inserted
cassette tape.
COMPACT DISC (CD) PLAYER
OPERATION
Turn the ignition key to the ACC or ON
position and carefully insert the compact
disc into the slot with the label side up. The
compact disc is automatically pulled into the
slot and starts to play.
If the radio or cassette tape is already
operating, it automatically turns off and the
compact disc begins to play.
CAUTION
Do not force the compact disc into the
slot. This could damage the player.
CD button
When thebutton is pushed with the
compact disc loaded and the tape or the
radio playing, the tape or radio turns off and
compact disc starts to play.
FF (fast forward) REW (rewind)
buttons
When theorbutton is pushed
while the compact disc is playing, the com-
pact disc plays at an increased speed while
Heater, air conditioner and audio systems
4-33
ZX
Page 123 of 263
fast forwarding or rewinding. When the but-
ton is released, the compact disc returns to
normal play speed.
Automatic Program Search (APS)
APS FF, APS REW buttons
When thebutton is pushed while the
compact disc is playing, the selection fol-
lowing the present one starts to play from
the beginning. Push the
button several
times to skip several selections. Each time
the button is pushed, the CD advances one
additional selection. The number appears in
the display window. (When the last selection
on the compact disc is skipped, the first
selection is played.)
When the
button is pushed, the selection
being played returns to the beginning. Push
the
button several times to skip back
several selections. Each time the button is
pushed, the CD moves back one selection.
If the play pattern is in RANDOM mode
when the
orbuttons are pushed the
next selection will be chosen at random.
RPT/RDM
(repeat/random) button
When thebutton is pushed while the
compact disc is playing, the play pattern
changes as follows.
1.The current selection is repeated.
RANDOM:Selections are played at ran-
dom, not following the sequence on the
compact disc. The same program may be
repeated twice. If the
button is pushed
in the RANDOM mode, selections will be
chosen at random.
Blank(no symbol): All selections are played
repeatedly in sequence.
When a new compact disc is inserted,
the play pattern automatically changes
to ALL.
CD EJECT button
When thebutton is pushed with a com-
pact disc loaded, the compact disc ejects.
When the
button is pushed while the
compact disc is playing, the compact disc
ejects and the system turns off.
If the compact disc ejects and is notremoved within 10 seconds, it is pulled
back into the slot.
CD (DISC) indicator light
This light comes on when a compact disc is
loaded into the player.
4-34Heater, air conditioner and audio systems
ZX
Page 124 of 263
CD CARE AND CLEANING
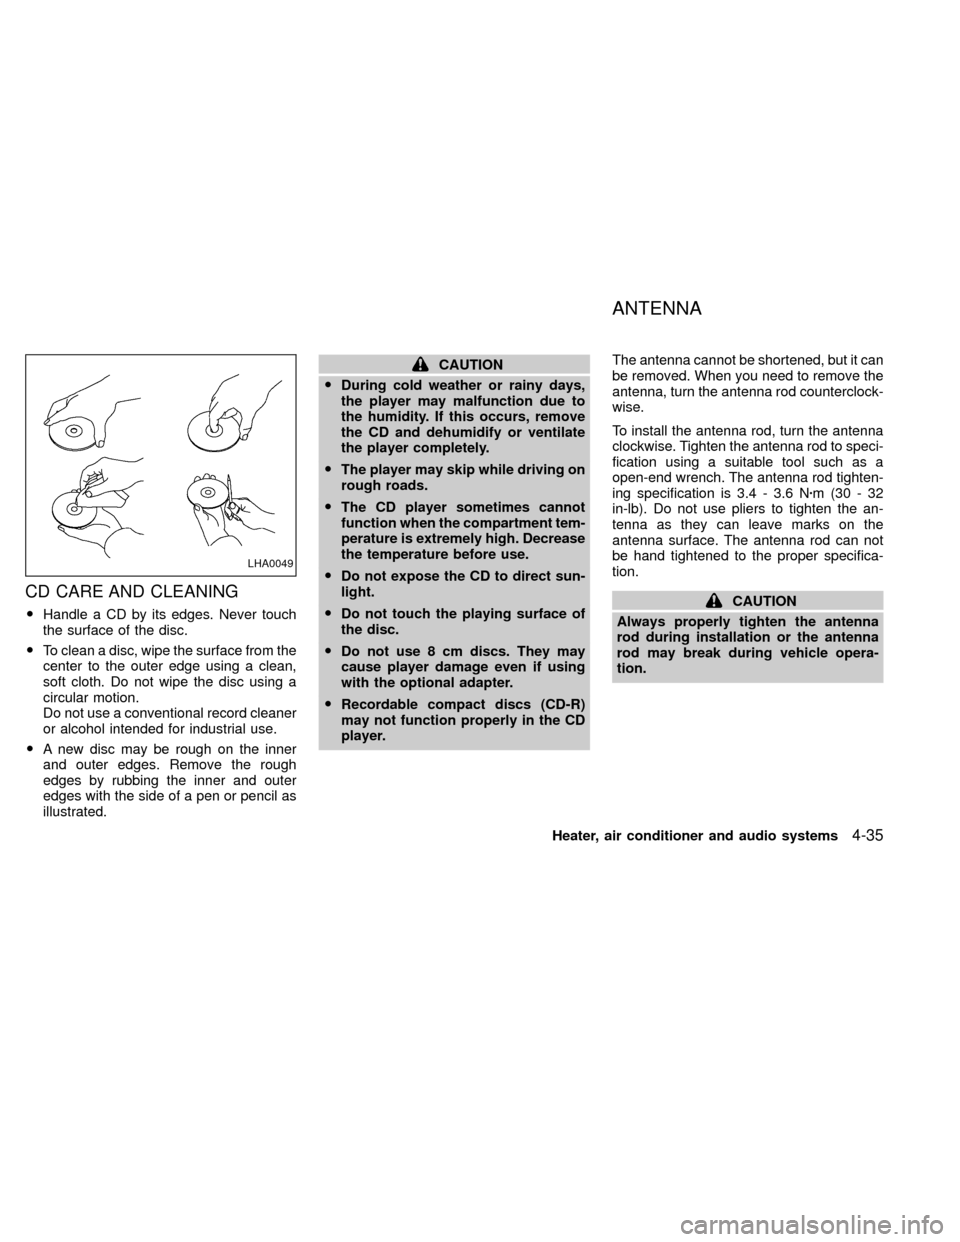
OHandle a CD by its edges. Never touch
the surface of the disc.
OTo clean a disc, wipe the surface from the
center to the outer edge using a clean,
soft cloth. Do not wipe the disc using a
circular motion.
Do not use a conventional record cleaner
or alcohol intended for industrial use.
OA new disc may be rough on the inner
and outer edges. Remove the rough
edges by rubbing the inner and outer
edges with the side of a pen or pencil as
illustrated.
CAUTION
ODuring cold weather or rainy days,
the player may malfunction due to
the humidity. If this occurs, remove
the CD and dehumidify or ventilate
the player completely.
OThe player may skip while driving on
rough roads.
OThe CD player sometimes cannot
function when the compartment tem-
perature is extremely high. Decrease
the temperature before use.
ODo not expose the CD to direct sun-
light.
ODo not touch the playing surface of
the disc.
ODo not use 8 cm discs. They may
cause player damage even if using
with the optional adapter.
ORecordable compact discs (CD-R)
may not function properly in the CD
player.The antenna cannot be shortened, but it can
be removed. When you need to remove the
antenna, turn the antenna rod counterclock-
wise.
To install the antenna rod, turn the antenna
clockwise. Tighten the antenna rod to speci-
fication using a suitable tool such as a
open-end wrench. The antenna rod tighten-
ing specification is 3.4 - 3.6 Nzm(30-32
in-lb). Do not use pliers to tighten the an-
tenna as they can leave marks on the
antenna surface. The antenna rod can not
be hand tightened to the proper specifica-
tion.
CAUTION
Always properly tighten the antenna
rod during installation or the antenna
rod may break during vehicle opera-
tion.
LHA0049
ANTENNA
Heater, air conditioner and audio systems4-35
ZX
Page 125 of 263
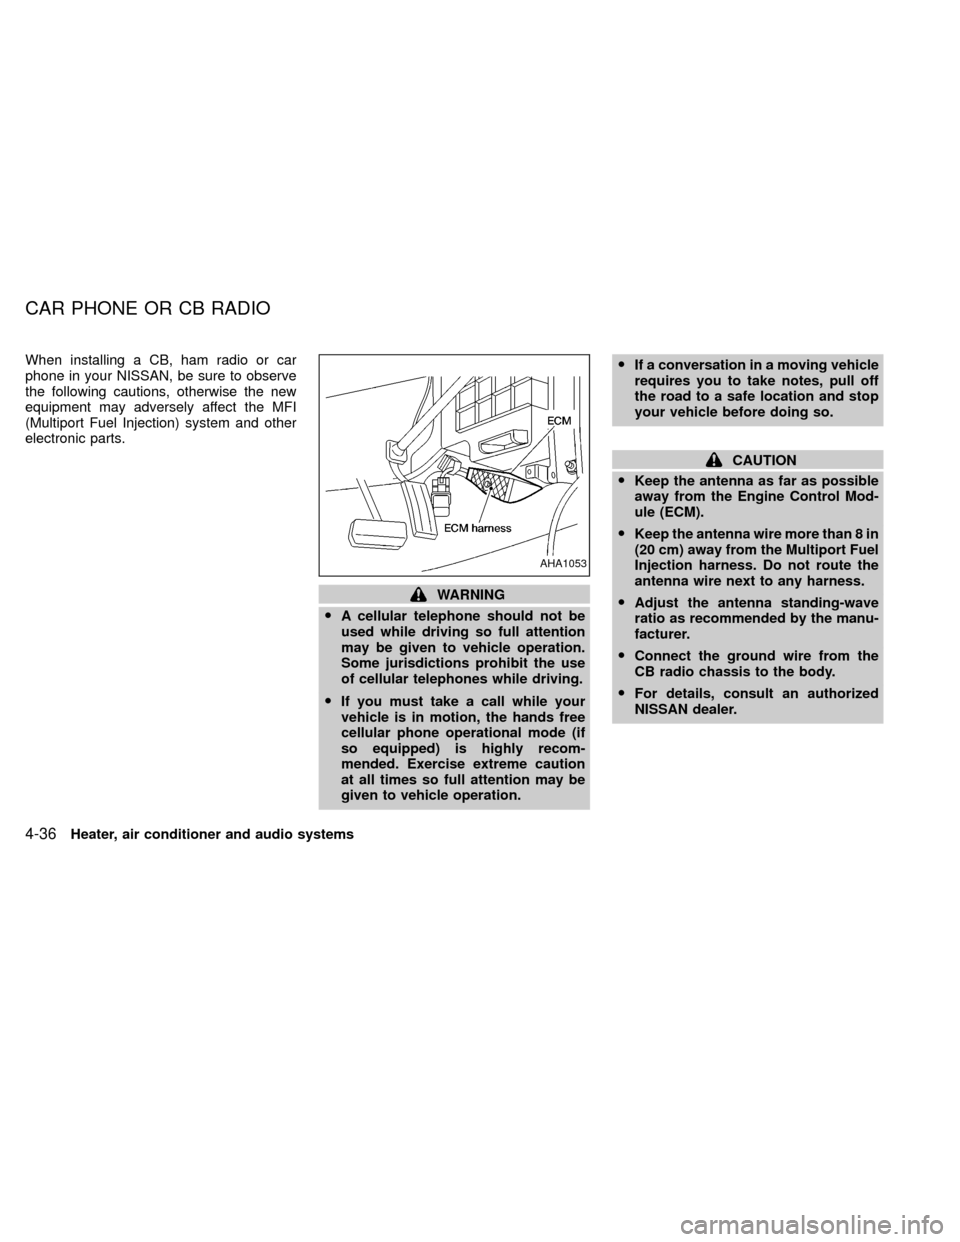
When installing a CB, ham radio or car
phone in your NISSAN, be sure to observe
the following cautions, otherwise the new
equipment may adversely affect the MFI
(Multiport Fuel Injection) system and other
electronic parts.
WARNING
OA cellular telephone should not be
used while driving so full attention
may be given to vehicle operation.
Some jurisdictions prohibit the use
of cellular telephones while driving.
OIf you must take a call while your
vehicle is in motion, the hands free
cellular phone operational mode (if
so equipped) is highly recom-
mended. Exercise extreme caution
at all times so full attention may be
given to vehicle operation.OIf a conversation in a moving vehicle
requires you to take notes, pull off
the road to a safe location and stop
your vehicle before doing so.
CAUTION
OKeep the antenna as far as possible
away from the Engine Control Mod-
ule (ECM).
OKeep the antenna wire more than 8 in
(20 cm) away from the Multiport Fuel
Injection harness. Do not route the
antenna wire next to any harness.
OAdjust the antenna standing-wave
ratio as recommended by the manu-
facturer.
OConnect the ground wire from the
CB radio chassis to the body.
OFor details, consult an authorized
NISSAN dealer.
AHA1053
CAR PHONE OR CB RADIO
4-36Heater, air conditioner and audio systems
ZX
Page 127 of 263
WARNING
ODo not leave children, unreliable
adults, or pets alone in your vehicle.
They could accidentally injure them-
selves or others through inadvertent
operation of the vehicle. Also, on
hot, sunny days, temperatures in a
closed vehicle could quickly become
high enough to cause severe or pos-
sibly fatal injuries to people or ani-
mals.
OProperly secure all cargo to help
prevent it from sliding or shifting. Do
not place cargo higher than the seat-
backs. In a sudden stop or collision,
unsecured cargo could cause per-
sonal injury.
EXHAUST GAS (carbon monoxide)
WARNING
ODo not breathe exhaust gases; they
contain colorless and odorless car-
bon monoxide. Carbon monoxide is
a dangerous. It can cause uncon-
sciousness or death.OIf you suspect that exhaust fumes
are entering the vehicle, drive with
all windows fully open, and have the
vehicle inspected immediately.
ODo not run the engine in closed
spaces such as a garage.
ODo not park the vehicle with the
engine running for any extended
length of time.
OKeep the back door and rear win-
dows closed while driving, other-
wise exhaust gases could be drawn
into the passenger compartment. If
you must drive with the back door or
rear windows open, follow these pre-
cautions:
1. Open all the windows.
2. Set the air recirculation switch
OFF and the fan control at 4 (high)
to circulate the air.
OIf electrical wiring or other cable
connections must pass to a trailer
through the seal on the back door or
the body, follow the manufacturer's
recommendation to prevent carbon
monoxide entry into the vehicle.O
If a special body, camper, or other
equipment is added for recreational
or other usage, follow the manufac-
turer's recommendation to prevent
carbon monoxide entry into the ve-
hicle. Do not occupy these areas
while the engine is running even if the
vehicle is parked. Some recreational
vehicle appliances such as stoves,
refrigerators, heaters, etc. may also
generate carbon monoxide.
OThe exhaust system and body
should be inspected by a qualified
mechanic whenever:
a. The vehicle is raised for service.
b. You suspect that exhaust fumes
are entering into the passenger
compartment.
c. You notice a change in the sound
of the exhaust system.
d.
You have had an accident involv-
ing damage to the exhaust system,
underbody, or rear of the vehicle.
PRECAUTIONS WHEN
STARTING AND DRIVING
5-2Starting and driving
ZX
Page 152 of 263
installing tire chains. When installing tire
chains, make sure they are of proper size
for the tires on your vehicle and are
installed according to the chain manufac-
turer's suggestions.Use only SAE
Class ``S'' chains.Other types may
damage your vehicle. Use chain tension-
ers when recommended by the tire chain
manufacturer to ensure a tight fit. Loose
end links of the tire chain must be se-
cured or removed to prevent the possi-
bility of whipping action damage to the
fenders or undercarriage. If possible,
avoid fully loading your vehicle when
using tire chains. In addition, drive at a
reduced speed, otherwise, your vehicle
may be damaged and/or vehicle handling
and performance may be adversely af-
fected. Never install tire chains on a
TEMPORARY USE ONLY spare tire. Do
not use tire chains on dry roads.
Special winter equipment
It is recommended that the following items
be carried in the vehicle during winter:
1. A scraper and stiff-bristled brush to re-
move ice and snow from the windows
and wiper blades.2. A sturdy, flat board to be placed under
the jack to give it firm support.
3. A shovel to dig the vehicle out of snow-
drifts.
4. Extra window washer fluid to refill the
reservoir tank.
Driving on snow or ice
WARNING
OWet ice (32ÉF, 0ÉC and freezing rain),
very cold snow, or ice can be slick
and very hard to drive on. The ve-
hicle will have much less traction or
``grip'' under these conditions. Try to
avoid driving on wet ice until the
road is salted or sanded.
OWhatever the condition, drive with
caution. Accelerate and slow down
with care. If accelerating or down-
shifting too fast, the drive wheels
will lose even more traction.
O
Allow more stopping distance under
these conditions. Braking should be
started sooner than on dry pavement.
OAllow greater following distances on
slippery roads.OWatch for slippery spots (glare ice).
These may appear on an otherwise
clear road in shaded areas. If a patch
of ice is seen ahead, brake before
reaching it. Try not to brake while on
the ice, and avoid any sudden steer-
ing maneuvers.
ODo not use the cruise control on
slippery roads.
OSnow can trap dangerous exhaust
gases under your vehicle. Keep
snow clear of the exhaust pipe and
from around your vehicle.
Engine block heater (if so equipped)
An engine block heater to assist extreme
cold temperature starting is available
through an authorized NISSAN dealer.
WARNING
Do not use your heater with an un-
grounded electrical system or two-
pronged (cheater) adapters. You can be
injured by an electrical shock if you use
an ungrounded connection.
Starting and driving
5-27
ZX
Page 162 of 263
ODo not attempt to jump start a frozen
battery. It could explode and cause
serious injury.
WARNING
Always follow the instructions be-
low. Failure to do so could result in
damage to the charging system and
cause personal injury.
1.
If the booster battery is in another vehicle,
position the two vehicles to bring their
batteries into close proximity to each other.
Do not allow the two vehicles to touch.
2. Apply the parking brake. Move the shift
selector lever to N (Neutral) (on auto-
matic transmission models, move the
lever to P (Park)). Switch off all unneces-
sary electrical systems (lights, heater, air
conditioner, etc.).
3. Remove vent caps on the battery (if so
equipped). Cover the battery with an old
cloth to reduce explosion hazard.
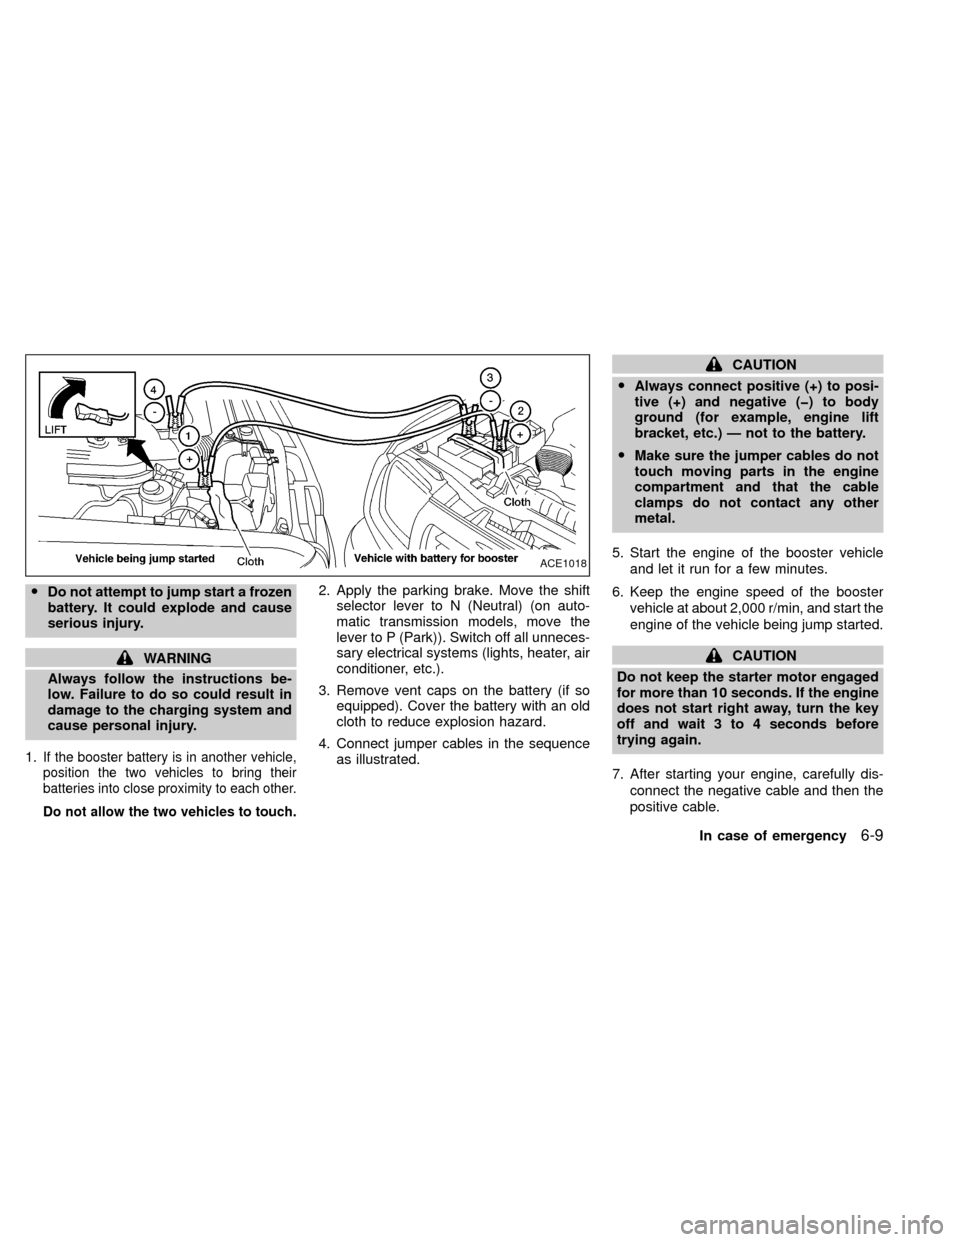
4. Connect jumper cables in the sequence
as illustrated.
CAUTION
OAlways connect positive (+) to posi-
tive (+) and negative (þ) to body
ground (for example, engine lift
bracket, etc.) Ð not to the battery.
OMake sure the jumper cables do not
touch moving parts in the engine
compartment and that the cable
clamps do not contact any other
metal.
5. Start the engine of the booster vehicle
and let it run for a few minutes.
6. Keep the engine speed of the booster
vehicle at about 2,000 r/min, and start the
engine of the vehicle being jump started.
CAUTION
Do not keep the starter motor engaged
for more than 10 seconds. If the engine
does not start right away, turn the key
off and wait 3 to 4 seconds before
trying again.
7. After starting your engine, carefully dis-
connect the negative cable and then the
positive cable.
ACE1018
In case of emergency6-9
ZX