2000 NISSAN XTERRA check engine
[x] Cancel search: check enginePage 85 of 263
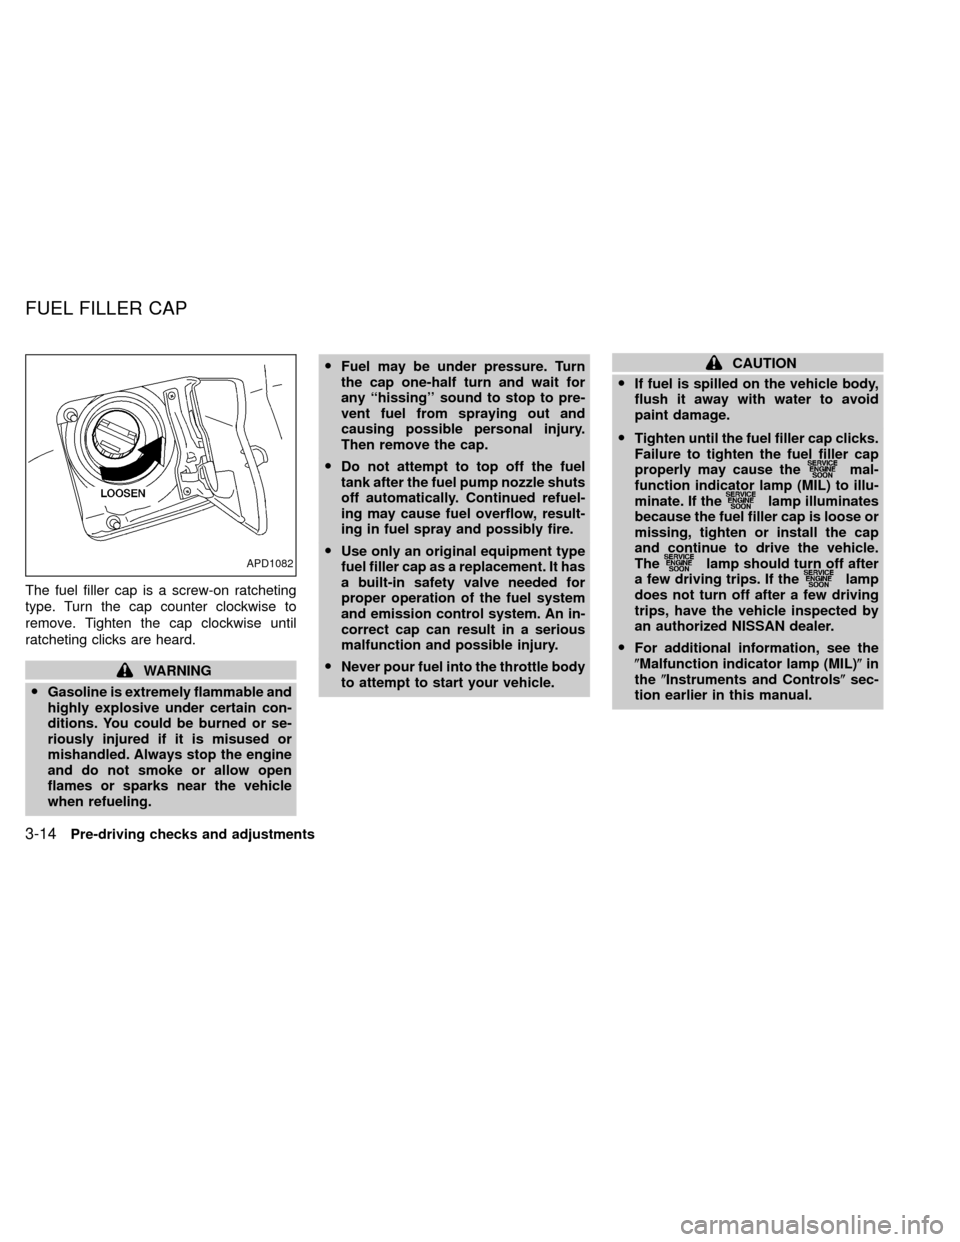
The fuel filler cap is a screw-on ratcheting
type. Turn the cap counter clockwise to
remove. Tighten the cap clockwise until
ratcheting clicks are heard.
WARNING
OGasoline is extremely flammable and
highly explosive under certain con-
ditions. You could be burned or se-
riously injured if it is misused or
mishandled. Always stop the engine
and do not smoke or allow open
flames or sparks near the vehicle
when refueling.OFuel may be under pressure. Turn
the cap one-half turn and wait for
any ``hissing'' sound to stop to pre-
vent fuel from spraying out and
causing possible personal injury.
Then remove the cap.
ODo not attempt to top off the fuel
tank after the fuel pump nozzle shuts
off automatically. Continued refuel-
ing may cause fuel overflow, result-
ing in fuel spray and possibly fire.
OUse only an original equipment type
fuel filler cap as a replacement. It has
a built-in safety valve needed for
proper operation of the fuel system
and emission control system. An in-
correct cap can result in a serious
malfunction and possible injury.
ONever pour fuel into the throttle body
to attempt to start your vehicle.
CAUTION
OIf fuel is spilled on the vehicle body,
flush it away with water to avoid
paint damage.
OTighten until the fuel filler cap clicks.
Failure to tighten the fuel filler cap
properly may cause the
mal-
function indicator lamp (MIL) to illu-
minate. If the
lamp illuminates
because the fuel filler cap is loose or
missing, tighten or install the cap
and continue to drive the vehicle.
The
lamp should turn off after
a few driving trips. If thelamp
does not turn off after a few driving
trips, have the vehicle inspected by
an authorized NISSAN dealer.
OFor additional information, see the
(Malfunction indicator lamp (MIL)(in
the(Instruments and Controls(sec-
tion earlier in this manual.
APD1082
FUEL FILLER CAP
3-14Pre-driving checks and adjustments
ZX
Page 133 of 263
ignition switch is in ACC position.
ON (Normal operating position) (3)
This position turns on the ignition system
and electrical accessories.
START (4)
This position starts the engine. As soon as
the engine has started, release the key. It
automatically returns to the ON position.OMake sure the area around the vehicle is
clear.
OCheck fluid levels such as engine oil,
coolant, brake and clutch fluid, and win-
dow washer fluid as frequently as pos-
sible, at least whenever you refuel.
OCheck that all windows and lights are
clean.
OVisually inspect tires for their appearance
and condition. Also check tires for proper
inflation.
OLock all doors.
OPosition seat and adjust head restraints.
OAdjust inside and outside mirrors.
OFasten seat belts and ask all passengers
to do likewise.
OCheck the operation of warning lights
when key is turned to the ON (3) position.
See9Warning/Indicator lights and
chimes9in the9Instruments and controls9
section.WARNING
ODo not depress the accelerator pedal
while shifting from P (Park) or N
(Neutral) to R (Reverse), D (Drive), 2
or 1. Always depress the brake pedal
until shifting is completed. Failure to
do so could cause you to lose con-
trol and have an accident.
OCold engine idle speed is high, so
use caution when shifting into a for-
ward or reverse gear before the en-
gine has warmed up.
ONever shift to P (Park) or R (Reverse)
while the vehicle is moving. This
could cause an accident.
CAUTION
OWhen stopping the vehicle on an
uphill grade, do not hold the vehicle
by depressing the accelerator pedal.
The foot brake should be used for
this purpose.
OOn slippery roads, do not downshift.
This may cause a loss of control.
BEFORE STARTING THE
ENGINEDRIVING WITH AUTOMATIC
TRANSMISSION (if so
equipped)
5-8Starting and driving
ZX
Page 135 of 263

Shifting with automatic transmission
Push the button to shift into P (Park), R
(Reverse) or from D (Drive) to 2. All other
positions can be selected without pushing
the button.
P (Park):
Use this selector position when the vehicle
is parked or when starting the engine. Al-
ways be sure the vehicle is at a complete
stop. For maximum safety, depress the
brake pedal, then push in the shift lever
button and move the lever to the P (Park)
position. Apply the parking brake. Whenparking on a hill, apply the parking brake
first, then shift the lever into the P (Park)
position.
Shifting from P (Park)
If the ignition switch is in the ON position
and the foot brake pedal is depressed, but
the shift selector lever still cannot be moved
out of P (Park), follow these instructions.
1. Turn the ignition key to the LOCK posi-
tion.
2. Apply the parking brake.3. Reinsert the key and turn it to the ACC
position.
4. Depress the foot brake pedal and move
the shift selector lever to N (Neutral).
5. Start the engine.
These instructions for starting the vehicle in
N (Neutral) should only be used until service
can be obtained at an authorized NISSAN
dealership.
R (Reverse):
Use this position to back up. Always be sure
the vehicle is at a complete stop before
shifting into the R (Reverse) position. For
maximum safety, check to ensure the area
behind the vehicle is clear. With the brake
pedal depressed, push in the shift selector
lever button and move the shift selector
lever to the R (Reverse) position.
N (Neutral)
Neither forward nor reverse gear is en-
gaged. The engine can be started in this
position. You may shift to N (Neutral) and
restart a stalled engine while the vehicle is
moving.
ASD1024
5-10Starting and driving
ZX
Page 141 of 263
Precautions
OThe cruise indicator light in the instru-
ment panel may blink when the cruise
control main switch is turned ON while
pushing the RES/ACCEL, COAST/SET,
or CANCEL switch. To properly set the
cruise control system, perform the follow-
ing steps in the order indicated.
OIf the cruise control system malfunctions,
it cancels automatically. The CRUISE
light in the instrument panel then blinks to
warn the driver.
OIf the cruise light blinks, turn the cruisecontrol main switch off and have the
system checked by an authorized NIS-
SAN dealer.
WARNING
Do not use the cruise control when
driving under the following conditions:
OWhen it is not possible to keep the
vehicle at a set speed.
OIn heavy traffic or in traffic that var-
ies in speed.
OOn winding or hilly roads.OOn slippery roads (rain, snow, ice,
etc.).
OIn very windy areas.
Doing so could cause a loss of vehicle
control and result in an accident.
CAUTION
On manual transmission models, do
not shift into N (Neutral) without de-
pressing the clutch pedal when the
cruise control is set. Should this occur,
depress the clutch pedal and turn the
main switch off immediately. Failure to
do so may cause engine damage.
The cruise control allows driving at a fixed
speed between 30 and 90 MPH (48 and 145
km/h) without keeping your foot on the
accelerator pedal.
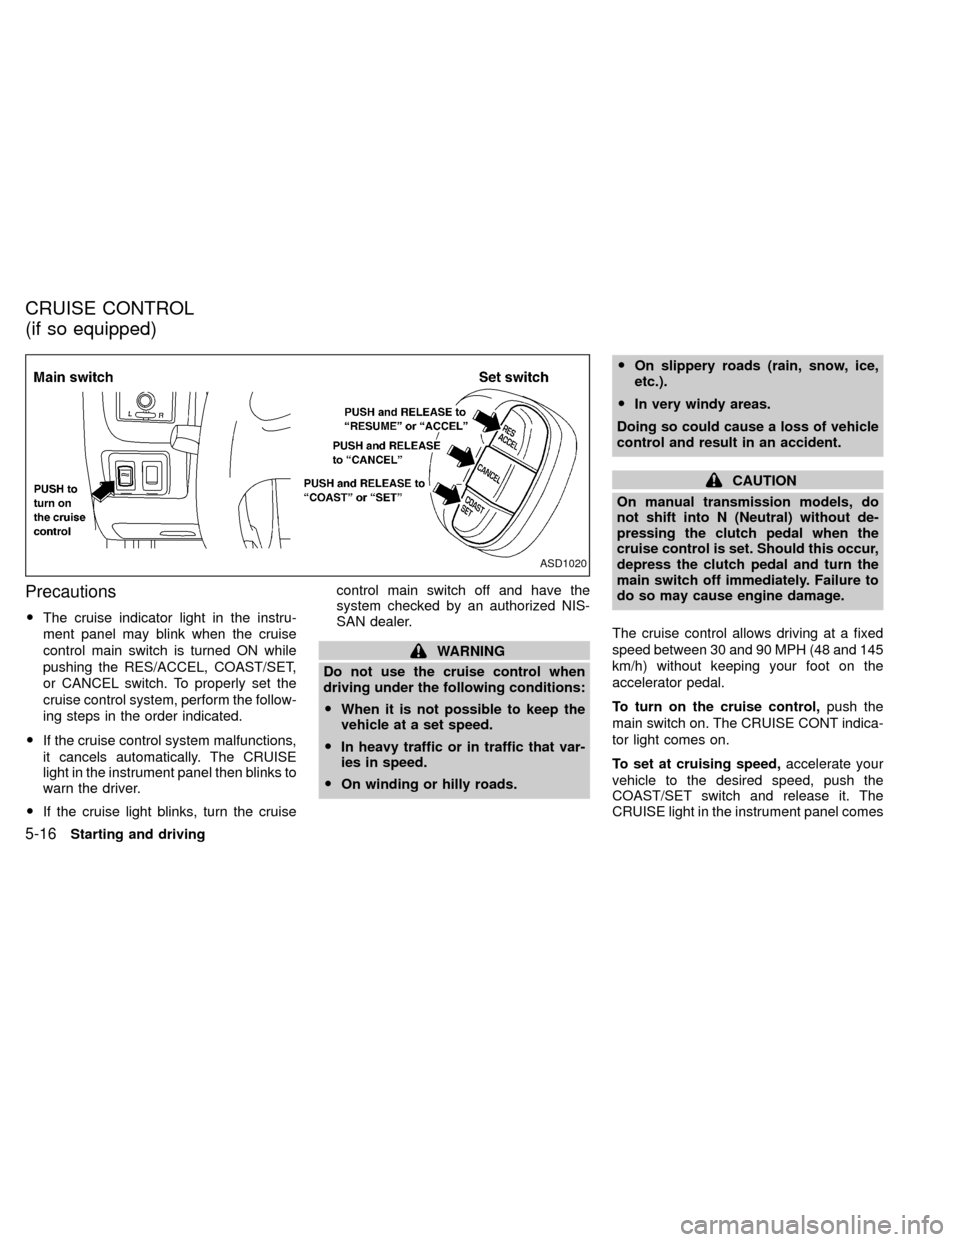
To turn on the cruise control,push the
main switch on. The CRUISE CONT indica-
tor light comes on.
To set at cruising speed,accelerate your
vehicle to the desired speed, push the
COAST/SET switch and release it. The
CRUISE light in the instrument panel comes
ASD1020
CRUISE CONTROL
(if so equipped)
5-16Starting and driving
ZX
Page 151 of 263
WARNING
The anti-lock brake system is a sophisti-
cated device, but it cannot prevent acci-
dents resulting from careless or danger-
ous driving techniques. It can help
maintain vehicle control under braking on
slippery surfaces, but remember that the
stopping distance on slippery surfaces
will be longer than on normal surfaces
even with the anti-lock brake system.
Stopping distances may also be longer
on rough, gravel, or snow covered roads,
or if you are using tire chains. Always
maintain a safe distance from the vehicle
in front of you. Ultimately, the responsi-
bility for safety of self and others rests in
the hands of the driver.
Tire type and condition may also affect
braking effectiveness.
OWhen replacing tires, install the speci-
fied tire size on all four wheels.
OWhen installing a spare tire, make sure
it is the proper size and type as speci-
fied on the tire placard. For tire placard
location information refer to ``Tire plac-
ard'' in the ``Technical and consumer
information'' section of this manual.
Freeing a frozen door lock
To prevent a door lock from freezing, apply
de-icer or glycerin through the key hole. If
the lock becomes frozen, heat the key be-
fore inserting it in the key hole.
Anti-freeze
In the winter when it is anticipated that the
temperature will drop below 32ÉF (0ÉC),
check anti-freeze (ethylene glycol base) to
assure proper winter protection. For details,
see ``Engine cooling system'' in the ``Do-it-
yourself'' section of this manual.
Battery
If the battery is not fully charged during
extremely cold weather conditions, the bat-
tery fluid may freeze and damage the bat-
tery. To maintain maximum efficiency, the
battery should be checked regularly. For
details, see ``Battery'' in the ``Do-it-yourself''
section of this manual.
Draining of coolant water
If the vehicle is to be left outside without
anti-freeze, drain the cooling system by open-
ing the drain valves located under the radiator
and on the engine block. Refill before operat-ing the vehicle. For details, see ``Changing
engine coolant'' in the ``Do-it-yourself'' section
of this manual.
Tire equipment
1. SUMMER tires have a tread designed to
provide superior performance on dry
pavement. However, the performance of
these tires will be substantially reduced
in snowy and icy conditions. If you oper-
ate your vehicle on snowy or icy roads,
NISSAN recommends the use on all four
wheels of MUD & SNOW or ALL SEA-
SON tires. Please consult your NISSAN
dealer for the tire type, size, speed rating
and availability information.
2. For additional traction on icy roads, stud-
ded tires may be used. However, some
U.S. states and Canadian provinces pro-
hibit their use. Check local, state and pro-
vincial laws before installing studded tires.
Skid and traction capabilities of studded
snow tires on wet or dry surfaces may be
poorer than that of non-studded snow
tires.
3. Tire chains may be used. Use of tire
chains may be prohibited according to
location. Check the local laws before
COLD WEATHER DRIVING
5-26Starting and driving
ZX
Page 164 of 263
perature control to maximum hot and fan
control to high speed.
3. If engine overheating is caused by climb-
ing a long hill on a hot day, run the engine
at a fast idle (approximately 1,500 r/min)
until the temperature gauge indicator re-
turns to normal.
4. Get out of the vehicle. Look and listen for
steam or coolant escaping from the ra-
diator before opening the hood. Wait until
no steam or coolant can be seen before
proceeding.
5. Open the hood.
WARNING
If steam or water is coming from the
engine, stand clear to prevent getting
burned.
6. Visually check drive belts for damage or
looseness. Also check if the cooling fan is
running. The radiator hoses and radiator
should not leak water. If coolant is leak-
ing, or the water pump belt is missing or
loose, or the cooling fan does not run,
stop the engine.
WARNING
Be careful not to allow your hands, hair,
jewelry or clothing to come into contact
with, or get caught in, engine belts or
the engine cooling fan. The engine
cooling fan can start at any time when
the coolant temperature is high.
7. After the engine cools down, check the
coolant level in the reservoir tank with the
engine running. Add coolant to the reser-
voir tank if necessary. Have your vehicle
repaired at an authorized NISSAN
dealer.When towing your vehicle, U.S. States, Ca-
nadian provinces and local regulations for
towing must be followed. Incorrect towing
equipment could damage your vehicle. Tow-
ing instructions are available from an autho-
rized NISSAN dealer. Local service operators
are generally familiar with the applicable laws
and procedures for towing. To assure proper
towing and to prevent accidental damage to
your vehicle, NISSAN recommends having a
service operator tow your vehicle. It is advis-
able to have the service operator carefully
read the following precautions:
WARNING
ONever ride in a vehicle that is being
towed.
ONever get under your vehicle after it
has been lifted by a tow truck.
CAUTION
OWhen towing, make sure that the
transmission, axles, steering system
and powertrain are in working con-
dition. If any unit is damaged, dollies
must be used.
TOW TRUCK TOWING
In case of emergency6-11
ZX
Page 174 of 263

8 Do-it-yourself
Maintenance precautions .......................................8-2
Engine compartment check locations ....................8-3
Engine cooling system ...........................................8-5
Checking engine coolant level ...............................8-5
Changing engine coolant .......................................8-6
Engine oil ...............................................................8-9
Checking engine oil level .......................................8-9
Changing engine oil .............................................8-10
Changing engine oil filter .....................................8-12
Automatic transmission fluid (ATF) ......................8-13
Temperature conditions for checking ATF............8-13
Power steering fluid..............................................8-14
Brake and clutch fluid...........................................8-15
Window washer fluid ............................................8-16
Battery ..................................................................8-16
Jump starting ........................................................8-17
Drive belts ............................................................8-18Spark plug replacement .......................................8-19
Air cleaner housing filter ......................................8-20
Wiper blades ........................................................8-22
Parking brake check.............................................8-24
Brake pedal ..........................................................8-24
Brake booster .......................................................8-25
Clutch pedal .........................................................8-26
Fuses ....................................................................8-27
Multi-remote controller battery replacement ........8-28
Light bulbs ............................................................8-29
Headlights ............................................................8-29
Bulb replacement .................................................8-30
Front fog light bulb replacement
(if so equipped) ....................................................8-33
Wheels and tires ..................................................8-34
Four-wheel drive models ......................................8-37
ZX
Page 176 of 263

ADI1129
ENGINE COMPARTMENT
CHECK LOCATIONS
Do-it-yourself8-3
ZX