2000 NISSAN SENTRA air condition
[x] Cancel search: air conditionPage 108 of 240
CD EJECT button
When thebutton is pushed with a com-
pact disc loaded, the compact disc ejects.
When thebutton is pushed while the
compact disc is playing, the compact disc
ejects and the system turns off.
If the compact disc ejects and is not
removed within 10 seconds, it is pulled
back into the slot.
Disc indicator light
CD IN appears in the display when a CD is
loaded with the system ON.
CD care and cleaning:
cHandle a CD by its edges. Never touch
the surface of the disc.
cTo clean a disc, wipe the surface from
the center to the outer edge using a
clean, soft cloth. Do not wipe the disc
using a circular motion.
Do not use a conventional record cleaner
or alcohol intended for industrial use.
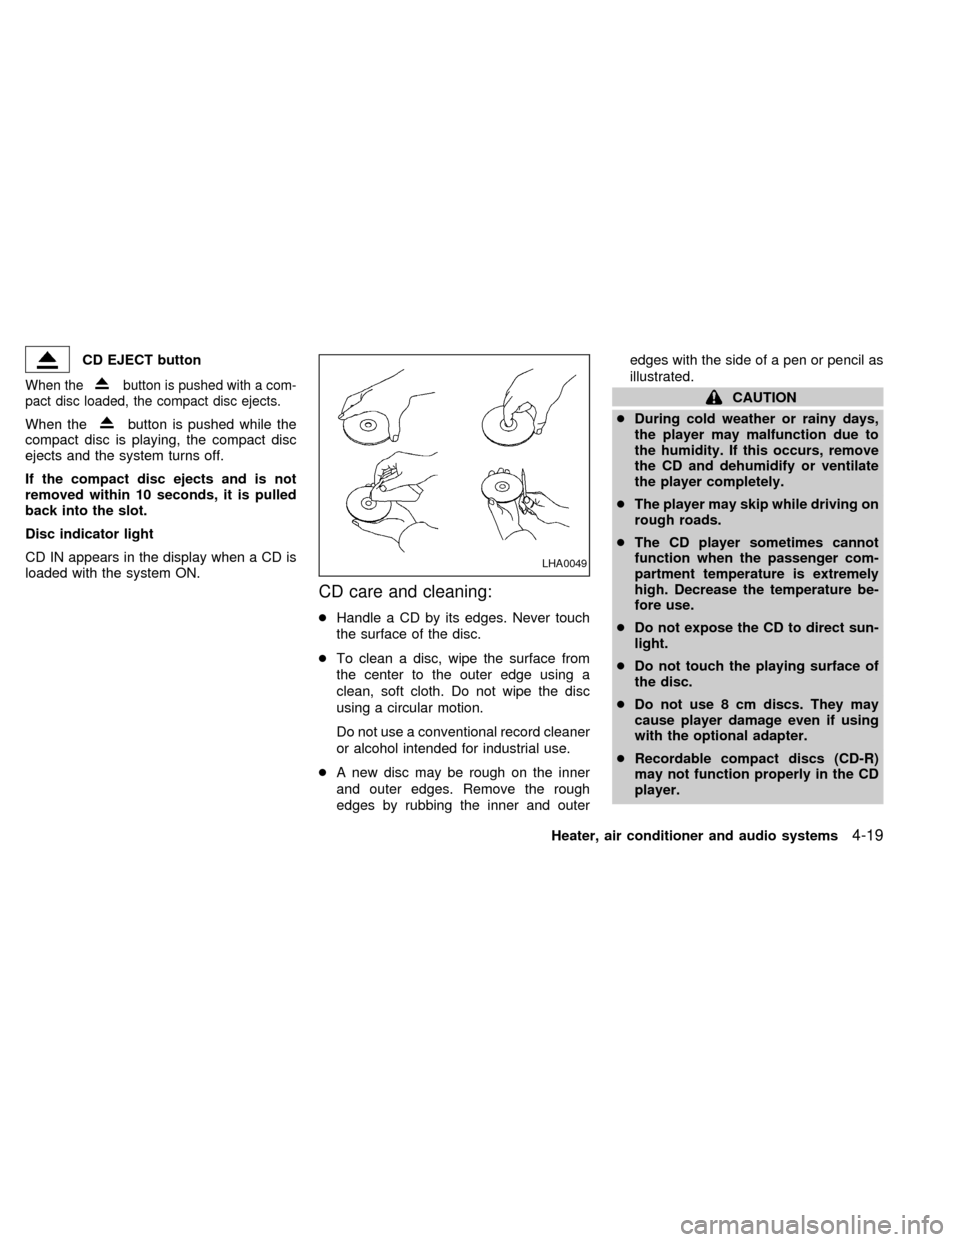
cA new disc may be rough on the inner
and outer edges. Remove the rough
edges by rubbing the inner and outeredges with the side of a pen or pencil as
illustrated.
CAUTION
cDuring cold weather or rainy days,
the player may malfunction due to
the humidity. If this occurs, remove
the CD and dehumidify or ventilate
the player completely.
cThe player may skip while driving on
rough roads.
cThe CD player sometimes cannot
function when the passenger com-
partment temperature is extremely
high. Decrease the temperature be-
fore use.
cDo not expose the CD to direct sun-
light.
cDo not touch the playing surface of
the disc.
cDo not use 8 cm discs. They may
cause player damage even if using
with the optional adapter.
cRecordable compact discs (CD-R)
may not function properly in the CD
player.
LHA0049
Heater, air conditioner and audio systems4-19
ZX
Page 109 of 240
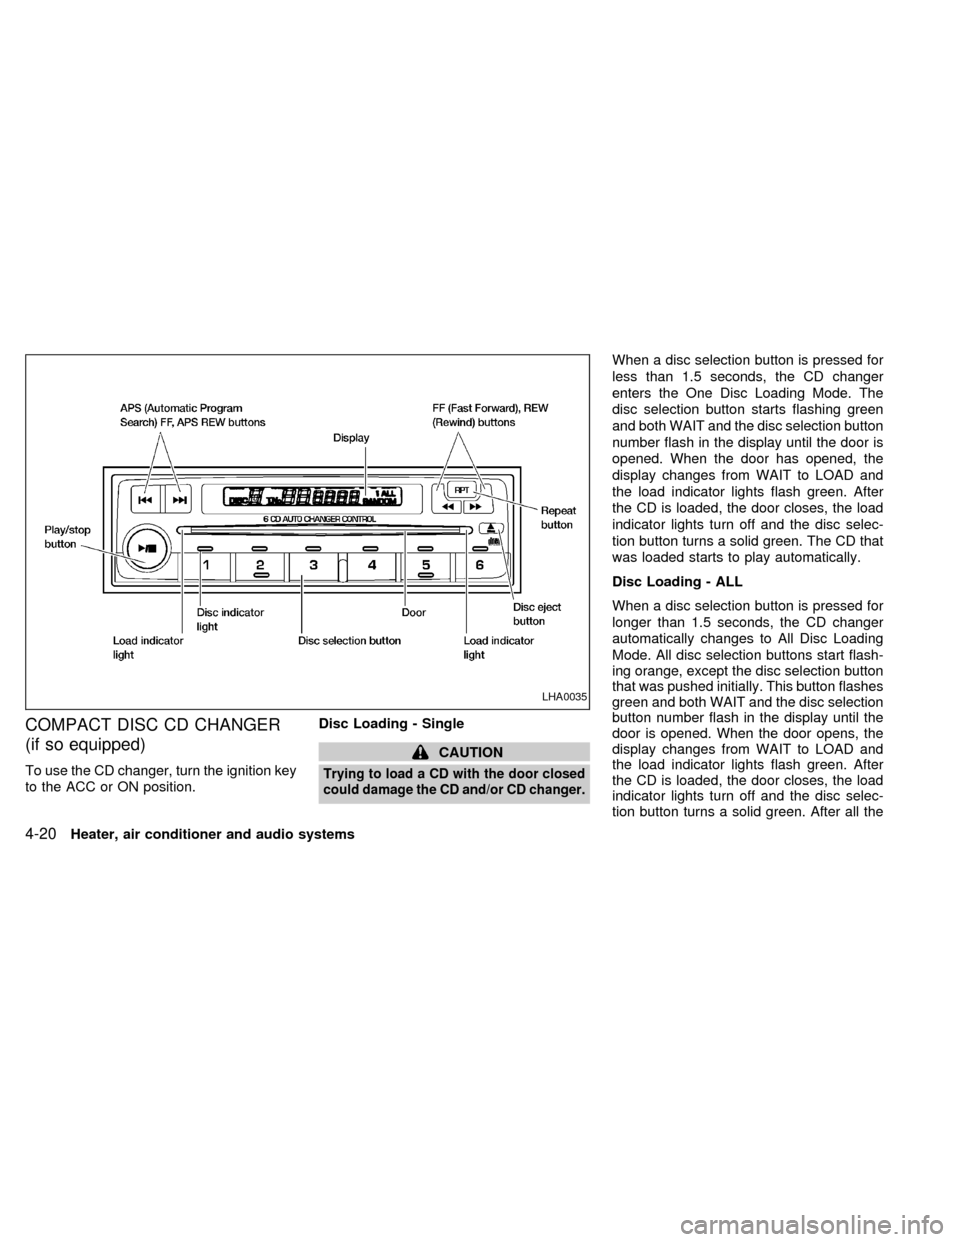
COMPACT DISC CD CHANGER
(if so equipped)
To use the CD changer, turn the ignition key
to the ACC or ON position.Disc Loading - Single
CAUTION
Trying to load a CD with the door closed
could damage the CD and/or CD changer.
When a disc selection button is pressed for
less than 1.5 seconds, the CD changer
enters the One Disc Loading Mode. The
disc selection button starts flashing green
and both WAIT and the disc selection button
number flash in the display until the door is
opened. When the door has opened, the
display changes from WAIT to LOAD and
the load indicator lights flash green. After
the CD is loaded, the door closes, the load
indicator lights turn off and the disc selec-
tion button turns a solid green. The CD that
was loaded starts to play automatically.
Disc Loading - ALL
When a disc selection button is pressed for
longer than 1.5 seconds, the CD changer
automatically changes to All Disc Loading
Mode. All disc selection buttons start flash-
ing orange, except the disc selection button
that was pushed initially. This button flashes
green and both WAIT and the disc selection
button number flash in the display until the
door is opened. When the door opens, the
display changes from WAIT to LOAD and
the load indicator lights flash green. After
the CD is loaded, the door closes, the load
indicator lights turn off and the disc selec-
tion button turns a solid green. After all the
LHA0035
4-20Heater, air conditioner and audio systems
ZX
Page 110 of 240
CDs have been loaded, the CD that was
loaded first starts to play.
Play/Stop button
Press the
button while a CD is play-
ing, the CD stops playing and the CD
changer turns off. Press the
button
while the CD changer is off, the last CD that
was loaded starts to play. Press the
button with no CDs loaded, the CD
changer enters the One Disc Loading
Mode.
FF (fast forward) REV
(reverse) buttons
When the
orbutton is pushed
while the CD is playing, the CD plays at an
increased speed while fast forwarding or
reversing. When the button is released, the
CD returns to normal play speed.
APS (Automatic Pro-
gram Search) FF, APS
REV
When the
button is pushed while the
CD is playing, the selection following the
current one starts to play from the begin-
ning. Push the
button several times to
skip several selections. Each time the but-ton is pushed, the CD advances one selec-
tion. When the last selection on the CD is
skipped, the first selection is played.
When the
button is pushed, the current
selection returns to the beginning. Push the
button several times to skip back sev-
eral selections. Each time the button is
pushed, the CD moves back one selection.
When the first selection on the CD is
skipped, the last selection is played.
Repeat Button
When the
button is pushed while a CD
is playing, the play pattern will change as
follows.
ALL - All disc repeat:All CDs are played
repeatedly in sequence.
BLANK (no symbol) - One disc repeat:
The current CD is repeated.
1 - One track repeat:The current selection
is repeated.
ALL RANDOM - All disc random:Selec-
tions from all the CDs that are stored are
played at random. The same program may
be repeated twice. Pressing the
but-
ton will select the next random selection.RANDOM - One disc random:Selections
from the current CD are played at random.
The same program may be repeated twice.
Pressing the
button will select the next
random selection.
When a new CD is inserted, the play
pattern automatically changes to the
``ALL'' play pattern.
CD Eject - Single
When the
button is pressed for less
than 1.5 seconds, then the current CD that
is playing (or if the CD changer is off, the
last CD that was played) ejects. The disc
indicator light starts flashing orange and
both WAIT and the disc selection button
number flash in the display until the CD is
ejected. When the CD is ejected, the disc
indicator light turns off and the display turns
from WAIT to EJECT. When the CD is
removed from the unit, the CD changer
automatically changes to One Disc Loading
Mode so a new CD can be loaded into the
empty holder. The disc indicator light starts
flashing green and both LOAD and the disc
selection button number appear in the dis-
play until a CD is loaded. One Disc Loading
Mode cancels if another disc selection but-
Heater, air conditioner and audio systems
4-21
ZX
Page 111 of 240
ton is pushed or by waiting longer than 15
seconds to load a CD.
CD Eject - ALL
When the
button is pressed for longer
than 1.5 seconds, the CD changer auto-
matically changes to All Disc Eject Mode.
The disc indicator light for the current CD (or
the last CD that was played) starts flashing
orange and both WAIT and the disc selec-
tion button number flash in the display until
the CD ejects. When the CD ejects, the disc
indicator light turns off and the display turns
from WAIT to EJECT. When the CD is
removed from the unit, the next CD starts to
eject. After all the CDs are ejected, the CD
changer turns off.
If a CD is ejected and is not removed
within 10 seconds, it will be pulled back
into the slot.
CD care and cleaning:
cHandle a CD by its edges. Never touch
the surface of the disc.
cTo clean a disc, wipe the surface from
the center to the outer edge using a
clean, soft cloth. Do not wipe the disc
using a circular motion.
Do not use a conventional record cleaner
or alcohol intended for industrial use.
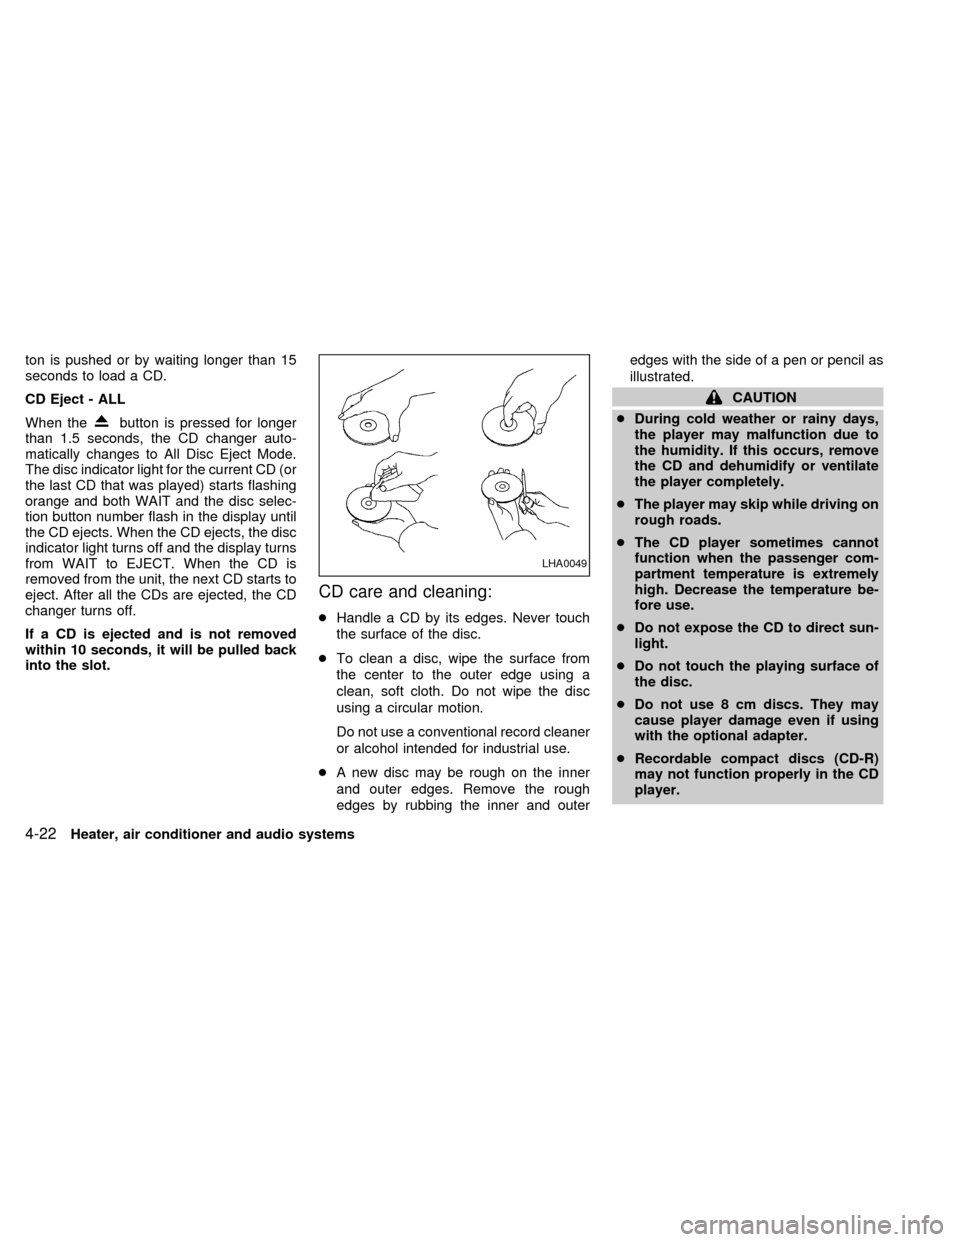
cA new disc may be rough on the inner
and outer edges. Remove the rough
edges by rubbing the inner and outeredges with the side of a pen or pencil as
illustrated.
CAUTION
cDuring cold weather or rainy days,
the player may malfunction due to
the humidity. If this occurs, remove
the CD and dehumidify or ventilate
the player completely.
cThe player may skip while driving on
rough roads.
cThe CD player sometimes cannot
function when the passenger com-
partment temperature is extremely
high. Decrease the temperature be-
fore use.
cDo not expose the CD to direct sun-
light.
cDo not touch the playing surface of
the disc.
cDo not use 8 cm discs. They may
cause player damage even if using
with the optional adapter.
cRecordable compact discs (CD-R)
may not function properly in the CD
player.
LHA0049
4-22Heater, air conditioner and audio systems
ZX
Page 112 of 240
ANTENNA
The antenna cannot be shortened, but can
be removed. When you need to remove the
antenna, turn the antenna rod counterclock-
wise.
To install the antenna rod, turn the antenna
clockwise. Tighten the antenna rod to speci-
fication using a suitable tool such as an
open-end wrench. The antenna rod tighten-
ing specification is 3.4 - 3.6 Nzm(30-32
in-lb). Do not use pliers to tighten the an-
tenna as they can leave marks on the
antenna surface. The antenna rod cannot
be hand tightened to the proper specifica-
tion.
CAUTION
Always properly tighten the antenna
rod during installation or the antenna
rod may break during vehicle opera-
tion.When installing a CB ham radio or a car
phone in your NISSAN, be sure to observe
the following cautions, otherwise the new
equipment may adversely affect the Multi-
port Fuel Injection (MFI) system and other
electronic parts.
WARNING
cA cellular telephone should not be
used while driving so full attention
may be given to vehicle operation.
Some jurisdictions prohibit the use
of cellular telephones while driving.
cIf you must make a call while your
vehicle is in motion, the hands free
cellular phone operational mode (if
so equipped) is highly recom-
mended. Exercise extreme caution
at all times so full attention may be
given to vehicle operation.
cIf a conversation in a moving vehicle
requires you to take notes, pull off
the road to a safe location and stop
your vehicle before doing so.
CAUTION
cKeep the antenna as far away as
possible from the Engine Control
Module (ECM).
c
Keep the antenna wire more than 8 in.
(20 cm) away from the Multiport Fuel
Injection harness. Do not route the
antenna wire next to any harness.
cAdjust the antenna standing-wave
ratio as recommended by the manu-
facturer.
cConnect the ground wire from the
CB radio chassis to the body.
cFor details, consult an authorized
NISSAN dealer.
CAR PHONE OR CB RADIO
Heater, air conditioner and audio systems4-23
ZX
Page 113 of 240

MEMO
4-24Heater, air conditioner and audio systems
ZX
Page 117 of 240

the influence of alcohol. Every year thou-
sands of people are injured or killed in
alcohol-related accidents. Although the lo-
cal laws vary on what is considered to be
legally intoxicated, the fact is that alcohol
affects all people differently and most
people underestimate the effects of alcohol.
Remember, drinking and driving don't mix!
And that is true for drugs, too (over-the-
counter, prescription, and illegal drugs). Do
not drive if your ability to operate your
vehicle is impaired by alcohol, drugs, or
some other physical condition.
AUTOMATIC TRANSMISSION
On automatic transmission models the igni-
tion lock is designed so the key cannot be
turned to LOCK and removed until the shift
selector lever is moved to the P (Park)
position.
When removing the key from the ignition,
make sure the shift selector lever is in the P
(Park) position.
When the key cannot be turned to the LOCK
position, proceed as follows to remove the
key.1) Move the shift selector lever into the P
(Park) position.
2) Turn the ignition key slightly toward the
ON position.
3) Turn the key to the LOCK position.
4) Remove the key.
The shift lever is designed so it cannot be
moved out of P (Park) and into any of the
other gear positions if the ignition key is
turned to OFF or if the key is removed from
the switch.
The shift selector lever can be moved if
the ignition switch is in the ON position
and the foot brake pedal is depressed.
There is an OFF position between the
LOCK and ACC positions. The OFF posi-
tion is indicated by a ``1'' on the key
cylinder. When the ignition is in OFF, the
steering wheel is not locked.
WSD0004
IGNITION SWITCH
5-4Starting and driving
ZX
Page 129 of 240

During the first 1,000 miles (1,600 km),
follow these recommendations for the future
reliability and economy of your new vehicle.
Failure to follow these recommendations
may result in vehicle damage or shortened
engine life.
cDo not drive over the legal speed limit
and do not run the engine over 4,000
rpm. Avoid driving for long periods at
constant speed, either fast or slow.
cDo not accelerate at full throttle in any
gear.
cAvoid quick starts.
cAvoid hard braking as much as possible.
cDo not tow a trailer for the first 500 miles
(800 km).cAccelerate slowly and smoothly. Main-
tain cruising speeds with a constant ac-
celerator position.
cDrive at moderate speeds on the high-
way. Driving at high speed lowers fuel
economy.
cAvoid unnecessary stopping and brak-
ing. Maintain a safe distance behind
other vehicles.
cUse a proper gear range which suits road
conditions. On level roads, shift into high
gear as soon as possible.
cAvoid unnecessary engine idling.cKeep your engine tuned up.
cFollow the recommended periodic main-
tenance schedule.
cKeep the tires inflated to the correct
pressure. Low tire pressure increases
tire wear and wastes fuel.
cKeep the front wheels in correct align-
ment. Improper alignment increases tire
wear and lowers fuel economy.
cAir conditioner operation lowers fuel
economy. Use the air conditioner only
when necessary.
cWhen cruising at highway speeds, it is
more economical to use the air condi-
tioner and leave the windows closed to
reduce drag.
SD1001M
BREAK-IN SCHEDULE INCREASING FUEL
ECONOMY
5-16Starting and driving
ZX