2000 NISSAN SENTRA ECO mode
[x] Cancel search: ECO modePage 130 of 240
WARNING
Do not park the vehicle over flammable
materials such as dry grass, waste pa-
per or rags. They may ignite and cause
a fire.
1. Firmly apply the parking brake.
2.Manual transmission models:
Place the selector lever in the R (Re-
verse) position. When parking on an up-
hill grade, place the selector lever in 1
(First) gear.Automatic transmission models:
Move the shift selector lever to the P
(Park) position.
WARNING
cSafe parking procedures require that
both the parking brake be set and
the transmission placed into P (Park)
for automatic transmission models
or in an appropriate gear for manual
transmission models. Failure to do
so could cause the vehicle to move
unexpectedly or roll away and resultin an accident. Make sure the shift
lever has been pushed as far forward
as it can go and cannot be moved
without depressing the button at the
end of the lever.
cNever leave the engine running while
the vehicle is unattended.
c
Do not leave children unattended in-
side the vehicle. They could unknow-
inly activate switches or controls.
Unattended children could become
involved in serious accidents.
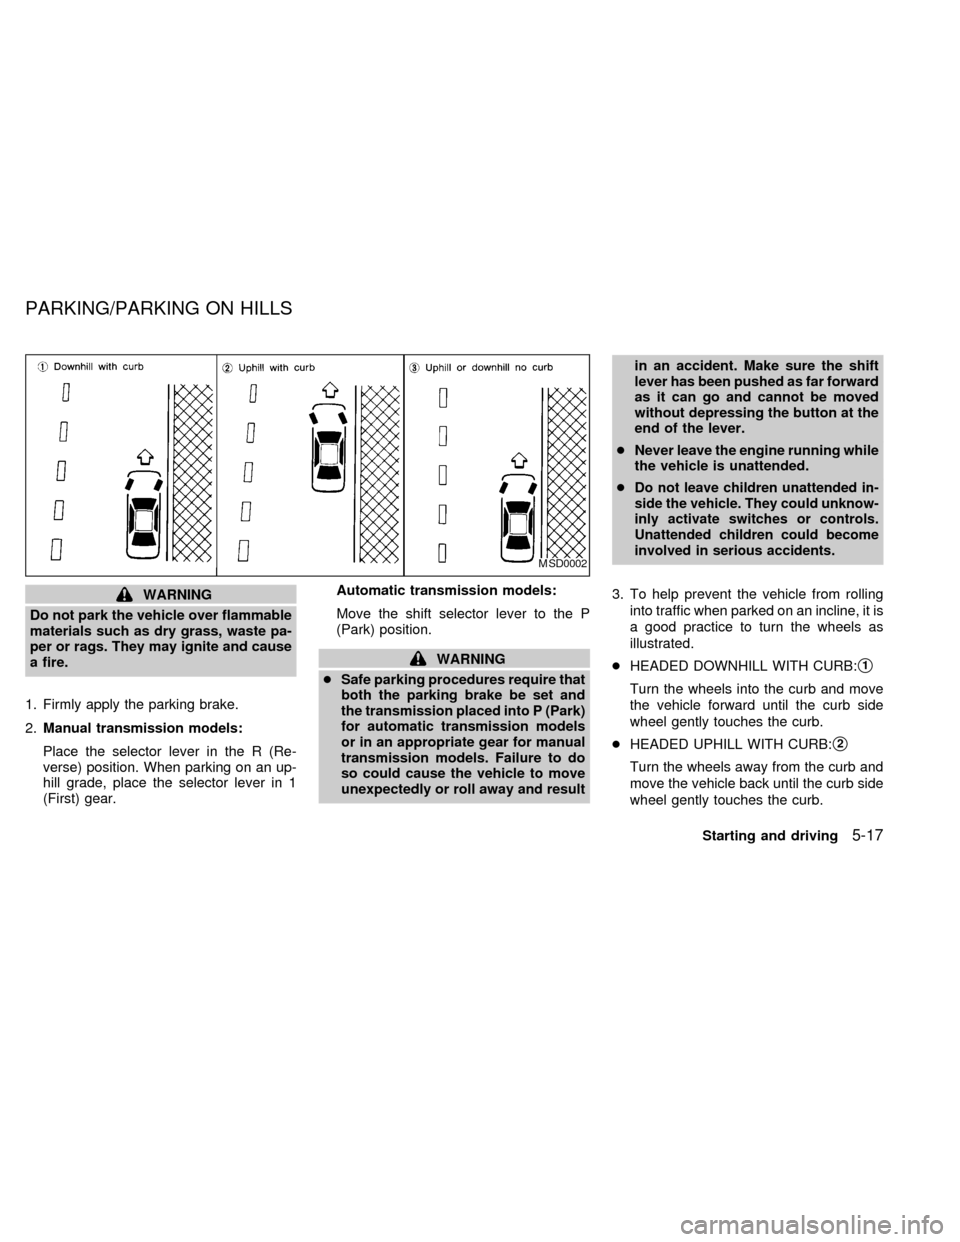
3. To help prevent the vehicle from rolling
into traffic when parked on an incline, it is
a good practice to turn the wheels as
illustrated.
cHEADED DOWNHILL WITH CURB:
s1
Turn the wheels into the curb and move
the vehicle forward until the curb side
wheel gently touches the curb.
cHEADED UPHILL WITH CURB:
s2
Turn the wheels away from the curb and
move the vehicle back until the curb side
wheel gently touches the curb.
MSD0002
PARKING/PARKING ON HILLS
Starting and driving5-17
ZX
Page 145 of 240
cMake sure the jumper cables do not
touch moving parts in the engine com-
partment and that the cable clamps do
not contact any other metal.
5. Start the engine of the booster vehicle
and let it run for a few minutes.
6. Keep the engine speed of the booster
vehicle at about 2,000 rpm, and start the
engine of the vehicle being jump started.
CAUTION
Do not keep the starter motor engaged
for more than 10 seconds. If the engine
does not start right away, turn the key
off and wait 3 to 4 seconds before
trying again.
7. After starting the engine, carefully dis-
connect the negative cable and then the
positive cable.
8. Be sure to dispose of the cloth used to
cover the vent holes as it may be con-
taminated with corrosive acid.
CAUTION
cAutomatic transmission models can-
not be push started. This may cause
transmission damage.
cThree way catalyst equipped models
should not be started by pushing.
The three way catalyst may be dam-
aged.
cNever try to start the vehicle by tow-
ing it. When the engine starts, the
forward surge could cause the ve-
hicle to collide with the tow vehicle.If your vehicle is overheating (indicated by
an extremely high temperature gauge read-
ing), or if you feel a lack of engine power,
detect abnormal noise, etc., take the follow-
ing steps.
WARNING
cDo not continue to drive if your ve-
hicle overheats. Doing so could
cause a vehicle fire.
cTo avoid the danger of being
scalded, never remove the radiator
cap while the engine is still hot.
When the radiator cap is removed,
pressurized hot water will spurt out,
possibly causing serious injury.
cDo not open the hood if steam is
coming out.
1. Move the vehicle safely off the road,
apply the parking brake and move the
selector lever to N (Neutral) (manual
transmission) or the shift selector lever to
P (Park) (automatic transmission).
Do not stop the engine.
2. Turn off the air conditioner. Open all the
windows, move the heater or air condi-
tioner temperature control to maximum
PUSH STARTING IF YOUR VEHICLE
OVERHEATS
6-10In case of emergency
ZX
Page 147 of 240
cWhen towing front wheel drive,
manual transmission models with
the front wheels on the ground (if
you do not use a towing dolly):
Turn the ignition key to the OFF
position, and secure the steering
wheel in a straight-ahead position
with a rope or similar device. Never
place the ignition key in the LOCK
position. This will result in damage
to the steering lock mechanism.
Move the gearshift lever to the N
(Neutral) position.
cWhen towing front wheel drive, auto-
matic transmission models with the
rear wheels on the ground (if you do
not use towing dollies), release the
parking brake.
cAlways attach safety chains before
towing.
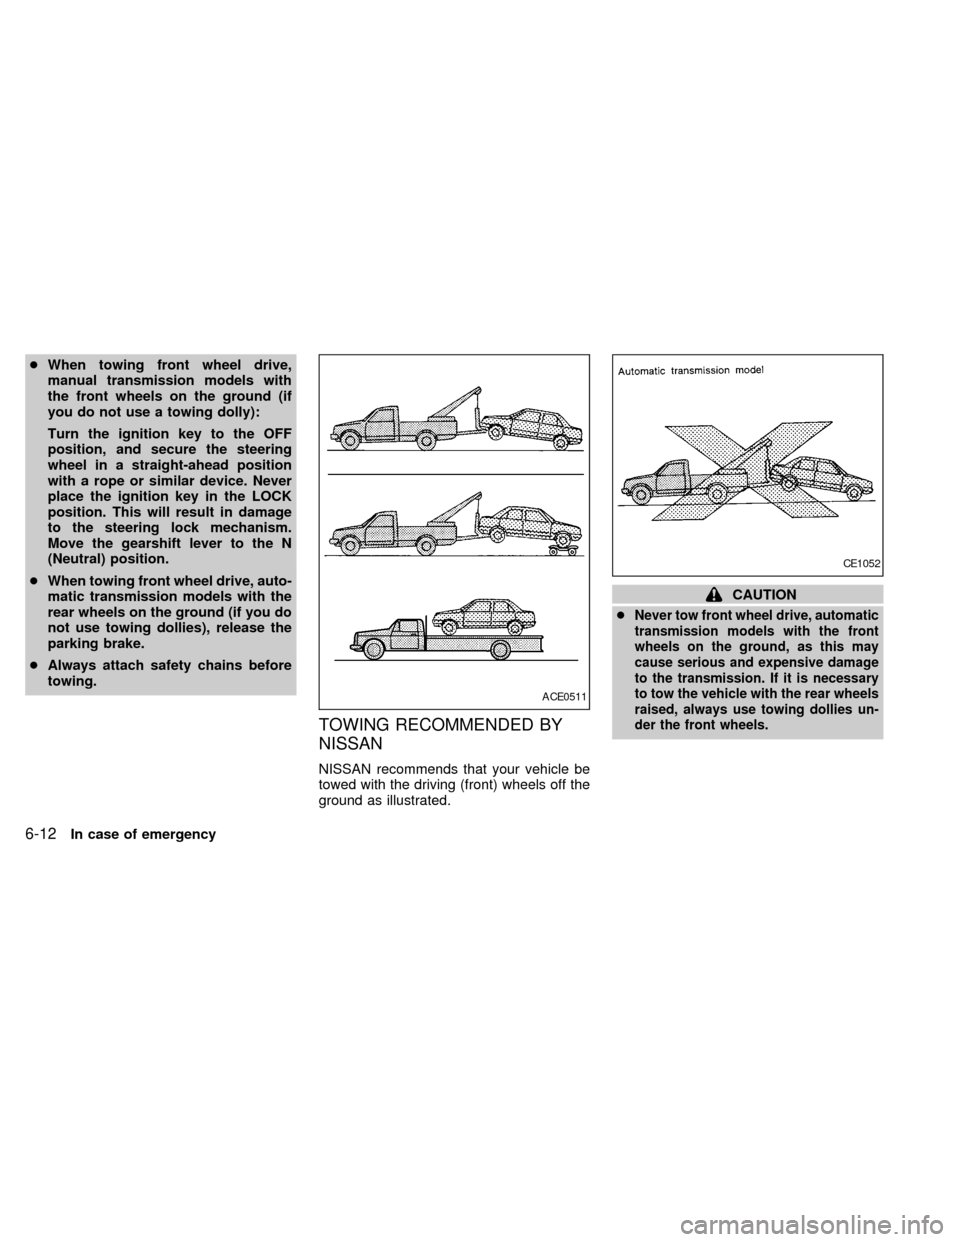
TOWING RECOMMENDED BY
NISSAN
NISSAN recommends that your vehicle be
towed with the driving (front) wheels off the
ground as illustrated.
CAUTION
c
Never tow front wheel drive, automatic
transmission models with the front
wheels on the ground, as this may
cause serious and expensive damage
to the transmission. If it is necessary
to tow the vehicle with the rear wheels
raised, always use towing dollies un-
der the front wheels.
ACE0511
CE1052
6-12In case of emergency
ZX
Page 148 of 240
cNever tow an automatic transmission
model with all four wheels on the
ground. This may cause serious and
expensive damage to the transmis-
sion.
VEHICLE RECOVERY (freeing a
stuck vehicle)
cTow chains or cables must be attached
only to the main structural members of
the vehicle.
cPulling devices should be routed so they
do not touch any part of the suspension,
steering, brake or cooling systems.
cAlways pull the cable straight out from
the front or rear of the vehicle. Never pull
the vehicle at an angle.
cPulling devices such as ropes or canvas
straps are not recommended for use in
vehicle towing or recovery.
cStand clear of a stuck vehicle.
WARNING
Do not spin your tires at high speed. This
could cause them to explode and result
in serious injury. Parts of your vehicle
could also overheat and be damaged.
In case of emergency6-13
ZX
Page 153 of 240
Occasionally remove loose dust from the
interior trim, plastic parts and seats using a
vacuum cleaner or soft brush. Wipe the
vinyl and leather surfaces with a clean, soft
cloth dampened in mild soap solution, then
wipe clean with a dry soft cloth. Before
using any fabric protector, read the manu-
facturer's recommendations. Some fabric
protectors contain chemicals that may stain
or bleach the seat material. Use a cloth
dampened only with water, to clean the
meter and gauge lens.
CAUTION
cNever use benzine, thinner, or any
similar material.
cNever use fabric protectors unless
recommended by the manufacturer.
cDo not use glass or plastic cleaner
on meter or gauge lens covers. It
may damage the lens cover.
Floor mats
The use of genuine NISSAN floor mats can
extend the life of your vehicle carpet and
make it easier to clean the interior.No
matter what mats are used, be sure theyare fitted for your vehicle and are prop-
erly positioned in the footwell to prevent
interference with pedal operation.Mats
should be maintained with regular cleaning
and replaced if they become excessively
worn.
Floor mat positioning aid
All models include front floor mat brackets
to act as a floor mat positioning aid. NIS-
SAN floor mats have been specially de-
signed for your vehicle model. The floor mat
has a grommet hole incorporated in it. Po-
sition the mat by placing the floor mat
bracket hook through the floor mat grommet
hole while centering the mat in the footwell.
Periodically check to make certain the mats
are properly positioned.
WAI0002
CLEANING INTERIOR
7-4Appearance and care
ZX
Page 181 of 240
If the brake pedal goes down farther than
normal, it may be due to a lack of adjust-
ment of the rear drum brakes. To adjust,
apply the parking brake several times.
WARNING
See an authorized NISSAN dealer for a
brake system check if the brake pedal
height does not return to normal.
Brake pad wear indicators
The disc brake pads on your vehicle have
an audible wear indicator. When a brake
pad requires replacement, it makes a high
pitched scraping or screeching sound when
the vehicle is in motion whether or not the
brake pedal is depressed. Have the brakes
checked as soon as possible if the wear
indicator sound is heard.
Under some driving or climate conditions,
occasional brake squeak, squeal or other
noise may be heard. Occasional brake
noise during light to moderate stops is nor-
mal and does not affect the function or
performance of the brake system.
The rear drum brakes (if so equipped) do
not have audible wear indicators. Shouldyou ever hear an unusually loud noise from
the rear drum brakes, have them inspected
as soon as possible by an authorized NIS-
SAN dealer.
Proper brake inspection intervals should
be followed.For more information regard-
ing brake inspections, see the appropriate
maintenance schedule information in the
``Maintenance'' section of this manual.
BRAKE BOOSTER
Check the brake booster function as fol-
lows:
1. With the engine off, press and release
the brake pedal several times. When
brake pedal movement (distance of
travel) remains the same from one pedal
application to the next, continue on to the
next step.
2. While depressing the brake pedal, start
the engine. The pedal height should drop
a little.
3. With the brake pedal depressed, stop the
engine. Keeping the pedal depressed for
about 30 seconds, the pedal height
should not change.
4. Run the engine for one minute withoutdepressing the brake pedal, then turn it
off. Depress the brake pedal several
times. The pedal travel distance will de-
crease gradually with each depression
as the vacuum is released from the
booster.
If the brakes do not operate properly, see an
authorized NISSAN dealer.
8-24Do-it-yourself
ZX
Page 194 of 240
vehicle has been parked for three or more
hours, or driven less than 1 mile (1.6 km).
COLD tire pressures are shown on the tire
placard affixed to the driver's side rear door
pillar.
WARNING
cImproperly inflated tires can fail sud-
denly and cause an accident.
c
The vehicle weight capacity is indi-
cated on the tire placard. Do not load
your vehicle beyond this capacity.
Overloading your vehicle may result
in reduced tire life, unsafe operating
conditions due to premature tire fail-
ure, or unfavorable handling charac-
teristics and could also lead to a
serious accident. Loading beyond the
specified capacity may also result in
failure of other vehicle components.
cBefore taking a long trip, or when-
ever you heavily load your vehicle,
use a tire pressure gauge to ensure
that the tire pressures are at the
specified level.cDo not drive your vehicle over 85
MPH (140 km/h) unless it is equipped
with high speed rated tires. Driving
faster than 85 MPH (140 km/h) may
result in tire failure, loss of control
and possible injury.
TYPES OF TIRES
WARNING
When changing or replacing tires, be
sure all four tires are of the same type
(i.e., summer, all season or snow) and
construction. An authorized NISSAN
dealer may be able to help you with
information about tire type, size, speed
rating and availability. Replacement
tires may have a lower speed rating
than the factory equipped tires, and
may not match the potential maximum
vehicle speed. Never exceed the maxi-
mum speed rating of the tire.
All Season tires
NISSAN specifies All Season tires on some
models to provide good performance all
year round, including snowy and icy road
conditions. All Season tires are identified by
``ALL SEASON'' and/or ``M&S'' on the tiresidewall. Snow tires have better snow trac-
tion than All Season tires and may be more
appropriate in some areas.
Summer tires
NISSAN specifies summer tires on some
models to provide superior performance on
dry roads. Summer tire performance is sub-
stantially reduced in snow and ice. Summer
tires do not have the tire traction rating
``M&S'' on the tire sidewall.
If you plan to operate your vehicle in snowy
or icy conditions, NISSAN recommends the
use of ``SNOW'' tires or ``ALL SEASON''
tires on all four wheels.
Snow tires
If snow tires are needed, it is necessary to
select tires equivalent in size and load rating
to the original equipment tires. If you do not,
it can adversely affect the safety and han-
dling of your vehicle.
Generally, snow tires have lower speed
ratings than factory equipped tires and may
not match the potential maximum vehicle
speed. Never exceed the maximum speed
rating of the tire.
If you plan to operate your vehicle in snowy
or icy conditions, NISSAN recommends the
Do-it-yourself
8-37
ZX
Page 226 of 240
cDo not modify the vehicle exhaust
system, brake system, etc. to install
a trailer hitch.
cTo reduce the possibility of addi-
tional damage if your vehicle is
struck from the rear, where practical,
remove the hitch and/or receiver
when not in use.
cAfter the hitch is removed, seal the
bolt holes to prevent exhaust fumes,
water or dust from entering the pas-
senger compartment.
cRegularly check that all hitch mount-
ing bolts are securely mounted.
Tire pressures
cWhen towing a trailer, inflate the vehicle
tires to the recommended cold tire pres-
sure indicated on the tire placard (lo-
cated on the driver's side rear door
pillar).
cTrailer tire condition, size, load rating
and proper inflation pressure should be
in accordance with the trailer and tire
manufacturers' specifications.
Safety chains
Always use suitable safety chains between
your vehicle and the trailer. Safety chains
should be crossed and should be attached
to the hitch, not to the vehicle bumper or
axle. Be sure to leave enough slack in the
chains to permit turning corners.
Trailer lights
Trailer lights should comply with federal
and/ or local regulations. When wiring the
vehicle for towing, connect the stop and tail
light pickup into the vehicle electrical circuit.
Trailer brakes
If your trailer is equipped with a braking
system, make sure it conforms to federal
and/or local regulations and that it is prop-
erly installed.
WARNING
Never connect a trailer brake system
directly to the vehicle brake system.
Pre-towing tips
cBe certain your vehicle maintains a level
position when a loaded and/or unloadedtrailer is hitched. Do not drive the vehicle if
it has an abnormal nose-up or nose- down
condition; check for improper tongue load,
overload, worn suspension or other pos-
sible causes of either condition.
cAlways secure items in the trailer to
prevent load shift while driving.
cBe certain your rear view mirrors con-
form to all federal, state or local regula-
tions. If not, install any mirrors required
for towing before driving the vehicle.
Trailer towing tips
In order to gain skill and an understanding
of the vehicle's behavior, you should prac-
tice turning, stopping and backing up in an
area which is free from traffic. Steering,
stability, and braking performance are
somewhat different than under normal driv-
ing conditions.
cAlways secure items in the trailer to
prevent load shift while driving.
c
Avoid abrupt starts, acceleration or stops.
cAvoid sharp turns or lane changes.
cAlways drive your vehicle at a moderate
speed.
c
Always block the wheels on both vehicle
and trailer when parking. Parking on a
Technical and consumer information10-17
ZX