2000 NISSAN QUEST light
[x] Cancel search: lightPage 168 of 292

Precautions on cassette player opera-
tion
cTo maintain good quality sound, Nis-
san recommends using cassette
tapes of 60 minutes or shorter in
length.
cCassette tapes should be removed
from the player when not in use. Store
cassettes in their protective cases
and away from direct sunlight, heat,
dust, moisture, and magnetic
sources.
cDirect sunlight can cause the cassette
to become deformed. The use of de-
formed cassettes may cause the cas-
sette to jam in the player.
cDo not use cassettes with loose labels
which are peeling and loose. If used
the label could jam in the player.
cIf a cassette has loose tape, insert a
pencil through one of the cassette
hubs and rewind the tape firmly
around the hubs. Loose tape may
cause tape jamming and wavering
sound quality.
cOver a period of time, the playbackhead, capstan and pinch roller may
collect a tape coating residue as the
tape is played. This residue accumu-
lation can cause weak or wavering
sound, and should be removed peri-
odically with a head cleaning tape. If
the residue is not removed periodi-
cally, the player may need to be dis-
assembled for cleaning.
PLAY/STOP
Push the CD, AM, or FM button while the
cassette tape is playing to stop the tape.
Push the TAPE button to play the tape.
Changing the direction of tape play
Push the SIDE 1-2 select button to switch
sides on the tape. The display will change
from TAPE 1 PLAY to TAPE 2 PLAY.
FF (Fast Forward), REW (Rewind)
Push the REW or FF button for the desired
direction.
When REW is pushed TAPE 1 REW illumi-
nates on the display (TAPE 2 REW will
illuminate if on side 2). When FF is pushed
TAPE 2 FF illuminates on the display (TAPE
2 FF will illuminate if on side 2). To stop the
FF or REW function, press the FF or REWbutton again or the TAPE button.
Dolby NR (Noise Reduction)
Push the
button for Dolby NR encoded
tapes to reduce high frequency tape noise.
When activated, a
appears in the dis-
play window.
Dolby NR is manufactured under license
from Dolby Laboratories Licensing Corpora-
tion. ``Dolby NR'' and the double-D symbol
are trademarks of Dolby Laboratories Li-
censing Corporation.
AMS (Automatic Music Search)
Pushing the seek button while playing a
cassette tape activates the Automatic Music
Search (AMS) mode. Press
SEEK to
rewind the tape to the previous selection, or
press SEEK
to forward the tape to the
nest selection.
This system searches for the blank intervals
between selections. If there is a blank inter-
val within one program or there is no interval
between programs, the system may not
stop in the desired or expected location.
Heater, air conditioner and audio systems
4-27
ZX
Page 169 of 292
Metal or chrome tape usage
The cassette player is automatically set to
high performance play when playing a metal
or chrome tape.
TAPE EJECT
Push the EJ button. The cassette tape
automatically come out.
Compact Disc (CD) player opera-
tion
Turn the ignition key to the ACC or ON
position and carefully insert the compact
disc into the slot with the label side up. The
compact disc is automatically pulled into the
slot and starts to play.
If the radio or cassette tape is already
operating, it automatically turns off and the
compact disc begins to play.
CAUTION
Do not force the compact disc into the
slot. This could damage the player.
TAPE/CD
When the CD side of the TAPE/CD button is
pushed with the compact disc loaded andthe tape or the radio playing, the tape or
radio turns off and the compact disc start to
play.
FF (Fast Forward), REW (Rewind)
When the FF or REW button is pushed
while the compact disc is playing, the com-
pact disc plays at an increased speed while
fast forwarding or rewinding. When the but-
ton is released, the compact disc returns to
normal play speed.
SEEK
or
When the SEEKbutton is pushed while the
compact disc is playing, the next selection
following the present one starts to play from
the beginning. Push the SEEK
button sev-
eral times to skip several selections. Each
time the button is pushed, the CD advances
one additional selection. The number appears
in the display window. (When the last selec-
tion on the compact disc is skipped, the first
selection is played.)
When the SEEKbutton is pushed, the se-
lection being played returns to the beginning.
Push the SEEK
button several times to skip
back several selections. Each time the button
is pushed, the CD moves back one selection.
SHUFFLE
When the SHUFFLE button is pressed the
tracks on the CD are played at random, not
following the sequence on the compact disc.
The same program may be repeated twice.
CD EJECT
When the EJ button is pushed with a com-
pact disc loaded, the compact disc ejects.
When the EJ button is pushed while the
compact disc is playing, the disc ejects and
the system turns off.
If the compact disc ejects and is not re-
moves within 10 seconds, it is pulled back
into the slot.
DISC indicator light
DISC illuminates when a compact disc is
loaded into the player.
4-28Heater, air conditioner and audio systems
ZX
Page 170 of 292
CD CARE AND CLEANING
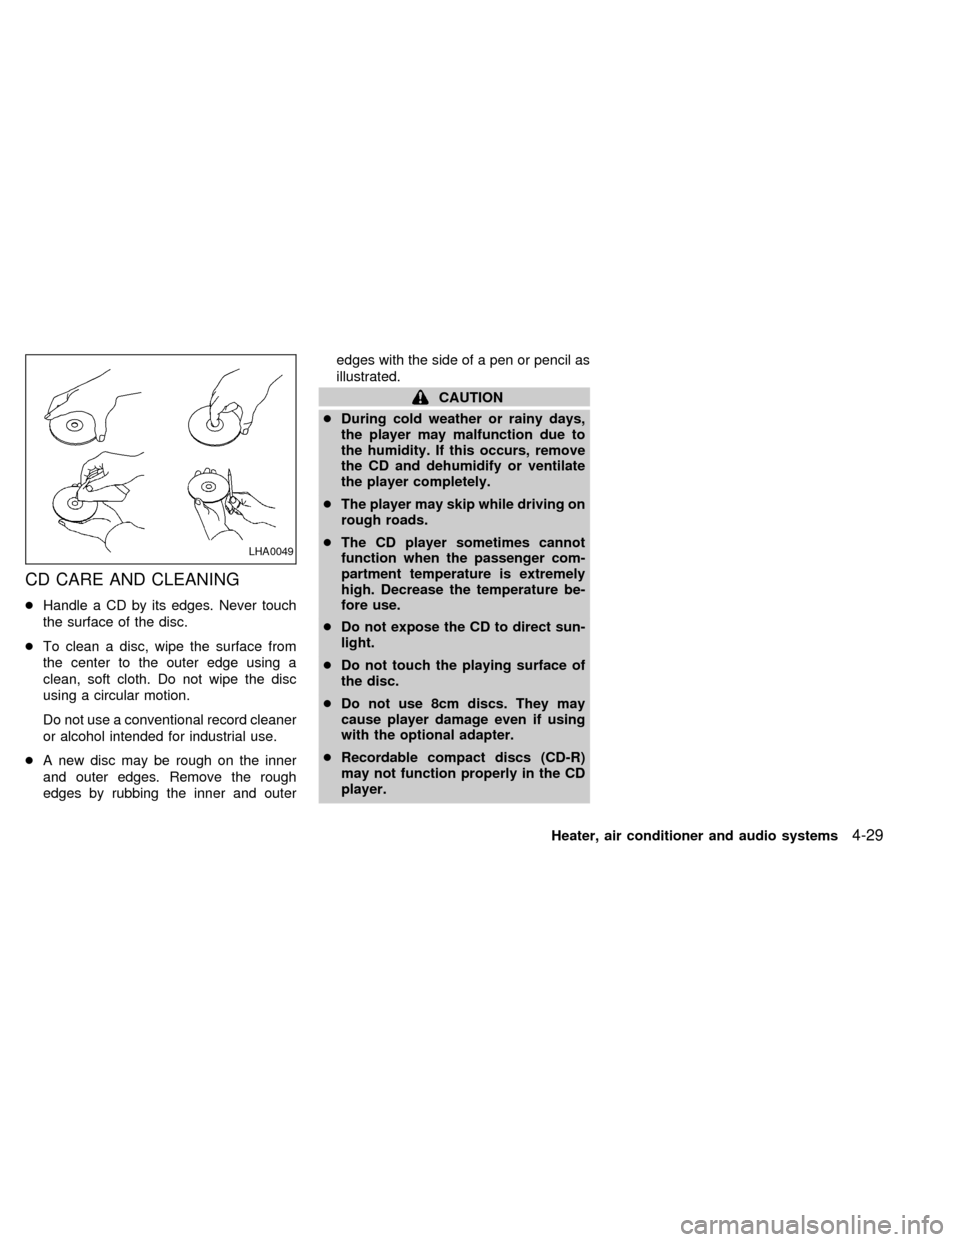
cHandle a CD by its edges. Never touch
the surface of the disc.
cTo clean a disc, wipe the surface from
the center to the outer edge using a
clean, soft cloth. Do not wipe the disc
using a circular motion.
Do not use a conventional record cleaner
or alcohol intended for industrial use.
cA new disc may be rough on the inner
and outer edges. Remove the rough
edges by rubbing the inner and outeredges with the side of a pen or pencil as
illustrated.
CAUTION
cDuring cold weather or rainy days,
the player may malfunction due to
the humidity. If this occurs, remove
the CD and dehumidify or ventilate
the player completely.
cThe player may skip while driving on
rough roads.
cThe CD player sometimes cannot
function when the passenger com-
partment temperature is extremely
high. Decrease the temperature be-
fore use.
cDo not expose the CD to direct sun-
light.
cDo not touch the playing surface of
the disc.
cDo not use 8cm discs. They may
cause player damage even if using
with the optional adapter.
cRecordable compact discs (CD-R)
may not function properly in the CD
player.
LHA0049
Heater, air conditioner and audio systems4-29
ZX
Page 173 of 292
CAUTION
cDuring cold weather or rainy days,
the player may malfunction due to
the humidity. If this occurs, remove
the CD and dehumidify or ventilate
the player completely.
cThe player may skip while driving on
rough roads.
cThe CD player sometimes cannot
function when the passenger com-
partment temperature is extremely
high. Decrease the temperature be-
fore use.
cDo not expose the CD to direct sun-
light.
cDo not touch the playing surface of
the disc.
cDo not use 8cm discs. They may
cause player damage even if using
with the optional adapter.
cRecordable compact discs (CD-R)
may not function properly in the CD
player.
STEERING WHEEL SWITCH FOR
AUDIO CONTROLS
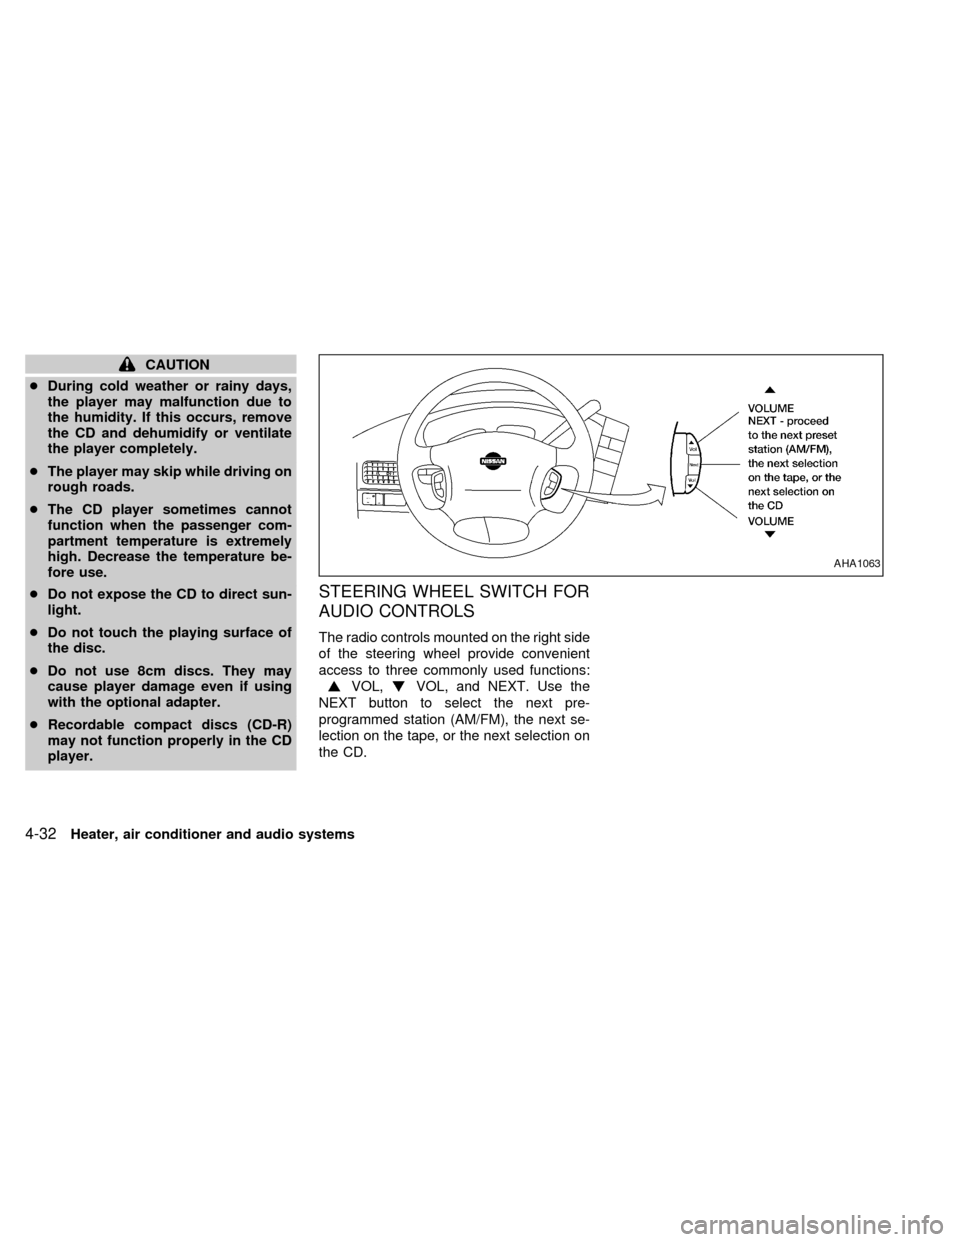
The radio controls mounted on the right side
of the steering wheel provide convenient
access to three commonly used functions:
VOL,VOL, and NEXT. Use the
NEXT button to select the next pre-
programmed station (AM/FM), the next se-
lection on the tape, or the next selection on
the CD.
AHA1063
4-32Heater, air conditioner and audio systems
ZX
Page 176 of 292
CD CARE AND CLEANING
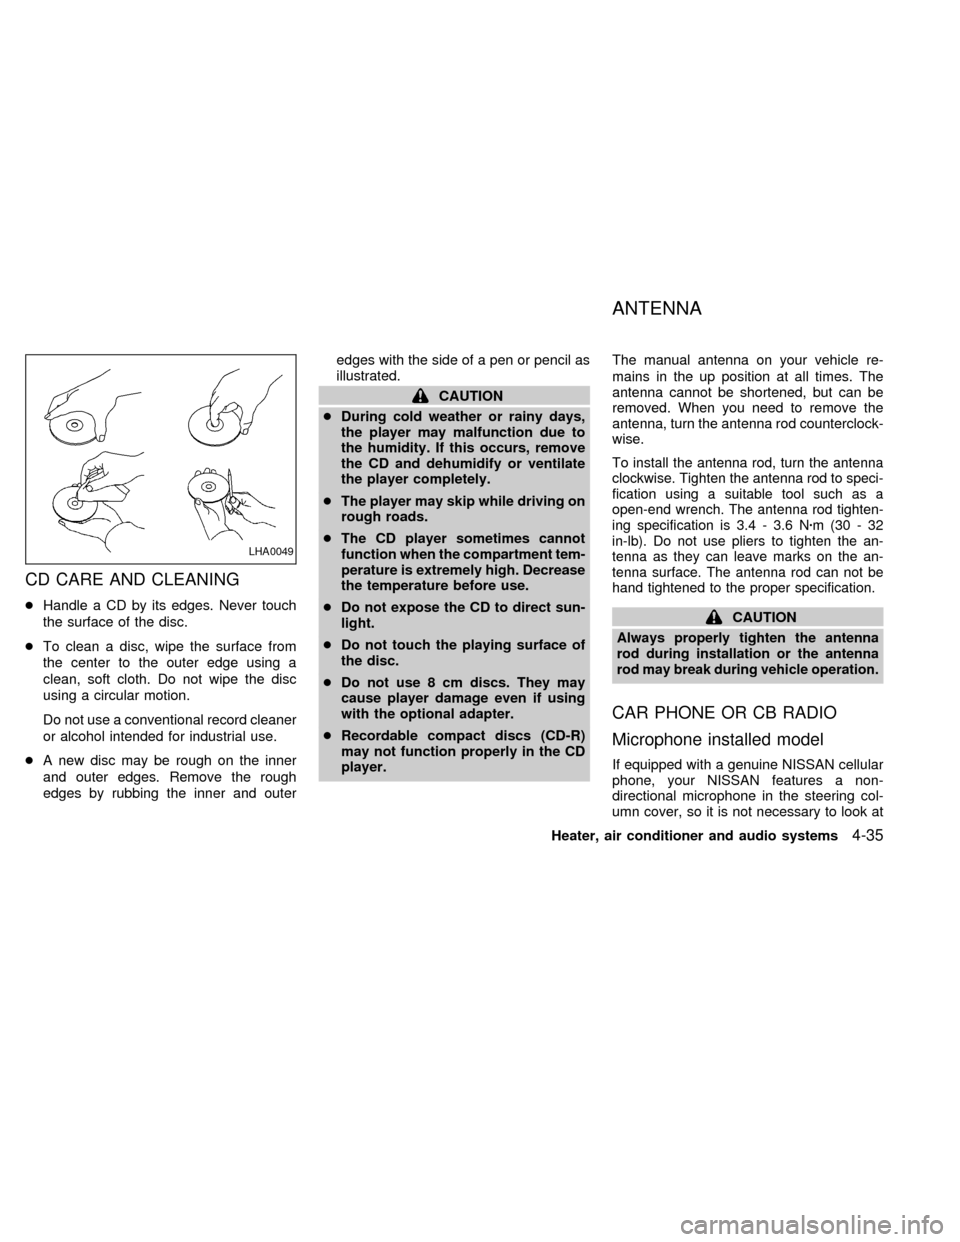
cHandle a CD by its edges. Never touch
the surface of the disc.
cTo clean a disc, wipe the surface from
the center to the outer edge using a
clean, soft cloth. Do not wipe the disc
using a circular motion.
Do not use a conventional record cleaner
or alcohol intended for industrial use.
cA new disc may be rough on the inner
and outer edges. Remove the rough
edges by rubbing the inner and outeredges with the side of a pen or pencil as
illustrated.
CAUTION
cDuring cold weather or rainy days,
the player may malfunction due to
the humidity. If this occurs, remove
the CD and dehumidify or ventilate
the player completely.
cThe player may skip while driving on
rough roads.
cThe CD player sometimes cannot
function when the compartment tem-
perature is extremely high. Decrease
the temperature before use.
cDo not expose the CD to direct sun-
light.
cDo not touch the playing surface of
the disc.
cDo not use 8 cm discs. They may
cause player damage even if using
with the optional adapter.
cRecordable compact discs (CD-R)
may not function properly in the CD
player.The manual antenna on your vehicle re-
mains in the up position at all times. The
antenna cannot be shortened, but can be
removed. When you need to remove the
antenna, turn the antenna rod counterclock-
wise.
To install the antenna rod, turn the antenna
clockwise. Tighten the antenna rod to speci-
fication using a suitable tool such as a
open-end wrench. The antenna rod tighten-
ing specification is 3.4 - 3.6 Nzm(30-32
in-lb). Do not use pliers to tighten the an-
tenna as they can leave marks on the an-
tenna surface. The antenna rod can not be
hand tightened to the proper specification.
CAUTION
Always properly tighten the antenna
rod during installation or the antenna
rod may break during vehicle operation.
CAR PHONE OR CB RADIO
Microphone installed model
If equipped with a genuine NISSAN cellular
phone, your NISSAN features a non-
directional microphone in the steering col-
umn cover, so it is not necessary to look at
LHA0049
ANTENNA
Heater, air conditioner and audio systems4-35
ZX
Page 181 of 292
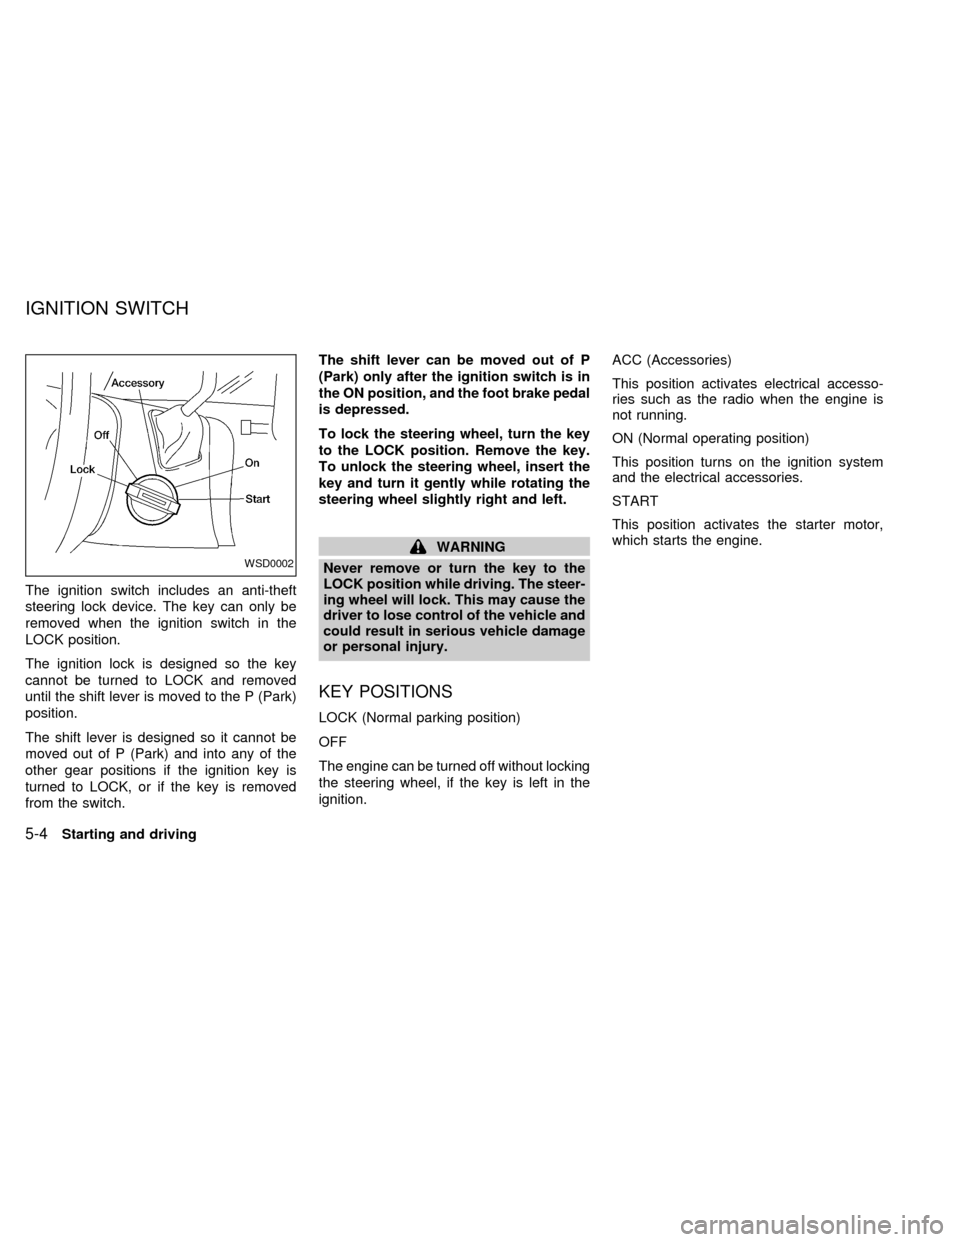
The ignition switch includes an anti-theft
steering lock device. The key can only be
removed when the ignition switch in the
LOCK position.
The ignition lock is designed so the key
cannot be turned to LOCK and removed
until the shift lever is moved to the P (Park)
position.
The shift lever is designed so it cannot be
moved out of P (Park) and into any of the
other gear positions if the ignition key is
turned to LOCK, or if the key is removed
from the switch.The shift lever can be moved out of P
(Park) only after the ignition switch is in
the ON position, and the foot brake pedal
is depressed.
To lock the steering wheel, turn the key
to the LOCK position. Remove the key.
To unlock the steering wheel, insert the
key and turn it gently while rotating the
steering wheel slightly right and left.
WARNING
Never remove or turn the key to the
LOCK position while driving. The steer-
ing wheel will lock. This may cause the
driver to lose control of the vehicle and
could result in serious vehicle damage
or personal injury.
KEY POSITIONS
LOCK (Normal parking position)
OFF
The engine can be turned off without locking
the steering wheel, if the key is left in the
ignition.ACC (Accessories)
This position activates electrical accesso-
ries such as the radio when the engine is
not running.
ON (Normal operating position)
This position turns on the ignition system
and the electrical accessories.
START
This position activates the starter motor,
which starts the engine.
WSD0002
IGNITION SWITCH
5-4Starting and driving
ZX
Page 182 of 292
cMake sure the area around the vehicle is
clear.
cMaintenance items listed here should be
checked periodically (for example, each
time you check engine oil).
cCheck that all windows and lights are
clean.
cVisually inspect tires for their appearance
and condition. Also check tires for proper
inflation.
cLock all doors.
cPosition seat and adjust head restraints.
cAdjust inside and outside mirrors.
cFasten seat belts and ask all passengers
to do likewise.
cCheck the operation of warning lights
when key is turned to the ON position.
See ``Warning/Indicator lights and chimes''
in the ``Instrument and controls'' section.
1. Apply the parking brake.
2. Move the selector lever to P (Park) or N
(Neutral) (P is recommended).
The shift selector lever cannot be
moved out of P and into any of the
other gear positions under the follow-
ing conditions:
cThe ignition key is turned to the
LOCK position.
cThe ignition key is turned to the ON
position without depressing the
foot brake pedal.
The starter will not operate if the shift
selector lever is in one of the driving
positions.
3. Crank the enginewith your foot off the
accelerator pedalby turning the ignition
key to START. Release the key when the
engine starts. If the engine starts, but
fails to run, repeat the above procedure.
Ð If the engine is very hard to start in
extremely cold or hot weather, de-
press the accelerator pedal to the
floor and hold it to help start the
engine.Ð In the summer, when restarting the
engine within 30 minutes after it has
been stopped, keep the accelerator
pedal slightly depressed while start-
ing.
CAUTION
Do not operate the starter for more than
15 seconds at a time. If the engine does
not start, turn the key off and wait 10
seconds before cranking again, other-
wise the starter could be damaged.
4. Warm-up
Allow the engine to idle for at least 30
seconds after starting. Drive at moderate
speeds for a short distance first, espe-
cially in cold weather.
BEFORE STARTING THE
ENGINESTARTING THE ENGINE
Starting and driving5-5
ZX
Page 185 of 292

Accelerator downshift--
In D position--
For rapid passing or hill climbing, fully depress
the accelerator pedal to the floor. This shifts the
transmission down into third gear, second gear
or first gear, depending on the vehicle speed.
Fail-safe
When the Fail-safe operation occurs, the
next time the key is turned to the ON
position, the O/D OFF light blinks for ap-
proximately 8 seconds after coming on for 2
seconds. While the vehicle can be driven
under these circumstances, please note
that the transmission will remain in 3rd gear.
NOTE: If the vehicle is driven under extreme
conditions, such as excessive wheel spinning
and subsequent hard braking, the Fail-safe
system may be activated. This will occur even
if all electrical circuits are functioning properly.
In this case, turn the ignition key OFF and wait
for 3 seconds. Then turn the key back to the
ON position. The vehicle should return to its
normal operating condition. If it does not re-
turn to its normal operating condition, have an
authorized NISSAN dealer check the trans-
mission and repair, if necessary.
Overdrive switch
Each time your vehicle is started, the trans-
mission is automatically ``reset'' to overdrive
ON.
ON: For normal driving the overdrive
switch is engaged. The transmission
is upshifted into overdrive as the
vehicle speed increases.
The overdrive does not engage until the
engine has reached operating tempera-
ture.
OFF: For driving up and down long slopes
where engine braking is necessary,push the overdrive switch once. The
O/D OFF indicator light illuminates at
this time.
When cruising at a low speed or climbing a
gentle slope, you may feel uncomfortable
shift shocks as the transmission shifts be-
tween 3rd gear and overdrive repeatedly. In
this case, press the overdrive switch.
When driving conditions change, press the
overdrive switch to turn the overdrive on.
The O/D OFF indicator light goes out.
Remember not to drive at high speeds for
extended periods of time with the O/D OFF
light illuminated. This reduces the fuel
economy.
ASD0561
5-8Starting and driving
ZX