2000 NISSAN PATHFINDER parking brake
[x] Cancel search: parking brakePage 180 of 265

CAUTION
If towing with the front wheels on the
ground or with the rear wheels on the
ground (if you cannot use towing dol-
lies) is necessary: Move the transfer
case shift lever into the 2H position.
IWhen towing with the front wheels on
the ground: On manual transmission
models to move the shift lever to the
N (neutral) position, turn the ignition
key to the OFF position and secure
the steering wheel in a straightahead
position with a rope on similar de-
vice.
On automatic transmission models to
move the selector lever to N (neutral)
position, turn the ignition key to the
ACC position. After moving the selec-
tor lever to the N (neutral) position,
turn the ignition key to the OFF posi-
tion and secure the steering wheel in
a straightahead position with a rope
or similar device.
Never place the ignition key in theLOCK position. This will result in
damage to the steering lock mecha-
nism.
IWhen towing manual transmission
models with the rear wheels on the
ground or four wheels on the ground:
Always release the parking brake and
move the transmission shift lever to
the N (neutral) position.
Observe the following restricted tow-
ing speeds and distances.
Manual transmission models:
ISpeed: Below 60 MPH (95 km/h)
IDistance: Less than 500 miles (800
km)
If the speed or distance must necessarily be
greater, remove the front and rear propeller
shafts beforehand to prevent damage to the
transmission.
VEHICLE RECOVERY (Freeing a
stuck vehicle)IUse the towinghookonly, not other parts of
the vehicle. Otherwise, the vehicle body will
be damaged.
IUse the towing hookonlyto free a vehicle
stuck in sand, snow, mud, etc.Nevertow
the vehicle for a long distance using only
the towing hook.
SCE0115A
In case of emergency
6-15
Z
00.1.17/R50-D/V5
X
Page 188 of 265

8 Do-it-yourselfMaintenance precautions .......................................... 8-2
Engine compartment check locations ....................... 8-4
Engine cooling system .............................................. 8-5
Checking engine coolant level .................................. 8-5
Changing engine coolant .......................................... 8-6
Engine oil .................................................................. 8-7
Checking engine oil level .......................................... 8-7
Changing engine oil .................................................. 8-8
Changing engine oil filter .......................................... 8-9
Automatic transmission fluid ................................... 8-10
Temperature conditions for checking ...................... 8-10
Power steering fluid ................................................ 8-12
Brake and clutch fluid ............................................. 8-12
Brake fluid ............................................................... 8-12
Clutch fluid .............................................................. 8-13
Window washer fluid ............................................... 8-13
Window washer fluid reservoir ................................ 8-13
Battery ..................................................................... 8-14
Jump starting........................................................... 8-15
Drive belts ............................................................... 8-15
Spark plugs ............................................................. 8-16
Replacing spark plugs ............................................. 8-16Air cleaner ............................................................... 8-17
Windshield wiper blades ......................................... 8-18
Cleaning .................................................................. 8-18
Replacement ........................................................... 8-18
Parking brake and brake pedal ............................... 8-19
Checking parking brake .......................................... 8-19
Checking brake pedal ............................................. 8-19
Brake booster .......................................................... 8-20
Clutch pedal ............................................................ 8-21
Checking clutch pedal ............................................. 8-21
Fuses....................................................................... 8-21
Engine compartment ............................................... 8-21
Passenger compartment ......................................... 8-22
Multi-remote controller battery replacement ........... 8-22
Lights ....................................................................... 8-24
Headlights ............................................................... 8-25
Wheels and tires ..................................................... 8-28
Tire pressure ........................................................... 8-28
Types of tires .......................................................... 8-29
Tire chains............................................................... 8-30
Changing wheels and tires...................................... 8-30
Clutch housing drain ................................... 8-34
Z
00.1.17/R50-D/V5
X
Page 189 of 265

When performing any inspection or mainte-
nance work on your vehicle, always take care
to prevent serious accidental injury to yourself
or damage to the vehicle. The following are
general precautions which should be closely
observed.
WARNING
IPark the vehicle on a level surface,
apply the parking brake securely and
block the wheels to prevent the ve-
hicle from moving. For a manual
transmission, move the shift lever to
Neutral. For an automatic transmis-
sion, move the selector lever to the P
(Park) position.
IBe sure the ignition key is in the OFF
or LOCK position when performing
any replacement or repair.
IIf you must work with the engine
running, keep your hands, clothing,
hair and tools away from moving fans
belts and any other moving parts.
IIt is advisable to secure or remove
any loose clothing and any jewelry,such as rings, watches, etc. before
working on your vehicle.
IAlways wear eye protection when-
ever you work on your vehicle.
IIf you must run the engine in an
enclosed space such as a garage, be
sure there is proper ventilation for
exhaust gases to escape.
INever get under the vehicle while it is
supported only by a jack. If it is nec-
essary to work under the vehicle,
support it with safety stands.
IKeep smoking materials, flame and
sparks away from fuel and battery.
IYour vehicle is equipped with an au-
tomatic engine cooling fan. It may
come on at any time without warning,
even if the ignition key is in the OFF
position and the engine is not run-
ning. To avoid injury, always discon-
nect the negative battery cable before
working near the fan.
IOn gasoline engine models with themultiport fuel injection (MFI) system,
the fuel filter or fuel lines should be
serviced by a NISSAN dealer because
the fuel lines are under high pressure
even when the engine is off.
CAUTION
IDo not work under the engine hood
while it is hot. Turn off the engine and
wait until it cools down.
INever connect or disconnect either
the battery or any transistorized com-
ponent connector while the ignition
key is on.
INever leave the engine or the auto-
matic transmission related compo-
nent harness connector discon-
nected while the ignition key is on.
IAvoid direct contact with used engine
oil. Improperly disposed motor oil and/
or other vehicle fluids can hurt the
environment. Always conform to lo-
MAINTENANCE PRECAUTIONS8-2
Do-it-yourself
Z
00.1.17/R50-D/V5
X
Page 194 of 265
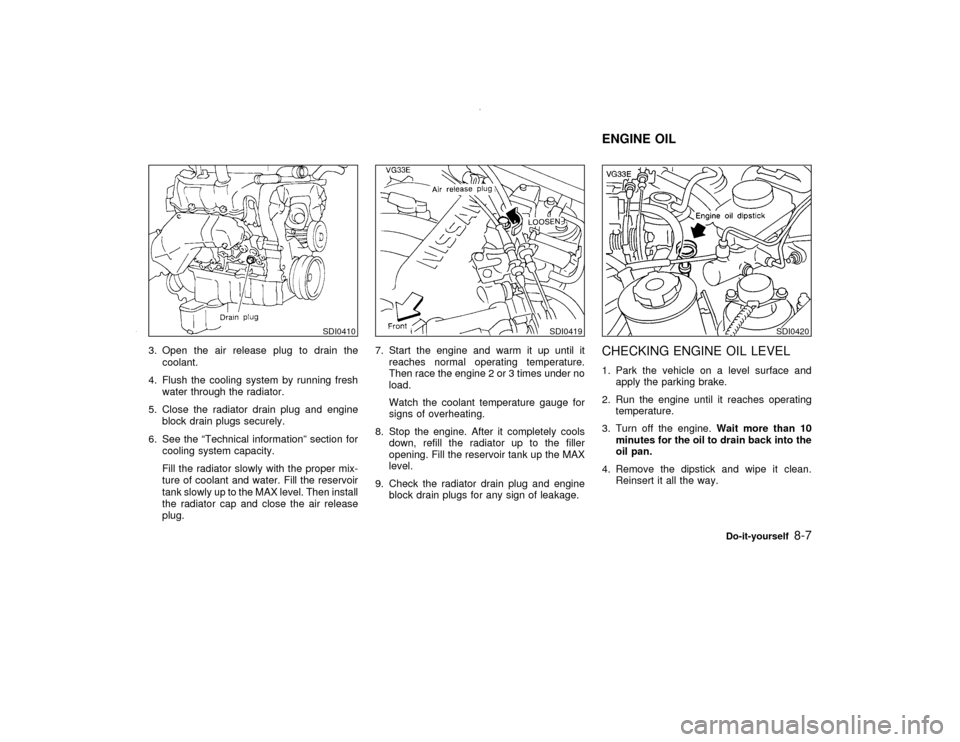
3. Open the air release plug to drain the
coolant.
4. Flush the cooling system by running fresh
water through the radiator.
5. Close the radiator drain plug and engine
block drain plugs securely.
6. See the ªTechnical informationº section for
cooling system capacity.
Fill the radiator slowly with the proper mix-
ture of coolant and water. Fill the reservoir
tank slowly up to the MAX level. Then install
the radiator cap and close the air release
plug.7. Start the engine and warm it up until it
reaches normal operating temperature.
Then race the engine 2 or 3 times under no
load.
Watch the coolant temperature gauge for
signs of overheating.
8. Stop the engine. After it completely cools
down, refill the radiator up to the filler
opening. Fill the reservoir tank up the MAX
level.
9. Check the radiator drain plug and engine
block drain plugs for any sign of leakage.
CHECKING ENGINE OIL LEVEL1. Park the vehicle on a level surface and
apply the parking brake.
2. Run the engine until it reaches operating
temperature.
3. Turn off the engine.Wait more than 10
minutes for the oil to drain back into the
oil pan.
4. Remove the dipstick and wipe it clean.
Reinsert it all the way.
SDI0410
SDI0419
SDI0420
ENGINE OIL
Do-it-yourself
8-7
Z
00.1.17/R50-D/V5
X
Page 195 of 265

5. Remove the dipstick again and check the
oil level. It should be between the H and L
marks. If the oil level is below the L mark,
remove the oil filler cap and pour recom-
mended oil through the opening. Do not
overfill.
6. Recheck oil level with dipstick.
It is normal to add some oil between oil
changes or during the break-in period, de-
pending on the severity of operating con-
ditions.
CAUTION
Oil level should be checked regularly.
Operating with insufficient amount of oil
can damage the engine, and such dam-
age is not covered by warranty.
CHANGING ENGINE OIL1. Park the vehicle on a level surface and
apply the parking brake.
2. Warm up the engine until it reaches oper-
ating temperature, and then turn it off.
3. Place a large drain pan under the drain
plug.
4. Remove the oil filler cap.
5. Remove the drain plug with a wrench and
completely drain the oil.
If the oil filter is to be changed, remove and
replace it at this time. See later in this
SDI0487
SDI0416
8-8
Do-it-yourself
Z
00.1.17/R50-D/V5
X
Page 196 of 265

section for changing engine oil filter.
CAUTION
Be careful not to burn yourself, as the
engine oil is hot.
Waste oil must be disposed of properly.
Check your local regulations.
6. Clean and re-install the drain plug and new
washer. Securely tighten the drain plug with
a wrench. Do not use excessive force.
Drain plug tightening torque:
22 to 29 ft-lb (29 to 39 N×m)
7. Refill engine with recommended oil through
the oil filler opening, then install the oil filler
cap securely.
See ªCapacities and recommended
fuel/lubricantsº in the ª10. Technical and
consumer informationº section for drain and
refill capacity.
The drain and refill capacity depends on the
oil temperature and drain time. Use these
specifications for reference only. Always
use the dipstick to determine when the
proper amount of oil is in the engine.8. Start the engine.
Check for leakage around the drain plug.
Correct as required.
9. Turn the engine off and wait several min-
utes. Check the oil level with the dipstick.
Add engine oil if necessary.
WARNING
IProlonged and repeated contact with
used engine oil may cause skin can-
cer.
ITry to avoid direct skin contact with
used oil. If skin contact is made, wash
thoroughly with soap or hand cleaner
as soon as possible.
IKeep used engine oil out of reach of
children.
CHANGING ENGINE OIL FILTER1. Park the vehicle on a level surface and
apply the parking brake.
2. Turn the engine off.
3. Loosen the oil filter with an oil filter wrench.
(A specialcap-typewrench will assist with
oil filter removal on models with the V6
engine. This tool can be purchased from
your NISSAN dealer.) Then remove the oil
filter by turning it by hand.
SDI0417
Do-it-yourself
8-9
Z
00.1.17/R50-D/V5
X
Page 197 of 265

CAUTION
Be careful not to burn yourself, as the
engine oil may be hot.
4. Wipe the engine oil filter mounting surface
with a clean rag.
Be sure to remove any old rubber gasket
remaining on the mounting surface of the
engine.
5. Coat the rubber gasket on the new filter
with engine oil.
6. Screw in the oil filter until a slight resistance
is felt, then tighten an additional 2/3 turn.
7. Start the engine and check for leakage
around the oil filter. Correct as required.
8. Turn the engine off and wait several min-
utes. Check the oil level. Add engine oil if
necessary.
WARNING
IWhen engine is running, keep hands,
jewelry, and clothing away from any
moving parts such as fan and drive
belt.
IAutomatic transmission fluid is poi-
sonous and should be stored care-
fully in marked containers out of the
reach of children.
TEMPERATURE CONDITIONS
FOR CHECKINGThe fluid level should be checked using the
HOT range (L & H marks) on the dipstick at
fluid temperatures between 122 and 176ÉF (50
and 80ÉC) after the vehicle has been driven
approximately 5 minutes in urban areas after
the engine is warmed up. The level can be
checked at fluid temperatures between 86 and
122ÉF (30 and 50ÉC) using the COLD range on
the dipstick for reference, after the engine is
warmed up but before driving. However, the
fluid level must be rechecked using the HOT
range.
1. Park the vehicle on a level surface and set
the parking brake.
2. Start the engine and then move the selector
lever through each gear range, ending in P.
3. Check the fluid level with the engine idling.
If the vehicle has been driven for a long
time at high speeds, or in city traffic in hot
weather, or if it is being used to pull a
trailer, the fluid level cannot be read accu-
rately. You should wait until the fluid has
cooled down (about 30 minutes).
4. Remove the dipstick and wipe it clean with
lint-free paper.
SDI0488
AUTOMATIC TRANSMISSION
FLUID
8-10
Do-it-yourself
Z
00.1.17/R50-D/V5
X
Page 203 of 265

tion and tension in accordance with the
maintenance schedule in this manual.
REPLACING SPARK PLUGS
Platinum-tipped spark plugsIt is not necessary to replace the platinum-
tipped spark plugs as frequently as the con-
ventional type spark plugs since they will last
much longer. Follow the maintenance sched-
ule, but do not reuse them by cleaning or
regapping.
If replacement is required, see your NISSAN
dealer for servicing.
WARNING
Be sure the engine and ignition switch
are off and that the parking brake is
engaged securely.
CAUTION
Be sure to use the correct socket to
remove the spark plugs. An incorrect
socket can cause damage the spark
plugs.
Always replace spark plugs with recom-
mended or equivalent ones.
SDI1022
SPARK PLUGS
8-16
Do-it-yourself
Z
00.1.17/R50-D/V5
X