2000 NISSAN FRONTIER fuel pressure
[x] Cancel search: fuel pressurePage 62 of 269
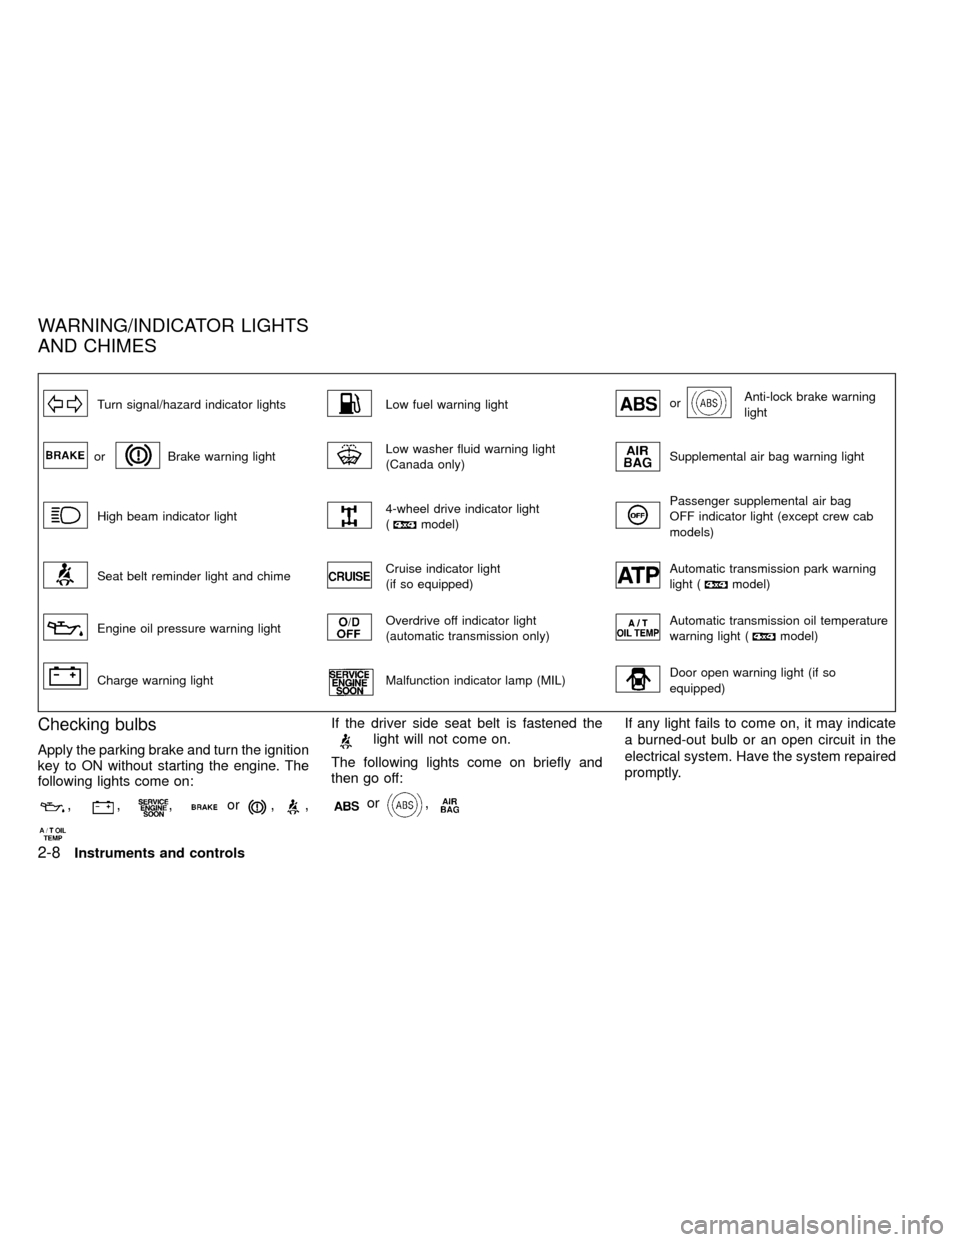
Turn signal/hazard indicator lightsLow fuel warning lightorAnti-lock brake warning
light
orBrake warning lightLow washer fluid warning light
(Canada only)Supplemental air bag warning light
High beam indicator light4-wheel drive indicator light
(model)
Passenger supplemental air bag
OFF indicator light (except crew cab
models)
Seat belt reminder light and chimeCruise indicator light
(if so equipped)Automatic transmission park warning
light (model)
Engine oil pressure warning lightOverdrive off indicator light
(automatic transmission only)Automatic transmission oil temperature
warning light (model)
Charge warning lightMalfunction indicator lamp (MIL)Door open warning light (if so
equipped)
Checking bulbs
Apply the parking brake and turn the ignition
key to ON without starting the engine. The
following lights come on:
,,,or,,
If the driver side seat belt is fastened thelight will not come on.
The following lights come on briefly and
then go off:
or,
If any light fails to come on, it may indicate
a burned-out bulb or an open circuit in the
electrical system. Have the system repaired
promptly.
WARNING/INDICATOR LIGHTS
AND CHIMES
2-8Instruments and controls
ZX
Page 64 of 269
3. The supplemental air bag warning light
does not come on at all.
Unless checked and repaired, the supplemen-
tal restraint system may not function properly.
For additional details on the Supplemental
restraint system (Supplemental air bag sys-
tem), see the ``Seats, restraints and supple-
mental air bag systems'' section of this
manual
WARNING
If the supplemental air bag warning
light is on, it could mean that the
supplemental air bag will not operate in
an accident.
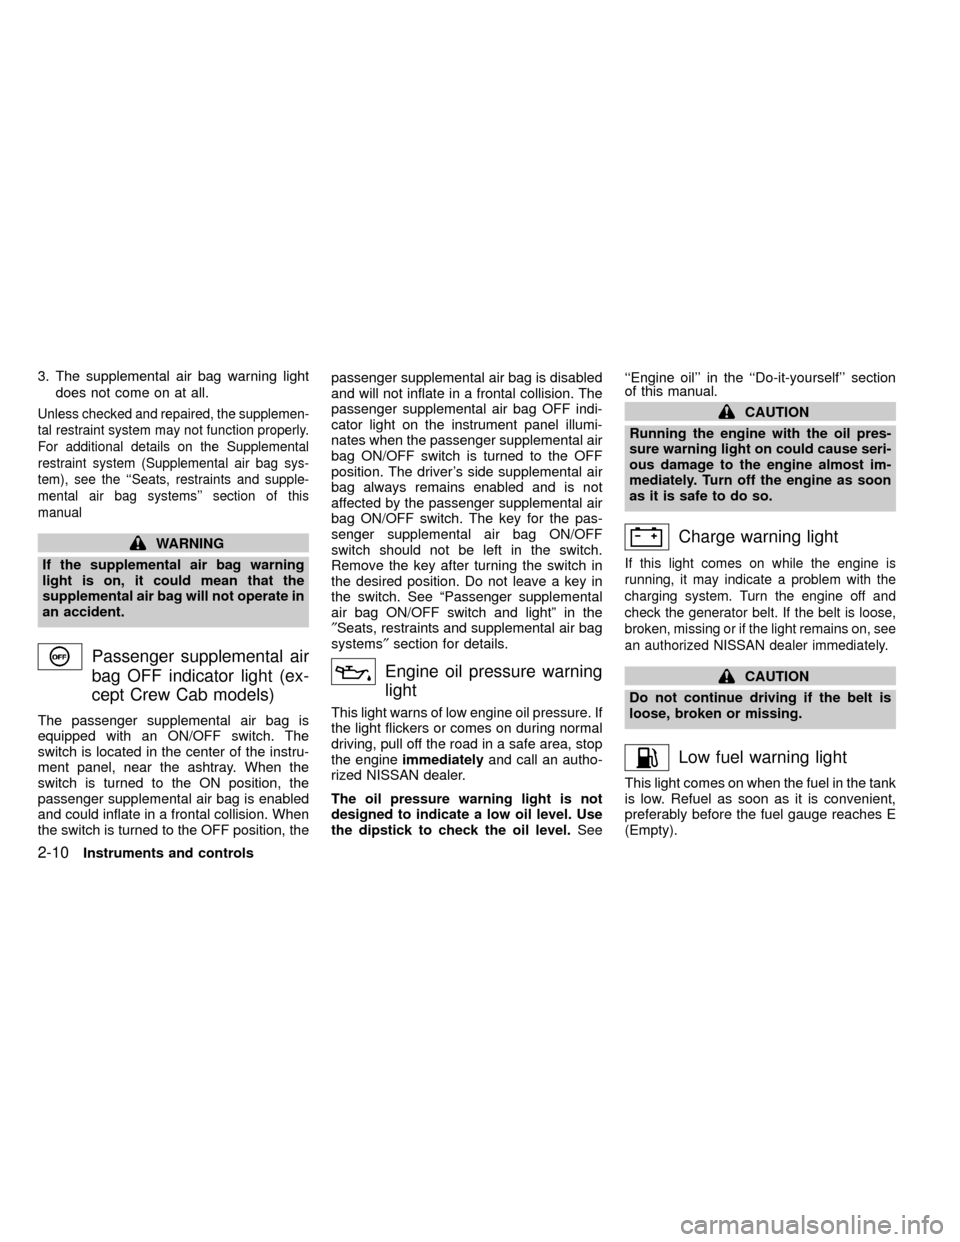
Passenger supplemental air
bag OFF indicator light (ex-
cept Crew Cab models)
The passenger supplemental air bag is
equipped with an ON/OFF switch. The
switch is located in the center of the instru-
ment panel, near the ashtray. When the
switch is turned to the ON position, the
passenger supplemental air bag is enabled
and could inflate in a frontal collision. When
the switch is turned to the OFF position, thepassenger supplemental air bag is disabled
and will not inflate in a frontal collision. The
passenger supplemental air bag OFF indi-
cator light on the instrument panel illumi-
nates when the passenger supplemental air
bag ON/OFF switch is turned to the OFF
position. The driver's side supplemental air
bag always remains enabled and is not
affected by the passenger supplemental air
bag ON/OFF switch. The key for the pas-
senger supplemental air bag ON/OFF
switch should not be left in the switch.
Remove the key after turning the switch in
the desired position. Do not leave a key in
the switch. See ªPassenger supplemental
air bag ON/OFF switch and lightº in the
²Seats, restraints and supplemental air bag
systems²section for details.
Engine oil pressure warning
light
This light warns of low engine oil pressure. If
the light flickers or comes on during normal
driving, pull off the road in a safe area, stop
the engineimmediatelyand call an autho-
rized NISSAN dealer.
The oil pressure warning light is not
designed to indicate a low oil level. Use
the dipstick to check the oil level.See``Engine oil'' in the ``Do-it-yourself'' section
of this manual.
CAUTION
Running the engine with the oil pres-
sure warning light on could cause seri-
ous damage to the engine almost im-
mediately. Turn off the engine as soon
as it is safe to do so.
Charge warning light
If this light comes on while the engine is
running, it may indicate a problem with the
charging system. Turn the engine off and
check the generator belt. If the belt is loose,
broken, missing or if the light remains on, see
an authorized NISSAN dealer immediately.
CAUTION
Do not continue driving if the belt is
loose, broken or missing.
Low fuel warning light
This light comes on when the fuel in the tank
is low. Refuel as soon as it is convenient,
preferably before the fuel gauge reaches E
(Empty).
2-10Instruments and controls
ZX
Page 94 of 269
IFuel may be under pressure. Turn
the cap one-half turn and wait for
any ``hissing'' sound to stop to pre-
vent fuel from spraying out and
causing possible personal injury.
Then remove the cap.
IDo not attempt to top off the fuel
tank after the fuel pump nozzle shuts
off automatically. Continued refuel-
ing may cause fuel overflow, result-
ing in fuel spray and possibly fire.
IUse only an original equipment type
fuel filler cap as a replacement. It has
a built-in safety valve needed for
proper operation of the fuel system
and emission control system. An in-
correct cap can result in a serious
malfunction and possible injury.
INever pour fuel into the throttle body
to attempt to start your vehicle.
CAUTION
IIf fuel is spilled on the vehicle body,
flush it away with water to avoid
paint damage.ITighten until the fuel filler cap clicks.
Failure to tighten the fuel filler cap
properly may cause the
mal-
function indicator lamp (MIL) to illu-
minate. If the
lamp illuminates
because the fuel filler cap is loose or
missing, tighten or install the cap
and continue to drive the vehicle.
The
lamp should turn off after
a few driving trips. If thelamp
does not turn off after a few driving
trips, have the vehicle inspected by
an authorized NISSAN dealer.
IFor additional information, see the
²Malfunction indicator lamp (MIL)²in
the²Instruments and Controls²sec-
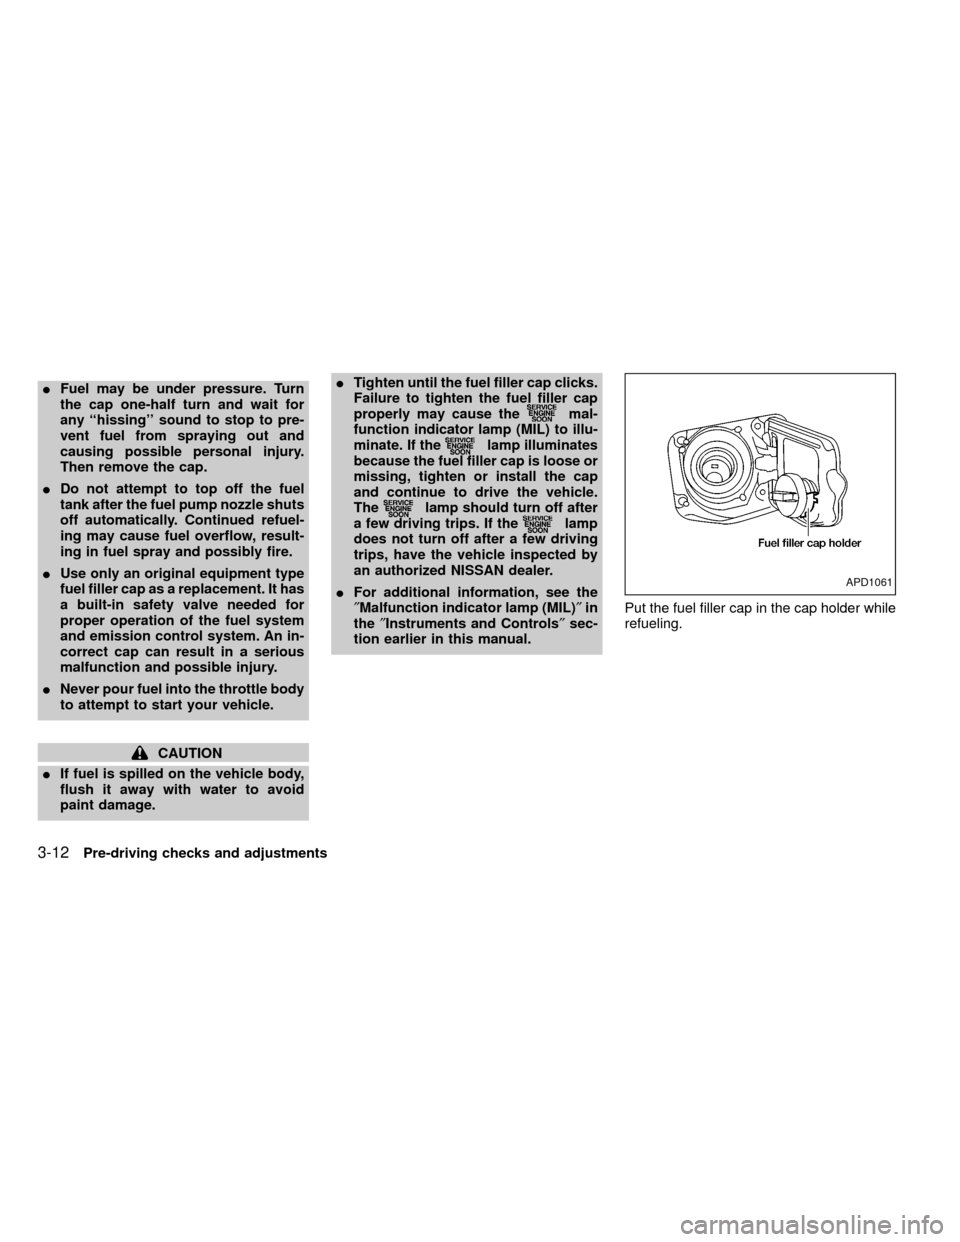
tion earlier in this manual.Put the fuel filler cap in the cap holder while
refueling.
APD1061
3-12Pre-driving checks and adjustments
ZX
Page 150 of 269

During the first 1,000 miles (1,609 km),
follow these recommendations for the future
reliability and economy of your new vehicle.
Failure to follow these recommendations
may result in vehicle damage or shortened
engine life.
IDo not run the engine over 4,000 rpm.
IDo not drive over the following speed
limits:
two-wheel drive models:
55 MPH (88 km/h)
four-wheel drive models
(2H or 4H position):
55 MPH (88 km/h)
four-wheel drive models
(4L position):
30 MPH (48 km/h)
IDo not accelerate at full throttle in any
gear.
IAvoid quick starts.
IAvoid hard braking as much as possible.
IDo not tow a trailer for the first 500 miles
(805 km).IAccelerate slowly and smoothly. Maintain
cruising speeds with a constant accelera-
tor position.
IDrive at moderate speeds on the high-
way. Driving at high speeds lowers fuel
economy.
IAvoid unnecessary stopping and brak-
ing. Maintain a safe distance behind
other vehicles.
IUse a proper gear range which suits road
conditions. On level roads, shift into high
gear as soon as possible.
IAvoid unnecessary engine idling.IKeep your engine tuned up.
IFollow the recommended periodic main-
tenance schedule.
IKeep the tires inflated to the correct
pressure. Low tire pressure increases
tire wear and wastes fuel.
IKeep the front wheels in correct align-
ment. Improper alignment increases tire
wear and lowers fuel economy.
IAir conditioner operation lowers fuel
economy. Use the air conditioner only
when necessary.
IWhen cruising at highway speeds, it is
more economical to use the air condi-
tioner and leave the windows closed to
reduce drag.
I
Use 4H or 4L position only when neces-
sary. Four-wheel drive operation lowers
fuel economy.
SD0001
BREAK-IN SCHEDULE INCREASING FUEL
ECONOMY
5-20Starting and driving
ZX
Page 184 of 269
When performing any inspection or mainte-
nance work on your vehicle, always take
care to prevent serious accidental injury to
yourself or damage to the vehicle. The
following are general precautions which
should be closely observed.
WARNING
IPark the vehicle on a level surface,
apply the parking brake securely and
block the wheels to prevent the ve-
hicle from moving. For manual trans-
mission models, move the shift lever
to N (Neutral). For automatic trans-
mission models, move the shift lever
to P (Park).
IBe sure the ignition key is in the OFF
or LOCK position when performing
any parts replacement or repairs.
INever leave the engine or automatic
transmission related component
harnesses disconnected while the
ignition switch is in the ON position.
INever connect or disconnect the bat-
tery or any transistorized compo-
nent while the ignition switch is in
the ON position.IIf you must work with the engine
running, keep your hands, clothing,
hair and tools away from moving
fans, belts, and any other moving
parts.
IIt is advisable to secure or remove
any loose clothing and remove any
jewelry, such as rings, watches, etc.,
before working on your vehicle.
IAlways wear eye protection when-
ever you work on your vehicle.
IIf you must run the engine in an
enclosed space such as a garage, be
sure there is proper ventilation for
exhaust gases to escape.
INever get under the vehicle while it
is supported only by a jack. If it is
necessary to work under the vehicle,
support it with safety stands.
IKeep smoking materials, flame and
sparks away from fuel tank and bat-
tery.
IOn gasoline engine models with the
multiport fuel injection (MFI) system,
the fuel filter or fuel lines should
beserviced by an authorized NISSANdealer because the fuellines are un-
der high pressure even when the
engine is off.
CAUTION
IDo not work under the hood while
the engine is hot. Turn the engine off
and wait until it cools down.
INever connect or disconnect either
the battery or any transistorized
component connector while the igni-
tion is on.
IAvoid contact with used engine oil.
Improperly disposed engine oil and/
or other vehicle fluids can damage
the environment. Always conform to
local regulations for disposal of ve-
hicle fluid.
This ``Do-it-yourself'' section gives instruc-
tions regarding only those items which are
relatively easy for an owner to perform.
You should be aware that incomplete or
improper servicing may result in operating
difficulties or excessive emissions, and
could affect your warranty coverage.If in
doubt about any servicing, have it done
by an authorized NISSAN dealer.
MAINTENANCE
PRECAUTIONS
8-2Do-it-yourself
ZX
Page 188 of 269
If the cooling system frequently requires
coolant, have it checked by an autho-
rized NISSAN dealer.CHANGING ENGINE COOLANT
IMajor cooling system repairs should be
performed by an authorized NISSAN
dealer. The service procedures can be
found in the appropriate NISSAN Ser-
vice Manual.
IImproper servicing can result in reduced
heater performance and engine over-
heating.
WARNING
ITo avoid the danger of being
scalded, never change the coolant
when the engine is hot.
INever remove the radiator cap when
the engine is hot. Serious burns
could be caused by high pressure
fluid escaping from the radiator.
1. Open the radiator drain valve. Open the
drain plugs on the engine block.
2.
Open the radiator cap to drain the coolant.
3. Flush the cooling system by running
fresh water through the radiator.
4. Close the radiator drain valve and drain
plug on the engine block securely.5. See ``Capacities and recommended
fuel/lubricants'' in the ``Technical and
consumer information'' section for cool-
ing system capacity. Fill the radiator
slowly with the proper mixture of coolant
and water. Fill the reservoir tank slowly
up to the MAX level.
8-6Do-it-yourself
ZX
Page 264 of 269
Checking engine coolant level ............... 8-5
Engine coolant temperature gauge ........ 2-5
Corrosion protection .................................... 7-4
Cruise control............................................. 5-18
Cup holder ................................................. 2-21
D
Daytime running light system (Canada
only) ........................................................... 2-16
Dimensions and weights .......................... 10-11
Door locks .................................................... 3-2
Drive belts .................................................. 8-18
Driving
Auto-lock free-running hubs ................. 5-22
Cold weather driving............................. 5-30
Driving with automatic transmission ..... 5-14
Driving with manual transmission ......... 5-12
Manual-lock free-running hubs ............. 5-24
Precautions when starting and driving ... 5-2
E
Economy - fuel........................................... 5-20
Emission control information label........... 10-14
Emission control system warranty ........... 10-27
Engine
Before starting the engine ...................... 5-8
Capacities and recommended fuel/
lubricants .............................................. 10-2
Changing engine coolant........................ 8-6Changing engine oil.............................. 8-10
Changing engine oil filter...................... 8-12
Checking engine coolant level ............... 8-5
Checking engine oil level ....................... 8-9
Engine compartment check locations .... 8-3
Engine coolant temperature gauge ........ 2-5
Engine cooling system ........................... 8-5
Engine oil ................................................ 8-9
Engine oil and oil filter
recommendation ................................... 10-6
Engine oil pressure warning light ......... 2-10
Engine oil viscosity ............................... 10-7
Engine serial number ......................... 10-13
Engine specifications ............................ 10-9
Starting the engine ............................... 5-16
Exhaust gas (Carbon monoxide) ................. 5-2
F
Flashers (See hazard warning flasher
switch) ........................................................ 2-19
Flat tire ......................................................... 6-2
Floor mat positioning aid ............................. 7-4
Fluid
Automatic transmission fluid (ATF)....... 8-13
Brake fluid ................................... 10-3, 8-15
Capacities and recommended fuel/
lubricants .............................................. 10-2
Clutch fluid ............................................ 8-15
Engine coolant ........................................ 8-5
Engine oil ................................................ 8-9
Power steering fluid .............................. 8-14Window washer fluid ............................ 8-15
F.M.V.S.S. certification label .................... 10-13
Front seats
Bench...................................................... 1-7
Separate ................................................. 1-2
Fuel
Capacities and recommended fuel/
lubricants .............................................. 10-2
Fuel economy ....................................... 5-20
Fuel filler cap ........................................ 3-11
Fuel gauge.............................................. 2-6
Fuel octane rating................................. 10-5
Fuel recommendation ........................... 10-4
Fuses ......................................................... 8-26
G
Gauge
Engine coolant temperature gauge ........ 2-5
Fuel gauge.............................................. 2-6
Odometer ................................................ 2-3
Speedometer .......................................... 2-3
Tachometer ............................................. 2-5
General maintenance .................................. 9-2
H
Hazard warning flasher switch .................. 2-19
Headlight and turn signal switch ............... 2-16
Headlights .................................................. 8-29
Heater
11-2
ZX
Page 268 of 269
Recommended fuel:
Unleaded gasoline, at least 87 AKI number
(RON 91)
For further details such as gasohol or diesel
fuel grade, see ``Fuel recommendation'' in
the ``Technical and consumer information''
section.
CAUTION
Using fuel other that specified could
adversely effect the emissions control
system, and may also affect warranty
coverage.
Under no circumstances should a
leaded gasoline be used since this will
damage the three way catalyst.
Recommended engine oil:
IAPI Certification Mark
IAPI grade SG/SH Energy Conserving I &
II or API grade SJ Energy Conserving
IILSAC grade GF-I & GF-II
See²Engine oil and filter recommendatio-
n²in the ``Technical and consumer informa-
tion'' section.
Tire cold pressure:
See the tire placard affixed to the inside of
the glove box lid.
Recommended new vehicle
break-in procedure:
During the first 1,000 miles (1,600 km) of
vehicle use, follow the recommendations
outlined in the ``BREAK-IN SCHEDULE''
found in the ``Starting and Driving'' section of
this Owner's Manual. Follow these recom-
mendations for the future reliability and
economy of your new vehicle. Failure to
follow these recommendations may result in
vehicle damage or shortened engine life.(page)
IIn case of emergency ...................... 6-1
(Flat tire, engine will not start, overheat-
ing, towing)
IHow to start the engine ................... 5-1
IHow to read the meters and
gauges ............................................. 2-1
IMaintenance schedule ..................... 9-1
IDo-it-yourself operations.................. 8-1
ITechnical and consumer
information ..................................... 10-1
GAS STATION INFORMATION QUICK REFERENCE
ZX