2000 NISSAN ALTIMA trunk
[x] Cancel search: trunkPage 13 of 242

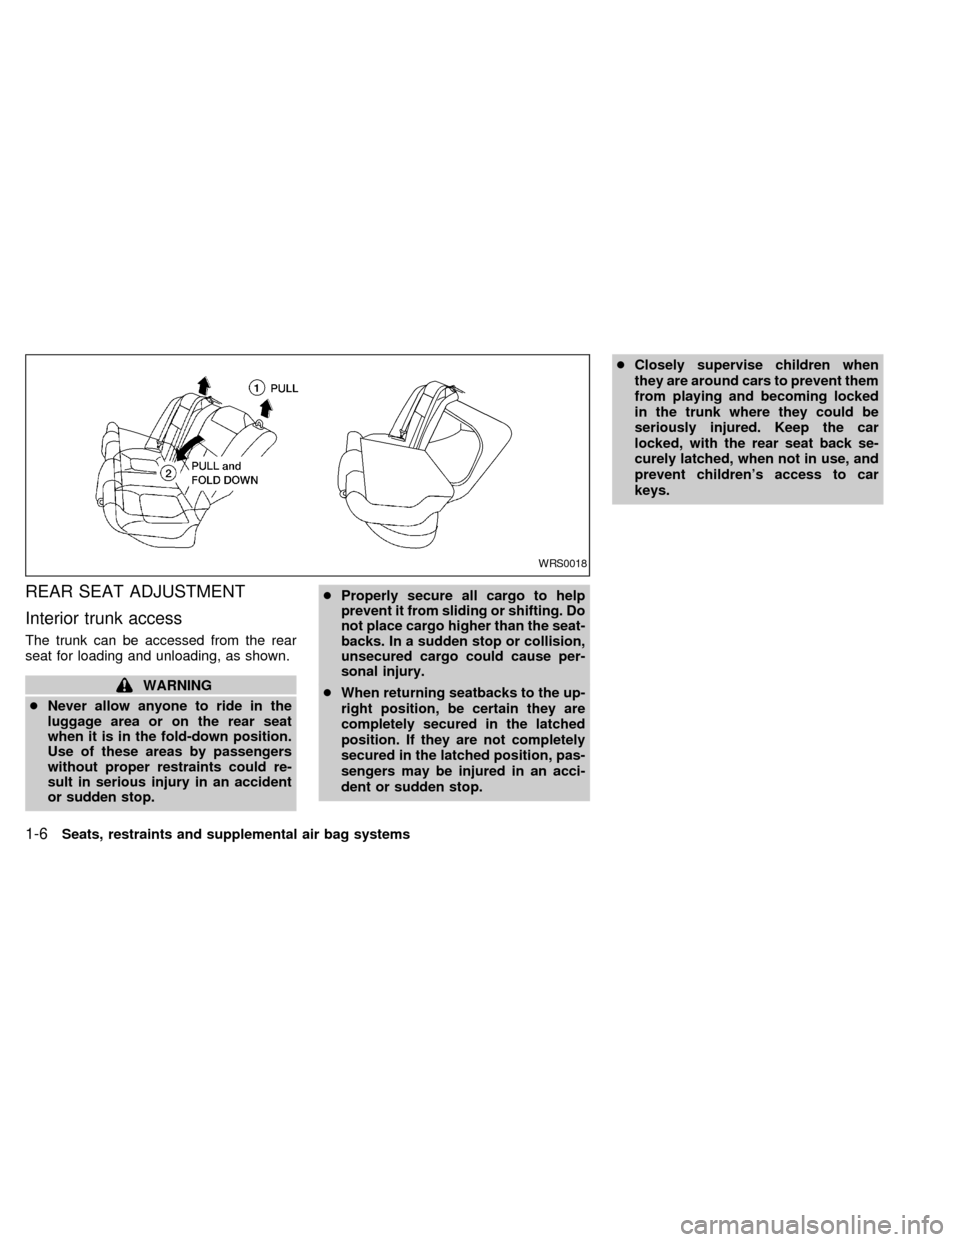
REAR SEAT ADJUSTMENT
Interior trunk access
The trunk can be accessed from the rear
seat for loading and unloading, as shown.
WARNING
cNever allow anyone to ride in the
luggage area or on the rear seat
when it is in the fold-down position.
Use of these areas by passengers
without proper restraints could re-
sult in serious injury in an accident
or sudden stop.cProperly secure all cargo to help
prevent it from sliding or shifting. Do
not place cargo higher than the seat-
backs. In a sudden stop or collision,
unsecured cargo could cause per-
sonal injury.
cWhen returning seatbacks to the up-
right position, be certain they are
completely secured in the latched
position. If they are not completely
secured in the latched position, pas-
sengers may be injured in an acci-
dent or sudden stop.cClosely supervise children when
they are around cars to prevent them
from playing and becoming locked
in the trunk where they could be
seriously injured. Keep the car
locked, with the rear seat back se-
curely latched, when not in use, and
prevent children's access to car
keys.
WRS0018
1-6Seats, restraints and supplemental air bag systems
ZX
Page 47 of 242

2 Instruments and controls
Meters and gauges ................................................2-2
Speedometer and odometer ..................................2-3
Tachometer ............................................................2-4
Engine coolant temperature gauge........................2-4
Fuel gauge .............................................................2-5
Warning/indicator lights and chimes ......................2-6
Checking bulbs .......................................................2-6
Warning lights.........................................................2-6
Indicator lights ........................................................2-8
Chimes ...................................................................2-9
Security systems ..................................................2-10
Nissan vehicle immobilizer system (NVIS) ..........2-10
Enhanced immobilizer security system
(if so equipped) ....................................................2-12
Windshield wiper and washer switch ...................2-14
Switch operation ...................................................2-14
Rear window defogger switch ..............................2-15
Headlight and turn signal switch ..........................2-16
Headlight switch ...................................................2-16
Turn signal switch ................................................2-17
Cornering light ......................................................2-18
Fog light switch (if so equipped) ..........................2-18Hazard warning flasher switch .............................2-18
Horn ......................................................................2-19
Power socket ......................................................2-19
Cigarette lighter (accessory) and ash tray ...........2-20
Storage .................................................................2-21
Map pocket ...........................................................2-21
Glasses case ........................................................2-21
Cup holders ..........................................................2-22
Glove box .............................................................2-23
Console box .........................................................2-23
Cargo net (if so equipped) ...................................2-25
Trunk side net ......................................................2-26
Windows ...............................................................2-26
Power windows ....................................................2-26
Sunroof (if so equipped).......................................2-27
Interior light...........................................................2-29
Map lights (if so equipped)...................................2-29
Trunk light.............................................................2-30
Integrated HomeLinkTuniversal transceiver
(if so equipped) ....................................................2-30
Programming HomeLinkT.....................................2-31
ZX
Page 60 of 242

How to arm the enhanced immobi-
lizer security system
1. Close all windows.(The system can be
armed even if the windows are open).
2. Remove the key from the ignition switch.
3. Close the hood, trunk lid and all doors.
Lock all doors. The doors can be locked
with the key or with the multi-remote
controller.
Multi-remote controller operation:
cPush the
button on the multi-
remote controller. All doors lock. The
hazard lights flash twice and the horn
beeps once to indicate all doors are
locked.
cWhen the
button is pushed with all
doors locked, the hazard lights flash
twice and the horn beeps once as a
reminder that the doors are already
locked.
The horn may or may not beep once.
Refer to ``Silencing the horn beep fea-
ture'' later in this section for details.
4.
Confirm that the SECURITY indicator light
comes on. The SECURITY light stays on
for about 30 seconds. The enhanced im-mobilizer security system is now pre-
armed. After about 30 seconds the en-
hanced immobilizer security system
automatically shifts into the armed phase.
The SECURITY light begins to flash once
every three seconds. If, during the 30-
second pre-arm time period, the door is
unlocked by the key or the multi-remote
controller, or the ignition key is turned to
ACC or ON, the system will not arm.
cIf the key is turned slowly when lock-
ing the door, the system may not arm.
Furthermore, if the key is turned ex-
cessively to the unlock position, the
system may be disarmed when the key
is removed. If the indicator light fails to
glow for 30 seconds, unlock the door
once and lock it again.
cEven when the driver and/or passen-
gers are in the vehicle, the system will
arm with all doors, hood and trunk lid
closed and locked with the ignition
key in the OFF position.
Enhanced immobilizer security sys-
tem activation
The enhanced immobilizer security system
will give the following alarm:cThe headlights blink and the horn sounds
intermittently.
cThe alarm automatically turns off after 2
to 3 minutes. However, the alarm reacti-
vates if the vehicle is tampered with
again. The alarm can be shut off by
unlocking a door or trunk lid with the key,
or by pressing the
button on the
multi-remote controller.
The alarm is activated by:
copening the door or trunk lid without
using the key or multi-remote controller
(even if the door is unlocked by releasing
the door inside lock switch) or opening
the trunk lid by operating the opener
lever.
copening the hood.
How to stop an activated alarm
The alarm stops only by unlocking a door or
the trunk lid with the key, or by pressing
the
button on the multi-remote control-
ler.
The alarm does not stop if the ignition
switch is turned to ACC or ON.
Instruments and controls
2-13
ZX
Page 73 of 242

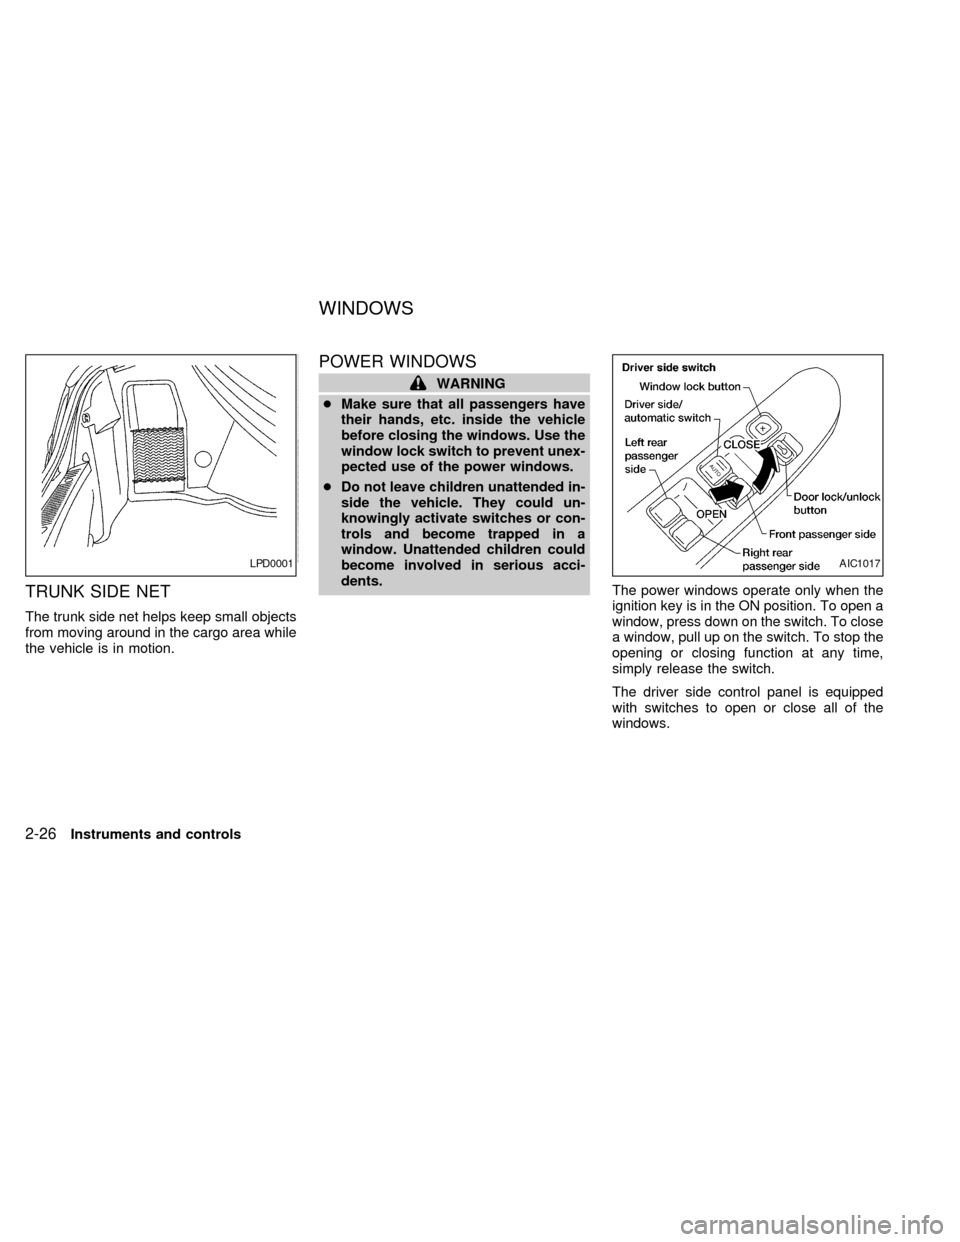
TRUNK SIDE NET
The trunk side net helps keep small objects
from moving around in the cargo area while
the vehicle is in motion.
POWER WINDOWS
WARNING
cMake sure that all passengers have
their hands, etc. inside the vehicle
before closing the windows. Use the
window lock switch to prevent unex-
pected use of the power windows.
cDo not leave children unattended in-
side the vehicle. They could un-
knowingly activate switches or con-
trols and become trapped in a
window. Unattended children could
become involved in serious acci-
dents.
The power windows operate only when the
ignition key is in the ON position. To open a
window, press down on the switch. To close
a window, pull up on the switch. To stop the
opening or closing function at any time,
simply release the switch.
The driver side control panel is equipped
with switches to open or close all of the
windows.
LPD0001AIC1017
WINDOWS
2-26Instruments and controls
ZX
Page 77 of 242

The light illuminates when the trunk lid is
opened. When the trunk lid is closed, the
light goes off.
INTEGRATED HomeLinkTUNI-
VERSAL TRANSCEIVER (if so
equipped)
The Integrated HomeLinkTUniversal Trans-
ceiver provides a convenient way to consoli-
date the functions of up to three individual
hand-held transmitters into one built-in de-
vice.
Integrated HomeLinkTUniversal Trans-
ceiver:
cWill operate most Radio Frequency (RF)
devices such as garage doors, gates,
home and office lighting, entry door locks
and security systems.
cIs powered by your vehicle's battery. No
separate batteries are required. If the
vehicle's battery is discharged or is dis-
connected, HomeLinkTwill retain all pro-
gramming.Once the Integrated HomeLinkTUniver-
sal Transceiver is programmed, retain
the original transmitter for future pro-
gramming procedures (i.e., new vehicle
purchases). Upon sale of the vehicle, the
programmed Integrated HomeLinkTUni-
versal Transceiver buttons should be
erased for security purposes. For addi-
tional information refer to ``Program-
ming the Integrated HomeLinkTUniver-
sal Transceiver'' later in this section.
WARNING
cDo not use the Integrated
HomeLinkTUniversal Transceiver
with any garage door opener that
lacks safety stop and reverse fea-
tures as required by federal safety
standards. (These standards be-
came effective for opener models
manufactured after April 1, 1982). A
garage door opener which cannot
detect an object in the path of a
closing garage door and then auto-
matically stop and reverse, does not
meet current federal safety stan-
dards. Using a garage door opener
without these features increases the
risk of serious injury or death.
cDuring programming, your garage
door or gate may open or close.
Make sure that people and objects
are clear of the garage door or gate
that you are programming.
cYour vehicle's engine should be
turned off while programming the
Integrated HomeLinkTUniversal
Transceiver.
TRUNK LIGHT
2-30Instruments and controls
ZX
Page 82 of 242

3 Pre-driving checks and adjustments
Keys .......................................................................3-2
Nissan vehicle immobilizer system (NVIS)
keys ........................................................................3-2
Doors ......................................................................3-2
Locking with key .....................................................3-3
Locking with inside lock knob ................................3-3
Locking with power door lock switch .....................3-4
Child safety rear door lock .....................................3-5
Multi-remote control system (if so equipped).........3-5
How to use multi-remote control system ...............3-5
Battery replacement ...............................................3-8
Hood .......................................................................3-9
Trunk lid................................................................3-10Opener operation .................................................3-10
Key operation .......................................................3-10
Fuel filler lid ..........................................................3-11
Opener operation .................................................3-11
Fuel filler cap ........................................................3-11
Steering wheel .....................................................3-13
Tilt operation.........................................................3-13
Sunvisors ..............................................................3-13
Vanity mirrors .......................................................3-13
Mirrors ..................................................................3-14
Inside mirror .........................................................3-14
Outside mirror remote control ..............................3-14
ZX
Page 87 of 242

cWhen thebutton is pushed with all
doors locked, the hazard lights flash
twice and the horn beeps once as a
reminder that the doors are already
locked.
The horn may or may not beep once.
Refer to ``Silencing the horn beep fea-
ture'' later in this section for details.
Unlocking doors
1. Push thebutton on the multi-
remote controller. Only the driver's side
door unlocks.
2. Push the
button on the multi-
remote controller again within five sec-onds. The passenger doors unlock.
3. The interior light comes on and stays on
for 30 seconds when the light switch is in
the O position.Releasing the trunk lid
1. Push the trunk button on the multi-
WPD0004
3-6Pre-driving checks and adjustments
ZX
Page 88 of 242

remote controller for longer than 0.5 sec-
ond. The trunk release button on the
multi-remote controller will not operate
when the ignition switch is in the ON
position.
2. The trunk lid opens.
Using the panic alarm
If you are near your vehicle and feel threat-
ened, you may activate the alarm to call
attention as follows:
1. Push and hold the
button on the
remote controller forlonger than 1.5
seconds.
2. The theft warning alarm and headlights
will stay on for 30 seconds.
3. The panic alarm stops when:
cit has run for 30 seconds, or
cany button is pressed on the multi-
remote controller.
Silencing the horn beep feature
If desired, the horn beep feature can be
deactivated using the multi-remote control-
ler. The instructions are on the back of the
multi-remote controller.
To deactivate:Press and hold the
andbuttonsfor at least two seconds.
The hazard lights will flash three times to
confirm that the horn beep feature has been
deactivated.
To activate:Press and hold the
andbuttonsfor at least two seconds
once more.The hazard lights will flash three times to
confirm that the horn beep feature has been
reactivated.
Deactivating the horn feature does not si-
lence the horn if the alarm is triggered.
Using the interior light
The interior light can be turned off without
waiting 30 seconds by inserting the key into
the ignition or locking the doors with the
multi-remote controller or pushing the inte-
rior light button to OFF.
WPD0005
Pre-driving checks and adjustments3-7
ZX