2000 NISSAN ALTIMA bulb
[x] Cancel search: bulbPage 47 of 242

2 Instruments and controls
Meters and gauges ................................................2-2
Speedometer and odometer ..................................2-3
Tachometer ............................................................2-4
Engine coolant temperature gauge........................2-4
Fuel gauge .............................................................2-5
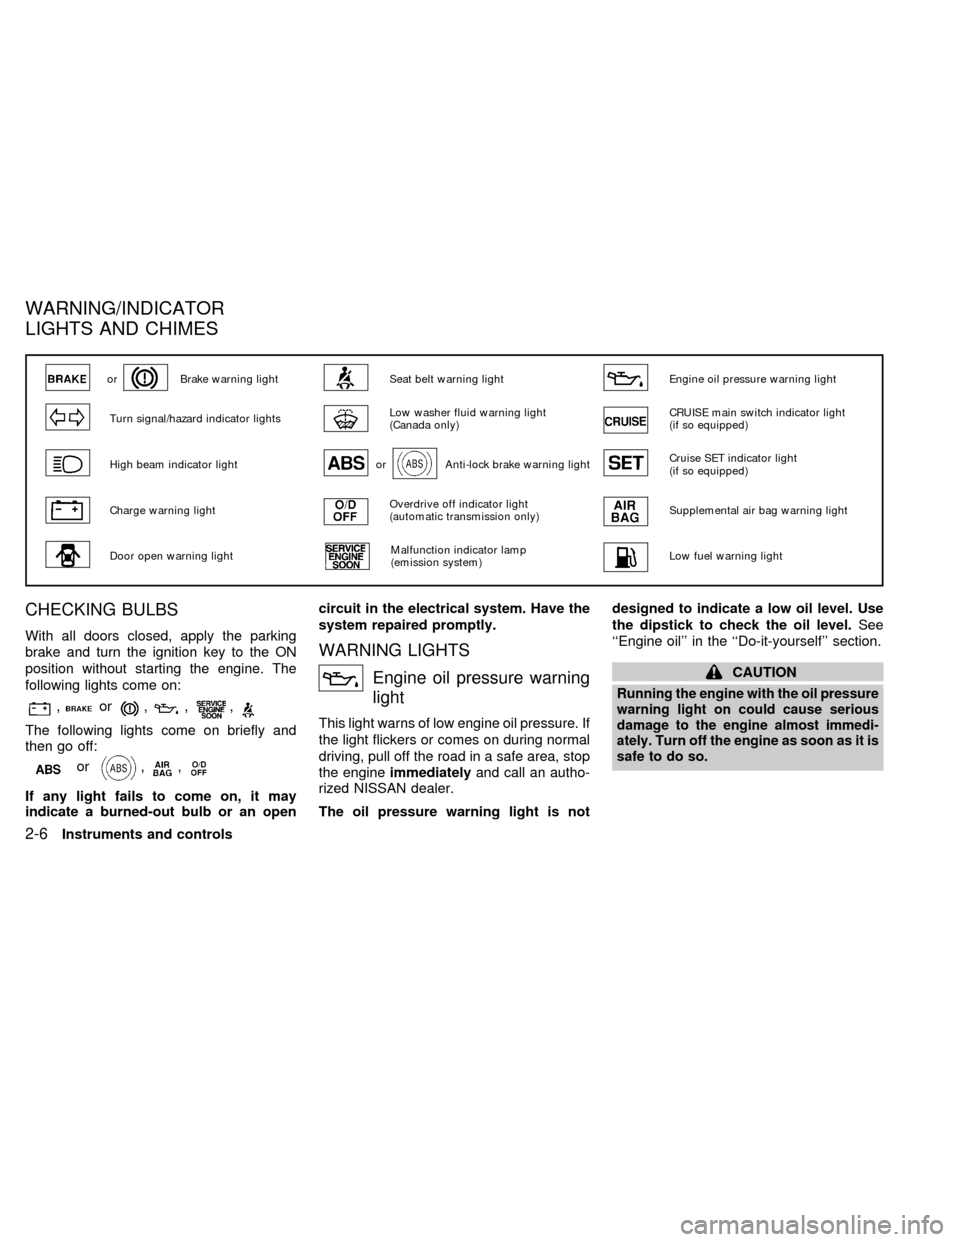
Warning/indicator lights and chimes ......................2-6
Checking bulbs .......................................................2-6
Warning lights.........................................................2-6
Indicator lights ........................................................2-8
Chimes ...................................................................2-9
Security systems ..................................................2-10
Nissan vehicle immobilizer system (NVIS) ..........2-10
Enhanced immobilizer security system
(if so equipped) ....................................................2-12
Windshield wiper and washer switch ...................2-14
Switch operation ...................................................2-14
Rear window defogger switch ..............................2-15
Headlight and turn signal switch ..........................2-16
Headlight switch ...................................................2-16
Turn signal switch ................................................2-17
Cornering light ......................................................2-18
Fog light switch (if so equipped) ..........................2-18Hazard warning flasher switch .............................2-18
Horn ......................................................................2-19
Power socket ......................................................2-19
Cigarette lighter (accessory) and ash tray ...........2-20
Storage .................................................................2-21
Map pocket ...........................................................2-21
Glasses case ........................................................2-21
Cup holders ..........................................................2-22
Glove box .............................................................2-23
Console box .........................................................2-23
Cargo net (if so equipped) ...................................2-25
Trunk side net ......................................................2-26
Windows ...............................................................2-26
Power windows ....................................................2-26
Sunroof (if so equipped).......................................2-27
Interior light...........................................................2-29
Map lights (if so equipped)...................................2-29
Trunk light.............................................................2-30
Integrated HomeLinkTuniversal transceiver
(if so equipped) ....................................................2-30
Programming HomeLinkT.....................................2-31
ZX
Page 53 of 242

CHECKING BULBS
With all doors closed, apply the parking
brake and turn the ignition key to the ON
position without starting the engine. The
following lights come on:
,or,,,
The following lights come on briefly and
then go off:
or,,
If any light fails to come on, it may
indicate a burned-out bulb or an opencircuit in the electrical system. Have the
system repaired promptly.
WARNING LIGHTS
Engine oil pressure warning
light
This light warns of low engine oil pressure. If
the light flickers or comes on during normal
driving, pull off the road in a safe area, stop
the engineimmediatelyand call an autho-
rized NISSAN dealer.
The oil pressure warning light is notdesigned to indicate a low oil level. Use
the dipstick to check the oil level.See
``Engine oil'' in the ``Do-it-yourself'' section.
CAUTION
Running the engine with the oil pressure
warning light on could cause serious
damage to the engine almost immedi-
ately. Turn off the engine as soon as it is
safe to do so.
orBrake warning lightSeat belt warning lightEngine oil pressure warning light
Turn signal/hazard indicator lightsLow washer fluid warning light
(Canada only)CRUISE main switch indicator light
(if so equipped)
High beam indicator lightorAnti-lock brake warning lightCruise SET indicator light
(if so equipped)
Charge warning lightOverdrive off indicator light
(automatic transmission only)Supplemental air bag warning light
Door open warning lightMalfunction indicator lamp
(emission system)Low fuel warning light
WARNING/INDICATOR
LIGHTS AND CHIMES
2-6Instruments and controls
ZX
Page 187 of 242

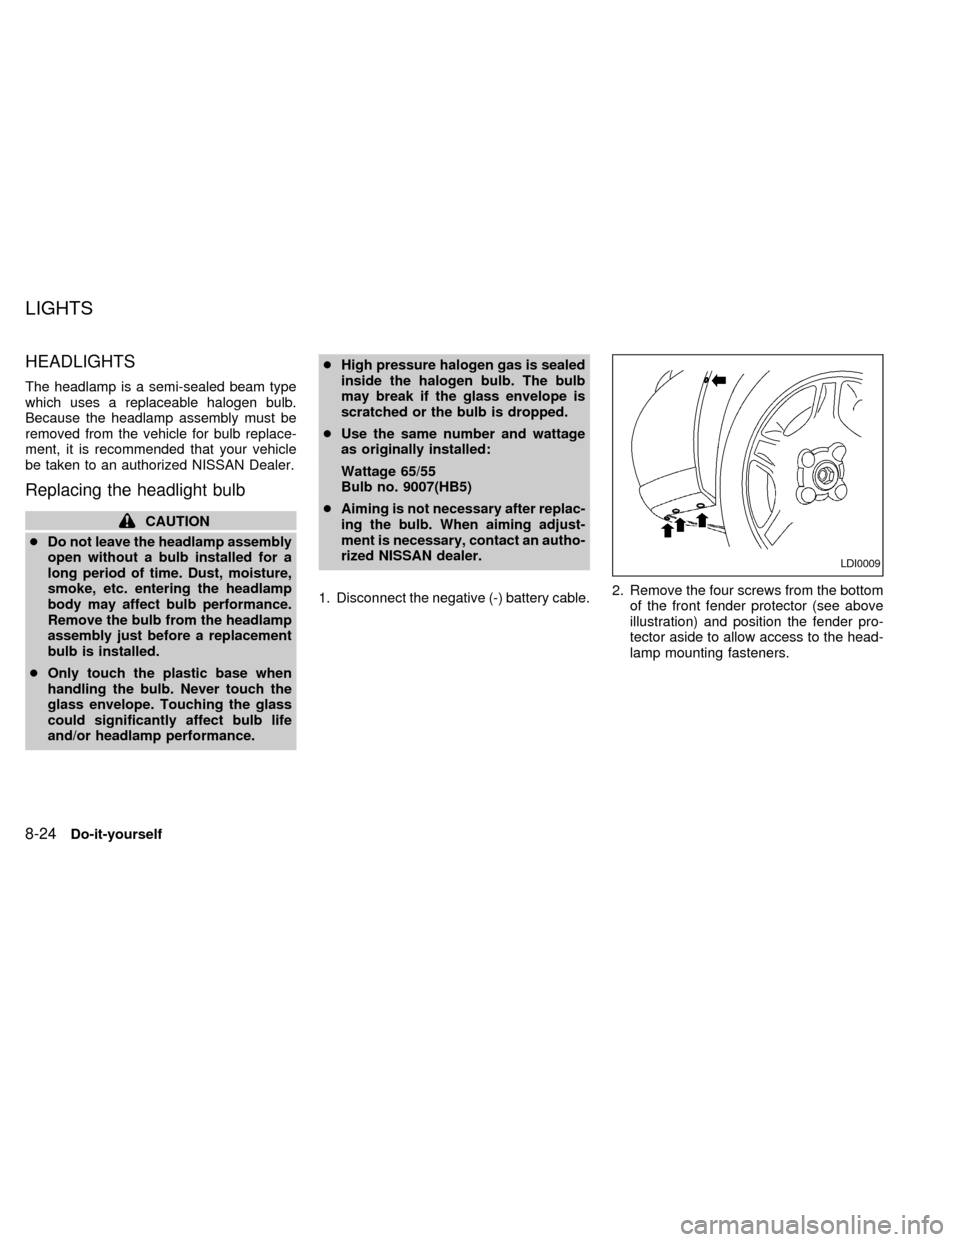
HEADLIGHTS
The headlamp is a semi-sealed beam type
which uses a replaceable halogen bulb.
Because the headlamp assembly must be
removed from the vehicle for bulb replace-
ment, it is recommended that your vehicle
be taken to an authorized NISSAN Dealer.
Replacing the headlight bulb
CAUTION
cDo not leave the headlamp assembly
open without a bulb installed for a
long period of time. Dust, moisture,
smoke, etc. entering the headlamp
body may affect bulb performance.
Remove the bulb from the headlamp
assembly just before a replacement
bulb is installed.
cOnly touch the plastic base when
handling the bulb. Never touch the
glass envelope. Touching the glass
could significantly affect bulb life
and/or headlamp performance.cHigh pressure halogen gas is sealed
inside the halogen bulb. The bulb
may break if the glass envelope is
scratched or the bulb is dropped.
cUse the same number and wattage
as originally installed:
Wattage 65/55
Bulb no. 9007(HB5)
cAiming is not necessary after replac-
ing the bulb. When aiming adjust-
ment is necessary, contact an autho-
rized NISSAN dealer.
1. Disconnect the negative (-) battery cable.2. Remove the four screws from the bottom
of the front fender protector (see above
illustration) and position the fender pro-
tector aside to allow access to the head-
lamp mounting fasteners.
LDI0009
LIGHTS
8-24Do-it-yourself
ZX
Page 188 of 242

3. Remove the three nuts and one bolt
mounting the headlamp assembly (see
above illustration).
4. Pull the headlamp assembly evenly away
from the front of the vehicle to access the
bulb sockets.5. Disconnect the harness connector from
the back side of the bulb socket (see
above illustration).
6. Turn the bulb retaining ring counter-
clockwise until it is free from the head-
lamp assembly and then remove it.
7. Remove the bulb by pulling it straight out
of the lamp assembly. Do not shake the
bulb when removing it.
8. Follow the instructions in reverse order to
install new bulb.
Headlamp mounting nuts and bolt
torque: 36 to 47 in-lb (4.1 to 5.3 Nzm)
Adjusting the headlight aim
Before performing aiming adjustment, make
sure of the following:
a. Use an aiming wall screen.
b. Keep all of the tires inflated to the correct
pressure.
c. Place the vehicle and screen on level
ground.
d. See that the vehicle is unloaded (except
for full levels of coolant, engine oil and
fuel, and that the spare tire, jack, and
tools are stored). Have the driver or an
equivalent weight placed in the driver's
seat.
Low beam
1. Open the hood. Turn headlamp low
beam on.
2. Adjust the vertical aim by turning the
adjusting screw.
cCover the opposite lamp and ensure the
fog lamps (if so equipped) are turned off.
cAdjust beam pattern until cutoff line is
positioned at the same height off ground
as bulb center (on H-line).
LDI0010LDI0011
Do-it-yourself8-25
ZX
Page 190 of 242

If the vehicle front body has been repaired
and/or the headlight assembly has been
replaced, check aiming. Use the aiming
chart shown in the illustration.
cBasic illuminating area should be within
the range shown. Adjust headlamps ac-
cordingly.
FRONT TURN SIGNAL LAMP
Replacing the front turn signal lamp
bulb
1. Disconnect the negative (-) battery cable.
2. Reach between the grille and radiator to
access the turn signal bulb socket.
3. Rotate the socket counter-clockwise and
pull it out of the headlamp assembly. Do
not shake the bulb socket when remov-
ing it.
4. Pull the bulb out of the socket.
5. Follow the instructions in reverse order to
install new bulb.
FRONT PARKING AND CORNER-
ING LAMP
Replacing the front parking and cor-
nering lamp bulb
1. Disconnect the negative (-) battery cable.
2. Remove the four screws from the bottom
of the front fender protector (see above
illustration) and position the fender pro-
tector aside to allow access to the head-
lamp mounting fasteners.
LDI0009
Do-it-yourself8-27
ZX
Page 191 of 242

3. Remove the three nuts and one bolt
mounting the headlamp assembly (see
above illustration).
4. Pull the headlamp assembly evenly away
from the front of the vehicle to access the
bulb sockets.
5. Rotate the socket counter-clockwise and
pull it out of the headlamp assembly. Do
not shake the bulb socket when remov-
ing it.
6. Pull the bulb out of the socket.
7. Follow the instructions in reverse order to
install new bulb.Headlamp mounting nuts and bolt
torque: 36 to 47 in-lb (4.1 to 5.3 Nzm)
FRONT SIDEMARKER LAMP
Replacing the front sidemarker lamp
bulb
1. Disconnect the negative (-) battery cable.
2. Remove the four screws from the bottom
of the front fender protector (see above
illustration) and position the fender pro-
tector aside to allow access to the head-
lamp mounting fasteners.
LDI0010LDI0009
8-28Do-it-yourself
ZX
Page 192 of 242

3. Remove the three nuts and one bolt
mounting the headlamp assembly (see
above illustration).
4. Pull the headlamp assembly evenly away
from the front of the vehicle to access the
bulb sockets.
5. Rotate the socket counter-clockwise and
pull it out of the headlamp assembly. Do
not shake the bulb socket when remov-
ing it.
6. Pull the bulb out of the socket.
7. Follow the instructions in reverse order to
install new bulb.Headlamp mounting nuts and bolt
torque: 36 to 47 in-lb (4.1 to 5.3 Nzm)
FOG LIGHTS
Replacing the fog light bulb
LDI0010
WDI0003
Do-it-yourself8-29
ZX
Page 193 of 242

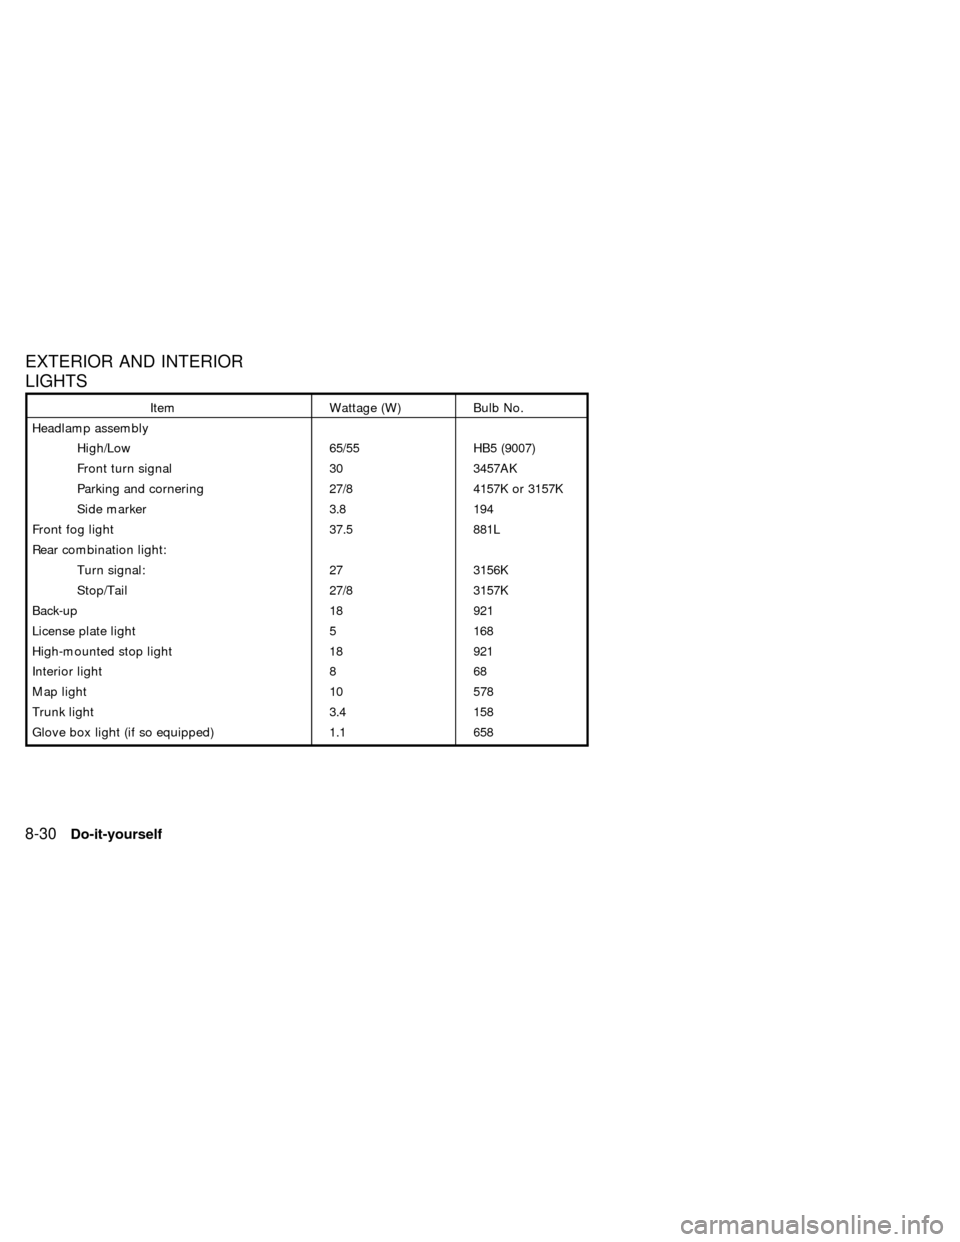
EXTERIOR AND INTERIOR
LIGHTS
Item Wattage (W) Bulb No.
Headlamp assembly
High/Low 65/55 HB5 (9007)
Front turn signal 30 3457AK
Parking and cornering 27/8 4157K or 3157K
Side marker 3.8 194
Front fog light 37.5 881L
Rear combination light:
Turn signal: 27 3156K
Stop/Tail 27/8 3157K
Back-up 18 921
License plate light 5 168
High-mounted stop light 18 921
Interior light 8 68
Map light 10 578
Trunk light 3.4 158
Glove box light (if so equipped) 1.1 658
8-30Do-it-yourself
ZX