2000 NISSAN ALTIMA light
[x] Cancel search: lightPage 80 of 242

The garage door opener should now recog-
nize the Integrated HomeLinkTUniversal
Transceiver and activate when the
HomeLinkTbutton is pressed. The remain-
ing two buttons may now be programmed (if
not yet programmed, follow steps 2 through
4 in the ``Programming HomeLinkT'' proce-
dures earlier in this section).
REPROGRAMMING A SINGLE
HomeLinkTBUTTON
To reprogram an Integrated HomeLinkT
Universal Transceiver button, complete the
following.
1. Press and hold the desired HomeLinkT
button.Do notrelease the button until
step 4 has been completed.
2. When the indicator light begins to flash
slowly (after 20 seconds), position the
hand-held transmitter 2 to 5 inches (50 to
127 mm) away from the HomeLinkTsur-
face.
3. Press and hold the hand-held transmitter
button.
4. The HomeLinkTindicator light will flash,
first slowly and then rapidly. When the
indicator light begins to flash rapidly,release both buttons.
The Integrated HomeLinkTUniversal Trans-
ceiver button has now been reprogrammed.
The new device can be activated by push-
ing the HomeLinkTbutton that was just
programmed. This procedure will not affect
any other programmed HomeLinkTbuttons.
IF YOUR VEHICLE IS STOLEN
If your vehicle is stolen, you should change
the codes of any non-rolling code device
that has been programmed into HomeLinkT.
Consult the Owner's Manual of each device
or call the manufacturer or dealer of those
devices for additional information.
When your vehicle is recovered, you will
need to reprogram the Integrated
HomeLinkTUniversal Transceiver with
your new transmitter information.
FCC Notice:
This device complies with FCC rules part
15. Operation is subject to the following
two conditions: (1) This device may not
cause harmful interference and (2) This
device must accept any interference that
may be received, including interference
that may cause undesired operation.This transmitter has been tested and
complies with FCC and DOC/MDC rules.
Changes or modifications not expressly
approved by the party responsible for
compliance could void the user's author-
ity to operate the device.
DOC: ISTC 1763K1313
FCC I.D. CV2V67690
Instruments and controls
2-33
ZX
Page 86 of 242

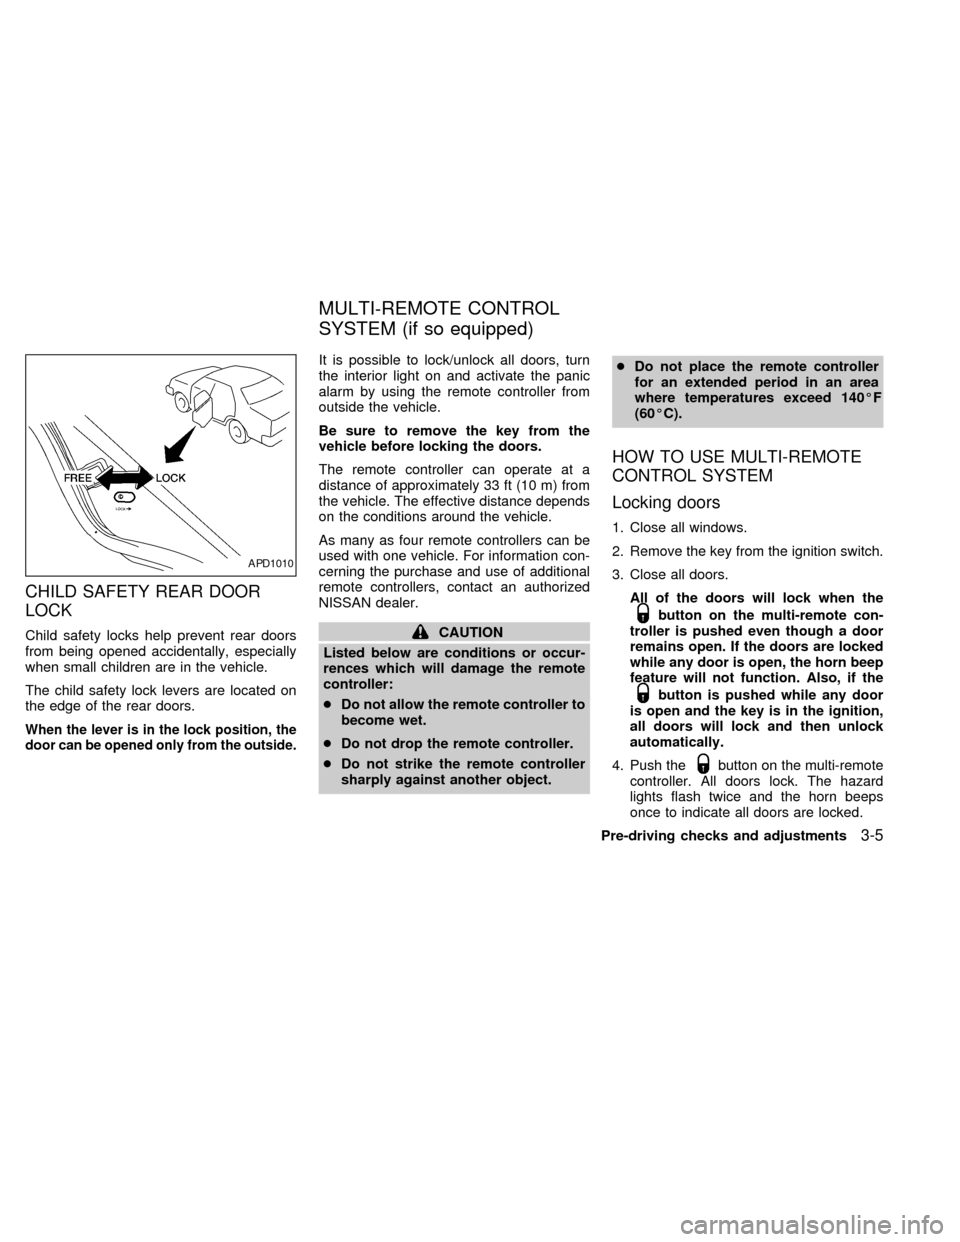
CHILD SAFETY REAR DOOR
LOCK
Child safety locks help prevent rear doors
from being opened accidentally, especially
when small children are in the vehicle.
The child safety lock levers are located on
the edge of the rear doors.
When the lever is in the lock position, the
door can be opened only from the outside.
It is possible to lock/unlock all doors, turn
the interior light on and activate the panic
alarm by using the remote controller from
outside the vehicle.
Be sure to remove the key from the
vehicle before locking the doors.
The remote controller can operate at a
distance of approximately 33 ft (10 m) from
the vehicle. The effective distance depends
on the conditions around the vehicle.
As many as four remote controllers can be
used with one vehicle. For information con-
cerning the purchase and use of additional
remote controllers, contact an authorized
NISSAN dealer.
CAUTION
Listed below are conditions or occur-
rences which will damage the remote
controller:
cDo not allow the remote controller to
become wet.
cDo not drop the remote controller.
cDo not strike the remote controller
sharply against another object.cDo not place the remote controller
for an extended period in an area
where temperatures exceed 140ÉF
(60ÉC).
HOW TO USE MULTI-REMOTE
CONTROL SYSTEM
Locking doors
1. Close all windows.
2. Remove the key from the ignition switch.
3. Close all doors.
All of the doors will lock when the
button on the multi-remote con-
troller is pushed even though a door
remains open. If the doors are locked
while any door is open, the horn beep
feature will not function. Also, if the
button is pushed while any door
is open and the key is in the ignition,
all doors will lock and then unlock
automatically.
4. Push the
button on the multi-remote
controller. All doors lock. The hazard
lights flash twice and the horn beeps
once to indicate all doors are locked.
APD1010
MULTI-REMOTE CONTROL
SYSTEM (if so equipped)
Pre-driving checks and adjustments3-5
ZX
Page 87 of 242

cWhen thebutton is pushed with all
doors locked, the hazard lights flash
twice and the horn beeps once as a
reminder that the doors are already
locked.
The horn may or may not beep once.
Refer to ``Silencing the horn beep fea-
ture'' later in this section for details.
Unlocking doors
1. Push thebutton on the multi-
remote controller. Only the driver's side
door unlocks.
2. Push the
button on the multi-
remote controller again within five sec-onds. The passenger doors unlock.
3. The interior light comes on and stays on
for 30 seconds when the light switch is in
the O position.Releasing the trunk lid
1. Push the trunk button on the multi-
WPD0004
3-6Pre-driving checks and adjustments
ZX
Page 88 of 242

remote controller for longer than 0.5 sec-
ond. The trunk release button on the
multi-remote controller will not operate
when the ignition switch is in the ON
position.
2. The trunk lid opens.
Using the panic alarm
If you are near your vehicle and feel threat-
ened, you may activate the alarm to call
attention as follows:
1. Push and hold the
button on the
remote controller forlonger than 1.5
seconds.
2. The theft warning alarm and headlights
will stay on for 30 seconds.
3. The panic alarm stops when:
cit has run for 30 seconds, or
cany button is pressed on the multi-
remote controller.
Silencing the horn beep feature
If desired, the horn beep feature can be
deactivated using the multi-remote control-
ler. The instructions are on the back of the
multi-remote controller.
To deactivate:Press and hold the
andbuttonsfor at least two seconds.
The hazard lights will flash three times to
confirm that the horn beep feature has been
deactivated.
To activate:Press and hold the
andbuttonsfor at least two seconds
once more.The hazard lights will flash three times to
confirm that the horn beep feature has been
reactivated.
Deactivating the horn feature does not si-
lence the horn if the alarm is triggered.
Using the interior light
The interior light can be turned off without
waiting 30 seconds by inserting the key into
the ignition or locking the doors with the
multi-remote controller or pushing the inte-
rior light button to OFF.
WPD0005
Pre-driving checks and adjustments3-7
ZX
Page 89 of 242

BATTERY REPLACEMENT
Replace the battery in the multi-remote con-
troller as follows:
1. Open the lid using a coin.
2. Replace the battery with a new one.Recommended battery: Sanyo CR2025
or equivalent.
3. Close the lid securely.
4. Press the
button, then thebut-
ton two or three times to check themulti-remote controller operation.
Each time the
button is pressed, the
hazard lights flash once.
If the battery is removed for any reason
other than replacement, perform step 4.
cAn improperly disposed battery can
hurt the environment. Always confirm
local regulations for battery disposal.
cThe multi-remote controller is water-
resistant; however, if it does get wet,
immediately wipe completely dry.
cThe operational range of the multi-
remote controller extends to approxi-
mately 33 ft (10 m) from the vehicle.
This range may vary with conditions.
FCC Notice:
Changes or modifications not expressly
approved by the manufacturer for com-
pliance could void the user's authority to
operate the equipment.
This device complies with part 15 of the
FCC Rules and RSS-210 of Industry
Canada.
Operation is subject to the following two
conditions: (1) This device may not
APD1026
3-8Pre-driving checks and adjustments
ZX
Page 90 of 242

cause harmful interference, and (2) this
device must accept any interference re-
ceived including interference that may
cause undesired operation of the device.
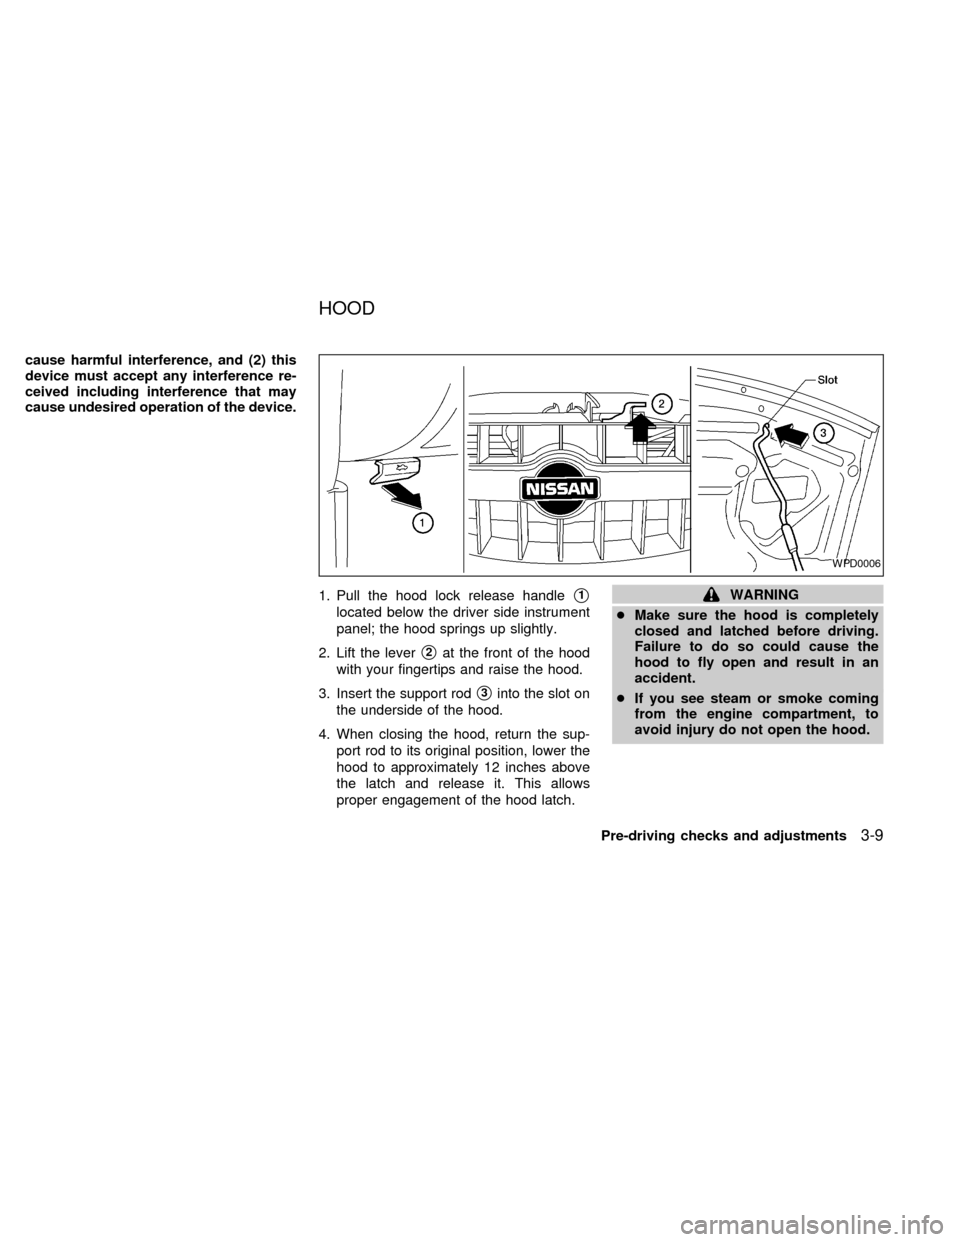
1. Pull the hood lock release handle
s1
located below the driver side instrument
panel; the hood springs up slightly.
2. Lift the lever
s2at the front of the hood
with your fingertips and raise the hood.
3. Insert the support rod
s3into the slot on
the underside of the hood.
4. When closing the hood, return the sup-
port rod to its original position, lower the
hood to approximately 12 inches above
the latch and release it. This allows
proper engagement of the hood latch.
WARNING
cMake sure the hood is completely
closed and latched before driving.
Failure to do so could cause the
hood to fly open and result in an
accident.
cIf you see steam or smoke coming
from the engine compartment, to
avoid injury do not open the hood.
WPD0006
HOOD
Pre-driving checks and adjustments3-9
ZX
Page 95 of 242

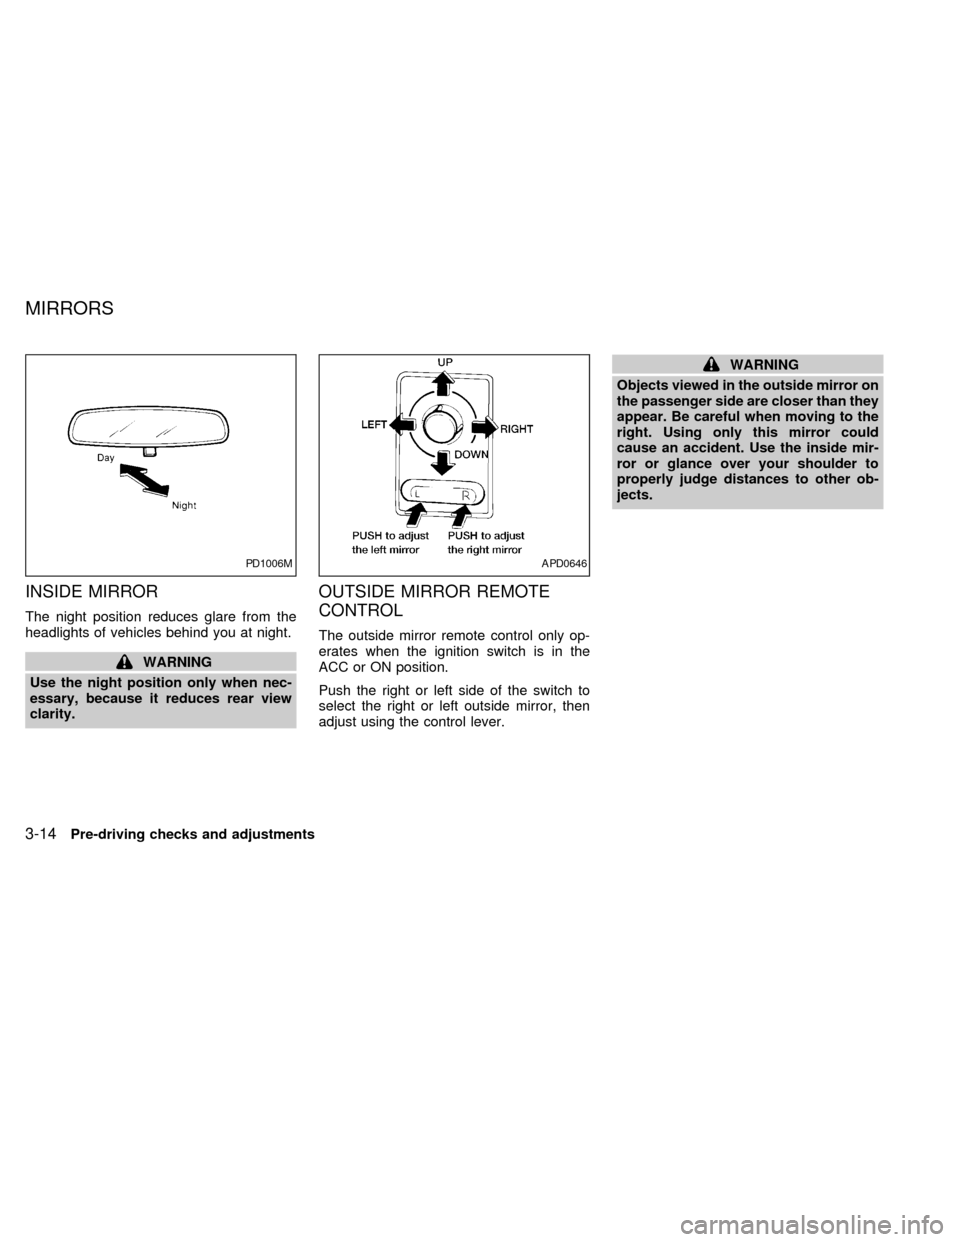
INSIDE MIRROR
The night position reduces glare from the
headlights of vehicles behind you at night.
WARNING
Use the night position only when nec-
essary, because it reduces rear view
clarity.
OUTSIDE MIRROR REMOTE
CONTROL
The outside mirror remote control only op-
erates when the ignition switch is in the
ACC or ON position.
Push the right or left side of the switch to
select the right or left outside mirror, then
adjust using the control lever.
WARNING
Objects viewed in the outside mirror on
the passenger side are closer than they
appear. Be careful when moving to the
right. Using only this mirror could
cause an accident. Use the inside mir-
ror or glance over your shoulder to
properly judge distances to other ob-
jects.
PD1006MAPD0646
MIRRORS
3-14Pre-driving checks and adjustments
ZX
Page 99 of 242

Ð Air flows from center and side
ventilators and foot outlets.
Ð Air flows mainly from foot outlets.
Ð Air flows from defroster outlets
and foot outlets.
Ð Air flows mainly from defroster
outlets.
Temperature control lever
This lever allows you to adjust the tempera-
ture of the outlet air.
Air recirculation button (if so
equipped)
Off position (Indicator light off):
Outside air is drawn into the passenger
compartment and distributed through the
selected outlet.
Use the off position for normal heater or air
conditioner operation.
On position (Indicator light on):
Interior air is recirculated inside the vehicle.
Push the
button to the on position
when:cdriving on a dusty road.
cto avoid traffic fumes.
cfor maximum cooling when using the air
conditioner
Air conditioner button
(if so equipped)
This button is provided only on vehicles
equipped with an air conditioner.
Start the engine, turn the fan control dial to
the desired (1 to 4) position and push the
A/C button to turn on the air conditioner.
The indicator light comes on when the air
conditioner is operating. To stop the air
conditioner, push the switch again.
The air conditioner cooling function op-
erates only when the engine is running.
HEATER OPERATION
Heating
This mode is used to direct heated air to the
foot outlets. Some air also flows from the
defroster outlets.
1. Push the
button to the off position
for normal heating.2. Push the
button in.
3. Move the fan control dial to the desired
position.
4. Move the temperature control lever to the
desired position between the middle and
the HOT position.
Ventilation
This mode directs outside air to the side and
center ventilators.
1. Push the
button to the off position.
2. Push the
button in.
3. Move the fan control dial to the desired
position.
4. Move the temperature control lever to the
desired position.
Defrosting or defogging
This mode is used to defrost/defog the
windows.
1. Push the
button in.
2. Move the fan control dial to the desired
position.
3. Move the temperature control lever to the
4-4Heater, air conditioner and audio systems
ZX