2000 NISSAN ALTIMA check engine
[x] Cancel search: check enginePage 178 of 242

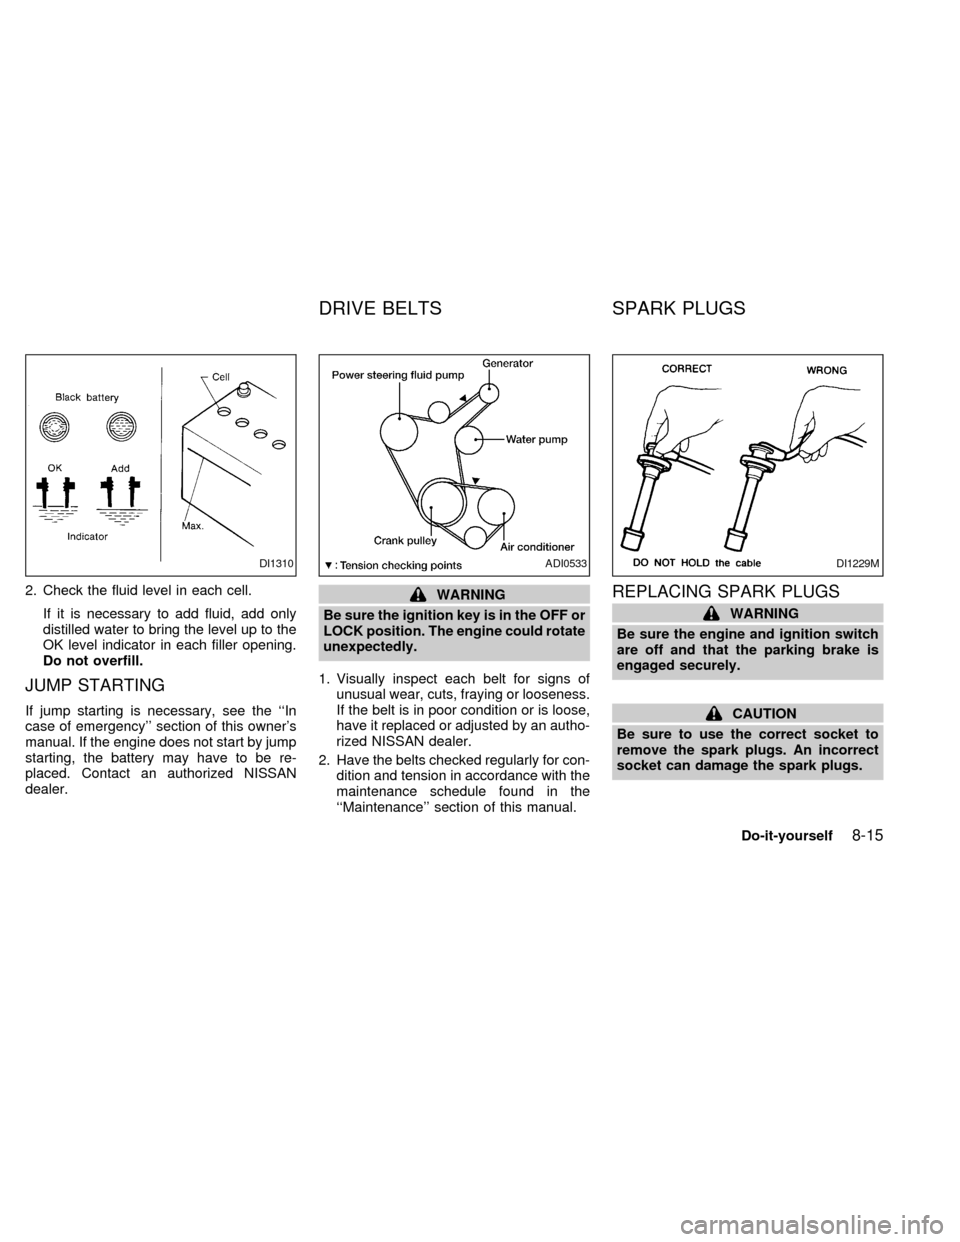
2. Check the fluid level in each cell.
If it is necessary to add fluid, add only
distilled water to bring the level up to the
OK level indicator in each filler opening.
Do not overfill.
JUMP STARTING
If jump starting is necessary, see the ``In
case of emergency'' section of this owner's
manual. If the engine does not start by jump
starting, the battery may have to be re-
placed. Contact an authorized NISSAN
dealer.
WARNING
Be sure the ignition key is in the OFF or
LOCK position. The engine could rotate
unexpectedly.
1. Visually inspect each belt for signs of
unusual wear, cuts, fraying or looseness.
If the belt is in poor condition or is loose,
have it replaced or adjusted by an autho-
rized NISSAN dealer.
2. Have the belts checked regularly for con-
dition and tension in accordance with the
maintenance schedule found in the
``Maintenance'' section of this manual.REPLACING SPARK PLUGS
WARNING
Be sure the engine and ignition switch
are off and that the parking brake is
engaged securely.
CAUTION
Be sure to use the correct socket to
remove the spark plugs. An incorrect
socket can damage the spark plugs.
DI1310ADI0533DI1229M
DRIVE BELTS SPARK PLUGS
Do-it-yourself8-15
ZX
Page 182 of 242

If you wax the surface of the hood, be
careful not to let wax get into the washer
nozzle. This may cause clogging or im-
proper windshield washer operation. If wax
gets into the nozzle, remove it with a needle
or small pin.
CHECKING PARKING BRAKE
From the released position, pull the parking
brake lever up slowly and firmly. If the
number of clicks is out of the range listed
above, see an authorized NISSAN dealer.
CHECKING BRAKE PEDAL
With the engine running, check the distance
between the upper surface of the pedal and
the metal floor. If it is out of the range shown
above, see an authorized NISSAN dealer.
ADI0613
ADI1003DI1020M
PARKING BRAKE AND BRAKE
PEDAL
Do-it-yourself8-19
ZX
Page 183 of 242

Self-adjusting brakes
Your vehicle is equipped with self-adjusting
brakes.
The front (and rear, if equipped) disc-type
brakes self-adjust every time the brake
pedal is applied. The rear drum-type brakes
also self-adjust every time the brake pedal
is applied.
If the brake pedal goes down farther than
normal, it may be due to a lack of adjust-
ment of the rear drum brakes. To adjust,
apply the parking brake several times.
WARNING
See an authorized NISSAN dealer for a
brake system check if the brake pedal
height does not return to normal.
Brake pad wear indicators
The disc brake pads on your vehicle have
audible wear indicators. When a brake pad
requires replacement, it makes a high
pitched scraping or screeching sound when
the vehicle is in motion whether or not the
brake pedal is depressed. Have the brakes
checked as soon as possible if the wearindicator sound is heard.
Under some driving or climate conditions,
occasional brake squeak, squeal or other
noise may be heard. Occasional brake
noise during light to moderate stops is nor-
mal and does not affect the function or
performance of the brake system.
The rear drum brakes (if so equipped) do
not have audible wear indicators. Should
you ever hear an unusually loud noise from
the rear drum brakes, have them inspected
as soon as possible by an authorized
NISSAN dealer.
Proper brake inspection intervals should
be followed.For more information regard-
ing brake inspections, see the appropriate
maintenance schedule information in the
``Maintenance'' section of this manual.
BRAKE BOOSTER
Check the brake booster function as fol-
lows:
1. With the engine off, press and release
the brake pedal several times. When
brake pedal movement (distance of
travel) remains the same from one pedal
application to the next, continue on to the
next step.
2. While depressing the brake pedal, start
the engine. The pedal height should drop
a little.
3. With the brake pedal depressed, stop the
engine. Keep the pedal depressed for
about 30 seconds. The pedal height
should not change.
4. Run the engine for one minute without
depressing the brake pedal, then turn it
off. Depress the brake pedal several
times. The pedal travel distance will de-
crease gradually with each depression
as the vacuum is released from the
booster.
If the brakes do not operate properly, see an
authorized NISSAN dealer.
8-20Do-it-yourself
ZX
Page 184 of 242

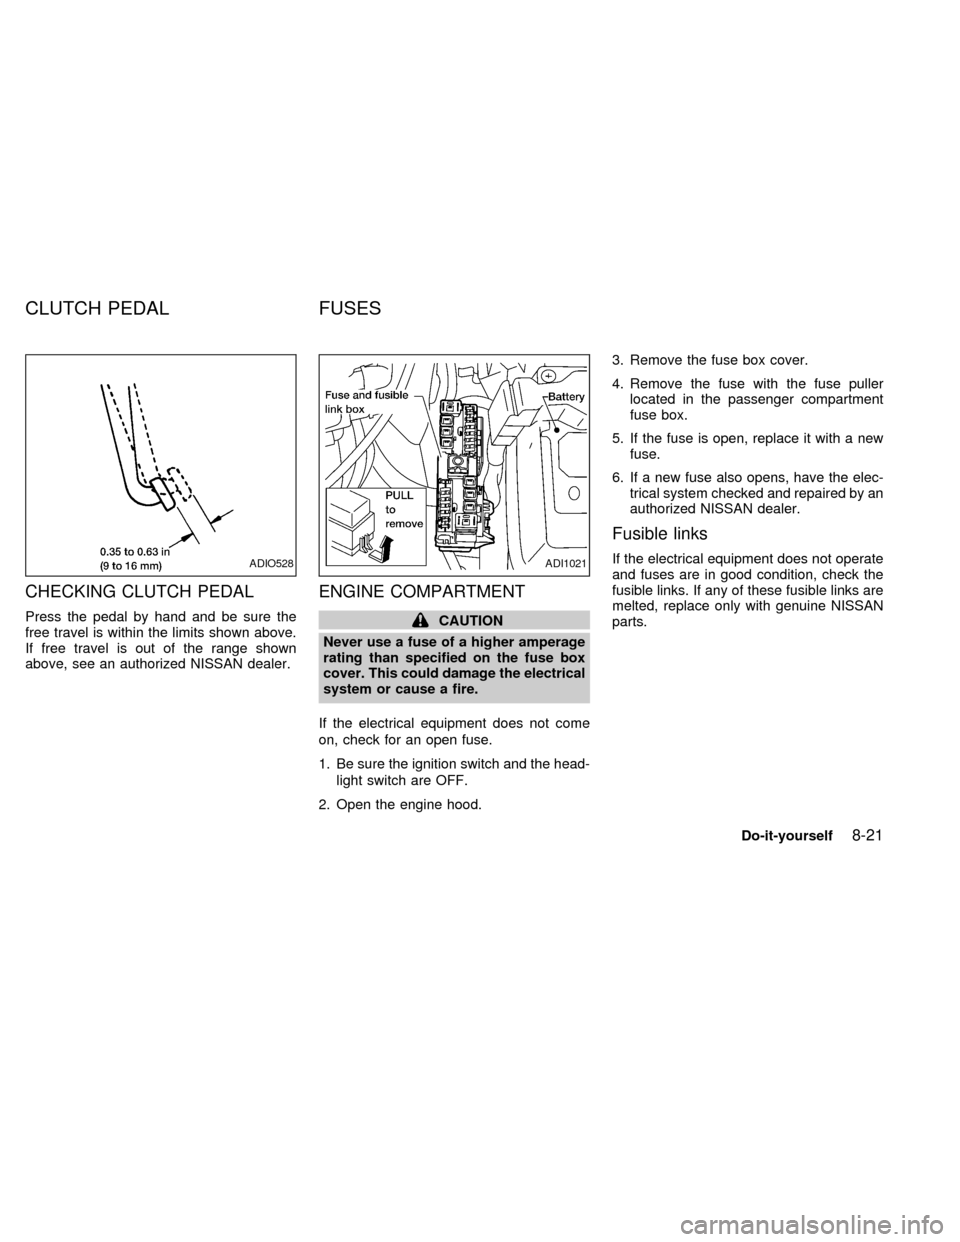
CHECKING CLUTCH PEDAL
Press the pedal by hand and be sure the
free travel is within the limits shown above.
If free travel is out of the range shown
above, see an authorized NISSAN dealer.
ENGINE COMPARTMENT
CAUTION
Never use a fuse of a higher amperage
rating than specified on the fuse box
cover. This could damage the electrical
system or cause a fire.
If the electrical equipment does not come
on, check for an open fuse.
1. Be sure the ignition switch and the head-
light switch are OFF.
2. Open the engine hood.3. Remove the fuse box cover.
4. Remove the fuse with the fuse puller
located in the passenger compartment
fuse box.
5. If the fuse is open, replace it with a new
fuse.
6. If a new fuse also opens, have the elec-
trical system checked and repaired by an
authorized NISSAN dealer.
Fusible links
If the electrical equipment does not operate
and fuses are in good condition, check the
fusible links. If any of these fusible links are
melted, replace only with genuine NISSAN
parts.ADIO528ADI1021
CLUTCH PEDAL FUSES
Do-it-yourself8-21
ZX
Page 203 of 242

Your new NISSAN has been designed to
have minimum maintenance requirements
with longer service intervals to save you
both time and money. However, some day-
to-day and regular maintenance is essential
to maintain your NISSAN's good mechani-
cal condition, as well as its emission and
engine performance.
It is the owner's responsibility to make sure
the specified periodic maintenance, as well
as general maintenance, is performed.
As the vehicle owner, you are the only one
who can ensure that your vehicle receives
proper maintenance. You are a vital link in
the maintenance chain.
General maintenance
General maintenance includes those items
which should be checked during normal
day-to-day operation of the vehicle. They
are essential if your vehicle is to continue to
operate properly. It is your responsibility to
perform these maintenance procedures
regularly as prescribed.
These checks or inspections can be done
by yourself, a qualified technician or, if you
prefer, an authorized NISSAN dealer.Periodic maintenance
The maintenance items listed under peri-
odic maintenance are required to be ser-
viced at regular intervals.
However, under severe driving conditions,
additional or more frequent maintenance is
required.
Where to go for service
If maintenance service is required or your
vehicle appears to malfunction, have the
systems checked and tuned by an autho-
rized NISSAN dealer.
NISSAN technicians are well-trained spe-
cialists who are kept up to date with the
latest service information through technical
bulletins, service tips, and in-dealership
training programs. They are completely
qualified to work on NISSAN vehiclesbe-
forethey work on your vehicle, rather than
after they have worked on it.
You can be confident that an authorized
NISSAN dealer's service department per-
forms the best job to meet the maintenance
requirements on your vehicle Ð in a reliable
and economic way.During the normal day-to-day operation of
the vehicle, general maintenance should be
performed regularly as prescribed in this
section. If you detect any unusual sounds,
vibrations or smells, be sure to check for the
cause or have an authorized NISSAN
dealer do it promptly. In addition, you should
notify an authorized NISSAN dealer if you
think repairs are required.
When performing any checks or mainte-
nance work, closely observe the precau-
tions in the ``Do-it-yourself'' section of this
manual.
EXPLANATION OF
MAINTENANCE ITEMS
Additional information on the items
marked with an ``*'' can be found in the
``Do-it-yourself'' section of this manual.
EXTERIOR MAINTENANCE
Outside the vehicle
The maintenance items listed here should
be performed from time to time, unless
otherwise specified.
MAINTENANCE
PRECAUTIONSGENERAL MAINTENANCE
9-2Maintenance
ZX
Page 204 of 242

Tires* ÐCheck the pressure with a gauge
periodically when at a service station, in-
cluding the spare, and adjust to the speci-
fied pressure if necessary. Check carefully
for damage, cuts or excessive wear.
Wheel nuts* ÐWhen checking the tires,
make sure no wheel nuts are missing, and
check for any loose wheel nuts. Tighten if
necessary.
Tire rotation* ÐTires should be rotated
every 7,500 miles (12,000 km).
Wheel alignment and balance ÐIf the
vehicle should pull to either side while driv-
ing on a straight and level road, or if you
detect uneven or abnormal tire wear, there
may be a need for a wheel alignment.
If the steering wheel or seat vibrates at
normal highway speeds, wheel balancing
may be needed.Windshield wiper blades* ÐCheck for
cracks or wear if they do not wipe properly.
Doors and engine hood ÐCheck that all
doors and the hood operate properly. Also
ensure all latches lock securely. Lubricate
hinges, latches, rollers and links if neces-
sary. Make sure the secondary latch keeps
the hood from opening when the primary
latch is released.
When driving in areas using road salt or
other corrosive materials, check lubrication
frequently.
Lights* ÐMake sure the headlights, stop
lights, tail lights, turn signal lights, and other
lights are all operating properly and installed
securely. Also check headlight aim.
INTERIOR MAINTENANCE
The maintenance items listed here should
be checked on a regular basis, such as
when performing periodic maintenance,
cleaning the vehicle, etc.
Additional information on the following
items with an ``*'' is found in the ``Do-it-
yourself'' section of this manual.Warning lights and chimes ÐMake sure
all warning lights and buzzers/chimes are
operating properly.
Windshield wiper and washer* ÐCheck
that the wipers and washer operate properly
and that the wipers do not streak.
Windshield defroster ÐCheck that the air
comes out of the defroster outlets properly
and in sufficient quantity when operating the
heater or air conditioner.
Steering wheel ÐCheck for changes in
the steering conditions, such as excessive
freeplay, hard steering or strange noises.
Seats ÐCheck seat position controls such
as seat adjusters, seatback recliner, etc. to
ensure they operate smoothly and all
latches lock securely in every position.
Check that the head restraints move up and
down smoothly and the locks (if so
equipped) hold securely in all latched posi-
tions.
Seat belts ÐCheck that all parts of the seat
belt system (for example, buckles, anchors,
adjusters and retractors) operate properly
and smoothly, and are installed securely.
Check the belt webbing for cuts, fraying,
wear or damage.
Maintenance
9-3
ZX
Page 205 of 242

Accelerator pedal ÐCheck the pedal for
smooth operation and make sure the pedal
does not catch or require uneven effort.
Keep the floor mat away from the pedal.
Clutch pedal* ÐMake sure the pedal
operates smoothly and check that it has the
proper free travel.
Brakes ÐCheck that the brakes do not pull
the vehicle to one side when applied.
Brake pedal and booster* ÐCheck the
pedal for smooth operation and make sure it
has the proper distance under it when de-
pressed fully. Check the brake booster func-
tion. Be certain to keep the floor mat away
from the pedal.
Parking brake* ÐCheck that the lever has
the proper travel and confirm that your
vehicle is held securely on a fairly steep hill
with only the parking brake applied.
Automatic transmission P position
mechanism ÐOn a fairly steep hill check
that your vehicle is held securely with the
shift selector lever in the P (Park) position
without applying any brakes.Under the hood and vehicle
The maintenance items listed here should
be checked periodically, such as each time
you check the engine oil or refuel.
Additional information on the items
marked with an ª*º can be found in the
ªDo-it-yourself'' section of this manual.
Windshield washer fluid* ÐCheck that
there is adequate fluid in the tank.
Engine oil level* ÐCheck the level after
parking the vehicle on a level surface, with
the engine off. Wait a few minutes for the oil
to drain back into the oil pan.
Brake and (if so equipped) clutch fluid
levels* ÐMake sure that the brake and
clutch fluid level are between the MIN and
MAX lines on each reservoir.
Power steering fluid level* and lines Ð
Check the level when the fluid is cold and
with the engine off. Check the lines for
proper attachment, leaks, cracks, etc.
Automatic transmission fluid level* Ð
Check the level after putting the shift selec-
tor lever in P (Park) with the engine idling at
operating temperature.Engine coolant level* ÐCheck the cool-
ant level when the engine is cold.
Radiator and hoses ÐCheck the front of
the radiator and clean off any dirt, insects,
leaves, etc., that may have accumulated.
Make sure the hoses have no cracks, de-
formation, rot or loose connections.
Engine drive belts* ÐMake sure the drive
belts are not frayed, worn, cracked or oily.
Battery* ÐCheck the fluid level in each
cell. It should be between the MAX and MIN
lines.
Exhaust system ÐMake sure there are no
cracks, holes, loose joints or supports. If the
sound of the exhaust seems unusual or
there is a smell of exhaust fumes, immedi-
ately have the exhaust system inspected by
a qualified individual. (See the carbon mon-
oxide warning in the ``Starting and driving''
section of this manual.)
Underbody ÐThe underbody is frequently
exposed to corrosive substances such as
those used on icy roads or to control dust. It
is very important to remove these sub-
stances from the underbody, otherwise rust
may form on the floor pan, frame, fuel lines
9-4Maintenance
ZX
Page 211 of 242

EXPLANATION OF
MAINTENANCE ITEMS
Additional information on the following
items marked with an ``*'' is found in the
``Do-it- yourself'' section of this manual.
Emission control system
maintenance
Drive belts* ÐCheck drive belts for wear,
fraying or cracking and also for proper ten-
sion. Replace any damaged drive belts.
Air cleaner filter ÐUnder normal driving
conditions, the air cleaner filter should be
replaced in accordance with the mainte-
nance schedule. However, driving the ve-
hicle in dusty areas may cause rapid clog-
ging of the element. Consequently, the
element may have to be replaced more
frequently.
EVAP vapor lines ÐCheck vapor lines
and connections for leaks, looseness or
deterioration. If leaks are found, replace
them.
Fuel lines ÐCheck the fuel hoses, piping
and connections for leaks, looseness or
deterioration. Replace any damaged parts.Fuel filter ÐIf the vehicle is operated
under extremely adverse weather condi-
tions or in areas where ambient tempera-
tures are either extremely low or extremely
high, the filter might become clogged. In
such an event, replace the filter immedi-
ately.
Engine coolant* ÐDrain and flush the
cooling system.
Engine oil & oil filter* ÐUnder normal
driving conditions, the engine oil and oil filter
should be replaced in accordance with the
maintenance schedule. However, under se-
vere driving conditions, they may have to be
replaced more frequently.
Spark plugs* ÐReplace with new plugs
having the correct heat range.
Intake & exhaust valve clearance Ð
Check the valve clearance if valve noise
increases.
Chassis and body maintenance
Brake lines & cables ÐCheck the brake
lines and hoses (including brake booster
vacuum hoses, connections & check valve)and parking brake cables for proper attach-
ment, leaks, cracks, chafing, abrasion, de-
terioration, etc.
Brake pads, rotors, drums & linings Ð
Check these and the other neighboring
brake components for wear, deterioration
and leaks. Under severe driving conditions,
they may have to be inspected more fre-
quently.
Manual & automatic transmission fluid*
ÐCheck the fluid level and visually inspect
for signs of leakage.
Under severe driving conditions, the fluid
should be replaced at the specified interval.
Steering gear & linkage, axle & suspen-
sion parts, and drive shaft boots Ð
Check for damage, looseness and leakage
of oil or grease. Under severe driving con-
ditions, inspection should be performed
more frequently.
Exhaust system ÐVisually check the ex-
haust pipes, muffler, and hangers for proper
attachment, leaks, cracks, chafing, abra-
sion, deterioration, etc. Under severe driv-
ing conditions, inspection should be per-
formed more frequently.
9-10Maintenance
ZX