Page 28 of 280
LOCKING AND UNLOCKING
2–16
(6) Depending on the models of ski carriers
or roof carriers, the sunroof may contact
with the carrier when the sunroof is tilted
up. Be careful when tilting up the sun-
roof if such a ski carrier or a roof carrier
is installed.
(7) Be sure to close the sunroof completely
when washing the vehicle or when lea-
ving the vehicle.
(8) Be careful, not to put any wax on the
weatherstrip (black rubber) around the
sunroof opening. If stained with wax, the
weatherstrip cannot maintain a wea-
therproof seal with the sunroof.
(9) After washing the vehicle or after it has
rained, wipe off any water that is on the
sunroof before operating it.
(10) Operating the sunroof repeatedly with
the engine stationary will run down the
battery. Operate the sunroof while the
engine is running.
Page 88 of 280
INSTRUMENTS AND CONTROLS
4–22
E23A001a
Horn switchEE23A-Ac
When the ignition switch is in the “ON” or
“ACC” position, pressing the “” mark on
the steering wheel, causes the horn to
sound.
E19A134a
Room lampsEE19AAZ
Vehicles without sunroof
Room lamp1(OFF)
-The lamp goes out.
2(�)
-The lamp illuminates when a
door or the tailgate is opened
and goes out when it is closed.
3(ON)
-The lamp illuminates.
F19A037a
Spot lamps*4 - The lamp goes out.
5 - The lamp illuminates.
Page 89 of 280
INSTRUMENTS AND CONTROLS
4–23
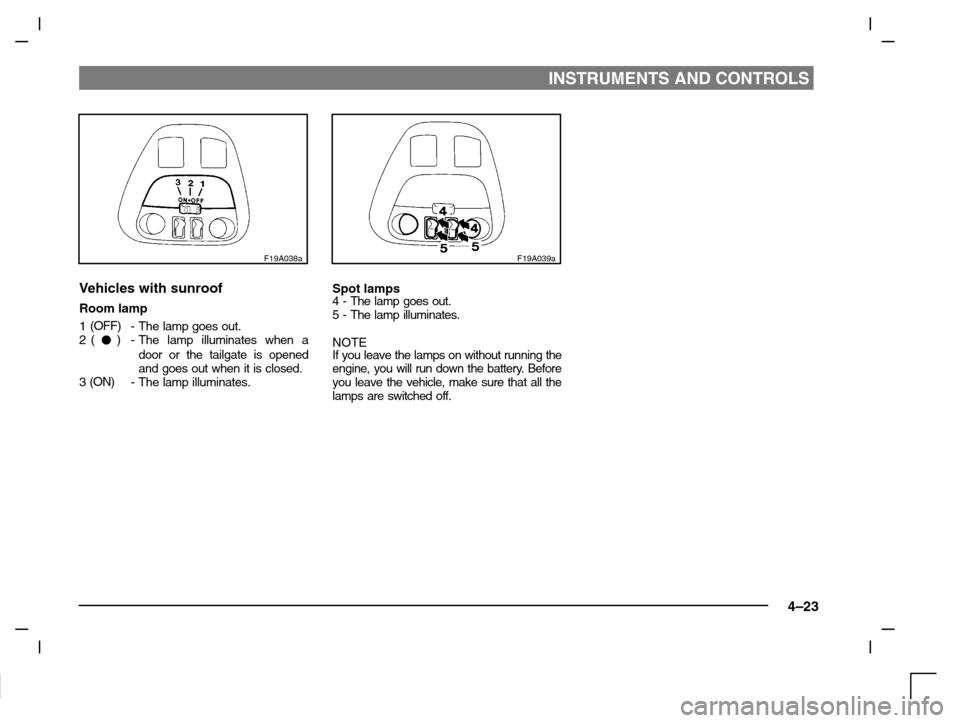
F19A038a
Vehicles with sunroof
Room lamp
1(OFF)
-The lamp goes out.
2(�)
-The lamp illuminates when a
door or the tailgate is opened
and goes out when it is closed.
3(ON)
-The lamp illuminates.
F19A039a
Spot lamps4 - The lamp goes out.
5 - The lamp illuminates.
NOTE
If you leave the lamps on without running the
engine, you will run down the battery. Before
you leave the vehicle, make sure that all the
lamps are switched off.
Page 197 of 280

VEHICLE CARE
7–5
During cold weatherThe salt and other chemicals spread on the
roads in some areas in winter can have a
harmful effect on the vehicle body. You
should therefore wash the vehicle as often
as possible in accordance with our care–in-
structions. It is recommended to have a pre-
servative applied and the underfloor protec-
tion checked at an authorized MITSUBISHI
dealer before and after the cold weather sea-
son.
After washing your vehicle, wipe off all water-
drops from the rubber parts around the doors
to prevent the doors from freezing.
NOTE
To prevent freezing of the weatherstripping
on the doors, bonnet, etc., they should be
treated with silicone spray.
WaxingEK33A-N
Waxing the vehicle will help prevent the ad-
herence of dust and road chemicals to the
paintwork. Apply a wax solution after wash-
ing the vehicle, or at least once every three
months to assist displacing of water. Do not
wax your vehicle in direct sunlight. You
should wax after the surfaces have cooled.
CAUTION
(1) Waxes containing high abrasive
compounds should not be used.
Such waxes remove rust and
stain effectively from the paint-
work but they are harmful to the
lustre of the painted surface.
Further, they are harmful to
glossy surfaces such as grille,
garnish, mouldings, etc.
(2) Do not use petrol or paint
thinners to remove road tar or
other contamination to the
painted surface.
(3) Do not apply wax on the areas
having black mat coating as it can
cause uneven discolouration,
patches, blurs, etc. If stained with
wax, immediately wipe off with a
piece of soft cloth and warm
water.
(4) On vehicles with the sunroof, be
careful when waxing the area
around the sunroof opening, not
to put any wax on the weather-
strip (black rubber). If stained
with wax, the weatherstrip cannot
maintain a weatherproof seal with
the sunroof.
PolishingEK04A-Ac
The vehicle should only be polished if the
paintwork has become stained or lost its
lustre. Matt - finish parts and plastic bumpers
must not be polished, polishing these parts
will stain them or damage their finish.
Damaged paintEK08A-Ac
Small cracks and scratches in the paint coat
should be touched up as soon as possible
with MITSUBISHI touch - up paint to prevent
corrosion.
Check body areas facing the road or the
tyres carefully for damage to the paint coat
caused by flying stones, etc. The paint code
number for your vehicle can be found on the
vehicle information code plate in the engine
compartment.
Chrome partsEK06A-Aa
In order to prevent spots and corrosion of
chrome parts, wash with water, dry thor-
oughly, and apply a special protective coat-
ing. This should be done more frequently in
winter.
Page 199 of 280

VEHICLE CARE
7–7
Cleaning the sunroof*EK30A-Ab
Clean the inside of the sunroof with a soft
cloth. Hard deposits should be wiped away
with a cloth dipped in warm, neutral deter-
gent solution. Wipe away the solution with a
sponge dipped in fresh water.
NOTEThe surface treatment on the inside of the
glass may be removed if hard cloth or or-
ganic solvent (benzine, thinner, etc.) is used.
Chassis and underbody protec-
tion
EK12A-Jc
Your vehicle’s underbody has been treated
at the factory in order to protect it from rust
and corrosion. Some areas have been in-
jected with anti-corrosion agents and wax.
The effectiveness of these measures, how-
ever, will be reduced by flying stones, road
chemicals, etc., as the vehicle is driven. You
should take your vehicle to your authorized
MITSUBISHI dealer every 12 months to
have body sheet metal inspected for condi-
tion, and it is recommended to have the un-
derbody checked regularly (autumn and
spring) and have additional protection treat-
ment carried out as required.
As not all of the commercially available ma-
terials are suitable for use on your vehicle, it
is recommended that you have this work
carried out by an authorized MITSUBISHI
dealer.
When washing the vehicle, especially in
winter, spray the underbody with water to re-
move dirt and dust which might contain salts,
road chemicals, etc.
Engine compartmentEK13A-Aa
Clean the engine compartment at the begin-
ning and end of winter. Pay particular atten-
tion to flanges, crevices and peripheral parts
where dust containing road chemicals and
other corrosive materials might collect.
If salt and other chemicals are used on the
roads in your area, clean the engine com-
partment at least once every three months.
Page 223 of 280
FOR EMERGENCIES
8–23
N09A031a
In the engine compartment, the fuse box is
located as shown in the illustration.
N29B071a
Fuse load capacityEN29BMKd
The fuse capacity and the name of the elec-
trical systems protected by the fuses are
indicated on the inside of the coin box lo-
cated at the driver’s leg area and on the fuse
box lid for fuses located in the engine com-
partment.
Passenger compartment
NOTE
Spare fuses are contained in the fuse hous-
ing. Always use a fuse of the same capacity
for replacement.
NOSym-
bolNameCapacity
1Cigarette lighter15 A
2Electric remote-con-
trolled outside rear-view
mirrors10A
3Supplemental restraint
system (SRS)10 A
4Relay15 A
5Rear fog lamp15 A
6Windscreen wiper20 A
7Sunroof20 A
8Horn10 A
9Reversing lamps10 A
10Auto-speed (cruise)
control10 A
11Heated seat20 A
12Gauges10 A
13Heater25 A
14–Spare fuse25 A
15–Spare fuse20 A
16–Spare fuse15 A
17–Spare fuse10 A
Page 227 of 280
FOR EMERGENCIES
8–27
Hatchback
N10B173a
6-Rear turn - signal lamps
21W (PY21W) . . . . . . . . . . . . . . . . . .
7-Reversing lamps 21W (P21W). . . . .
8-Licence - plate lamps 5W (W5W). .
9-Tail lamps 21/5W (P21/5W). . . . . . .
10-Stop lamps (Hatchback)
21W (P21W) . . . . . . . . . . . . . . . . . . . .
Stop and tail lamps (Sedan)
21/5W (P21/5W) . . . . . . . . . . . . . . . .
11-Rear fog lamp 21W (P21W). . . . . . .
12-High mounted stop lamp 5W (W5W)
Inside
Front room lamps 10W. . . . . . . . . . . . . . . .
Spot lamps*
Vehicles without sunroof 10W. . . . . . . .
Vehicles with sunroof 5W. . . . . . . . . . .
Luggage compartment lamp 10W. . . . . . . .
Sedan
N10B171aN10C046a
Headlamps and position lampsEN10CAHd
Remove the sealing cover by turning it
anti clockwise and disconnect the connector.
Page 237 of 280
FOR EMERGENCIES
8–37
Vehicles without sunroof
N10M049a
Room lampsEN10M–Ac
Insert a straight blade (or minus) screwdriver
into the notch of the lamp assembly and pry
gently to remove the lens.
Remove the lamp bulb from the lamp holder.
NOTEWrap a piece of cloth around the straight
blade (or minus) screwdriver in order to
avoid scratching the lens.
Vehicles with sunroof
N10M013a
Vehicles without sunroof
N10R002a
Spot lamps*EN10R–K
Insert a straight blade (or minus) screwdriver
into the notch of the lamp assembly and pry
gently to remove the lens.
Remove the bulb from the lamp holder.
NOTE
Wrap a piece of cloth around the straight
blade (or minus) screwdriver in order to
avoid scratching the lens.
 Depending on the models of ski carriers
or roof carriers, the sunroof may contact
with the carrier when the sunroof is tilted
up. Be careful when tilting up the sun-
r")


 . . . . . . . . . . . . . . . . . .
7-Reversing lamps 21W (P21W). . . . .
8-Licence - plate lamps 5W (W5W). .
9-Tail")
 screwdriver
into the notch of the lamp assembly and pry
gently to remove the lens.
Remo")