2000 MERCEDES-BENZ SLK320 rear view mirror
[x] Cancel search: rear view mirrorPage 4 of 273

1 Contents
IntroductionProduct information .......................... 5
Operator’s manual ............................. 6
Where to find it ................................ 11
Reporting Safety Defects ................ 13Instruments and controlsInstruments and controls ............... 16
Center console .............................. 18
Overhead control panel ............... 19OperationVehicle keys ...................................... 22
Remote control with
folding master key ...................... 22
Start lock-out .................................... 24
General notes on the
central locking system ............... 24
Central locking system ................... 25
Remote control ............................. 25
Panic button .................................. 27
Doors .................................................. 28Central locking switch .................... 30
Automatic central locking ...............31
Emergency unlocking in
case of accident .......................... 32
Trunk ................................................. 33
Emergency release
for trunk lid ................................. 35
Antitheft alarm system ................... 35
Tow-away alarm ............................... 37
Seats .................................................. 38
Seat heater ........................................ 42
Seat belts and integrated
restraint system .......................... 44
Seat belts .......................................... 44
Seat belt nonusage
warning system ............................ 45
BabySmart
TM airbag
deactivation system ................... 50
Self-test BabySmart
TM without
special child
seat installed .................................51
Supplemental restraint
system (SRS) ................................51
Emergency tensioning
retractor (ETR) ............................ 52Airbags .............................................. 52
Safety guidelines for the
seat belt, emergency
tensioning retractor
and airbag .................................... 59
Infant and child
restraint systems ......................... 61
Adjusting telescoping
steering column .......................... 63
Rear view mirrors ............................ 64
Instrument cluster ........................... 68
Flexible service
system (FSS) ................................ 75
Checking engine oil level ............... 77
Engine oil consumption .................. 78
Exterior lamp switch ....................... 79
Headlamp cleaning system ............ 80
Combination switch ........................ 81
Hazard warning flasher
switch ............................................ 83
Climate control ................................. 84
Rear window defroster .................... 88
Audio and telephone,
operation ...................................... 91
Page 22 of 273
19 Instruments and controls
Te ch n ica l
data Instruments
and controlsOperation DrivingInstrument
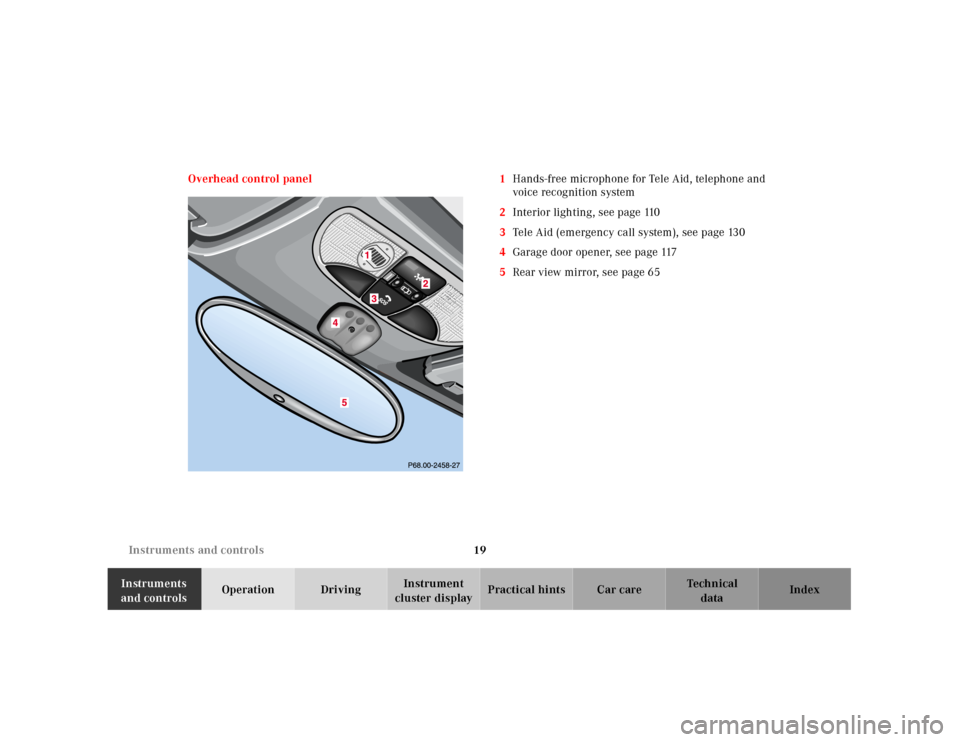
cluster displayPractical hints Car care Index Overhead control panel 1Hands-free microphone for Tele Aid, telephone and
voice recognition system
2Interior lighting, see page 110
3Tele Aid (emergency call system), see page 130
4Garage door opener, see page 117
5Rear view mirror, see page 65
Page 23 of 273

20 Contents - Operation
Te ch n ica l
data Instruments
and controlsOperationDrivingInstrument
cluster displayPractical hints Car care Index
OperationVehicle keys ...................................... 22
Remote control
with folding master key ............. 22
Start lock-out .................................... 24
General notes on
the central locking system ........ 24
Central locking system ................... 25
Remote control ............................. 25
Panic button .................................. 27
Doors .................................................. 28
Central locking switch .................... 30
Automatic central locking .............. 31
Emergency unlocking in case of
accident ........................................ 32
Trunk ................................................. 33Emergency release for trunk lid ... 35
Antitheft alarm system ................... 35
Tow-away alarm ............................... 37
Seats .................................................. 38
Seat heater ........................................ 42
Seat belts and integrated restraint
system .......................................... 44
Seat belts .......................................... 44
Seat belt nonusage
warning system ............................ 45
BabySmart
TM airbag deactivation
system .......................................... 50
Self-test BabySmart
TM without
special child seat installed ..........51
Supplemental restraint system
(SRS) ..............................................51
Emergency tensioning retractor
(ETR) ............................................. 52Airbags .............................................. 52
Safety guidelines for the seat belt,
emergency tensioning retractor
and airbag .................................... 59
Infant and child
restraint systems ......................... 61
Adjusting telescoping steering
column .......................................... 63
Rear view mirrors ............................ 64
Instrument cluster ........................... 68
Flexible service system (FSS) ........ 75
Checking engine
oil level ......................................... 77
Engine oil consumption .................. 78
Exterior lamp switch ....................... 79
Headlamp cleaning system ............ 80
Combination switch ........................ 81
Page 44 of 273
41 Seats
Te ch n ica l
data Instruments
and controlsOperationDrivingInstrument
cluster displayPractical hints Car care Index Important!
Prior to operating the vehicle, the driver should adjust
the seat height for proper vision as well as fore / aft
placement and backrest angle to insure adequate
control, reach, operation, and comfort. The head
restraint should also be adjusted for proper height. See
also airbag section for proper seat positioning.
In addition also adjust the steering wheel to ensure
adequate control, reach, operation, and comfort.Both the inside and outside rear view mirrors should be
adjusted for adequate rearward vision.
Fasten seat belts. Infants and small children should be
seated in a properly secured restraint system that
complies with U.S. Federal Motor Vehicle Safety
Standard 213 and Canadian Motor Vehicle Safety
Stand ard 213.1.
All seat, head restraint, steering wheel and rear view
mirror adjustments as well as fastening of seat belts
should be done before the vehicle is put into motion.
Page 68 of 273
65 Rear view mirrors
Te ch n ica l
data Instruments
and controlsOperationDrivingInstrument
cluster displayPractical hints Car care Index Rear view mirrors
Inside rear view mirror
Manually adjust the mirror.
Use your inside mirror to determine the size and
distance of objects seen in the passenger-side convex
mirror.
Automatic antiglare
Antiglare mode:
With the key in steering lock position 2, the mirror
reflection brightness responds to changes in light
sensitivity.
W it h g e a r s e l e c t or l e ve r ( m a nu a l t ra ns m i s si o n: g e a rs h if t
l ever) in position “R”, or w it h t he interior la mp switch ed
on, the mirror brightness does not respond to changes
in light sensitivity.Note:
The automatic antiglare function does not react, if
incoming light is not aimed directly at sensors in the
mirror.
Wa r n i n g !
In the case of an accident liquid electrolyte may
escape the mirror housing when the mirror glass
breaks.Electrolyte has an irritating effect. Do not allow the
liquid come into contact with eyes, skin, clothing,
or respiratory system. In cases it does, imm edi ately
flush affected area with water, and seek medical
help if necessary.
Page 69 of 273
66 Rear view mirrors
Te ch n ica l
data Instruments
and controlsOperationDrivingInstrument
cluster displayPractical hints Car care Index
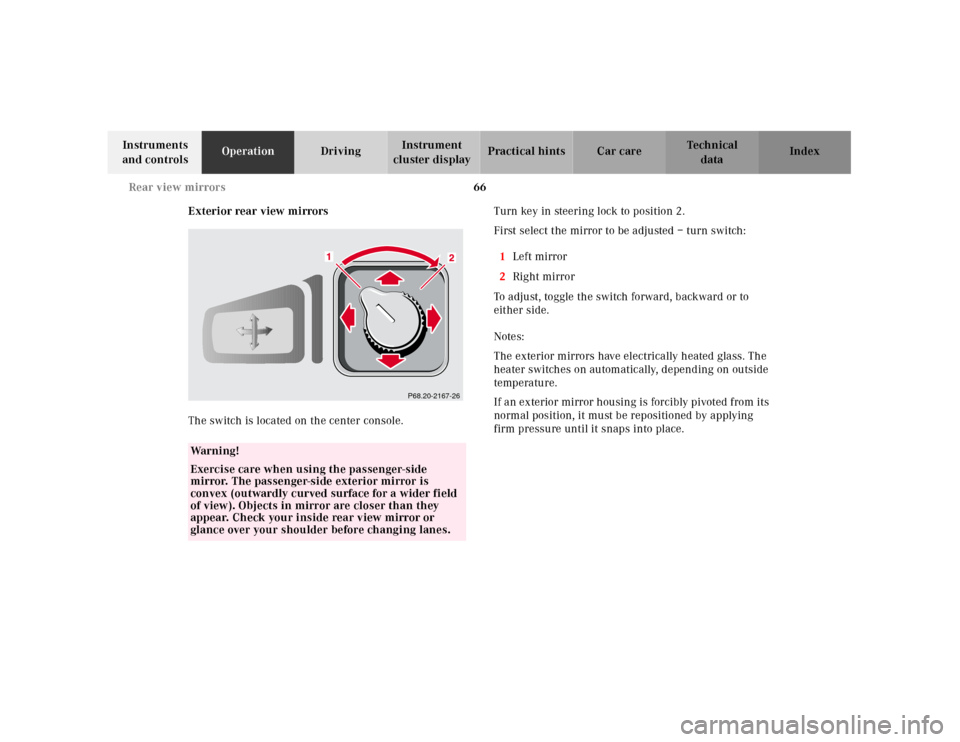
Exterior rear view mirrors
The switch is located on the center console.Turn key in steering lock to position 2.
First select the mirror to be adjusted – turn switch:
1Left mirror
2Right mirror
To adjust, toggle the switch forward, backward or to
either side.
Notes:
The exterior mirrors have electrically heated glass. The
heater switches on automatically, depending on outside
temperature.
If an exterior mirror housing is forcibly pivoted from its
normal position, it must be repositioned by applying
firm pressure until it snaps into place.
Wa r n i n g !
Exercise care when using the passenger-side
mirror. The passenger-side exterior mirror is
convex (outwardly curved surface for a wider field
of view). Objects in mirror are closer than they
appear. Check your inside rear view mirror or
glance over your shoulder before changing lanes.
P68.20-2167-26
Page 70 of 273
67 Rear view mirrors
Te ch n ica l
data Instruments
and controlsOperationDrivingInstrument
cluster displayPractical hints Car care Index With the key in steering lock position 2, the driver’s
side mirror reflection brightness responds to changes in
light sensitivity.
W it h g e a r s e l e c t or l e ve r ( m a nu a l t ra ns m i s si o n: g e a rs h if t
l ever) in position “R”, or w it h t he interior la mp switch ed
on, the driver’s side mirror brightness does not respond
to changes in light sensitivity.
Important!
Electrolyte drops coming into contact with the vehicle
paint finish can only be completely removed while in
their liquid state, by applying plenty of water.
Wa r n i n g !
In the case of an accident liquid electrolyte may
escape the mirror housing when the mirror glass
breaks.Electrolyte has an irritating effect. Do not allow the
liquid come into contact with eyes, skin, clothing,
or respiratory system. In cases it does, imm edi ately
flush affected area with water, and seek medical
help if necessary.
Page 121 of 273
118 Garage door opener
Te ch n ica l
data Instruments
and controlsOperationDrivingInstrument
cluster displayPractical hints Car care Index
Programming or reprogramming the integrated
remote control:
1.Turn key in starter switch to position 1 or 2.
2.Hold the end of the hand-held transmitter of the
d evice you w ish to train approxim ately 2 to 5 inch es
(5 cm to 12 cm) away from the surface of the
integrated remote control located on the inside rear
view mirror, keeping the indicator lamp in view.
3.Using both hands, simultaneously push the hand-
held transmitter button and the desired integrated
remote control button. Do not release the buttons
until completing step 4.
4.The indicator lamp on the integrated remote control
will flash, first slowly and then rapidly. When the
indicator lamp flashes rapidly, both buttons may be
released (the rapid flashing lamp indicates
successful programming of the new frequency
signal). To program the remaining two buttons,
follow steps 1 through 4.Note:
If, after repeated attempts, you do not successfully
program the integrated remote control device to learn
the signal of the hand-held transmitter, the garage door
opener could be equipped with the “rolling code
feature”.
Rolling code programming:
To train a garage door opener (or other rolling code
devices) with the rolling code feature, follow these
instructions after completing the “Programming”
portion of this text. (A second person may make the
following training procedures quicker and easier.)
1.Locate training button on the garage door opener
motor head unit. Exact location and color of the
button may vary by garage door opener brand. If
there is difficulty locating the transmitting button,
reference to garage door opener operator’s manual.
2.Press “training” button on the garage door opener
motor head unit (which activated the “training
light”).