2000 MERCEDES-BENZ SLK320 engine
[x] Cancel search: enginePage 82 of 273

79 Exterior lamp switch
Te ch n ica l
data Instruments
and controlsOperationDrivingInstrument
cluster displayPractical hints Car care Index Exterior lamp switch
DOff
CParking lamps (also side marker lamps, taillamps,
license plate lamps, instrument panel lamps)
Canada only: When the engine is running, the low
beam is additionally switched on.
BParking lamps plus low beam or high beam
headlamps (combination switch pushed forward).
ˆStanding lamps, right (turn left one stop)
‚Standing lamps, left (turn left two stops)‡Front fog lamps (pull out one stop) with parking
lamps and / or low beam headlamps on. Green
indicator in lamp switch comes on.
†Rear fog lamp (pull out to second detent) in
addition to the front fog lamps. Yellow indicator in
lamp switch comes on.
Standing lamps
When the vehicle is parked on the street the standing
lamps (right or left side parking lamps) can be turned
on, making the vehicle more visible to passing vehicles.
The standing lamps cannot be operated with the key in
steering lock position 2.
Notes:
With the key removed and a door open, a warning
sounds if the vehicle’s exterior lamps (except standing
lamps) are not switched off.
Fog lamps will operate with the parking lamps and / or
the low beam headlamps on. Fog lamps should only be
used in conjunction with low beam headlamps. Consult
your State or Province Motor Vehicle Regulations
regarding allowable lamp operation.
P82.10-2476-26
Page 83 of 273

80 Exterior lamp switch
Te ch n ica l
data Instruments
and controlsOperationDrivingInstrument
cluster displayPractical hints Car care Index
Fog lamps are automatically switched off when the
exterior lamp switch is turned to position D.
Daytime running lamps (Canada only)
Vehicles with automatic transmission:
When the engine is running and the selector lever is in
a driving position, the low beam headlamps (includes
parking lamps, side marker lamps, taillamps and
license plate lamps) are automatically switched on.
When shifting from a driving position to position “N”
or “P”, the low beam switches off (2 seconds delay).
Vehicles with manual transmission:
With the engine running, the low beam headlamps
(includes parking lamps, side marker lamps, taillamps
and license plate lamps) are automatically switched on.
For nighttime driving the exterior lamp switch should
be turned to position B to permit activation of the
high beam headlamps.Headlamp cleaning system
The switch is located in the center console.
The headlamp washer can be activated with the key in
steering lock position 2.
Briefly press symbol side of switch.
P82.15-2007-26
Page 88 of 273
85 Climate control
Te ch n ica l
data Instruments
and controlsOperationDrivingInstrument
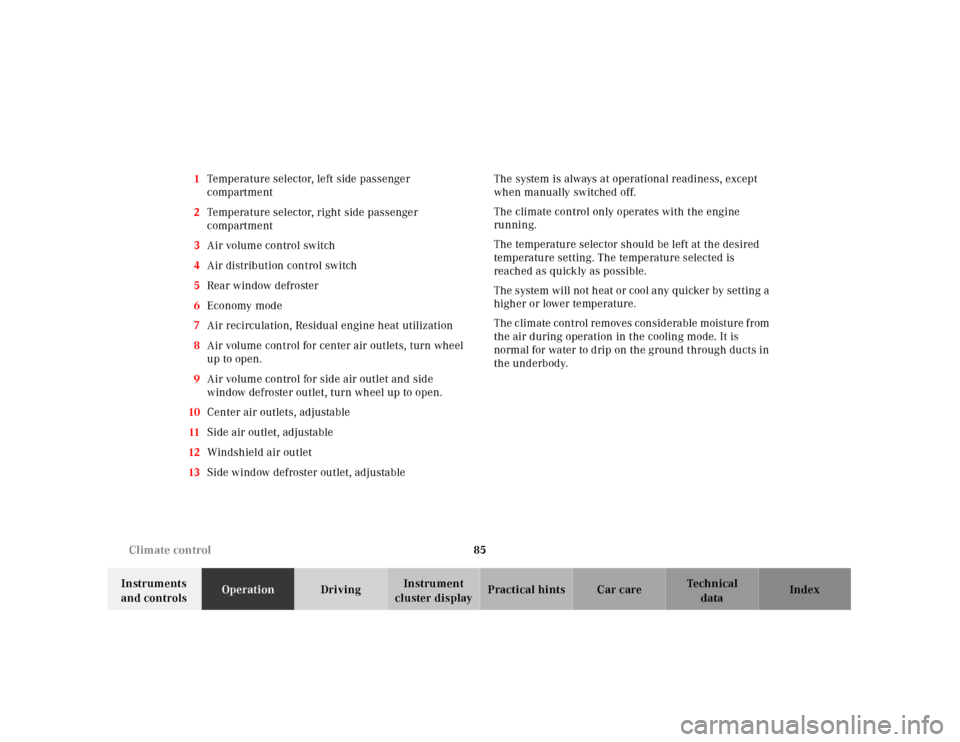
cluster displayPractical hints Car care Index 1Temperature selector, left side passenger
compartment
2Temperature selector, right side passenger
compartment
3Air volume control switch
4Air distribution control switch
5Rear window defroster
6Economy mode
7Air recirculation, Residual engine heat utilization
8Air volume control for center air outlets, turn wheel
up to open.
9Air volume control for side air outlet and side
window defroster outlet, turn wheel up to open.
10Center air outlets, adjustable
11Side air outlet, adjustable
12Windshield air outlet
13Side window defroster outlet, adjustableThe system is always at operational readiness, except
when manually switched off.
The climate control only operates with the engine
running.
The temperature selector should be left at the desired
temperature setting. The temperature selected is
reached as quickly as possible.
The system will not h eat or cool a ny quicker by setting a
higher or lower temperature.
The climate control removes considerable moisture from
the air during operation in the cooling mode. It is
normal for water to drip on the ground through ducts in
the underbody.
Page 92 of 273
89 Climate control
Te ch n ica l
data Instruments
and controlsOperationDrivingInstrument
cluster displayPractical hints Car care Index Air recirculation
This mode can be selected to temporarily reduce the
entry of annoying odors or dust into the vehicle’s
interior.
Outside air is not supplied to the vehicle’s interior.
To select, press O button.
To cancel, press O button again.
The system will automatically switch from recirculated
air to fresh air
•after approximately 5 minutes at outside
temperatures below approximately 40°F (5°C),
•after approximately 30 minutes, at outside
temperatures above approximately 40°F (5°C),
•after approximately 5 minutes, if button S is
pressed.
At high outside temperatures, the system automatically
engages the recirculated air mode for approximately
30 minutes, thereby increasing the cooling capacity
performance. Press O button again to extend the
recirculated air mode.Residual engine heat utilization (REST)
With the engine switched off, it is possible to continue
heating the interior for a short while.
Air volume is controlled automatically. Select
temperature for each side of the passenger
compartment. Set air distribution control switch to the
desired position.
To select:
Turn key in steering lock to position 1 or 0 or remove.
Press O button. Indicator lamp in the button lights
up.
This function selection will not activate if the battery
charge level is insufficient.
To c a n c e l :
Press O button. Indicator lamp in the button goes
out.
The system will automatically shut off
•if you turn key in steering lock to position 2,
•after approximately 30 minutes,
•if the battery voltage drops.
Page 127 of 273
124 Retractable hardtop
Te ch n ica l
data Instruments
and controlsOperationDrivingInstrument
cluster displayPractical hints Car care Index
If the hardtop switch is held or is released and slid
forward again within approximately 30 seconds, the
door windows will close.
However, the door windows can also be closed / opened
later on. Slide hardtop switch twice forward / backward
and hold.For safety reasons, the hardtop cannot be raised while
driving. However, if the hardtop is not completely locked
after raising it, you can then lock it while driving by
pushing the hardtop switch forward.
If t he ind ica tor lamp in th e h ardtop switch bl inks slowly
while activating the switch,
•the battery voltage may be insufficient – start
engine and let run while activating switch,
•the system may be overloaded (for example after
lowering or raising the hardtop approximately
5 consecutive times) - after approximately
10 minutes the hardtop switch may be activated
again.
I f t h e i nd ic a tor l a mp c on t in u e s to b l in k , l oc k t h e h a rd top
manually, see page 226.
Have the system checked at your authorized
Mercedes-Benz Center as soon as possible.
Wa r n i n g !
The hardtop is not fully closed and locked:
• if the indicator lamp in the hardtop switch
does not go out (key in steering lock
position 2),
• if the indicator lamp blinks, and a warning
sounds for 10 seconds when starting to drive.Stop the vehicle and before continuing to drive,
close and lock the hardtop:
The key should be in steering lock position 2.
Slide the hardtop switch forward.To prevent possible accidents, drive the vehicle
only with the hardtop either completely closed and
locked, or fully lowered into its storage
compartment.
Page 130 of 273
127 Contents - Driving
Te ch n ica l
data Instruments
and controlsOperationDrivingInstrument
cluster displayPractical hints Car care Index
DrivingControl and operation of radio
transmitters ............................... 128
The first 1 000 miles
(1 500 km) ................................. 129
Maintenance ................................... 129
Tele Aid ........................................... 130
Catalytic converter ........................ 138
Emission control ............................ 139
Steering lock ................................... 140
Starting and turning off
the engine .................................. 142
Manual transmission .................... 143Automatic transmission ............... 144
Parking brake .................................153
Driving instructions .......................154
Drive sensibly – Save Fuel ........154
Drinking and driving .................154
Pedals ...........................................154
Power assistance .........................155
Brakes ...........................................155
Driving off ....................................156
Parking .........................................156
Tires ..............................................157
Snow chains ................................160
Winter driving
instructions .................................160Block heater ................................ 162
Deep water .................................. 162
Passenger compartment ........... 162
Traveling abroad ........................ 162
Cruise control ................................. 163
Brake assist system
(BAS) ........................................... 166
Antilock brake system
(ABS) ........................................... 168
Electronic stability program
(ESP) ........................................... 170
What you should know
at the gas station ....................... 174
Check regularly and
before a long trip ...................... 176
Page 131 of 273
128 Control and operation of radio transmitters
Te ch n ica l
data Instruments
and controlsOperationDrivingInstrument
cluster displayPractical hints Car care Index
Control and operation of radio transmitters
Radio and telephone
1 Observe all legal requirements.
Telephones and two-way radio
Radio transmitters, such as a portable telephone or a
citizens band unit should only be used inside the
vehicle if they are connected to an antenna that is
installed on the outside of the vehicle.
Refer to the radio transmitter operation instructions
regarding use of an external antenna.
Wa r n i n g !
Please do not forget that your primary
responsibility is to drive the vehicle. Only operate
the radio or telephone
1 if road and traffic
conditions permit.
Bear in mind that at a speed of just 30 mph
(approximately 50 km / h), your vehicle is covering
a distance of approximately 50 feet (approximately
14 m ) e v e r y s e c o n d .
Wa r n i n g !
Never operate radio transmitters equipped with a
built-in or attached antenna (i.e. without being
connected to an external antenna) from inside the
vehicle while the engine is running. Doing so could
lead to a malfunction of the vehicle’s electronic
system, possibly resulting in an accident and
personal injury.
Page 132 of 273
129 The first 1 000 miles
Te ch n ica l
data Instruments
and controlsOperationDrivingInstrument
cluster displayPractical hints Car care Index The first 1 000 miles (1 500 km)
The more cautiously you treat your vehicle during the
break-in period, the more satisfied you will be with its
performance later on. Therefore, drive your vehicle
during the first 1 000 miles (1 500 km) at moderate
vehicle and engine speeds.
During this period, avoid heavy loads (full throttle
driving) and excessive engine speeds.
Manual transmission:
Downshift at proper engine speeds.
Automatic transmission:
Avoid accelerating by kickdown. It is not recommended
to bra ke t he veh icl e by ma nu al ly shif ting to a l owe r gear.
We recommend that you select positions “3”, “2” or “1”
only at moderate speeds (for hill driving).
After 1 000 miles (1 500 km) speeds may be gradually
increased to the permissible maximum.Maintenance
Approximately 30 days or 2000 miles (2000 km) prior to
the next recommended service, the remaining distance
or days are displayed in the main odometer field. See
Flexible service system (FSS) on page 75.
We strongly recommend that you have your vehicle
serviced by your authorized Mercedes-Benz Center, in
accordance with the Service Booklet at the times called
for by the FSS.
Failure to have the vehicle maintained in accordance
with the Service Booklet at the designated times /
mileage may result in vehicle damage not covered by
the Mercedes-Benz Limited Warranty.