2000 MERCEDES-BENZ SLK230 gear ratio
[x] Cancel search: gear ratioPage 72 of 273
69 Instrument cluster
Te ch n ica l
data Instruments
and controlsOperationDrivingInstrument
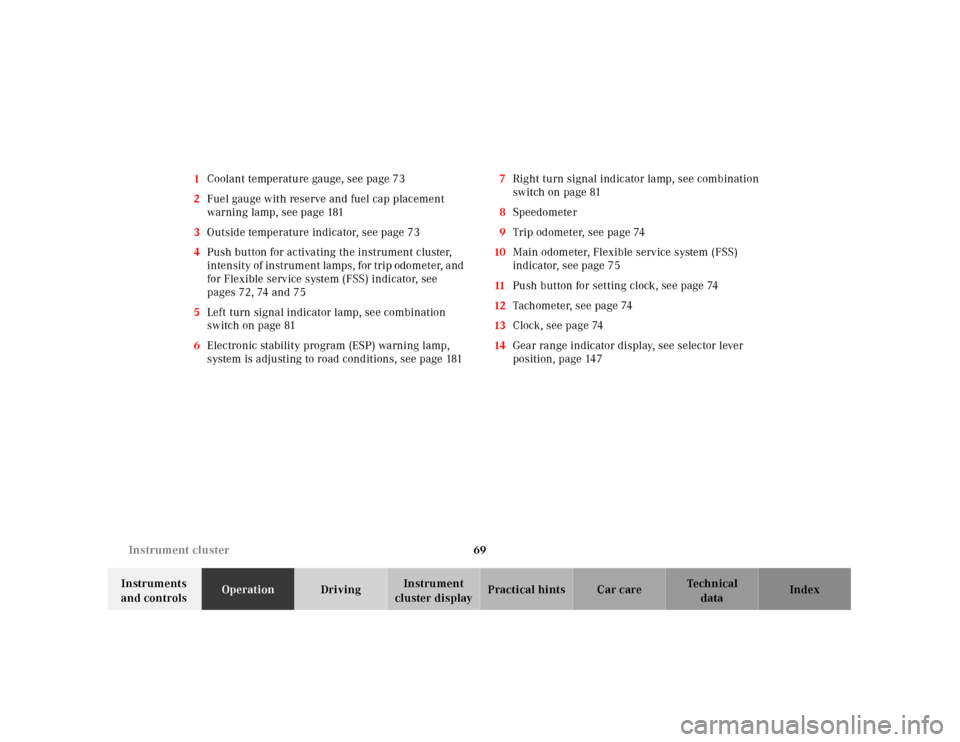
cluster displayPractical hints Car care Index 1Coolant temperature gauge, see page 73
2Fuel gauge with reserve and fuel cap placement
warning lamp, see page 181
3Outside temperature indicator, see page 73
4Push button for activating the instrument cluster,
intensity of instrument lamps, for trip odometer, and
for Flexible service system (FSS) indicator, see
pages 72, 74 and 75
5Left turn signal indicator lamp, see combination
switch on page 81
6Electronic stability program (ESP) warning lamp,
system is adjusting to road conditions, see page 1817Right turn signal indicator lamp, see combination
switch on page 81
8Speedometer
9Trip odometer, see page 74
10Main odometer, Flexible service system (FSS)
indicator, see page 75
11Push button for setting clock, see page 74
12Tachometer, see page 74
13Clock, see page 74
14Gear range indicator display, see selector lever
position, page 147
Page 132 of 273
129 The first 1 000 miles
Te ch n ica l
data Instruments
and controlsOperationDrivingInstrument
cluster displayPractical hints Car care Index The first 1 000 miles (1 500 km)
The more cautiously you treat your vehicle during the
break-in period, the more satisfied you will be with its
performance later on. Therefore, drive your vehicle
during the first 1 000 miles (1 500 km) at moderate
vehicle and engine speeds.
During this period, avoid heavy loads (full throttle
driving) and excessive engine speeds.
Manual transmission:
Downshift at proper engine speeds.
Automatic transmission:
Avoid accelerating by kickdown. It is not recommended
to bra ke t he veh icl e by ma nu al ly shif ting to a l owe r gear.
We recommend that you select positions “3”, “2” or “1”
only at moderate speeds (for hill driving).
After 1 000 miles (1 500 km) speeds may be gradually
increased to the permissible maximum.Maintenance
Approximately 30 days or 2000 miles (2000 km) prior to
the next recommended service, the remaining distance
or days are displayed in the main odometer field. See
Flexible service system (FSS) on page 75.
We strongly recommend that you have your vehicle
serviced by your authorized Mercedes-Benz Center, in
accordance with the Service Booklet at the times called
for by the FSS.
Failure to have the vehicle maintained in accordance
with the Service Booklet at the designated times /
mileage may result in vehicle damage not covered by
the Mercedes-Benz Limited Warranty.
Page 145 of 273
142 Starting and turning off the enging
Te ch n ica l
data Instruments
and controlsOperationDrivingInstrument
cluster displayPractical hints Car care Index
Starting and turning off the engine
Before starting
Ensure that parking brake is engaged and that selector
lever is in position “P” or “N” (gearshift lever in
neutral). Turn key in steering lock to position 2.
Starting
Vehicles with automatic transmission:
Do not depress accelerator. Briefly turn key in steering
lock clockwise to the stop and release. The starter will
engage until the engine is running.
If engine will not run, and the starting procedure stops,
turn key completely to the left and repeat starting the
engine.
After several unsuccessful attempts, have the system
checked at the nearest authorized Mercedes-Benz
Center.Vehicles with manual transmission:
Do not depress accelerator. Fully depress clutch pedal,
otherwise the engine cannot be started due to the
integrated safety interlock.
Turn key in steering lock clockwise to the stop. Release
key only when the engine is firing regularly.
Important!
Due to the installed starter nonrepeat feature, the key
must be turned completely to the left before attempting
to start the engine again.
In areas where temperatures frequently drop below
-4°F(-20°C) we rec omm end tha t a n e ng ine bl ock h eater
be insta lled . You r a ut horized Mercedes-Benz Center will
advise you on this subject, see page 162.
Turning off
Turn the key in the steering lock to position 0 to stop the
engine.
Vehicles with automatic transmission:
The key can only be removed with your foot off the
brake pedal and the selector lever in position “P”.
Page 146 of 273
143 Manual transmission
Te ch n ica l
data Instruments
and controlsOperationDrivingInstrument
cluster displayPractical hints Car care Index Manual transmission
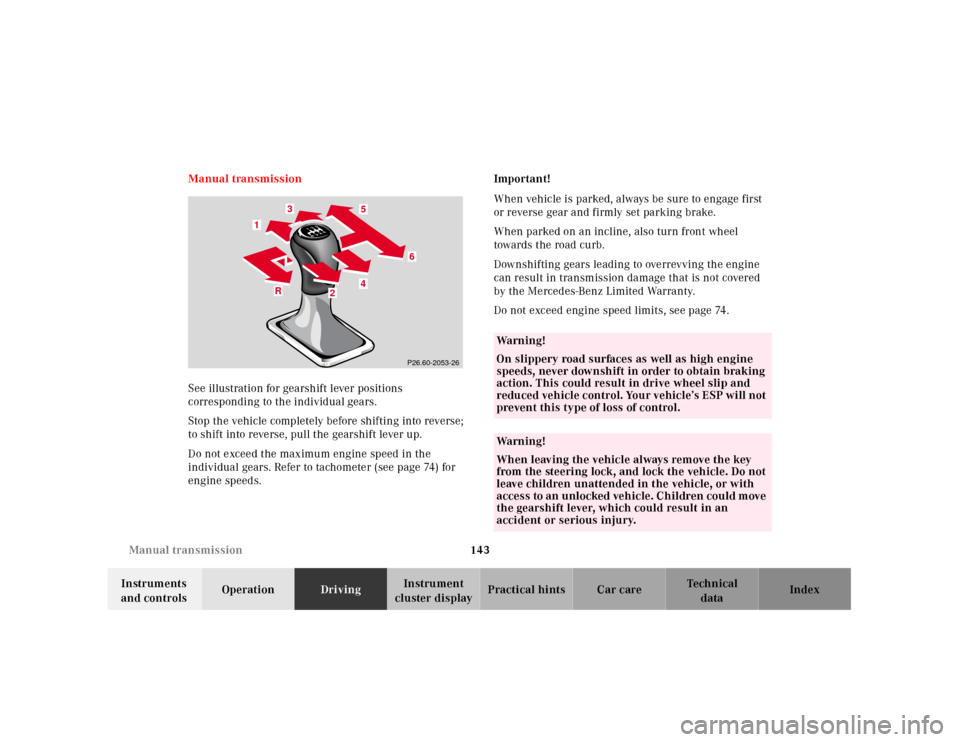
See illustration for gearshift lever positions
corresponding to the individual gears.
Stop the vehicle completely before shifting into reverse;
to shift into reverse, pull the gearshift lever up.
Do not exceed the maximum engine speed in the
individual gears. Refer to tachometer (see page 74) for
engine speeds.Important!
When vehicle is parked, always be sure to engage first
or reverse gear and firmly set parking brake.
When parked on an incline, also turn front wheel
towards the road curb.
Downshifting gears leading to overrevving the engine
can result in transmission damage that is not covered
by the Mercedes-Benz Limited Warranty.
Do not exceed engine speed limits, see page 74.
4 1
6
5
1
3
R
4
R4
6
13
5
2
2
P26.60-2053-26
Wa r n i n g !
On slippery road surfaces as well as high engine
speeds, never downshift in order to obtain braking
action. This could result in drive wheel slip and
reduced vehicle control. Your vehicle’s ESP will not
prevent this type of loss of control.Wa r n i n g !
When leaving the vehicle always remove the key
from the steering lock, and lock the vehicle. Do not
leave children unattended in the vehicle, or with
access to an u nlocked veh ic le. Ch ildren cou ld m ove
the gearshift lever, which could result in an
accident or serious injury.
Page 147 of 273
144 Automatic transmission
Te ch n ica l
data Instruments
and controlsOperationDrivingInstrument
cluster displayPractical hints Car care Index
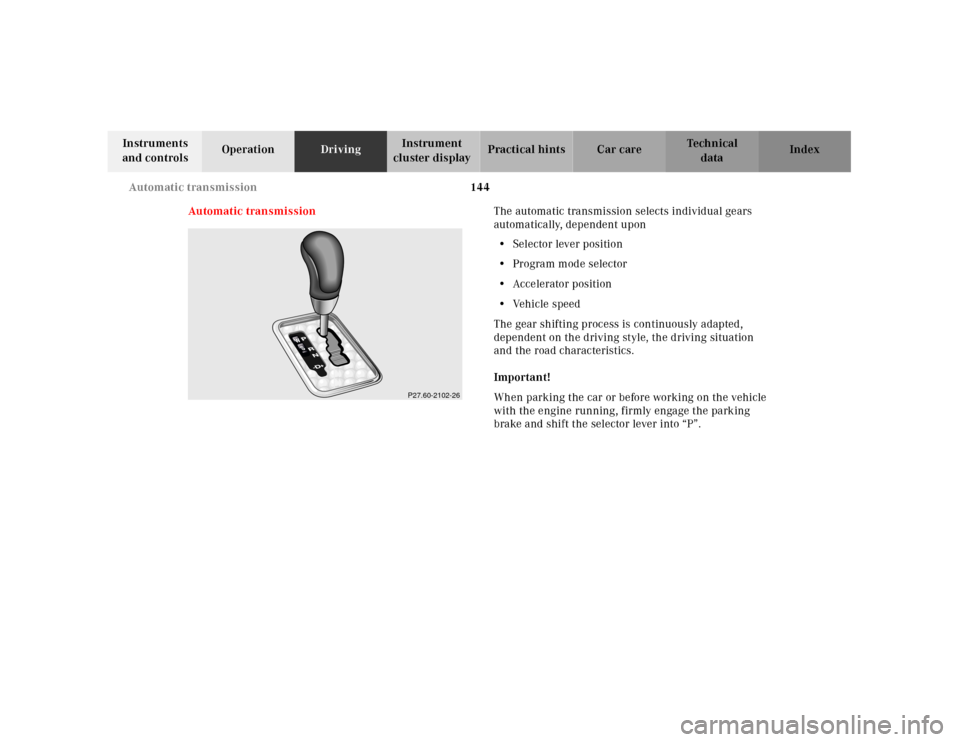
Automatic transmissionThe automatic transmission selects individual gears
automatically, dependent upon
•Selector lever position
•Program mode selector
•Accelerator position
•Vehicle speed
The gear shifting process is continuously adapted,
dependent on the driving style, the driving situation
and the road characteristics.
Important!
When parking the car or before working on the vehicle
with the engine running, firmly engage the parking
brake and shift the selector lever into “P”.
�� @@
€€
ÀÀ
��
@@
€€
ÀÀ
��
@@
€€
ÀÀ
��
@@
€€
ÀÀ
��
@@
€€
ÀÀ
��
@@
€€
ÀÀ
��
@@
€€
ÀÀ
��
@@
€€
ÀÀ
��
@@
€€
ÀÀ
��
@@
€€
ÀÀ
��
@@
€€
ÀÀ
��
@@
€€
ÀÀ
��
@@
€€
ÀÀ
��
@@
€€
ÀÀ
��
@@
€€
ÀÀ
��
@@
€€
ÀÀ
��
@@
€€
ÀÀ
��
@@
€€
ÀÀ
��
@@
€€
ÀÀ
��
@@
€€
ÀÀ
��
@@
€€
ÀÀ
��
@@
€€
ÀÀ
��
@@
€€
ÀÀ
��
@@
€€
ÀÀ
��
@@
€€
ÀÀ
��
@@
€€
ÀÀ
��
@@
€€
ÀÀ
��
@@
€€
ÀÀ
��
@@
€€
ÀÀ
��
@@
€€
ÀÀ
��
@@
€€
ÀÀ
��
@@
€€
ÀÀ
��
@@
€€
ÀÀ
��
@@
€€
ÀÀ
��
@@
€€
ÀÀ
��
@@
€€
ÀÀ
��
@@
€€
ÀÀ
��
@@
€€
ÀÀ
��
@@
€€
ÀÀ
��
@@
€€
ÀÀ
��
@@
€€
ÀÀ
��
@@
€€
ÀÀ
��
@@
€€
ÀÀ
��
@@
€€
ÀÀ
��
@@
€€
ÀÀ
��
@@
€€
ÀÀ
��
@@
€€
ÀÀ
��
@@
€€
ÀÀ
��
@@
€€
ÀÀ
��
@@
€€
ÀÀ
��
@@
€€
ÀÀ
��
@@
€€
ÀÀ
��
@@
€€
ÀÀ
��
@@
€€
ÀÀ
��
@@
€€
ÀÀ
��
@@
€€
ÀÀ
��
@@
€€
ÀÀ
��
@@
€€
ÀÀ
��
@@
€€
ÀÀ
��
@@
€€
ÀÀ
��
@@
€€
ÀÀ
��
@@
€€
ÀÀ
��
@@
€€
ÀÀ
��
@@
€€
ÀÀ
��
@@
€€
ÀÀ
��
@@
€€
ÀÀ
��
@@
€€
ÀÀ
��
@@
€€
ÀÀ
��
@@
€€
ÀÀ
��
@@
€€
ÀÀ
��
@@
€€
ÀÀ
��
@@
€€
ÀÀ
��
@@
€€
ÀÀ
��
@@
€€
ÀÀ
��
@@
€€
ÀÀ
��
@@
€€
ÀÀ
��
@@
€€
ÀÀ
��
@@
€€
ÀÀ
��
@@
€€
ÀÀ
��
@@
€€
ÀÀ
��
@@
€€
ÀÀ
��
@@
€€
ÀÀ
��
@@
€€
ÀÀ
��
@@
€€
ÀÀ
��
@@
€€
ÀÀ
��
@@
€€
ÀÀ
��
@@
€€
ÀÀ
��
@@
€€
ÀÀ
��
@@
€€
ÀÀ
��
@@
€€
ÀÀ
��
@@
€€
ÀÀ
��
@@
€€
ÀÀ
��
@@
€€
ÀÀ
��
@@
€€
ÀÀ
��
@@
€€
ÀÀ
��
@@
€€
ÀÀ
��
@@
€€
ÀÀ
��
@@
€€
ÀÀ
��
@@
€€
ÀÀ
��
@@
€€
ÀÀ
��
@@
€€
ÀÀ
��
@@
€€
ÀÀ
��
@@
€€
ÀÀ
��
@@
€€
ÀÀ
��
@@
€€
ÀÀ
��
@@
€€
ÀÀ
��
@@
€€
ÀÀ
��
@@
€€
ÀÀ
��
@@
€€
ÀÀ
��
@@
€€
ÀÀ
��
@@
€€
ÀÀ
��
@@
€€
ÀÀ
��
@@
€€
ÀÀ
��
@@
€€
ÀÀ
��
@@
€€
ÀÀ
��
@@
€€
ÀÀ
��
@@
€€
ÀÀ
��
@@
€€
ÀÀ
��
@@
€€
ÀÀ
��
@@
€€
ÀÀ
��
@@
€€
ÀÀ
��
@@
€€
ÀÀ
��
@@
€€
ÀÀ
��
@@
€€
ÀÀ
��
@@
€€
ÀÀ
��
@@
€€
ÀÀ
��
@@
€€
ÀÀ
��
@@
€€
ÀÀ
��
@@
€€
ÀÀ
��
@@
€€
ÀÀ
��
@@
€€
ÀÀ
��
@@
€€
ÀÀ
��
@@
€€
ÀÀ
��
@@
€€
ÀÀ
��
@@
€€
ÀÀ
��
@@
€€
ÀÀ
��
@@
€€
ÀÀ
��
@@
€€
ÀÀ
��
@@
€€
ÀÀ
��
@@
€€
ÀÀ
��
@@
€€
ÀÀ
��
@@
€€
ÀÀ
��
@@
€€
ÀÀ
��
@@
€€
ÀÀ
��
@@
€€
ÀÀ
��
@@
€€
ÀÀ
��
@@
€€
ÀÀ
��
@@
€€
ÀÀ
��
@@
€€
ÀÀ
��
@@
€€
ÀÀ
��
@@
€€
ÀÀ
��
@@
€€
ÀÀ
��
@@
€€
ÀÀ
��
@@
€€
ÀÀ
��
@@
€€
ÀÀ
��
@@
€€
ÀÀ
��
@@
€€
ÀÀ
��
@@
€€
ÀÀ
��
@@
€€
ÀÀ
��
@@
€€
ÀÀ
��
@@
€€
ÀÀ
��
@@
€€
ÀÀ
��
@@
€€
ÀÀ
��
@@
€€
ÀÀ
��
@@
€€
ÀÀ
��
@@
€€
ÀÀ
��
@@
€€
ÀÀ
��
@@
€€
ÀÀ
��
@@
€€
ÀÀ
��
@@
€€
ÀÀ
��
@@
€€
ÀÀ
��
@@
€€
ÀÀ
��
@@
€€
ÀÀ
��
@@
€€
ÀÀ
��
@@
€€
ÀÀ
��
@@
€€
ÀÀ
��
@@
€€
ÀÀ
��
@@
€€
ÀÀ
��
@@
€€
ÀÀ
��
@@
€€
ÀÀ
��
@@
€€
ÀÀ
��
@@
€€
ÀÀ
��
@@
€€
ÀÀ
��
@@
€€
ÀÀ
��
@@
€€
ÀÀ
��
@@
€€
ÀÀ
��
@@
€€
ÀÀ
��
@@
€€
ÀÀ
��
@@
€€
ÀÀ
��
@@
€€
ÀÀ
��
@@
€€
ÀÀ
��
@@
€€
ÀÀ
��
@@
€€
ÀÀ
��
@@
€€
ÀÀ
��
@@
€€
ÀÀ
��
@@
€€
ÀÀ
��
@@
€€
ÀÀ
��
@@
€€
ÀÀ
��
@@
€€
ÀÀ
��
@@
€€
ÀÀ
��
@@
€€
ÀÀ
��
@@
€€
ÀÀ
��
@@
€€
ÀÀ
��
@@
€€
ÀÀ
��
@@
€€
ÀÀ
��
@@
€€
ÀÀ
��
@@
€€
ÀÀ
��
@@
€€
ÀÀ
��
@@
€€
ÀÀ
��
@@
€€
ÀÀ
��
@@
€€
ÀÀ
��
@@
€€
ÀÀ
��
@@
€€
ÀÀ
��
@@
€€
ÀÀ
��
@@
€€
ÀÀ
��
@@
€€
ÀÀ
��
@@
€€
ÀÀ
��
@@
€€
ÀÀ
��
@@
€€
ÀÀ
��
@@
€€
ÀÀ
��
@@
€€
ÀÀ
��
@@
€€
ÀÀ
��
@@
€€
ÀÀ
��
@@
€€
ÀÀ
��
@@
€€
ÀÀ
��
@@
€€
ÀÀ
��
@@
€€
ÀÀ
��
@@
€€
ÀÀ
��
@@
€€
ÀÀ
��
@@
€€
ÀÀ
��
@@
€€
ÀÀ
��
@@
€€
ÀÀ
��
@@
€€
ÀÀ
��
@@
€€
ÀÀ
��
@@
€€
ÀÀ
��
@@
€€
ÀÀ
��
@@
€€
ÀÀ
��
@@
€€
ÀÀ
��
@@
€€
ÀÀ
��
@@
€€
ÀÀ
��
@@
€€
ÀÀ
��
@@
€€
ÀÀ
��
@@
€€
ÀÀ
��
@@
€€
ÀÀ
��
@@
€€
ÀÀ
��
@@
€€
ÀÀ
��
@@
€€
ÀÀ
��
@@
€€
ÀÀ
��
@@
€€
ÀÀ
��
@@
€€
ÀÀ
��
@@
€€
ÀÀ
��
@@
€€
ÀÀ
��
@@
€€
ÀÀ
��
@@
€€
ÀÀ
��
@@
€€
ÀÀ
��
@@
€€
ÀÀ
��
@@
€€
ÀÀ
��
@@
€€
ÀÀ
��
@@
€€
ÀÀ
��
@@
€€
ÀÀ
��
@@
€€
ÀÀ
��
@@
€€
ÀÀ
��
@@
€€
ÀÀ
��
@@
€€
ÀÀ
��
@@
€€
ÀÀ
��
@@
€€
ÀÀ
��
@@
€€
ÀÀ
��
@@
€€
ÀÀ
��
@@
€€
ÀÀ
��
@@
€€
ÀÀ
��
@@
€€
ÀÀ
��
@@
€€
ÀÀ
��
@@
€€
ÀÀ
��
@@
€€
ÀÀ
��
@@
€€
ÀÀ
��
@@
€€
ÀÀ
��
@@
€€
ÀÀ
��
@@
€€
ÀÀ
��
@@
€€
ÀÀ
��
@@
€€
ÀÀ
��
@@
€€
ÀÀ
��
@@
€€
ÀÀ
��
@@
€€
ÀÀ
��
@@
€€
ÀÀ
��
@@
€€
ÀÀ
��
@@
€€
ÀÀ
��
@@
€€
ÀÀ
��
@@
€€
ÀÀ
��
@@
€€
ÀÀ
��
@@
€€
ÀÀ
��
@@
€€
ÀÀ
��
@@
€€
ÀÀ
��
@@
€€
ÀÀ
��
@@
€€
ÀÀ
��
@@
€€
ÀÀ
��
@@
€€
ÀÀ
��
@@
€€
ÀÀ
��
@@
€€
ÀÀ
��
@@
€€
ÀÀ
��
@@
€€
ÀÀ
��
@@
€€
ÀÀ
��
@@
€€
ÀÀ
��
@@
€€
ÀÀ
��
@@
€€
ÀÀ
��
@@
€€
ÀÀ
��
@@
€€
ÀÀ
��
@@
€€
ÀÀ
��
@@
€€
ÀÀ
��
@@
€€
ÀÀ
��
@@
€€
ÀÀ
��
@@
€€
ÀÀ
��
@@
€€
ÀÀ
��
@@
€€
ÀÀ
��
@@
€€
ÀÀ
��
@@
€€
ÀÀ
��
@@
€€
ÀÀ
��
@@
€€
ÀÀ
��
@@
€€
ÀÀ
��
@@
€€
ÀÀ
��
@@
€€
ÀÀ
��
@@
€€
ÀÀ
��
@@
€€
ÀÀ
��
@@
€€
ÀÀ
��
@@
€€
ÀÀ
��
@@
€€
ÀÀ
��
@@
€€
ÀÀ
��
@@
€€
ÀÀ
��
@@
€€
ÀÀ
��
@@
€€
ÀÀ
��
@@
€€
ÀÀ
��
@@
€€
ÀÀ
��
@@
€€
ÀÀ
��
@@
€€
ÀÀ
��
@@
€€
ÀÀ
��
@@
€€
ÀÀ
��
@@
€€
ÀÀ
��
@@
€€
ÀÀ
��
@@
€€
ÀÀ
��
@@
€€
ÀÀ
��
@@
€€
ÀÀ
��
@@
€€
ÀÀ
��
@@
€€
ÀÀ
��
@@
€€
ÀÀ
��
@@
€€
ÀÀ
��
@@
€€
ÀÀ
��
@@
€€
ÀÀ
��
@@
€€
ÀÀ
��
@@
€€
ÀÀ
��
@@
€€
ÀÀ
��
@@
€€
ÀÀ
��
@@
€€
ÀÀ
��
@@
€€
ÀÀ
��
@@
€€
ÀÀ
��
@@
€€
ÀÀ
��
@@
€€
ÀÀ
��
@@
€€
ÀÀ
��
@@
€€
ÀÀ
��
@@
€€
ÀÀ
��
@@
€€
ÀÀ
��
@@
€€
ÀÀ
��
@@
€€
ÀÀ
��
@@
€€
ÀÀ
��
@@
€€
ÀÀ
��
@@
€€
ÀÀ
��
yy
P27.60-2102-26
Page 148 of 273
145 Automatic transmission
Te ch n ica l
data Instruments
and controlsOperationDrivingInstrument
cluster displayPractical hints Car care Index Driving
The selector lever is automatically locked while in
position “P”. To move the selector lever out of
position “P”, the service brake pedal must be firmly
depressed before the shift lock will release.
Shift selector lever to the desired position only when the
engine is idling normally and the service brake is
applied. Do not release the brake until ready to drive.
The vehicle may otherwise start creeping when the
selector lever is in drive or reverse position.Important!
After selecting any driving position from “N” or “P”,
wait a moment to allow the gear to fully engage before
accelerating, especially when the engine is cold.
Accelerator position
Partial throttle = early upshifting = normal acceleration
Full throttle = later upshifting = rapid acceleration
Kickdown (depressing the accelerator beyond full
throttle) = downshifting to a lower gear = maximum
acceleration. Once the desired speed is attained, ease up
on the accelerator – the transmission shifts up again.
Wa r n i n g !
It is dangerous to shift the selector lever out of “P”
or “N” if the engine speed is higher than idle speed.
If your foot is not firmly on the brake pedal, the
vehicle could accelerate quickly forward or in
reverse. You could lose control of the vehicle and
hit someone or something. Only shift into gear
when the engine is idling normally and when your
right foot is firmly on the brake pedal.
Page 149 of 273
146 Automatic transmission
Te ch n ica l
data Instruments
and controlsOperationDrivingInstrument
cluster displayPractical hints Car care Index
Stopping
For brief stops, e.g. at traffic lights, leave the
transmission in gear and hold vehicle with the service
brake.
For longer stops with the engine idling, shift into “N”
or “P” and hold the vehicle with the service brake.
When stopping the vehicle on an uphill gradient, do not
hold it with the accelerator, use the brake. This avoids
unnecessary transmission heat build up.
Maneuvering
To maneuver in tight areas, e.g. when pulling into a
parking space, control the vehicle speed by gradually
releasing the brakes. Accelerate gently and never
abruptly step on the accelerator.
To rock a vehicle out of soft ground (mud or snow),
alternately shift from forward to reverse, while applying
only slight partial throttle.
Rocking a vehicle free in this manner may cause the
ABS or traction system malfunction indicator lamp to
come on. Turn off and restart the engine to clear the
malfunction indication.
Wa r n i n g !
Getting out of your vehicle with the selector lever
not fully engaged in position “P” is dangerous.
Also, when parked on an incline, posi tion “P” alone
may not prevent your vehicle from moving,
possibly hitting people or objects.Always set t he parki ng brake in addi tion to sh ifting
to position “P”, see page 153 for parking brake. When parked on an incline, also turn front wheel
towards the road curb.Wa r n i n g !
When leaving the vehicle always remove the key
from the steering lock, and lock the vehicle. Do not
leave children unattended in the vehicle, or with
access to an u nlocked veh ic le. Ch ildren cou ld m ove
the gear selector lever from position “P”, which
could result in an accident or serious injury.
Page 150 of 273
147 Automatic transmission
Te ch n ica l
data Instruments
and controlsOperationDrivingInstrument
cluster displayPractical hints Car care Index Selector lever position
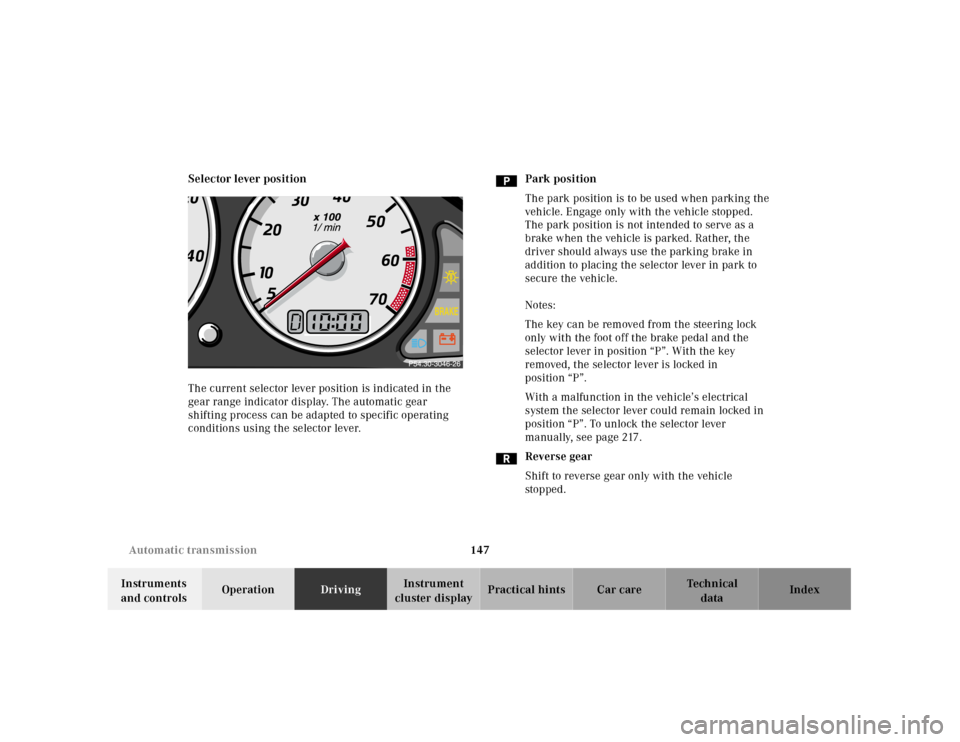
The current selector lever position is indicated in the
gear range indicator display. The automatic gear
shifting process can be adapted to specific operating
conditions using the selector lever.Park position
The park position is to be used when parking the
vehicle. Engage only with the vehicle stopped.
The park position is not intended to serve as a
brake when the vehicle is parked. Rather, the
driver should always use the parking brake in
addition to placing the selector lever in park to
secure the vehicle.
Notes:
The key can be removed from the steering lock
only with the foot off the brake pedal and the
selector lever in position “P”. With the key
removed, the selector lever is locked in
position “P”.
With a malfunction in the vehicle’s electrical
system the selector lever could remain locked in
position “P”. To unlock the selector lever
manually, see page 217.
Reverse gear
Shift to reverse gear only with the vehicle
sto p ped .