2000 MERCEDES-BENZ SLK CLASS spare wheel
[x] Cancel search: spare wheelPage 6 of 273

3 Contents
Instrument cluster displayMalfunction and indicator
lamps in the instrument
cluster ......................................... 178
On-board diagnostic system ..... 178
Check engine malfunction
indicator lamp ............................. 178
Brake warning lamp .................. 179
Brake pad wear
indicator lamp ............................. 180
Seat belt nonusage
warning lamp .............................. 180
Supplemental restraint
system (SRS)
indicator lamp ............................. 180
Fuel reserve and fuel cap
placement warning .................... 181
Electronic stability
program (ESP) —
warning lamp .............................. 181
BAS / ESP malfunction
indicator lamp ............................. 181
ABS malfunction
indicator lamp ............................. 182Telescoping steering
column warning lamp ................182
Low engine coolant level
warning lamp ..............................183
Low windshield and
headlamp washer system
f luid level warning lamp ...........183
Low engine oil level
warning lamp ..............................184
Charge indicator lamp ...............184
Exterior lamp failure
indicator lamp .............................185
Additional function
indicator lamps
(in the odometer display) ..........185
Malfunction and indicator
lamp in the center console .......185
AIRBAG OFF
indicator lamp .............................185
Practical hintsFirst aid kit ......................................188
Stowing things
in the vehicle .............................188Fuses ................................................ 188
Hood ................................................. 190
Automatic transmission
fluid level ................................... 192
Checking engine oil level ............. 193
Coolant level ................................... 194
Adding coolant ........................... 194
Windshield and
headlamp washer system ........ 195
Air pump, spare wheel,
vehicle tools,
storage compartment ................ 196
Vehicle jack ..................................... 197
Wheels ............................................. 198
Tire replacement ........................ 198
Rotating wheels .......................... 199
Spare wheel ....................................200
Spare wheel bolts ....................... 201
Changing wheels ...........................202
Inflating the collapsible
spare tire .....................................207
Storing spare wheel in
wheel well ...................................208
Tire inflation pressure ..................209
Page 7 of 273

4 Contents
Battery ............................................. 210
Jump starting .................................. 212
Towing the vehicle ......................... 214
Transmission selector lever,
manually unlocking .................. 217
Exterior lamps ................................ 218
Headlamp assembly ................... 219
Taillamp assemblies ..................222
Changing batteries in the
remote control ...........................224
Synchronizing
remote control ............................225
Emergency engine shut-down .....226
Raising hardtop manually ............226
Replacing wiper blade insert ....... 231
Antenna ...........................................232
Manual release of
fuel filler flap .............................232
Vehicle careCleaning and care
of the vehicle .............................234
Power washer ..............................235Paintwork, painted body
components ................................ 235
Tar stains .................................... 235
Engine cleaning ......................... 236
Vehicle washing ......................... 236
Headlamps, taillamps,
turn signal lenses ...................... 237
Window cleaning ....................... 237
Rear window cleaning .............. 237
Wiper blades .............................. 238
Light alloy wheels ..................... 238
Instrument cluster ..................... 238
Steering wheel and
gear selector lever ..................... 239
Cup holder .................................. 239
Hard plastic trim items ............. 239
Plastic and rubber parts ........... 239
Headliner and shelf
behind roll bars .......................... 239
Upholstery .................................. 239
Seat belts ..................................... 240
Technical data
Spare parts service ........................242
Warranty coverage .........................242
Identification labels ......................243
Layout of poly-V-belt drive ............245
Technical data ................................248
Fuels, coolants, lubricants
etc. – capacities .........................252
Engine oils ......................................254
Engine oil additives .......................254
Air conditioner refrigerant ...........254
Brake fluid ......................................254
Premium unleaded gasoline ........255
Fuel requirements .........................255
Gasoline additives .........................256
Coolants ...........................................256
Consumer information ..................258IndexIndex ................................................260
Page 174 of 273

171 Driving systems
Te ch n ica l
data Instruments
and controlsOperationDrivingInstrument
cluster displayPractical hints Car care Index Notes:
Th e m alf unction indicator l amp for t he ESP is combined
with that of the BAS.
The yellow BAS / ESP malfunction indicator lamp in the
instrument cluster and the yellow ESP warning
lampv in the speedometer dial come on with the
key in steering lock position 2. They should go out with
the engine running.
If the BAS / ESP malfunction indicator lamp comes on
continuously with the engine running, a malfunction
has been detected in either system. Only partial engine
output will be available.
If the BAS malfunctions, the brake system functions in
the usual manner, but without BAS.
Have the BAS or ESP checked at your authorized
Mercedes-Benz Center as soon as possible.
With the ABS malfunctioning, the ESP is also switched
off.Driving the vehicle with varied size tires will cause the
wheels to rotate at different speeds, therefore the ESP
may activate (yellow ESP warning lamp in speedometer
dial comes on). For this reason, all wheels, including the
spare wheel, must have the same tire size.
When testing the parking brake on a brake test
dynamometer, the engine must be shut off. Otherwise,
the ESP will immediately be engaged and will apply the
rear wheel brakes.
In winter operation, the maximum effectiveness of the
ESP is only achieved with Mercedes-Benz recommended
M+S rated radial-ply tires and / or snow chains.
Synchronizing ESP
If the power supply was interrupted (battery
disconnected or empty), the BAS / ESP malfunction
indicator lamp may be illuminated with the engine
running.
Turn steering wheel completely to the left and then to
the right. The BAS / ESP malfunction indicator lamp
should go out.
Page 190 of 273

187 Contents - Practical hints
Te ch n ica l
data Instruments
and controlsOperation DrivingInstrument
cluster displayPractical hintsCar care Index
Practical hintsFirst aid kit ..................................... 188
Stowing things in the vehicle ...... 188
Fuses ................................................ 188
Hood ................................................. 190
Automatic transmission
fluid level ................................... 192
Checking engine oil level ............. 193
Coolant level ................................... 194
Adding coolant ........................... 194
Windshield and headlamp
washer system ........................... 195
Air pump, spare wheel,
vehicle tools, storage
compartment ............................. 196Vehicle jack .....................................197
Wheels .............................................198
Tire replacement ........................198
Rotating wheels ..........................199
Spare wheel .................................... 200
Spare wheel bolts ...................... 201
Changing wheels ........................... 202
Inflating the collapsible
spare tire ..................................... 207
Storing spare wheel
in wheel well .............................. 208
Tire inflation pressure ................. 209
Battery ..............................................210
Jump starting ..................................212
Towing the vehicle .........................214Transmission selector lever,
manually unlocking .................. 217
Exterior lamps ................................ 218
Headlamp assembly ................... 219
Taillamp assemblies ..................222
Changing batteries
in the remote control ................224
Synchronizing
remote control ............................225
Emergency engine
shut-down ..................................226
Raising hardtop manually ............226
Replacing wiper blade insert ....... 231
Antenna ...........................................232
Manual release of
fuel filler flap .............................232
Page 199 of 273

196 Air pump, spare wheel, vehicle tools, storage compartment
Te ch n ica l
data Instruments
and controlsOperation DrivingInstrument
cluster displayPractical hintsCar care Index
Air pump, spare wheel, vehicle tools, storage
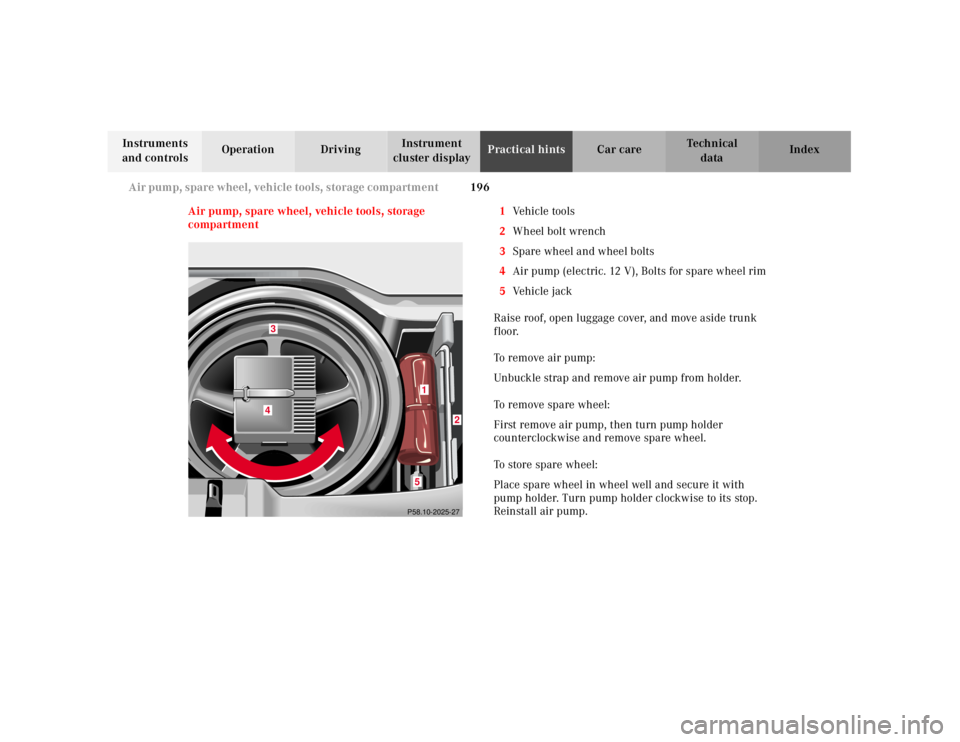
compartment1Ve h i c l e t o o l s
2Wheel bolt wrench
3Spare wheel and wheel bolts
4Air pump (electric. 12 V), Bolts for spare wheel rim
5Vehicle jack
Raise roof, open luggage cover, and move aside trunk
floor.
To remove air pump:
Unbuckle strap and remove air pump from holder.
To remove spare wheel:
First remove air pump, then turn pump holder
counterclockwise and remove spare wheel.
To store spare wheel:
Place spare wheel in wheel well and secure it with
pump holder. Turn pump holder clockwise to its stop.
Reinstall air pump.
P58.10-2025-27
43
2
15
Page 200 of 273

197 Vehicle jack
Te ch n ica l
data Instruments
and controlsOperation DrivingInstrument
cluster displayPractical hintsCar care Index Ve h i c l e j a c k
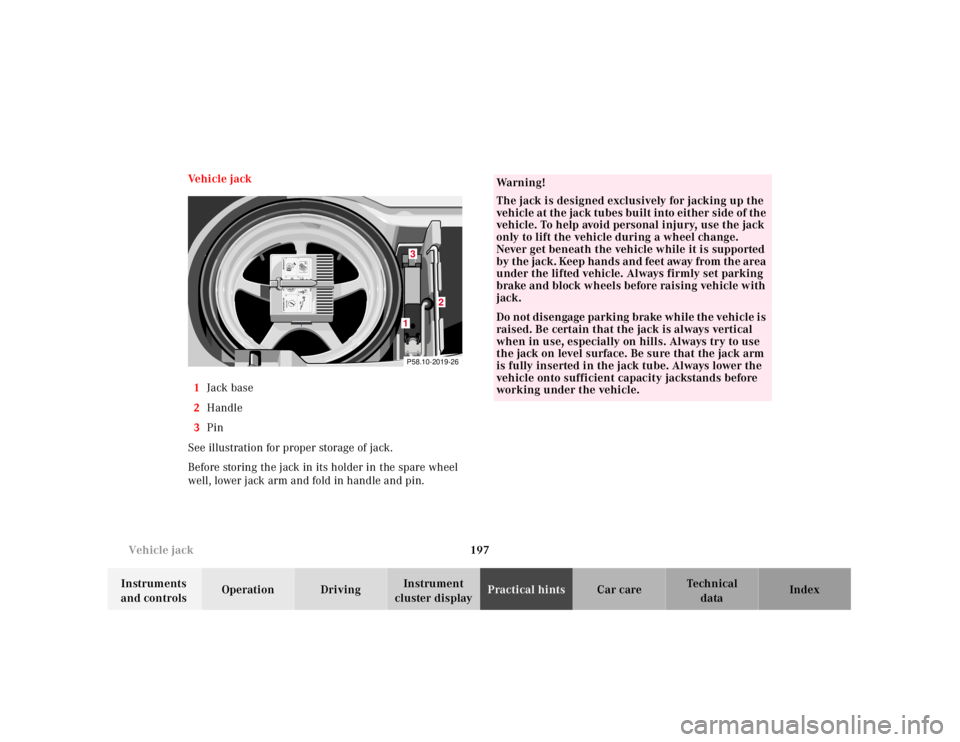
1Jack base
2Handle
3Pin
See illustration for proper storage of jack.
Before storing the jack in its holder in the spare wheel
well, lower jack arm and fold in handle and pin.
1
0
456max. 6 min
A 170 584 01 38 AIR COMPRESSOR 23
Mercedes-Benz2
3
2 1
12,5 bar
36 psi1
0 23
4
5
620PSI
BAR40
60
80LUFTPRESSER 1
2
P58.10-2019-261
2
3
Wa r n i n g !
The jack is designed exclusively for jacking up the
veh icle at th e jack tu bes bu ilt into eit her side of th e
vehicle. To help avoid personal injury, use the jack
only to lift the vehicle during a wheel change.
Never get beneath the vehicle while it is supported
by t he jack. Keep hands and feet away from th e area
under the lifted vehicle. Always firmly set parking
brake and block wheels before raising vehicle with
jack.Do not disengage parki ng brake wh ile th e vehi cle i s
raised. Be certain that the jack is always vertical
when in use, especially on hills. Always try to use
the jack on level surface. Be sure that the jack arm
is fully inserted in the jack tube. Always lower the
vehicle onto sufficient capacity jackstands before
working under the vehicle.
Page 203 of 273

200 Tires, wheels
Te ch n ica l
data Instruments
and controlsOperation DrivingInstrument
cluster displayPractical hintsCar care Index
Spare wheel
Important!
SLK 230 Kompressor:
The spare wheel rim size is 4
1/2 B x 15 H 2 with
inflatable, collapsible tire, size 165-15 89 P.
SLK 320:
The spare wheel rim size is 4
1/2 B x 16 H 2 with
inflatable, collapsible tire, size 165/70-16 92 P.
You should inf late the spare tire using the supplied air
pump.In the case of a f lat tire, you may temporarily use the
spare wheel, while observing the following restrictions:
•Do not exceed vehicle speed of 50 mph (80 km / h).
•Drive to the nearest tire repair facility to have the
flat tire repaired or replaced as appropriate.
•Do not operate vehicle with more than one
collapsible spare wheel / tire mounted.
For additional information, see page 249.
Page 204 of 273

201 Tires, wheels
Te ch n ica l
data Instruments
and controlsOperation DrivingInstrument
cluster displayPractical hintsCar care Index Spare wheel bolts
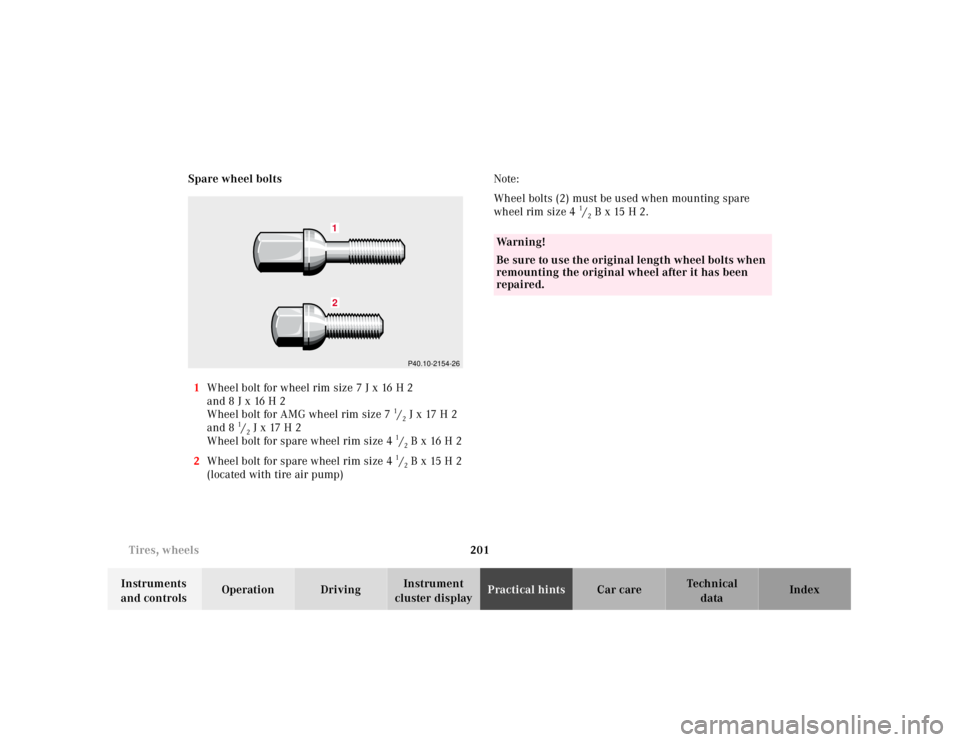
1Wheel bolt for wheel rim size 7 J x 16 H 2
and 8 J x 16 H 2
Wheel bolt for AMG wheel rim size 7
1/2 J x 17 H 2
and 8
1/2 J x 17 H 2
Wheel bolt for spare wheel rim size 4
1/2 B x 16 H 2
2Wheel bolt for spare wheel rim size 4
1/2 B x 15 H 2
(located with tire air pump)Note:
Wheel bolts (2) must be used when mounting spare
wheel rim size 4
1/2 B x 15 H 2.
21
P40.10-2154-26
Wa r n i n g !
Be su re to u se th e original lengt h wheel bolts wh en
remounting the original wheel after it has been
repaired.