Page 43 of 273

40 Seats
Te ch n ica l
data Instruments
and controlsOperationDrivingInstrument
cluster displayPractical hints Car care Index
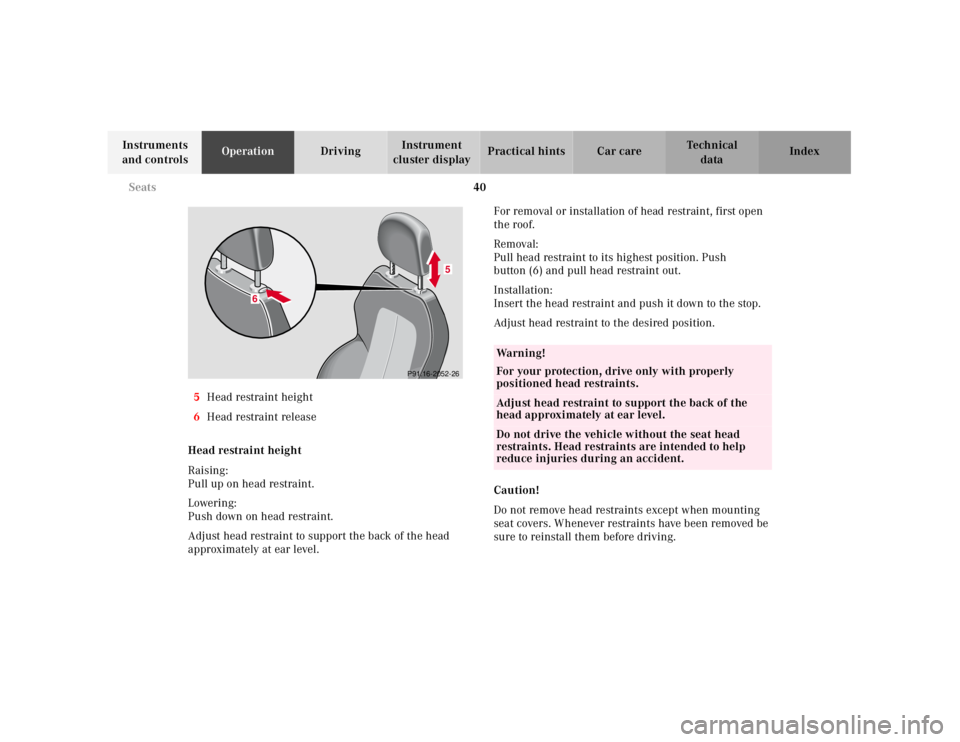
5Head restraint height
6Head restraint release
Head restraint height
Raising:
Pull up on head restraint.
Lowering:
Push down on head restraint.
Adjust head restraint to support the back of the head
approximately at ear level.For removal or installation of head restraint, first open
the roof.
Removal:
Pull head restraint to its highest position. Push
button (6) and pull head restraint out.
Installation:
Insert the head restraint and push it down to the stop.
Adjust head restraint to the desired position.
Caution!
Do not remove head restraints except when mounting
seat covers. Whenever restraints have been removed be
sure to reinstall them before driving.
P91.16-2052-26
6
5
Wa r n i n g !
For your protection, drive only with properly
positioned head restraints.Adjust head restraint to support the back of the
head approximately at ear level.Do not drive the vehicle without the seat head
restraints. Head restraints are intended to help
reduce injuries during an accident.
Page 112 of 273

109 Interior equipment
Te ch n ica l
data Instruments
and controlsOperationDrivingInstrument
cluster displayPractical hints Car care Index Power w indows
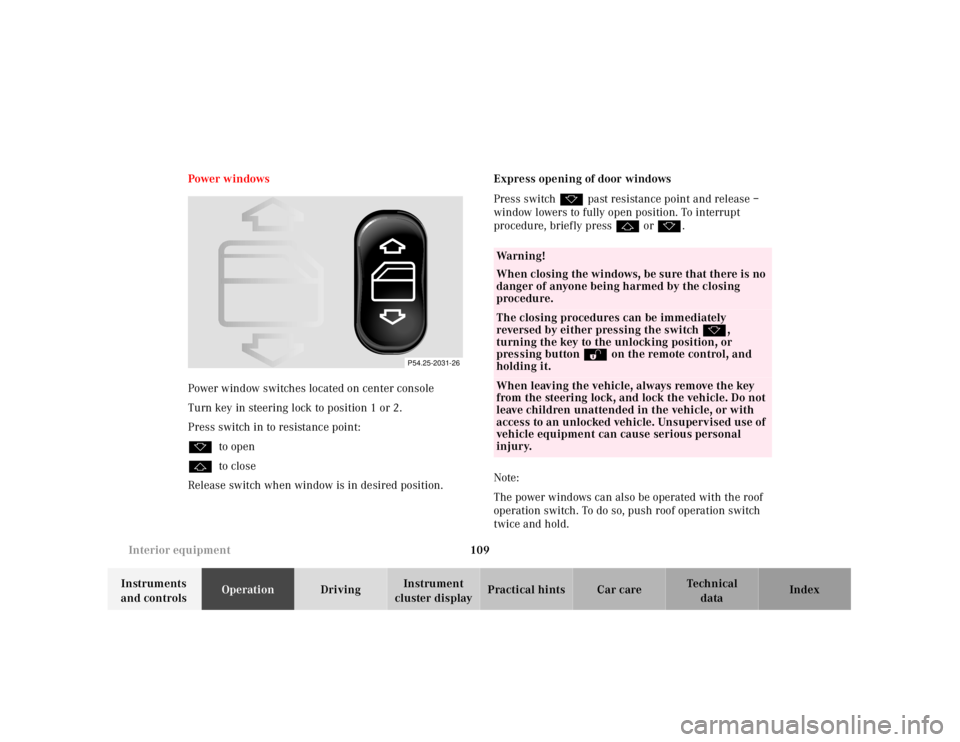
Power window switches located on center console
Turn key in steering lock to position 1 or 2.
Press switch in to resistance point:
kto open
jto close
Release switch when window is in desired position.Express opening of door windows
Press switch k past resistance point and release –
window lowers to fully open position. To interrupt
procedure, briefly press j or k.
Note:
The power windows can also be operated with the roof
operation switch. To do so, push roof operation switch
twice and hold.
P54.25-2031-26
Wa r n i n g !
When closing the windows, be sure that there is no
danger of anyone being harmed by the closing
procedure.The closing procedures can be immediately
reversed by either pressing the switch k,
turning the key to the unlocking position, or
pressing button Πon the remote control, and
holding it.When leaving the vehicle, always remove the key
from the steering lock, and lock the vehicle. Do not
leave children unattended in the vehicle, or with
access to an unlocked vehicle. Unsupervised use of
vehicle equipment can cause serious personal
injury.
Page 123 of 273

120 Retractable hardtop
Te ch n ica l
data Instruments
and controlsOperationDrivingInstrument
cluster displayPractical hints Car care Index
Retractable hardtop
Important!
A minimum clearance height of 5
1/2 ft. (1.65 m) and an
additional 10 in (25 cm) length behind the vehicle is
required to lower or raise the hardtop.
Th e add itional space is requ ired since th e roof moves u p
and the trunk lid back during raising and lowering
operations.
The raising or lowering operations can only be started
with the luggage cover and trunk lid closed.
The raising or lowering procedure is immediately
interrupted by releasing the hardtop switch.
Do not operate the roof while a roof luggage carrier is
installed.To prevent damage to hardtop or luggage / cargo when
lowering the roof:
•load trunk only to the height of the luggage cover,
•do not permit luggage / cargo to raise the closed
luggage cover,
•do not load anything on top of the luggage cover,
•do not place anything on shelf behind roll bars.
Note:
To prevent the hardtop from being lowered
unintentionally while a roof luggage carrier is installed,
keep luggage cover in trunk in the open position.
Wa r n i n g !
Before operating the switch for the retractable
hardtop make sure that no persons due to
inattention are injured by the moving parts
(retractable roof, roof frame, and trunk lid).Hands must never be placed near the roof frame,
upper windshield area, hardtop, shelf behind roll
bars, or trunk lid while the retractable hardtop is
being raised or lowered. Serious personal injury
may occur.
Page 124 of 273
121 Retractable hardtop
Te ch n ica l
data Instruments
and controlsOperationDrivingInstrument
cluster displayPractical hints Car care Index Important!
Do not manually move corner flaps of rear shelf. Doing
so will result in damage to the roof folding mechanism
that is not covered by the Mercedes-Benz Limited
War ra nt y.
Prior to cleaning the rear window, see page 237.Lowering Hardtop
1.Engage parking brake.
2.Turn key in steering lock to position 2.
P65.10-2102-26
1
P77.39-2030-26
Page 129 of 273
126 Luggage cover
Te ch n ica l
data Instruments
and controlsOperationDrivingInstrument
cluster displayPractical hints Car care Index
Luggage cover
1Handle
2HolderTo close compartment:
Pull out on handle and hook guide rod into left and right
side holders.
To open compartment:
Unhook guide rod from holders and guide luggage cover
into storage compartment.
Important!
To prevent damage to hardtop or luggage / cargo when
lowering the roof:
•load trunk only to the height of the luggage
cover (3),
•do not permit luggage / cargo to raise the closed
luggage cover (4),
•do not load anything on top of the luggage cover (5),
•do not place anything on shelf behind roll bars (6).
P77.30-2064-27
2
2
1
3
4
5
6
Page 199 of 273
196 Air pump, spare wheel, vehicle tools, storage compartment
Te ch n ica l
data Instruments
and controlsOperation DrivingInstrument
cluster displayPractical hintsCar care Index
Air pump, spare wheel, vehicle tools, storage
compartment1Ve h i c l e t o o l s
2Wheel bolt wrench
3Spare wheel and wheel bolts
4Air pump (electric. 12 V), Bolts for spare wheel rim
5Vehicle jack
Raise roof, open luggage cover, and move aside trunk
floor.
To remove air pump:
Unbuckle strap and remove air pump from holder.
To remove spare wheel:
First remove air pump, then turn pump holder
counterclockwise and remove spare wheel.
To store spare wheel:
Place spare wheel in wheel well and secure it with
pump holder. Turn pump holder clockwise to its stop.
Reinstall air pump.
P58.10-2025-27
43
2
15
Page 231 of 273

228 Raising hardtop manually
Te ch n ica l
data Instruments
and controlsOperation DrivingInstrument
cluster displayPractical hintsCar care Index
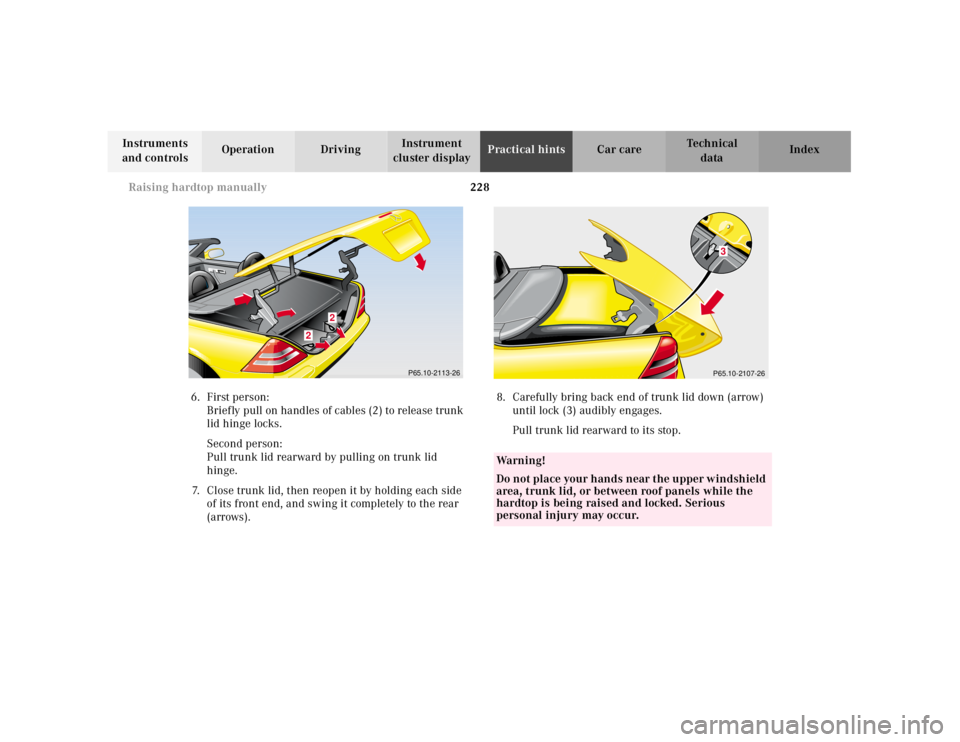
6.First person:
Briefly pull on handles of cables (2) to release trunk
lid hinge locks.
Second person:
Pull trunk lid rearward by pulling on trunk lid
hinge.
7.Close trunk lid, then reopen it by holding each side
of its front end, and swing it completely to the rear
(arrows).8.Carefully bring back end of trunk lid down (arrow)
until lock (3) audibly engages.
Pull trunk lid rearward to its stop.
� @
€
À
�
@
€
À
�
@
€
À
�
@
€
À
�
@
€
À
�
@
€
À
�
@
€
À
�
@
€
À
�
@
€
À
�
@
€
À
�
@
€
À
�
@
€
À
�
@
€
À
�
@
€
À
�
@
€
À
�
@
€
À
�
@
€
À
�
@
€
À
�
@
€
À
�
@
€
À
�
@
€
À
�
@
€
À
�
@
€
À
�
@
€
À
�
@
€
À
�
@
€
À
�
@
€
À
�
@
€
À
�
@
€
À
�
@
€
À
�
@
€
À
�
@
€
À
�
@
€
À
�
@
€
À
�
@
€
À
�
@
€
À
�
@
€
À
�
@
€
À
�
@
€
À
�
@
€
À
�
@
€
À
�
@
€
À
�
@
€
À
�
@
€
À
�
@
€
À
�
@
€
À
�
@
€
À
�
@
€
À
�
@
€
À
�
@
€
À
�
@
€
À
�
@
€
À
�
@
€
À
�
@
€
À
�
@
€
À
�
@
€
À
�
@
€
À
�
@
€
À
�
@
€
À
�
@
€
À
�
@
€
À
�
@
€
À
�
@
€
À
�
@
€
À
�
@
€
À
�
@
€
À
�
@
€
À
�
@
€
À
�
@
€
À
�
@
€
À
�
@
€
À
�
@
€
À
�
@
€
À
�
@
€
À
�
@
€
À
�
@
€
À
�
@
€
À
�
@
€
À
�
@
€
À
�
@
€
À
�
@
€
À
�
@
€
À
�
@
€
À
�
@
€
À
�
@
€
À
�
@
€
À
�
@
€
À
�
@
€
À
�
@
€
À
�
@
€
À
�
@
€
À
�
@
€
À
�
@
€
À
�
@
€
À
�
@
€
À
�
@
€
À
�
@
€
À
�
@
€
À
�
@
€
À
�
@
€
À
�
@
€
À
�
@
€
À
�
@
€
À
�
@
€
À
�
@
€
À
�
@
€
À
�
@
€
À
�
@
€
À
�
@
€
À
�
@
€
À
�
@
€
À
�
@
€
À
�
@
€
À
�
@
€
À
�
@
€
À
�
@
€
À
�
@
€
À
�
@
€
À
�
@
€
À
�
@
€
À
�
@
€
À
�
@
€
À
�
@
€
À
�
@
€
À
�
@
€
À
�
@
€
À
�
@
€
À
�
@
€
À
�
@
€
À
�
@
€
À
�
@
€
À
�
@
€
À
�
@
€
À
�
@
€
À
�
@
€
À
�
@
€
À
�
@
€
À
�
@
€
À
�
@
€
À
�
@
€
À
�
@
€
À
�
@
€
À
�
@
€
À
�
@
€
À
�
@
€
À
�
@
€
À
�
@
€
À
�
@
€
À
�
@
€
À
�
@
€
À
�
@
€
À
�
@
€
À
�
@
€
À
�
@
€
À
�
@
€
À
�
@
€
À
�
@
€
À
�
@
€
À
�
@
€
À
�
@
€
À
�
@
€
À
�
@
€
À
�
@
€
À
�
@
€
À
�
@
€
À
�
@
€
À
�
@
€
À
�
@
€
À
�
@
€
À
�
@
€
À
�
@
€
À
�
@
€
À
�
@
€
À
�
@
€
À
�
@
€
À
�
@
€
À
�
@
€
À
�
@
€
À
�
@
€
À
�
@
€
À
�
@
€
À
�
@
€
À
�
@
€
À
�
@
€
À
�
@
€
À
�
@
€
À
�
@
€
À
�
@
€
À
�
@
€
À
�
@
€
À
�
@
€
À
�
@
€
À
�
@
€
À
�
@
€
À
�
@
€
À
�
@
€
À
�
@
€
À
�
@
€
À
�
@
€
À
�
@
€
À
�
@
€
À
�
@
€
À
�
@
€
À
�
@
€
À
�
@
€
À
�
@
€
À
�
@
€
À
�
@
€
À
�
@
€
À
�
@
€
À
�
@
€
À
�
@
€
À
�
@
€
À
�
@
€
À
�
@
€
À
�
@
€
À
�
@
€
À
�
@
€
À
�
@
€
À
�
@
€
À
�
@
€
À
�
@
€
À
�
@
€
À
�
@
€
À
�
@
€
À
�
@
€
À
�
@
€
À
�
@
€
À
�
@
€
À
�
@
€
À
�
@
€
À
�
@
€
À
�
@
€
À
�
@
€
À
�
@
€
À
�
@
€
À
�
@
€
À
�
@
€
À
�
@
€
À
�
@
€
À
�
@
€
À
�
@
€
À
�
@
€
À
�
@
€
À
�
@
€
À
�
@
€
À
�
@
€
À
�
P65.10-2113-26
2
2
Wa r n i n g !
Do not place your h ands near t he u pper w indsh ield
area, trunk lid, or between roof panels while the
hardtop is being raised and locked. Serious
personal injury may occur.
P65.10-2107-263
Page 232 of 273
229 Raising hardtop manually
Te ch n ica l
data Instruments
and controlsOperation DrivingInstrument
cluster displayPractical hintsCar care Index 9.Place hands from below on lower section of
hardtop (4), and pull hardtop out of its storage
compartment.10.With rear section of roof (5) in a vertical position,
place hands on rear section of roof as shown, and
guide pins (6) of roof front section into windshield
frame.
4
P65.10-2108-26
Wa r n i n g !
Do not place your hands in areas marked X.
Serious personal injury may occur.
P65.10-2109-26
5
6