Page 159 of 421
156 Exterior lamp switch
Te ch n ica l
data Instruments
and controlsOperationDrivingInstrument
cluster displayPractical hints Car care Index
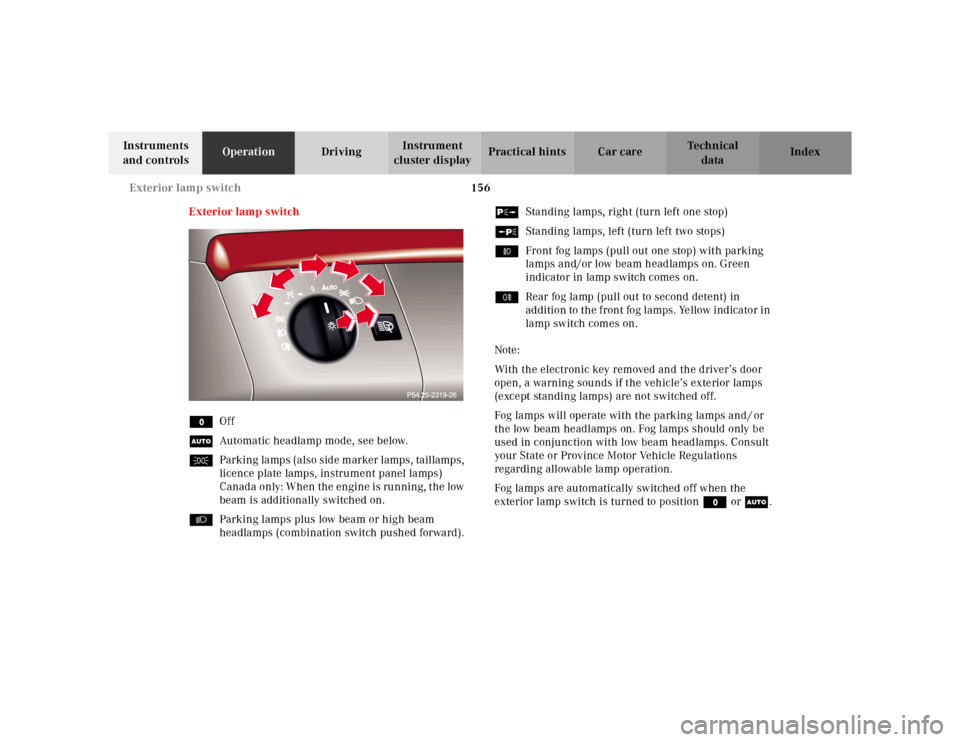
Exterior lamp switch
MOff
UAutomatic headlamp mode, see below.
CParking lamps (also side marker lamps, taillamps,
licence plate lamps, instrument panel lamps)
Canada only: When the engine is running, the low
beam is additionally switched on.
BParking lamps plus low beam or high beam
headlamps (combination switch pushed forward).ˆStanding lamps, right (turn left one stop)
‚Standing lamps, left (turn left two stops)
‡Front fog lamps (pull out one stop) with parking
lamps and/or low beam headlamps on. Green
indicator in lamp switch comes on.
†Rear fog lamp (pull out to second detent) in
addition to the front fog lamps. Yellow indicator in
lamp switch comes on.
Note:
With the electronic key removed and the driver’s door
open, a warning sounds if the vehicle’s exterior lamps
(except standing lamps) are not switched off.
Fog lamps will operate with the parking lamps and / or
the low beam headlamps on. Fog lamps should only be
used in conjunction with low beam headlamps. Consult
your State or Province Motor Vehicle Regulations
regarding allowable lamp operation.
Fog lamps are automatically switched off when the
exterior lamp switch is turned to position M or U.
Page 182 of 421
179 Automatic climate control
Te ch n ica l
data Instruments
and controlsOperationDrivingInstrument
cluster displayPractical hints Car care Index Controlling the rear air conditioner from the front
automatic air conditioner control panel
The rear air conditioner can be switched off and the
blower and temperature settings can be changed from
the automatic air conditioner control panel in the center
console.
Press A on the air volume switch and hold until the
display illustrated above is shown.The rear air conditioner can be switched on and off by
pressing the 0 button. The blower setting for the rear air
conditioner can be controlled with the air volume
switch and the temperature setting for the rear air
conditioner can be set with the temperature control
switches.
The message in the display disappears approximately
4 seconds after the button is pressed for the last time
and the automatic air conditioner switches to normal
operation.
Page 183 of 421
180 Automatic climate control
Te ch n ica l
data Instruments
and controlsOperationDrivingInstrument
cluster displayPractical hints Car care Index
Rear window defroster
Turn the electronic key in starter switch to position 2.
To s elec t:
Press the F button in the control panel of the
automatic air conditioner. The indicator lamp in the
button illuminates.
To ca nc el:
Press the F button in the control panel of the
automatic air conditioner. The indicator lamp in the
button goes out.
Note:
Heavy accumulation of snow and ice should be removed
before activating the defroster. The rear window defroster uses a large amount of power.
To keep the battery drain to a minimum, turn off the
defroster as soon as the rear window is clear.
The defroster is automatically turned off after
approximately 6–23 minutes of operation depending on
the outside temperature and vehicle speed.
If several power consumers are turned on
simultaneously, or the battery is only partially charged,
it is possible that the defroster will automatically turn
itself off. When this happens, the indicator lamp inside
the switch starts blinking.
As soon as the battery has sufficient voltage, the
defroster automatically turns itself back on.
Page 184 of 421
181 Interior equipment
Te ch n ica l
data Instruments
and controlsOperationDrivingInstrument
cluster displayPractical hints Car care Index Power w indows
The control panel is located on the driver’s door. Switches for:
1left, front
2right, front
3Switch for rear door window override
4left, rear
5right, rear
There are individual switches in the front passenger
door and the rear door for the respective windows.
Turn electronic key in starter switch to position 1 or 2.
Opening the side windows:
Press k on the switch to resistance point.
Closing the side windows:
Press j on the switch to resistance point.
Release switch when window is in desired position.
3
3
3
3
P54.25-0424-26
1
2
34
5
Page 245 of 421
242 Parking brake
Te ch n ica l
data Instruments
and controlsOperationDrivingInstrument
cluster displayPractical hints Car care Index
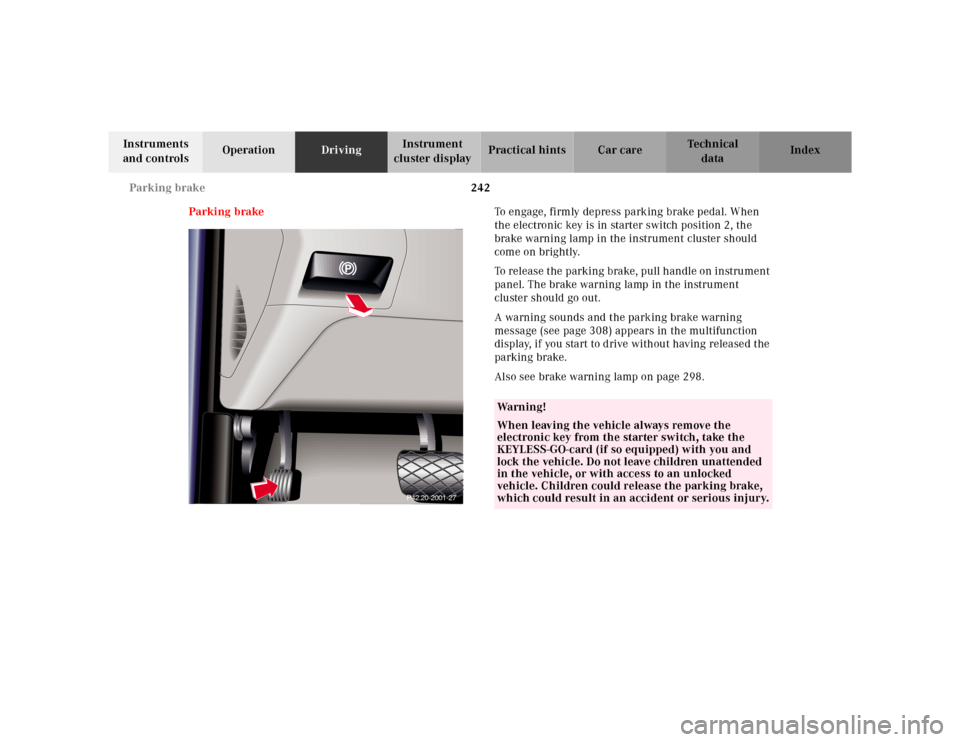
Parking brakeTo engage, firmly depress parking brake pedal. When
the electronic key is in starter switch position 2, the
brake warning lamp in the instrument cluster should
come on brightly.
To release the parking brake, pull handle on instrument
panel. The brake warning lamp in the instrument
cluster should go out.
A warning sounds and the parking brake warning
message (see page 308) appears in the multifunction
display, if you start to drive without having released the
parking brake.
Also see brake warning lamp on page 298.
P42.20-2001-27
Wa r n i n g !
When leaving the vehicle always remove the
electronic key from the starter switch, take the
KEYLESS-GO-card (if so equipped) with you and
lock the vehicle. Do not leave children unattended
in the vehicle, or with access to an unlocked
vehicle. Children could release the parking brake,
which could result in an accident or serious injury.
Page 335 of 421
332 Engine compartment
Te ch n ica l
data Instruments
and controlsOperation DrivingInstrument
cluster displayPractical hintsCar care Index
To o p e n :
To unlock the hood, pull release lever (1) under the
driver´s side of the instrument panel. At the same time
a handle will extend out of the radiator grill.
The engine is equipped with a transistorized
ignition system. Because of the high voltage it is
dangerous to touch any components (ignition coils,
spark plug sockets, diagnostic socket) of the
ignition system
• with the engine running,
• while starting the engine,
• if ignition is “on” and the engine is turned
manually.
1
P88.40-2001-26
Page 352 of 421
349 Battery
Te ch n ica l
data Instruments
and controlsOperation DrivingInstrument
cluster displayPractical hintsCar care Index The spare tire should be checked periodically for
condition and inflation. Spare tire will age and become
worn over time even if never used, and thus should be
inspected and replaced when necessary.Battery
Important!
Battery replacement information:
The maintenance-free battery is located in the trunk
under the right-hand wheel well cover panel.
The service life of the battery is dependent on its
condition of charge. The battery should always be kept
sufficiently charged, in order to last an optimum length
of time.
Wa r n i n g !
Do not overinflate tires. Overinflating tires can
result in sudden deflation (blowout) because they
are more likely to become punctured or damaged
by road debris, potholes etc.. Follow recommended
inflation pressures.Do not overload the tires by exceeding the specified
vehicle capacity weight (as indicated by the label
on the driver’s door latch post). Overloading the
tires can overheat them, possibly causing a
blowout.
Wa r n i n g !
Failure to follow these instructions can result in
severe injury or death.Never lean over batteries while connecting, you
might get injured.Battery fluid contains sulfuric acid. Do not allow
this fluid to come in contact with eyes, skin or
clothing. In case it does, immediately flush affected
area with water and seek medical help if necessary.A battery will also produce hydrogen gas, which is
flammable and explosive. Keep flames or sparks
away from battery, avoid improper connection of
jumper cables, smoking etc..
Page 354 of 421
351 Jump starting
Te ch n ica l
data Instruments
and controlsOperation DrivingInstrument
cluster displayPractical hintsCar care Index Jump startingImportant!
A discharged battery can freeze at approximately +14°F
(–10°C). In that case, it must be thawed out before
jumper cables are used. Attempting to jump start a
frozen battery can result in it exploding, causing
personal injury.
Jumper cable specifications:
•Minimum cable cross-section of 25 mm
2 or
approximately 2 AWG
•Maximum length of 11.5 ft. (3.5 m).
If the battery is discharged, the engine should be started
with jumper cables and the (12 V) battery of another
vehicle.
Only use 12 V battery to jump start your vehicle. Jump
starting with more powerful battery could damage the
vehicle’s electrical systems, which will not be covered
by the Mercedes-Benz Limited Warranty.
The battery is located in the trunk under the right-hand
wheel well cover panel.
Wa r n i n g !
Failure to follow these directions will cause
damage to the electronic components, and can lead
to a battery explosion and severe injury or death.Never lean over batteries while connecting or jump
starting, you might get injured.Battery fluid contains sulfuric acid. Do not allow
this fluid to come in contact with eyes, skin or
clothing. In case it does, immediately flush affected
area with water, and seek medical help if
necessary.A battery will also produce hydrogen gas, which is
flammable and very explosive. Keep flames or
sparks away from battery, avoid improper
connection of jumper cables, smoking etc..Read all instructions before proceeding.