2000 MERCEDES-BENZ S430 vehicle jack
[x] Cancel search: vehicle jackPage 8 of 421

5 Contents
Practical hintsFirst aid kit .....................................328
Stowing things in the vehicle ......328
Fuses ................................................329
Hood ................................................. 331
Checking engine oil level .............334
Automatic transmission
fluid level ...................................335
Active body control
(ABC) fluid level ........................335
Coolant level ...................................336
Adding coolant ...........................336
Windshield and
headlamp washer system ........337
Windshield and
headlamp washer fluid
mixing ratio ................................337
Spare wheel, vehicle tools,
storage compartment ................338
Vehicle jack .....................................339
Wheels .............................................340
Tire Replacement .......................340
Rotating wheels .......................... 341
Spare wheel .................................... 341Changing wheels ........................... 343
Tire inflation pressure ................. 348
Battery ............................................. 349
Jump starting ................................. 351
Towing the vehicle ........................ 353
Exterior lamps ............................... 356
Headlamp assembly .................. 357
Taillamp assemblies .................. 360
Trunk lamp ..................................... 362
Changing batteries in the
electronic main key .................. 363
Synchronizing
remote control ............................ 365
Changing batteries in the
KEYLESS-GO-card .................... 366
Emergency engine
shut-down .................................. 368
Fuel filler flap,
manual release ......................... 368
Emergency operation of
sliding/pop-up roof .................. 369
Replacing wiper blades ................ 370
Roof rack ..........................................371
Vehicle careCleaning and care
of the vehicle ............................. 374
Power washer ..............................375
Tar stains ..................................... 376
Paintwork, painted body
components ................................. 376
Engine cleaning .......................... 376
Vehicle washing ......................... 376
Ornamental moldings ................377
Headlamps, taillamps,
turn signal lenses ......................377
Cleaning the Distronic
system sensor .............................378
Cleaning the parktronic
system sensors ...........................378
Wiper blades ...............................379
Light alloy wheels ......................380
Instrument cluster .....................380
Steering wheel and
gear selector lever ......................380
Cup holder ...................................380
Seat belts ..................................... 381
Page 288 of 421
285 Parking system
Te ch n ica l
data Instruments
and controlsOperationDrivingInstrument
cluster displayPractical hints Car care Index Parking assist (Parktronic)
The Parktronic system assists the driver during parking
maneuvers. It visually and audibly indicates the relative
distance between the vehicle and an obstacle.
The front area of the vehicle is monitored when driving
forward. When reversing or with the gear selector lever
in position “N”, the front as well as the rear areas are
monitored.
With the electronic key in starter switch position 2,
Parktronic engages automatically at speeds up to
approximately 10 mph (15 km / h) and deactivates
during higher speeds.
Parktronic can be switched off by a control switch
located in the center console. It engages automatically
again when starting the engine.
See page 289 for Parktronic switch.
Wa r n i n g !
Parktronic is a supplemental system. It is not
intended to nor does it replace the need for extreme
care. The responsibility during parking and other
critical maneuvers rests always with the driver.Special attention must be paid to objects having
smooth surfaces or low silhouettes (e.g. trailer
couplings, painted posts, or street curbs). Such
objects may not be detected by the system and can
damage the vehicle.The operational function of the Parktronic can be
affected by dirty sensors, especially at times of
snow and ice. See page 378 for notes on cleaning
the parktronic system sensors.Interference caused by other ultrasonic signals
(e.g. working jackhammers or the air brakes of
trucks) can cause the system to send erratic
indications, and should be taken into
consideration.
Page 330 of 421
327 Contents - Practical hints
Te ch n ica l
data Instruments
and controlsOperation DrivingInstrument
cluster displayPractical hintsCar care Index
Practical hintsFirst aid kit .....................................328
Stowing things in the vehicle ......328
Fuses ................................................329
Hood ................................................. 331
Checking engine oil level .............334
Automatic transmission
fluid level ...................................335
Active body control
(ABC) fluid level ........................335
Coolant level ...................................336
Adding coolant ...........................336
Windshield and
headlamp washer system ........337Windshield and
headlamp washer fluid
mixing ratio ................................ 337
Spare wheel, vehicle tools,
storage compartment ............... 338
Vehicle jack .................................... 339
Wheels ............................................ 340
Tire Replacement ....................... 340
Rotating wheels ......................... 341
Spare wheel .................................... 341
Changing wheels ........................... 343
Tire inflation pressure ................. 348
Battery ............................................. 349
Jump starting ................................. 351
Towing the vehicle ........................ 353Exterior lamps ................................356
Headlamp assembly ...................357
Taillamp assemblies ..................360
Trunk lamp .....................................362
Changing batteries in the
electronic main key ..................363
Synchronizing
remote control ............................365
Changing batteries in the
KEYLESS-GO-card .....................366
Emergency engine
shut-down ..................................368
Fuel filler flap,
manual release ..........................368
Emergency operation of
sliding/pop-up roof ...................369
Replacing wiper blades .................370
Roof rack ......................................... 371
Page 341 of 421

338 Spare wheel
Te ch n ica l
data Instruments
and controlsOperation DrivingInstrument
cluster displayPractical hintsCar care Index
Spare wheel, vehicle tools, storage compartment
1Jack
2Luggage bowl with vehicle tool kit, towing eye bolt,
fuses, fuse extractor and fuse chart
3Storage tray
4Spare wheelLift trunk floor and engage handle in upper edge of
trunk.
Always lower trunk f loor before closing trunk lid.
To remove the spare wheel:
Take out the vehicle tool kit tray.
Turn the luggage bowl counterclockwise and remove the
spare wheel.
To store spare wheel:
Place spare wheel in wheel well and secure it with
luggage bowl. Turn luggage bowl clockwise to its stop.
Place vehicle tool kit tray in luggage bowl.
P40.10-0523-26
1
4
3
2
Page 342 of 421
339 Vehicle jack
Te ch n ica l
data Instruments
and controlsOperation DrivingInstrument
cluster displayPractical hintsCar care Index Ve h i c l e j a c k
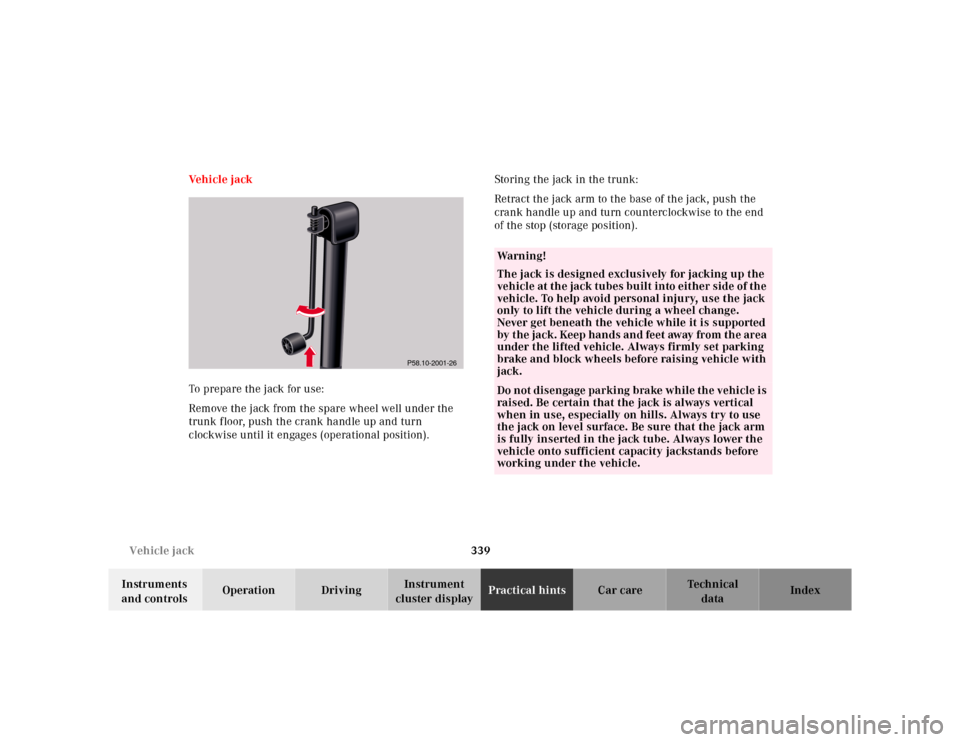
To prepare the jack for use:
Remove the jack from the spare wheel well under the
trunk floor, push the crank handle up and turn
clockwise until it engages (operational position).Storing the jack in the trunk:
Retract the jack arm to the base of the jack, push the
crank handle up and turn counterclockwise to the end
of the stop (storage position).
P58.10-2001-26
Wa r n i n g !
The jack is designed exclusively for jacking up the
vehicle at the jack tubes built into either side of the
vehicle. To help avoid personal injury, use the jack
only to lift the vehicle during a wheel change.
Never get beneath the vehicle while it is supported
by the jack. Keep hands and feet away from the area
under the lifted vehicle. Always firmly set parking
brake and block wheels before raising vehicle with
jack.Do not disengage parking brake while the vehicle is
raised. Be certain that the jack is always vertical
when in use, especially on hills. Always try to use
the jack on level surface. Be sure that the jack arm
is fully inserted in the jack tube. Always lower the
vehicle onto sufficient capacity jackstands before
working under the vehicle.
Page 346 of 421
343 Tires, Wheels
Te ch n ica l
data Instruments
and controlsOperation DrivingInstrument
cluster displayPractical hintsCar care Index Changing wheelsMove vehicle to a level area which is a safe distance
from the roadway.
1. Set parking brake and turn on hazard warning
flasher.
2. Move selector lever to position “P” and turn off
engine.
3. Prevent vehicle from rolling away by blocking
wheels with wheel chocks (not supplied with
vehicle) or sizable wood block or stone. When
changing a wheel on a hill, place chocks on the
downhill side blocking both wheels of the other
axle. On an level road, place one chock in front of
and one behind the wheel that is diagonally
opposite to the wheel being changed.
Wa r n i n g !
The jack is designed exclusively for jacking up the
vehicle at the jack tubes built into either side of the
vehicle. To help avoid personal injury, use the jack
only to lift the vehicle during a wheel change.
Never get beneath the vehicle while it is supported
by the jack. Keep hands and feet away from the area
under the lifted vehicle. Always firmly set parking
brake and block wheels before raising vehicle with
jack.Do not disengage parking brake while the vehicle is
raised. Be certain that the jack is always vertical
when in use, especially on hills. Always try to use
the jack on level surface. Be sure that the jack arm
is fully inserted in the jack tube. Always lower the
vehicle onto sufficient capacity jackstands before
working under the vehicle.
Page 347 of 421
344 Tires, Wheels
Te ch n ica l
data Instruments
and controlsOperation DrivingInstrument
cluster displayPractical hintsCar care Index
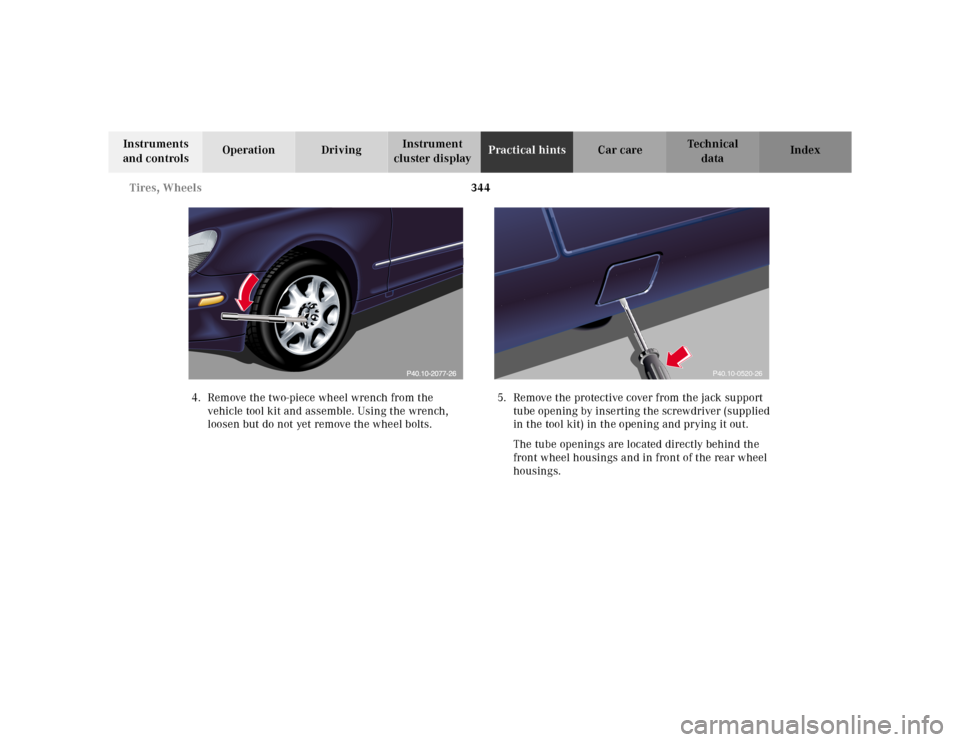
4. Remove the two-piece wheel wrench from the
vehicle tool kit and assemble. Using the wrench,
loosen but do not yet remove the wheel bolts.5. Remove the protective cover from the jack support
tube opening by inserting the screwdriver (supplied
in the tool kit) in the opening and prying it out.
The tube openings are located directly behind the
front wheel housings and in front of the rear wheel
housings.
P40.10-0520-26
Page 348 of 421
345 Tires, Wheels
Te ch n ica l
data Instruments
and controlsOperation DrivingInstrument
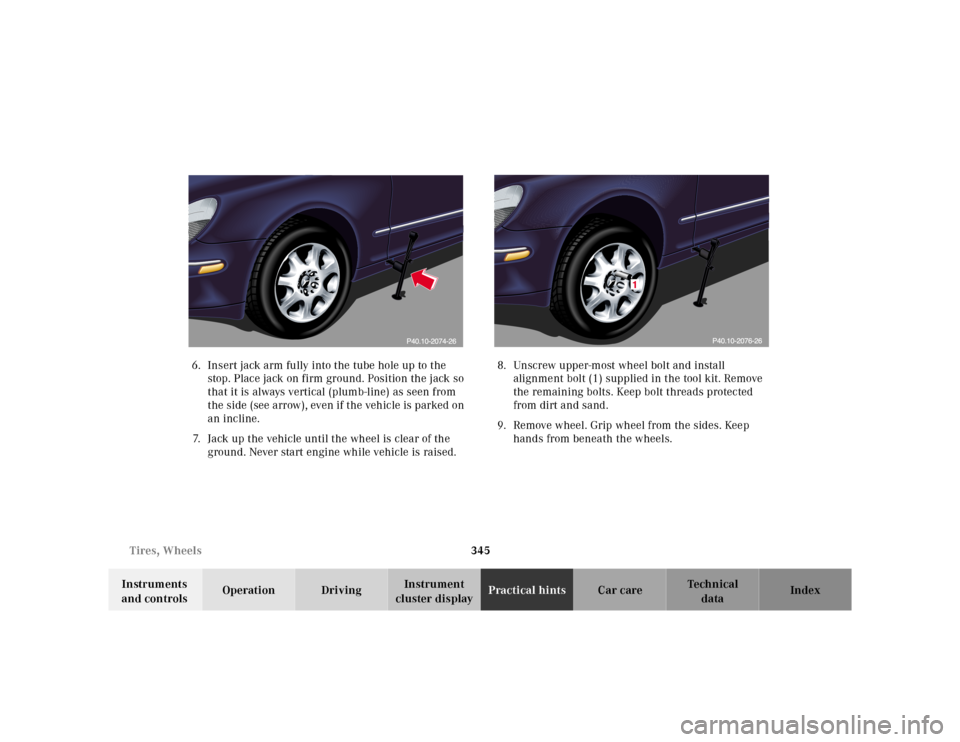
cluster displayPractical hintsCar care Index 6. Insert jack arm fully into the tube hole up to the
stop. Place jack on firm ground. Position the jack so
that it is always vertical (plumb-line) as seen from
the side (see arrow), even if the vehicle is parked on
an incline.
7. Jack up the vehicle until the wheel is clear of the
ground. Never start engine while vehicle is raised.8. Unscrew upper-most wheel bolt and install
alignment bolt (1) supplied in the tool kit. Remove
the remaining bolts. Keep bolt threads protected
from dirt and sand.
9. Remove wheel. Grip wheel from the sides. Keep
hands from beneath the wheels.