2000 MERCEDES-BENZ S430 key remote control
[x] Cancel search: key remote controlPage 209 of 421
206 Garage door opener
Te ch n ica l
data Instruments
and controlsOperationDrivingInstrument
cluster displayPractical hints Car care Index
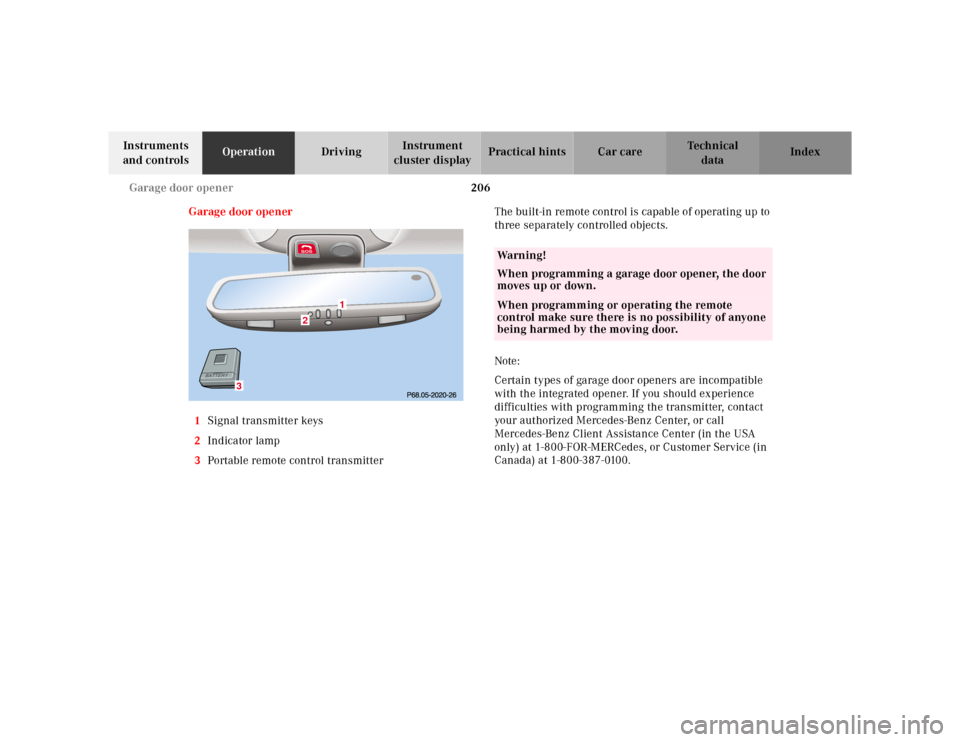
Garage door opener
1Signal transmitter keys
2Indicator lamp
3Portable remote control transmitterThe built-in remote control is capable of operating up to
three separately controlled objects.
Note:
Certain types of garage door openers are incompatible
with the integrated opener. If you should experience
difficulties with programming the transmitter, contact
your authorized Mercedes-Benz Center, or call
Mercedes-Benz Client Assistance Center (in the USA
only) at 1-800-FOR-MERCedes, or Customer Service (in
Canada) at 1-800-387-0100.
3
2
1
Wa r n i n g !
When programming a garage door opener, the door
moves up or down.When programming or operating the remote
control make sure there is no possibility of anyone
being harmed by the moving door.
Page 210 of 421
207 Garage door opener
Te ch n ica l
data Instruments
and controlsOperationDrivingInstrument
cluster displayPractical hints Car care Index For operation in the USA only: This device complies
with Part 15, Subpart C, Section 209 of the FCC Rules.
Operation is subject to the following two conditions:
(1) This device may not cause harmful interference, and
(2) this device must accept any interference received,
including interference that may cause undesired
operation.
WARNING: Changes or modification not expressly
approved by party responsible for compliance could void
the user’s authority to operate the equipment.
Programming or reprogramming the integrated
remote control:
1. Turn electronic key in starter switch to position 1
or 2.
2. Hold the end of the hand-held transmitter of the
device you wish to train approximately 2 to 5 inches
(5 cm to 12 cm) away from the surface of the
integrated remote control located on the inside rear
view mirror, keeping the indicator lamp in view.3. Using both hands, simultaneously push the hand-
held transmitter button and the desired integrated
remote control button. Do not release the buttons
until completing step 4.
4. The indicator lamp on the integrated remote control
will flash, first slowly and then rapidly. When the
indicator lamp flashes rapidly, both buttons may be
released (the rapid flashing lamp indicates
successful programming of the new frequency
signal). To program the remaining two buttons,
follow ste ps 1 through 4.
Note:
If, after repeated attempts, you do not successfully
program the integrated remote control device to learn
the signal of the hand-held transmitter, the garage door
opener could be equipped with the “rolling code
feature”.
Page 212 of 421
209 Garage door opener
Te ch n ica l
data Instruments
and controlsOperationDrivingInstrument
cluster displayPractical hints Car care Index Operation of remote control:
1. Turn electronic key in starter switch to position 1
or 2.
2. Select and press the appropriate button to activate
the remote controlled device. The integrated remote
control transmitter continues to send the signal as
long as the button is pressed – up to 20 seconds.Erasing the remote control memory:
1. Turn electronic key in starter switch to position 1
or 2.
2. Simultaneously holding down the left and right side
buttons for approximately 20 seconds, or until the
control lamp blinks rapidly, will erase the codes of
all three channels.
Page 217 of 421
214 Tele Aid
Te ch n ica l
data Instruments
and controlsOperationDrivingInstrument
cluster displayPractical hints Car care Index
Te l e A i d
Important!
The initial activation of the Tele Aid system may only be
performed by completing the subscriber agreement and
placing an acquaintance call using the “SOS” button.
Failure to complete either of these steps will result in a
system that is not activated. If the system is not
activated the indicator lamp in the “SOS” button stays
on after turning electronic key in starter switch to
position 2 (vehicles with KEYLESS-GO:
operating position, see page 228) and the message
“TELE AID – NOT ACTIVATED” will be shown in the
multifunction display for approx. 10 seconds.
If you have any questions regarding activation, please
call the Response Center at 1-800-756-9018 (in the USA)
or 1-888-923-8367 (in Canada).
(Te l ematic Alarm Identification on Demand)
The Tele Aid system consists of three types of response;
automatic and manual emergency, roadside assistance
and information.
The Tele Aid system is operational providing that the
vehicle’s battery is charged, properly connected, not
damaged and cellular and GPS coverage is available.The speaker volume of a Tele Aid call can be adjusted
when using the volume control on the multifunction
steering wheel, for raising press buttonæand for
lowering press buttonç.
To activate, press the “SOS” button, the Roadside
Assistance button• or the Information button¡,
depending on the type of response required.
Shortly after the completion of your Acquaintance Call,
you will receive a user ID and password via first call
mail. By visiting www.mbusa.com and selecting
“Tele Aid” (USA only), you will have access to account
information, remote door unlock, Info Services
* profile
and more.
* Optional System self-check
Initially, after turning the electronic key in starter
switch to position 2, malfunctions are detected and
indicated (the indicator lamps in the “SOS” button, the
Roadside Assistance button• and the Information
button¡ stay on longer than 10 seconds or do not
come on). The message “TELE AID – VISIT
WORKSHOP” appears for approx. 10 seconds in the
multifunction display.
Page 225 of 421
222 Tele Aid
Te ch n ica l
data Instruments
and controlsOperationDrivingInstrument
cluster displayPractical hints Car care Index
Remote door unlock
In the case you have your vehicle locked unintentionally
(e.g. key inside vehicle), and the reserve key is not
handy, contact the Mercedes-Benz Response Center at
1-800-756-9018 (in the USA) or 1-888-923-8367 (in
Canada). You will be asked to provide your password
which you provided when you completed the subscriber
agreement.
Then return to your vehicle and press trunk lock for
minimum of 20 seconds until the “SOS” button is
flashing. The message “EMERGENCY CALL – CALL
CONNECTED” appears in the multifunction display.
As an alternative, you may unlock the vehicle via
Internet using the ID and password sent to you shortly
after the completion of your Acquaintance Call.
The Response Center will then unlock your vehicle with
the remote door unlocking feature.Notes:
The remote door unlock feature is available if the
relevant cellular phone network is available.
The SOS button will flash and the message
“EMERGENCY CALL – CALL CONNECTED” will appear
in the multifunction display to indicate receipt of the
door unlock command.
Once the vehicle is unlocked, a Response Center
specialist will attempt to establish voice contact with the
vehicle occupants.
If the trunk button was pressed for more than
20 seconds before door unlock authorization was
received by the Response Center, you must wait
15 minutes before pressing the trunk button again.
Page 330 of 421
327 Contents - Practical hints
Te ch n ica l
data Instruments
and controlsOperation DrivingInstrument
cluster displayPractical hintsCar care Index
Practical hintsFirst aid kit .....................................328
Stowing things in the vehicle ......328
Fuses ................................................329
Hood ................................................. 331
Checking engine oil level .............334
Automatic transmission
fluid level ...................................335
Active body control
(ABC) fluid level ........................335
Coolant level ...................................336
Adding coolant ...........................336
Windshield and
headlamp washer system ........337Windshield and
headlamp washer fluid
mixing ratio ................................ 337
Spare wheel, vehicle tools,
storage compartment ............... 338
Vehicle jack .................................... 339
Wheels ............................................ 340
Tire Replacement ....................... 340
Rotating wheels ......................... 341
Spare wheel .................................... 341
Changing wheels ........................... 343
Tire inflation pressure ................. 348
Battery ............................................. 349
Jump starting ................................. 351
Towing the vehicle ........................ 353Exterior lamps ................................356
Headlamp assembly ...................357
Taillamp assemblies ..................360
Trunk lamp .....................................362
Changing batteries in the
electronic main key ..................363
Synchronizing
remote control ............................365
Changing batteries in the
KEYLESS-GO-card .....................366
Emergency engine
shut-down ..................................368
Fuel filler flap,
manual release ..........................368
Emergency operation of
sliding/pop-up roof ...................369
Replacing wiper blades .................370
Roof rack ......................................... 371
Page 368 of 421
365 Electronic main key
Te ch n ica l
data Instruments
and controlsOperation DrivingInstrument
cluster displayPractical hintsCar care Index Important!
Batteries contain materials that can harm the
environment if disposed of improperly. Recycling of
batteries is the preferred method of disposal. For
disposal, please follow manufacturer’s recommendation
on battery package.
Replacement Battery:
Lithium, type CR 2025 or equivalent.Synchronizing remote control
The remote control may have to be resynchronized, if
the vehicle cannot be locked or unlocked.
To synchronize insert electronic key in starter switch.
The remote control should once again be operational.
Page 407 of 421
404 Index
Te ch n ica l
data Instruments
and controlsOperation DrivingInstrument
cluster displayPractical hints Car careIndex
Electronic reserve key ................................................ 30
KEYLESS-GO-card ....................................................... 31
Locking and unlocking .............................................. 36
Locking and unlocking
with KEYLESS-GO-card ......................................... 40
Mechanical keys ................................................... 30, 47
Remote control ..................................................... 28, 34
Simultaneous use of
electronic main key
and KEYLESS-GO-card .......................................... 44
Summer opening/convenience feature ................... 45
Changing batteries in the
KEYLESS-GO-card .....................................................366
Changing wheels ...........................................................343
CHECK ENGINE
malfunction indicator lamp .....................................296
Check regulary and before a long trip .......................293
Checking engine oil level
Via engine oil level indicator .................................. 154
Via oil dipstick ...........................................................334
Child restraint ...........................................84, 91, 102, 104
CHIP-CARD (KEYLESS-GO) -
malfunction and warning messages ......................322
Cleaning and care of the vehicle ................................. 374
COMAND, radio and telephone ................................... 212
Combination switch ...................................................... 160Consumer information ................................................. 400
Control and operation
of radio transmitters ................................................. 212
COOLANT (coolant level) -
malfunction and warning messages ...................... 310
COOLANT (coolant temperature) -
malfunction and warning messages ...................... 311
Coolant level
Adding ........................................................................ 336
Checking .................................................................... 336
Coolant temperature gauge .......................................... 117
Coolants .......................................................................... 398
Anticorrosion/antifreeze quantity ........................ 399
Courtesy lighting ........................................................... 189
Cruise control ................................................................ 253
CRUISE CONTROL -
malfunction and warning messages ...................... 319
Cup holder
In front seat armrest ................................................. 199
In rear seat armrest ................................................. 200
DDashboard ......................................................................... 22
Daytime running lamp .................................................. 158