2000 MERCEDES-BENZ M-CLASS lock
[x] Cancel search: lockPage 274 of 317
271 Remote control
Te ch n ica l
data Instruments
and controlsOperation DrivingInstrument
cluster displayPractical hintsCar care Index Synchronizing remote control
If the remote control does not function correctly and the
batteries are in order, the system may have to be
resynchronized.
Turn key in steering lock to position 2, then to
position 0 and remove.
Within 10 seconds, push and hold button‹ while
pushing buttonΠfive times.
Release the button, and press‹, Œ orŠ once.
Check all functions. The remote control should once
again be operational.
Note:
If it is not possible to resynchronize the remote control,
have the system checked at your authorized Mercedes-
Benz Light Truck Center.Important!
Batteries contain materials that can harm the
environment if disposed of improperly. Recycling of
batteries is the preferred method of disposal. For
disposal, please follow manufacturer’s recommendation
on battery package.
Replacement Battery:
Lithium, type CR 2025 or equivalent.
ProCarManuals.com
Page 275 of 317

272 Emergency operation of sliding/pop-up roof
Te ch n ica l
data Instruments
and controlsOperation DrivingInstrument
cluster displayPractical hintsCar care Index
Emergency operation of sliding/pop-up roof
The sliding / pop-up roof can be opened or closed
manually should an electrical malfunction occur.
The sliding / pop-up roof drive is located behind the
cover between the front interior lamps.
1. Open cover by using a f lat blade screw driver at top
edge.
2. Obtain crank (supplied with vehicle) and insert in
hexagon drive hole, located at rear end of the open
cover.Note:
Push crank upward while turning it, to disengage the
electric motor.
To slide the roof closed or to raise the roof at the rear:
turn crank clockwise.
To slide the roof open or to lower the roof at the rear:
turn crank counterclockwise.
Important!
After manually operating the sliding / pop-up roof, a
timing synchronization is needed for future electrical
operation of the roof. To do so, remove fuse for sliding/
pop-up roof operation, located in fuse box, for one
second and reinstall. Now push and hold switch until
the sliding / pop-up roof is fully raised. Continue to hold
switch for another second.
RESETMODEMODE
ProCarManuals.com
Page 276 of 317
273 Emergency operation of Skyview Top
Te ch n ica l
data Instruments
and controlsOperation DrivingInstrument
cluster displayPractical hintsCar care Index Emergency operation of Skyview Top
The Skyview Top can be opened or closed manually
should an electrical malfunction occur.
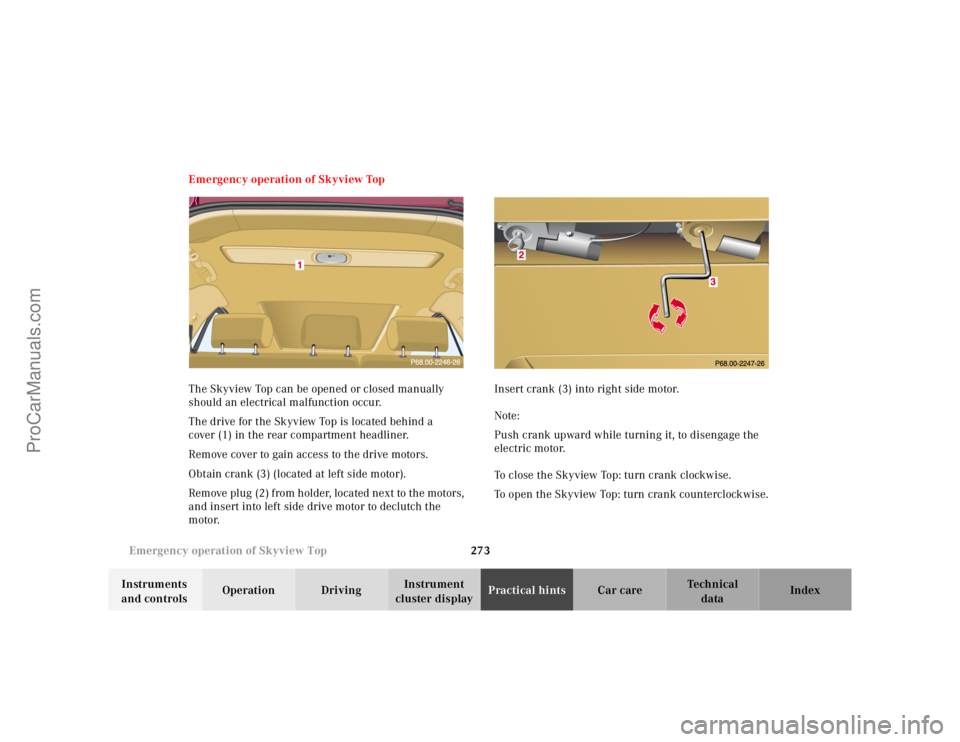
The drive for the Skyview Top is located behind a
cover (1) in the rear compartment headliner.
Remove cover to gain access to the drive motors.
Obtain crank (3) (located at left side motor).
Remove plug (2) from holder, located next to the motors,
and insert into left side drive motor to declutch the
motor.Insert crank (3) into right side motor.
Note:
Push crank upward while turning it, to disengage the
electric motor.
To close the Skyview Top: turn crank clockwise.
To open the Skyview Top: turn crank counterclockwise.
ProCarManuals.com
Page 277 of 317
274 Manual release for fuel filler flap
Te ch n ica l
data Instruments
and controlsOperation DrivingInstrument
cluster displayPractical hintsCar care Index
Important!
After manually operating the Skyview Top, a timing
synchronization is needed for future electrical operation
o f the Sk yv iew To p. To do s o, tur n key i n stee ri n g lock to
position 2. Now push and hold switch until the Skyview
Top is fully closed. Continue to hold switch for
additional 15 seconds.Manual release for fuel filler flap
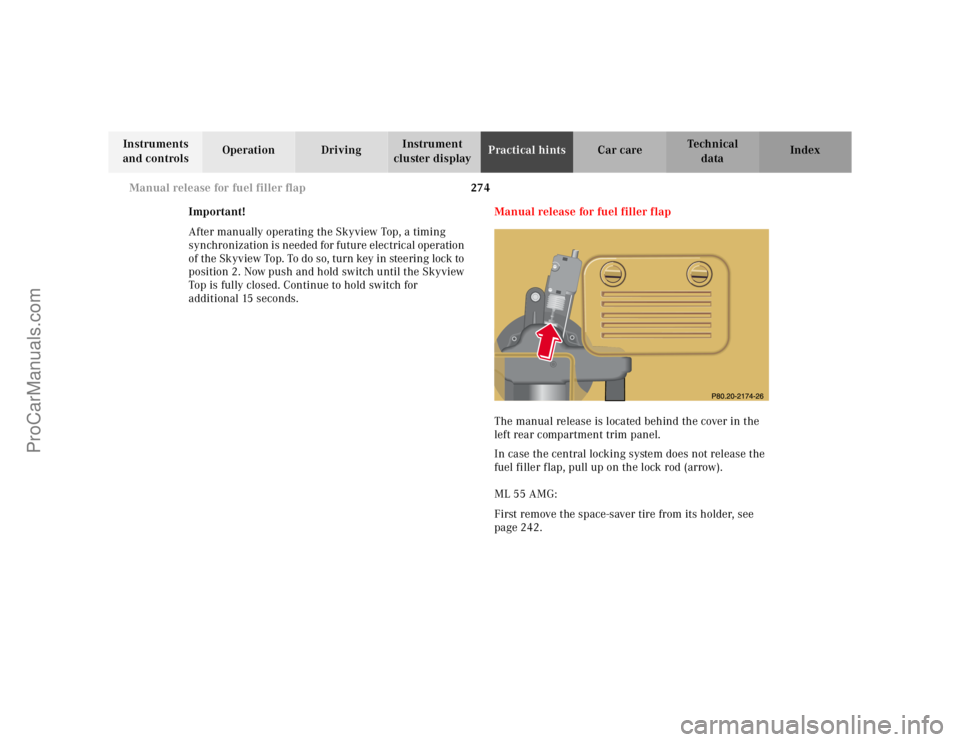
The manual release is located behind the cover in the
left rear compartment trim panel.
In case the central locking system does not release the
fuel filler flap, pull up on the lock rod (arrow).
ML 55 AMG:
First remove the space-saver tire from its holder, see
page 242.
ProCarManuals.com
Page 278 of 317
275 Replacing wiper blades
Te ch n ica l
data Instruments
and controlsOperation DrivingInstrument
cluster displayPractical hintsCar care Index Replacing wiper blades
For safety reasons, remove key from steering lock before
replacing the wiper blade, otherwise the motor can
suddenly turn on and cause injury.
Notes:
Do not open engine hood with wiper arm folded forward.
Do not allow the wiper arm to contact the windshield
glass without a wiper blade inserted. The glass may be
scratched or broken.
Make certain that the wiper blade is properly installed.
An improperly installed wiper blade may cause
windshield damage.
The wiper with air spoiler should be mounted on the
driver’s side.Replacing windshield/rear window wiper blade
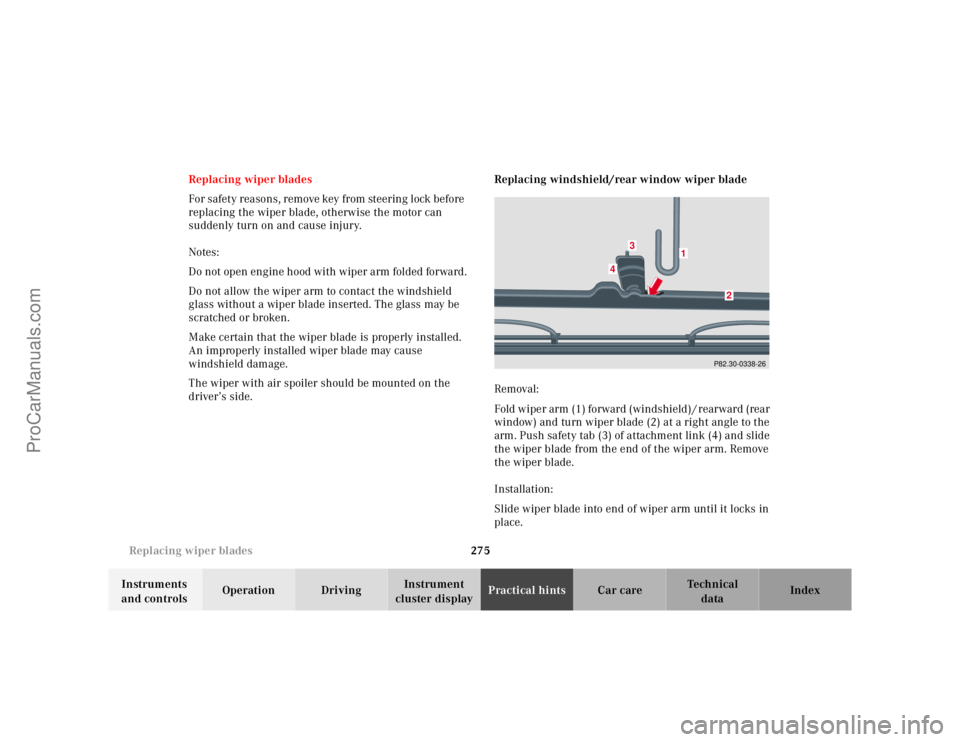
Removal:
Fold wiper arm (1) forward (windshield) / rearward (rear
window) and turn wiper blade (2) at a right angle to the
arm. Push safety tab (3) of attachment link (4) and slide
the wiper blade from the end of the wiper arm. Remove
the wiper blade.
Installation:
Slide wiper blade into end of wiper arm until it locks in
place.
P82.30-0338-26
1
2
3
4
ProCarManuals.com
Page 284 of 317
281 Cleaning and care of the vehicle
Te ch n ica l
data Instruments
and controlsOperation DrivingInstrument
cluster displayPractical hintsCar careIndex Window cleaning
Use a window cleaning solution on all glass surfaces. An
automotive glass cleaner is recommended.
Note:
For safety reasons, switch off wipers and remove key
from steering lock before cleaning the windshield,
otherwise the wiper motor can suddenly turn on and
cause injury.
Wiper blades
Clean the wiper blade rubbers with a clean cloth and
detergent solution.
Note:
For safety reasons, switch off wipers and remove key
from steering lock before cleaning the wiper blades,
otherwise the wiper motor can suddenly turn on and
cause injury.Light alloy wheels
Mercedes-Benz approved Wheel Care should be used for
regular cleaning of the light alloy wheels.
If possible, clean wheels once a week with
Mercedes-Benz approved Wheel Care, using a soft
bristle brush and a strong spray of water.
Follow instructions on container.
Note:
Use only acid-free cleaning materials. The acid could
lead to corrosion or may damage the clear coat.
Instrument cluster
Use a gentle dishwashing detergent or mild detergent
for delicate fabrics as a washing solution. Wipe with a
cloth moistened in lukewarm solution. Do not use
scouring agents.
Steering wheel and gear selector lever
Wipe with a damp cloth and dry thoroughly or clean
with Mercedes-Benz approved Leather Care.
ProCarManuals.com
Page 303 of 317

300 Index
Te ch n ica l
data Instruments
and controlsOperation DrivingInstrument
cluster displayPractical hints Car careIndex
Index
AABS (Antilock brake system) ....................................... 201
LOW RANGE – ABS ..................................................202
Malfunction indicator lamp .....................................222
Adjustable steering wheel .............................................. 70
Indicator lamp ...........................................................222
Adjusting headlamp aim ...............................................268
Air conditioner refrigerant ...........................................294
Air pump .........................................................................239
Air recirculation ............................................................ 102
Airbag deactivation system ............................................ 53
Airbag OFF indicator lamp ...........................................222
Airbags .............................................................................. 56
Alarm system ............................................................. 35, 36
Anticorrosion/antifreeze .................... 181, 235, 293, 297
Antiglare night position ................................................. 71
Antilock brake system (ABS) ....................................... 201
LOW RANGE – ABS ..................................................202
Malfunction indicator lamp .....................................222
Antitheft alarm system ................................................... 35
Aquaplaning ................................................................... 178Ashtray
Center console, front ................................................ 118
Rear passenger compartment ................................. 118
Automatic central locking ..............................................32
Automatic transmission ................................................ 165
Emergency Operation ............................................... 172
Fluid level .................................................................. 234
Selector lever position .............................................. 168
Transmission selector lever,
manually unlocking 259
BBabySmart
TM airbag deactivation system ..................... 53
Self-test ......................................................................... 53
BAS (Brake assist system) ............................................ 199
Malfunction indicator lamp .....................................221
Battery .............................................................................251
Battery recycling ...................................................... 252
Charge indicator lamp ............................................. 223
Battery, remote control ................................................. 270
Block heater .................................................................... 182
Blocking of rear door windows ....................................105
Brake assist system (BAS) ............................................ 199
Malfunction indicator lamp .....................................221
ProCarManuals.com
Page 304 of 317

301 Index
Te ch n ica l
data Instruments
and controlsOperation DrivingInstrument
cluster displayPractical hints Car careIndex Brake fluid ............................................................. 175, 294
Brake warning lamp ................................................. 219
Capacity ......................................................................293
Brake pad wear indicator .............................................225
Brake warning lamp ...................................................... 219
Brake fluid low .......................................................... 219
Brakes ....................................................173, 175, 293, 294
CCapacities
Fuels, coolants, lubricants etc. ...............................292
Cargo area ....................................................................... 131
Hooks .......................................................................... 133
Loading instructions ................................................ 136
Cargo area cover blind .................................................. 137
Cargo compartment lamp .............................................. 111
Cargo floor plates
Removable .................................................................. 129
Storage ........................................................................ 130
Cargo tie-down rings ..................................................... 132
Catalytic converter ........................................................ 160
Cellular telephone ......................................................... 139
Center console .................................................................. 20
Central locking switch .................................................... 32Central locking system .................................................... 26
Automatic central locking .........................................32
Locking and unlocking ............................................... 27
Mechanical keys ..........................................................29
Panic button .................................................................28
Remote control ............................................................26
Unlocking the liftgate ................................................. 28
Vehicle keys .................................................................24
Changing wheels ........................................................... 245
Inflating the space-saver tire ................................. 249
Charge indicator lamp .................................................. 223
CHECK ENGINE malfunction indicator lamp ............ 218
Check regularly and before a long trip ....................... 215
Checking engine oil level
Via engine oil level indicator ....................................89
Via oil dipstick .......................................................... 233
Child restraint ..............................................38, 46, 53, 65
Cleaning and care of the vehicle ................................ 278
Climate control .................................................................98
Air recirculation ........................................................102
Basic setting ...............................................................100
Defogging windows ................................................... 101
Defrosting windshield .............................................. 101
Dust filter ...................................................................102
Rear window defroster ............................................. 103
Special settings ......................................................... 101
ProCarManuals.com