2000 MERCEDES-BENZ E320 steering gear
[x] Cancel search: steering gearPage 7 of 341

4 Contents
AIRBAG OFF
indicator lamp .............................238
Malfunction and warning
messages in the
multifunction display ...............239
DISPLAY DEFECTIVE ................240
BATTERY / ALTERNATOR ......... 241
ABS-SYSTEM ...............................242
BRAKE ASSIST ...........................242
BRAKE LINING WEAR ..............243
BRAKE FLUID .............................243
PARKING BRAKE .......................244
ENGINE FAN ...............................244
COOLANT (coolant level) ..........245
COOLANT TEMP. ........................246
LIGHTING SYSTEM ....................247
LIGHT SENSOR ...........................248
REMOVE KEY .............................248
TELE AID .....................................249
STEERING GEAR OIL .................249
ENGINE OIL LEVEL ...................250
WASHER FLUID .......................... 251
ELEC. STABIL. PROG.
(Electronic stability program) ..252
Practical hintsFirst aid kit ..................................... 254
Stowing things in the vehicle ...... 254
Fuses ............................................... 255
Hood ................................................ 257
Checking engine oil level ............. 260
Automatic transmission
fluid level ................................... 261
Coolant level ................................... 261
Adding coolant ........................... 262
Windshield and headlamp
washer system .......................... 263
Windshield and headlamp
washer fluid mixing ratio ........ 263
Spare wheel, vehicle tools,
storage compartment ............... 264
Vehicle jack .................................... 265
Wheels ............................................ 266
Tire replacement ....................... 266
Rotating wheels ......................... 267
Spare wheel .................................... 268
Spare wheel bolts ...................... 268
Spare wheel .................................... 269Changing wheels ........................... 271
Tire inflation pressure .................. 276
Battery .............................................277
Jump starting ..................................279
Towing the vehicle .........................282
Transmission selector lever,
manually unlocking ..................284
Exterior lamps ................................285
Headlamp assembly ...................286
Taillamp assemblies ..................289
Changing batteries in the
electronic main key .................. 291
Synchronizing
remote control ............................293
Emergency engine
shut-down ..................................293
Rear seat cushion ..........................294
Emergency operation of
sliding / pop-up roof .................295
Manual release for
fuel filler flap .............................296
Replacing wiper blade insert .......296
Trunk lamp .....................................298
Roof rack .........................................298
Page 8 of 341

5 Contents
Vehicle careCleaning and care
of the vehicle .............................300
Power washer ..............................301
Tar stains .....................................301
Paintwork, painted body
components ................................. 301
Engine cleaning ..........................302
Vehicle washing .........................302
Ornamental moldings ................302
Headlamps, taillamps,
turn signal lenses ......................302
Cleaning the parktronic
system sensors ...........................303
Window cleaning /
glass sunroof ...............................303
Wiper blades ...............................303
Light alloy wheels ......................304
Instrument cluster .....................304
Steering wheel and
gear selector lever ......................304
Cup holder ...................................304
Seat belts .....................................304Headliner and shelf
below rear window .................... 304
Upholstery .................................. 305
Hard plastic trim items ............. 305
Plastic and rubber parts ........... 305
Technical dataSpare parts service ....................... 308
Warranty coverage ........................ 308
Identification labels ...................... 309
Layout of poly-V-belt drive ............ 311
Technical data .................................312
Fuels, coolants, lubricants
etc. - capacities ..........................318
Engine oils ...................................... 320
Engine oil additives ...................... 320
Air conditioner refrigerant .......... 320
Brake fluid ...................................... 320
Premium unleaded gasoline ........ 321
Fuel requirements ........................ 321
Gasoline additives ......................... 322
Coolants .......................................... 322
Consumer information ................. 324
IndexIndex ................................................326
Page 85 of 341

82 Rear view mirrors
Te ch n ica l
data Instruments
and controlsOperationDrivingInstrument
cluster displayPractical hints Car care Index
Rear view mirrors
Inside rear view mirror
Manually adjust the mirror.
Use your inside mirror to determine the size and
distance of objects seen in the passenger-side convex
mirror.
Antiglare night position
With the electronic key in steering lock position 2, the
mirror reflection brightness responds to changes in
light sensitivity.
With gear selector lever in position “R”, or with the
interior lamp switched on, the mirror brightness does
not respond to changes in light sensitivity.Note:
The automatic antiglare function does not react, if
incoming light is not aimed directly at sensors in the
mirror.
Wa r n i n g !
In the case of an accident liquid electrolyte may
escape the mirror housing when the mirror glass
breaks.Electrolyte has an irritating effect. Do not allow the
liquid come into contact with eyes, skin, clothing,
or respiratory system. In cases it does, immediately
flush affected area with water, and seek medical
help if necessary.
Page 86 of 341

83 Rear view mirrors
Te ch n ica l
data Instruments
and controlsOperationDrivingInstrument
cluster displayPractical hints Car care Index Exterior rear view mirrors
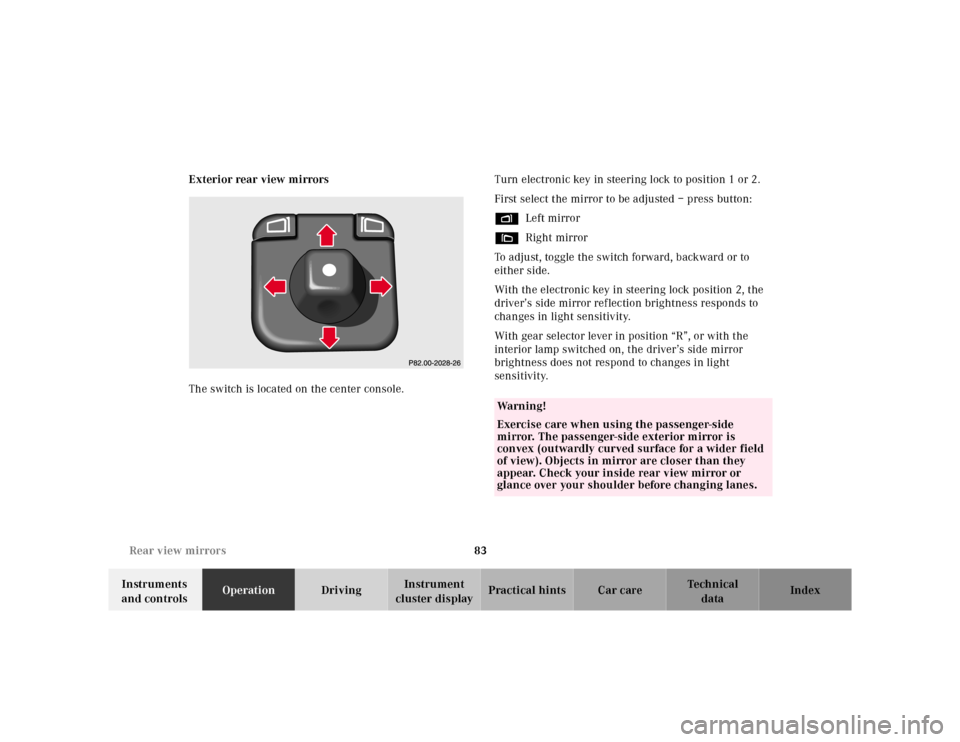
The switch is located on the center console.Turn electronic key in steering lock to position 1 or 2.
First select the mirror to be adjusted – press button:
%Left mirror
&Right mirror
To adjust, toggle the switch forward, backward or to
either side.
With the electronic key in steering lock position 2, the
driver’s side mirror reflection brightness responds to
changes in light sensitivity.
With gear selector lever in position “R”, or with the
interior lamp switched on, the driver’s side mirror
brightness does not respond to changes in light
sensitivity.
Wa r n i n g !
Exercise care when using the passenger-side
mirror. The passenger-side exterior mirror is
convex (outwardly curved surface for a wider field
of view). Objects in mirror are closer than they
appear. Check your inside rear view mirror or
glance over your shoulder before changing lanes.
Page 88 of 341

85 Rear view mirrors
Te ch n ica l
data Instruments
and controlsOperationDrivingInstrument
cluster displayPractical hints Car care Index Parking position
The passenger-side exterior mirror can be adjusted and
programmed to assist the driver during parking
maneuvers (e.g. to observe the curb or other objects
close to the vehicle).
With electronic key in steering lock position 2, and the
exterior rear view mirror switch in the passenger-side
position, the passenger-side mirror will be turned
downward when placing the gear selector lever in “R”
Reverse.
The mirror position can now be adjusted as desired.
At speeds above approximately 6 mph (10 km / h), upon
shifting gear selector lever from “R” Reverse, or upon
pressing the driver’s side mirror button, the passenger-
side mirror will return to its previous position.One passenger-side mirror position can be stored in
memory. To do so:
1. Turn electronic key to steering lock position 2.
The vehicle must be stationary.
2. Select passenger-side mirror and adjust the mirror
to view the curb.
3. Press green memory button located in switch cluster
for driver seat, see page 49.
4. Within 3 seconds pull the mirror toggle switch
rearward. The mirror should not move.
Repeat the memory procedure if the mirror moves.
5. Select driver side mirror. The passenger-side mirror
will return to its previous position.
Page 198 of 341

195 Automatic transmission
Te ch n ica l
data Instruments
and controlsOperationDrivingInstrument
cluster displayPractical hints Car care Index Stopping
For brief stops, e.g. at traffic lights, leave the
transmission in gear and hold vehicle with the service
brake.
For longer stops with the engine idling, shift into “N”
or “P” and hold the vehicle with the service brake.
When stopping the vehicle on an uphill gradient, do not
hold it with the accelerator, use the brake. This avoids
unnecessary transmission heat build up.
Maneuvering
To maneuver in tight areas, e.g. when pulling into a
parking space, control the vehicle speed by gradually
releasing the brakes. Accelerate gently and never
abruptly step on the accelerator.
To rock a vehicle out of soft ground (mud or snow),
alternately shift from forward to reverse, while applying
slight partial throttle.Rocking a vehicle free in this manner may cause the
ABS or traction system malfunction indicator lamp to
come on. Turn off and restart the engine to clear the
malfunction indication.
Wa r n i n g !
Getting out of your vehicle with the selector lever
not fully engaged in position “P” is dangerous.
Also, when parked on an incline, position “P” alone
may not prevent your vehicle from moving,
possibly hitting people or objects.Always set the parking brake in addition to shifting
to position “P”, see page 202 for parking brake. When parked on an incline, also turn front wheel
against curb.Wa r n i n g !
When leaving the vehicle always remove the key
from the steering lock, and lock the vehicle. Do not
leave children unattended in the vehicle, or with
access to an unlocked vehicle. Children could move
the gear selector lever from position “P”, which
could result in an accident or serious injury.
Page 199 of 341

196 Automatic transmission
Te ch n ica l
data Instruments
and controlsOperationDrivingInstrument
cluster displayPractical hints Car care Index
Selector lever position
The current selector lever position is indicated in the
gear range indicator display. The automatic gear
shifting process can be adapted to specific operating
conditions using the selector lever.Park position
The park position is to be used when parking the
vehicle. Engage only with the vehicle stopped.
The park position is not intended to serve as a
brake when the vehicle is parked. Rather, the
driver should always use the parking brake in
addition to placing the selector lever in park to
secure the vehicle.
Note:
The electronic key can only be removed from the
steering lock with the selector lever in
position “P”. With the electronic key removed, the
selector lever is locked in position “P”.
With a malfunction in the vehicle’s electrical
system the selector lever could remain locked in
position “P”. To unlock the selector lever
manually, see page 284.
Reverse gear
Shift to reverse gear only with the vehicle
sto p ped .
10
Page 208 of 341

205 Driving instructions
Te ch n ica l
data Instruments
and controlsOperationDrivingInstrument
cluster displayPractical hints Car care Index Caution!
When driving down long and steep grades, relieve the
load on the brakes by shifting into a lower gear to use
the engine’s braking power. This helps prevent
overheating of the brakes and reduces brake pad wear.
After hard braking, it is advisable to drive on for some
time, rather than immediately parking, so the air stream
will cool down the brakes faster.
Driving off
Apply the service brakes to test them briefly after
driving off. Perform this procedure only when the road
is clear of other traffic.
Warm up the engine smoothly. Do not place full load on
the engine until the operating temperature has been
reached.
When starting off on a slippery surface, do not allow one
drive wheel to spin for an extended period with the ESP
switched off. Doing so may cause serious damage to the
drive train which is not covered by the Mercedes-Benz
Limited Warranty.Parking
Important!
It is advisable to set the parking brake whenever
parking or leaving the vehicle. In addition, move
selector lever to position “P”.
When parking on hills, always set the parking brake.
Wa r n i n g !
To reduce the risk of personal injury as a result of
vehicle movement, before
turning off the engine
and leaving the vehicle, always:
1. Keep right foot on the service brake pedal.
2. Firmly depress parking brake pedal.
3. Move the selector lever to position “P”.
4. Slowly release the service brake pedal.
5. Turn front wheels towards the road curb.
6. Turn the electronic key to steering lock
position 0 and remove.
7. Take the electronic key and lock vehicle when
leaving.