Page 109 of 130

Electronic Main Key Remote Control
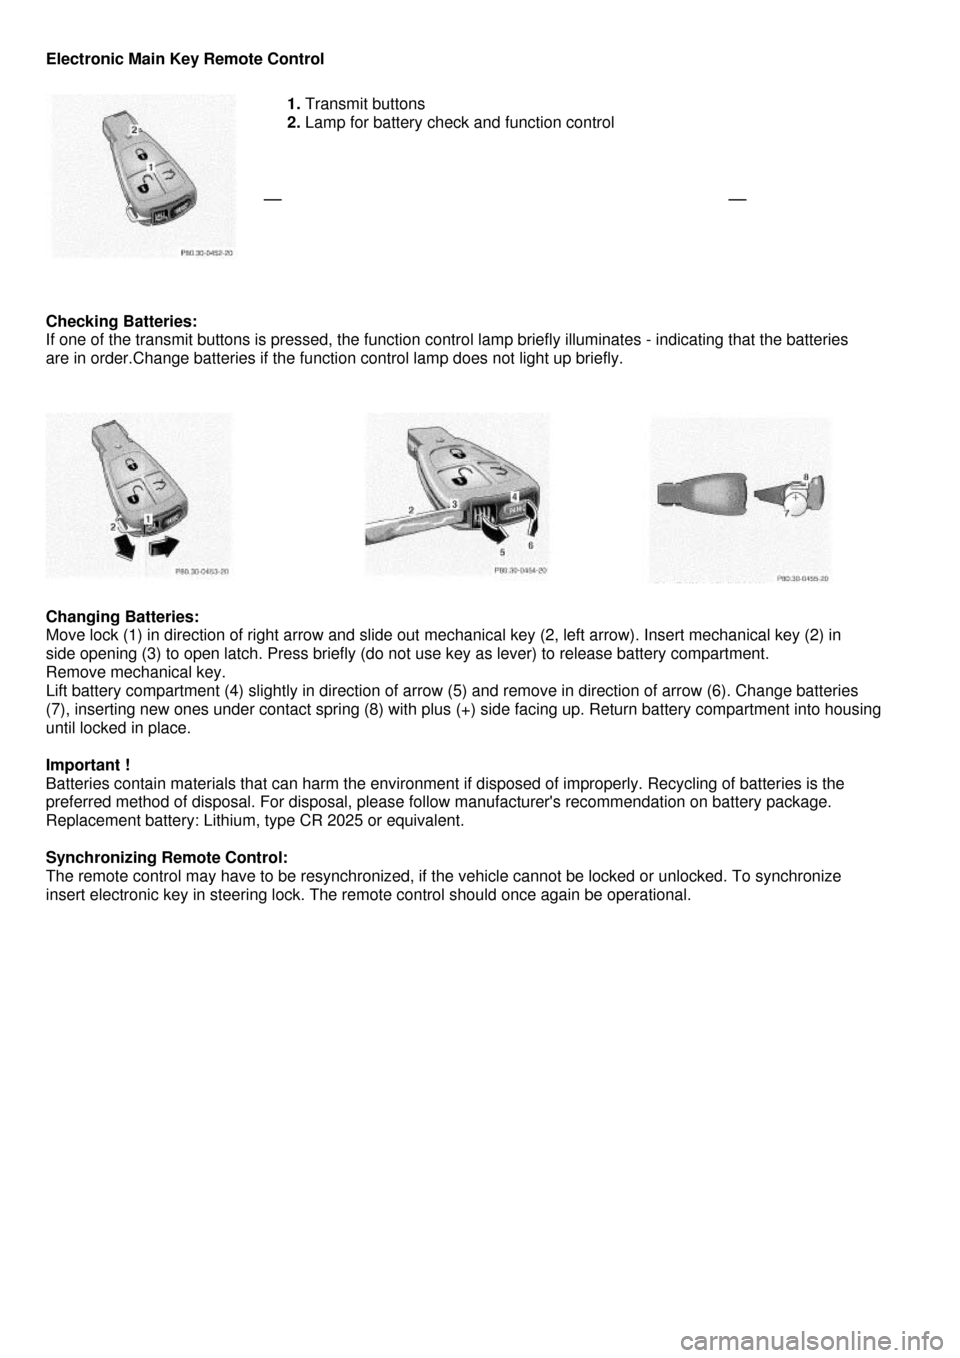
1. Transmit buttons
2. Lamp for battery check and function control
Checking Batteries:
If one of the transmit buttons is pressed, the function control lamp briefly illuminates - indicating that the batteries
are in order.Change batteries if the function control lamp does not light up briefly.
Changing Batteries:
Move lock (1) in direction of right arrow and slide out mechanical key (2, left arrow). Insert mechanical key (2) in
side opening (3) to open latch. Press briefly (do not use key as lever) to release battery compartment.
Remove mechanical key.
Lift battery compartment (4) slightly in direction of arrow (5) and remove in direction of arrow (6). Change batteries
(7), inserting new ones under contact spring (8) with plus (+) side facing up. Return battery compartment into housing
until locked in place.
Important !
Batteries contain materials that can harm the environment if disposed of improperly. Recycling of batteries is the
preferred method of disposal. For disposal, please follow manufacturer's recommendation on battery package.
Replacement battery: Lithium, type CR 2025 or equivalent.
Synchronizing Remote Control:
The remote control may have to be resynchronized, if the vehicle cannot be locked or unlocked. To synchronize
insert electronic key in steering lock. The remote control should once again be operational.
Page 111 of 130
Rear Seat Cushion
Removal:
Push in locking tabs (on left and right side of seat) and pull up seat at the front. Installation: Slide rear edge of
cushion under the backrest. Push front of cushion down until it locks in place.
Caution!
Watch out for sharp edges when removing or installing the rear seat cushion, and make sure that it is securely
locked in place again, to prevent personal injury.
Emergency Operation of Sliding/Pop-Up Roof
The sliding/pop-up roof can be opened or closed manually should an electrical malfunction occur.
The sliding/pop-up roof drive is located behind the lens of the left interior lamp between the sun visors.
1. Pry off lens (1) by using a screw driver.
2. Obtain crank (2) (supplied with vehicle) and insert it through hole.
To slide the roof closed or to raise the roof at the rear: turn crank clockwise.
To slide the roof open or to lower the roof at the rear: turn crank counterclockwise.
Page 112 of 130

Replacing Wiper Blade Insert
For safety reasons, remove electronic key from steering lock before replacing the wiper blade, otherwise the motor
can suddenly turn on and cause injury.
Notes:
Do not open engine hood with wiper arm folded forward. Do not allow the wiper arm to contact the windshield glass
without a wiper blade inserted. The glass may be scratched or broken. Make certain that the wiper blade is properly
installed. An improperly installed blade may cause windshield damage.
Removal:
Fold wiper arm forward. Press safety tab down (1), push wiper blade downward (2)
and remove.
Place wiper blade on firm support.
Slide (direction of arrow) the wiper blade insert out of the retainer claws.
Installation:
Slide (direction of arrow) wiper blade insert into retainer claws until tabs are engaged.
Insert wiper blade between tabs (3) on the wiper arm, and slide into end of wiper arm.
Press safety tab upward until it locks in place.
Headlamp Wiper Blades
Removal:
Fold wiper arm forward. Push pin (1) and remove wiper blade.
Installation:
Place wiper blade on wiper arm and press in pin (1).
Page 122 of 130

Fuels, Coolants, Lubricants etc. - Capacities
Vehicle components and their respective lubricants must match Therefore use only brands tested and
recommended by us. Please refer to the Factory Approv ed Service Products pamphlet, or inquire at your
authorized Mercedes-Benz dealer.
Model Capacity Fuels, coolants,
lubricants etc
Engine with
oil filter C 230
Konpressor 6.1US qt (5.8 l)
C 280 8.5US qt 8.0 l)
C 43 AMG 7.9US qt 7.5 l)
Recommended
engine oils
Automatic transmission C 230
Kompressor 8.5 US qt (8.0 l)
C 280 8.5 US qt (7.5 l)
C 43 AMG 9.6 US qt (9.1 l)
Automatic
transmission fluid
Rear axle C 230
Kompressor
C 280
1.2 US qt (1.1 l)
C 43 AMG 1.4 US qt(1.3 l)
Hypoid gear oil SAL
90, 85 W 90
Power steering approx 1.1 US qt (1.0 l) MB Power steering
fluid
Front wheel hubs
approx. 2.1 oz (60 g) each High temperature
roller bearing grease
Accelerator
control linkage
Hydraulic fluid
Brake system approx. 0.5 US qt (0.5 I) MB Brake fluid (DOT
4)
Windshield washer
and headlamp
cleaning system
approx. 5.3 US qt (5.0 I)
MB Windshield
washer
concentrate "S"
1
Cooling system C 230 approx. 9.6 US qt (9.5 I
C 280
C 43 AMG
approx. 10.6 US qt 10.0 I)
approx. 11.8 US qt (11.2 I
MB
Anticorrosion/antifreez
Fuel tank including
a reserve of
approx. 16.4 US gal (62.0 I)
approx. 2.1 US gal (8.0 I) Premium unleaded
gasoline:
Posted Octane 91
(Avg. of 96 RON/86
MON)
Air conditioner system
R-134a refrigerant
and special
lubricant (Never R-12)
Use MB Windshield Washer Concentrate "S" and water for temperatures above freezing or MB Windshield Washer
Concentrate "S" and commercially available premixed windsh ield washer solvent/antifreeze for temperatures below
freezing. Follow suggested mixing ratios, see Windshield/Headlamp Washer System in Index.
Page 130 of 130
Check Regularly and Before a Long Trip
The engine compartment of model C 230 is illustrated.
1. Fuel Supply
Open flap by pushing near front (arrow). Turn fuel cap
to the left and hold on to it until possible pressure in tank
has been released, then remove cap.
Failure to remove slowly could result in personal injury.
2. Tire Inflation Pressure
Check at least every two weeks.
For details see Index.
3. Coolant Level
See Adding coolant in Index.
4. Windshield Washer System,
Headlamp Cleaning System
For refilling reservoir see Index.
5. Engine Oil Level
See Engine oil level, checking in Index.
6. Brake Fluid
See Brake fluid in Index.
Vehicle Lighting: Check function and cleanliness.
For replacement of light bulbs, see Lamps, exterior in Index.