Page 40 of 272

Displaying outside temperature
Press EXT to display the outside air temperature. It will remain selected
until the EXT control is pressed again.
If the driver or passenger temperature or the fan speed is changed, or
the AUTO or
(defrost) modes selected while the outside
temperature is displayed, the driver and passenger temperature display
will be displayed for 4 seconds. Following this, the outside temperature
display will return to the window.
If the outside temperature is displayed while the DATC system is in the
OFF mode and the DATC is turned on, the driver and passenger
temperatures will be displayed for 4 seconds. Following this, the outside
temperature display will return to the window.
The outside temperature reading is most accurate when the vehicle is
moving. Higher readings may be obtained when the vehicle is not
moving. The readings that you get may not agree with temperatures
given on the radio due to differences in vehicle and station locations.
Operating tips
²In humid weather, select(defrost) andR(rear window
defrost) before driving. This will reduce fogging on your windshield.
After a few minutes, select any desired position.
²To prevent humidity buildup inside the vehicle, don't drive with the
climate control system in the OFF position.
²DO NOT leave the DATC system in recirculated air mode for extended
periods of time while the system is in a heating mode or in cold or
damp conditions as this may cause interior fogging of the front, side
and rear windows.
²Don't put objects under the front seat that will interfere with the
airflow to the back seats.
AUTO OFFA/C
R EXT
EXT TEMP
F C
F
Controls and features
40
Page 53 of 272

²Press the phone/mute control to enter phone mode.
²Use SEEK or radio presets 1 through 6 to select a phone number.
²Press the phone/mute control again to send and end calls.
Press the control again to return to the playing media.
This control will mute the playing media even if your vehicle is not
equipped with a factory-installed cellular phone.
Digital signal processing (if equipped)
The digital signal processing (DSP)
feature allows you to change the
signal mode to suit your listening
tastes.
Press the control to turn the feature on or off.
Use the SEL control to select the
desired signal mode (the selected
mode will appear in the display).
The following signal modes can be
selected:
²JAZZ CLUBÐjazz club with
clearly reflected sounds.
²HALLÐrectangular concert hall capacity of about 2 000
²CHURCHÐchurch with a high vault.
²STADIUMÐoutdoor stadium with a capacity of about 30 000.
²NEWSЪvoice-onlyº type of sound with a limited audio band.
Press the DSP control until one of
the following appears:
²ALL SEATS
²DRIVER SEAT
²REAR SEATS
Use the SELECT control to change
the equalization to the desired
mode.
DSP RDS
SEL
DSP RDS
SEL
Controls and features
53
Page 65 of 272

²Use the SEL control to select TYPE (displays the RDS program type:
rock, jazz, etc), NAME(displays the name of the radio station) or
NONE (deactivates the RDS display).
RDS clock feature
Refer toSetting the clockfor information.
Digital signal processing (if equipped)
The digital signal processing (DSP) feature allows you to change the
signal mode to suit your listening tastes.
Press the DSP control to access the
DSP menu. Press the SEL control to
enter one of the following modes:
²DSP OFF
²SIGNAL MODE
²OCCUPANCY MODE
Use the SEL control to select the
desired signal mode (the selected
mode will appear in the display).
The following signal modes can be
selected:
²DSP OFFÐdisengages the feature
²NEWSЪvoice-onlyº type of sound with a limited audio band
²JAZZ CLUBÐjazz club with clearly reflected sounds
²HALLÐrectangular concert hall capacity of about 2 000
²CHURCHÐchurch with a high vault
²STADIUMÐoutdoor stadium with a capacity of about 30 000
Press the DSP control again to access the occupancy modes. Use the
SEL control to optimize the sound based upon the occupants in the
vehicle. The following occupancy modes can be selected:
²ALL SEATS
²DRIVER SEAT
²REAR SEAT
DSP
SEL+
SEL
Controls and features
65
Page 112 of 272

SEATING
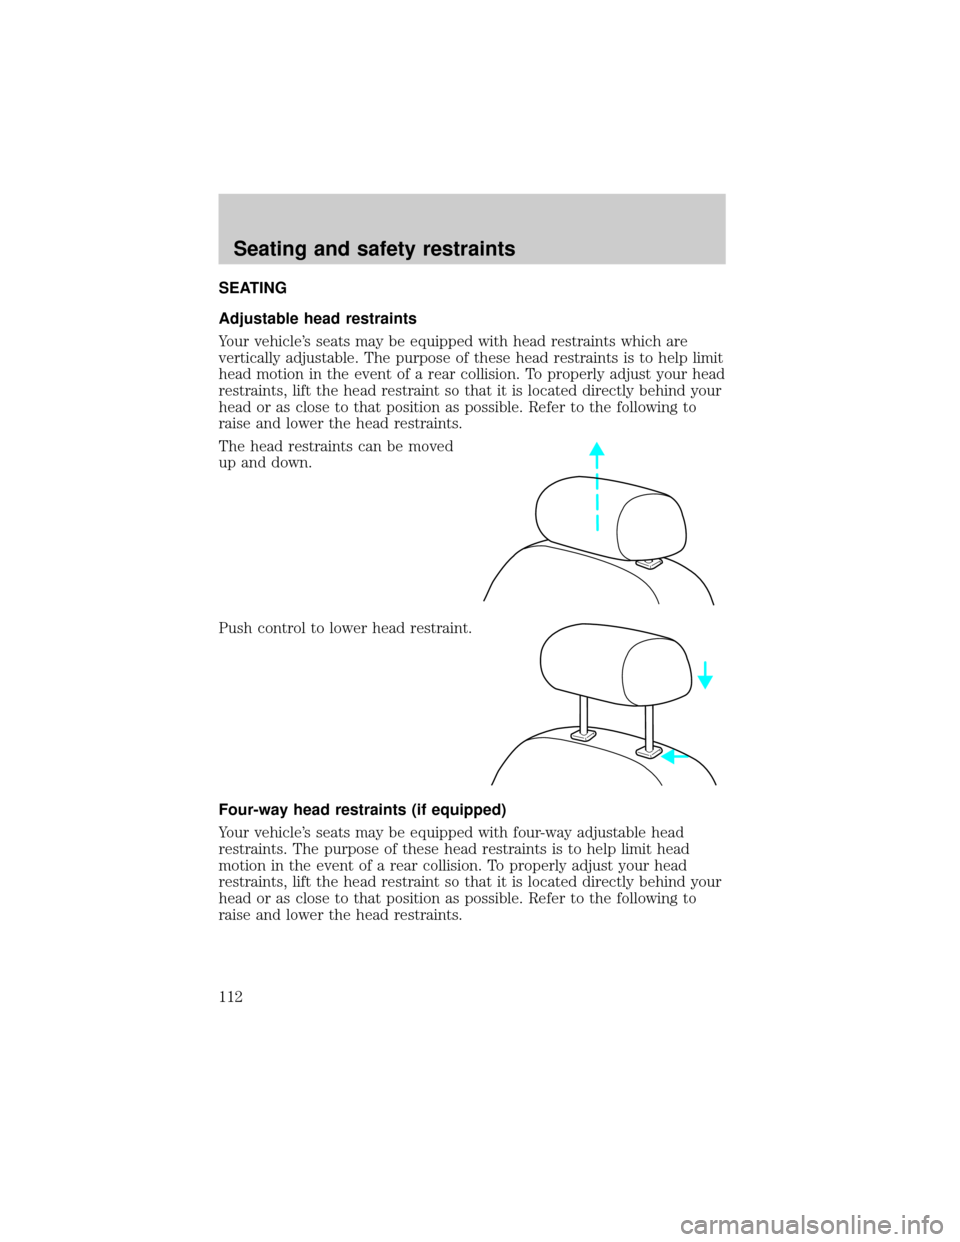
Adjustable head restraints
Your vehicle's seats may be equipped with head restraints which are
vertically adjustable. The purpose of these head restraints is to help limit
head motion in the event of a rear collision. To properly adjust your head
restraints, lift the head restraint so that it is located directly behind your
head or as close to that position as possible. Refer to the following to
raise and lower the head restraints.
The head restraints can be moved
up and down.
Push control to lower head restraint.
Four-way head restraints (if equipped)
Your vehicle's seats may be equipped with four-way adjustable head
restraints. The purpose of these head restraints is to help limit head
motion in the event of a rear collision. To properly adjust your head
restraints, lift the head restraint so that it is located directly behind your
head or as close to that position as possible. Refer to the following to
raise and lower the head restraints.
Seating and safety restraints
112
Page 113 of 272
The head restraints can be moved in
four directions and use the same
release control as the two-way head
restraints:
²up and down
²forward or backward
Adjusting the power seats
The power seat controls are located on the outboard side of the seat.
Never adjust the driver's seat or seatback when the vehicle is
moving.
Always drive and ride with your seatback upright and the lap
belt snug and low across the hips.
Reclining the seatback can reduce the effectiveness of the seat's
safety belt in the event of a collision.
Rotate the vertical control to adjust
the seatback.
²8 way
²6 way
Slide the control forward or
backward to move the seat forward
or backward.
²8 way
²6 way
Seating and safety restraints
113
Page 114 of 272
Move the control up or down to
move the seat up and down.
²8 way
²6 way
Move front/rear of control up/down
to tilt seat cushion.
²8 way
Heated seats (if equipped)
To operate the heated seats:
²Push control to activate.
²Push again to deactivate.
The heated seats will activate when the ignition is in the RUN position.
When activated, they will turn off automatically after 10 minutes or when
the ignition is turned to the OFF position.
The indicator light will illuminate when the heated seats have been
activated.
Seating and safety restraints
114
Page 116 of 272

Memory seats/steering column/mirrors (if equipped)
This system allows automatic
positioning of the driver seat,
outside rearview mirrors, and power
adjusted tilt/telescope steering
column to two programmable
positions.
The memory seat control is located
on the driver door.
²To program position one, move
the driver seat to the desired
position using the seat controls. Press the SET control. The SET
control indicator light will briefly illuminate. While the light is
illuminated, press control 1.
²To program position two, repeat the previous procedure using control
2.
A position can only be set or recalled when the transmission gearshift is
in Park (automatic transmission) or the park brake is set (manual
transmission). A memory seat position may be programmed at any time.
The memory seat positions are also recalled when you press your remote
entry transmitter UNLOCK control.
To program the memory seat to remote entry transmitter, refer to
Remote entry systemin theControls and features chapter.
2ND SEAT/SPLIT-FOLDING REAR SEAT
One or both rear seatbacks can be folded down to provide additional
cargo space.
To lower the seatback(s), pull the
release handle(s) located inside the
trunk.
SE T
12
Seating and safety restraints
116
Page 118 of 272

It is extremely dangerous to ride in a cargo area, inside or
outside of a vehicle. In a collision, people riding in these areas
are more likely to be seriously injured or killed. Do not allow people to
ride in any area of your vehicle that is not equipped with seats and
safety belts. Be sure everyone in your vehicle is in a seat and using a
safety belt properly.
In a rollover crash, an unbelted person is significantly more likely
to die than a person wearing a seat belt.
Each seating position in your vehicle has a specific safety belt
assembly which is made up of one buckle and one tongue that
are designed to be used as a pair. 1) Use the shoulder belt on the
outside shoulder only. Never wear the shoulder belt under the arm.
2) Never swing the safety belt around your neck over the inside
shoulder. 3) Never use a single belt for more than one person.
Always transport children 12 years old and under in the back
seat and always properly use appropriate child restraints.
Seating and safety restraints
118