Page 180 of 232
2. Release and open the hood.
3. Pull the rubber cowl seal
(number 1 in figure) away from the
cowl vent screen. Remove the right
half of the cowl vent screen
(number 2 in figure) by placing your
hand underneath the cowl vent
screen and lifting straight up to
release the four spring clips.
4. Remove the water shield (number
3 in figure) by disengaging the two
water shield locking tabs (number 4
in figure), then sliding the water
shield toward the front of the
vehicle. After the locking tabs are
disengaged from the water shield,
lift the water shield up and away
from the vehicle.
5. Remove the filter. Reverse the
procedure to install the new filter.BRAKE RELEASEHOOD
2
1
34
Maintenance and care
180
Page 181 of 232
Be careful when installing the new filter. Avoid bending or tearing the
filter and make sure it is fully seated in its mounting location after
installation.
WINDSHIELD WIPER BLADES
Check the wiper blades at least twice a year or when they seem less
effective. Substances such as tree sap and some hot wax treatments used
by commercial car washes reduce the effectiveness of wiper blades.
Checking the wiper blades
If the wiper blades do not wipe properly, clean both the windshield and
wiper blades using undiluted windshield wiper solution or a mild
detergent. Rinse thoroughly with clean water. To avoid damaging the
blades, do not use fuel, kerosene, paint thinner or other solvents.
Changing the wiper blades
To replace the wiper blades:
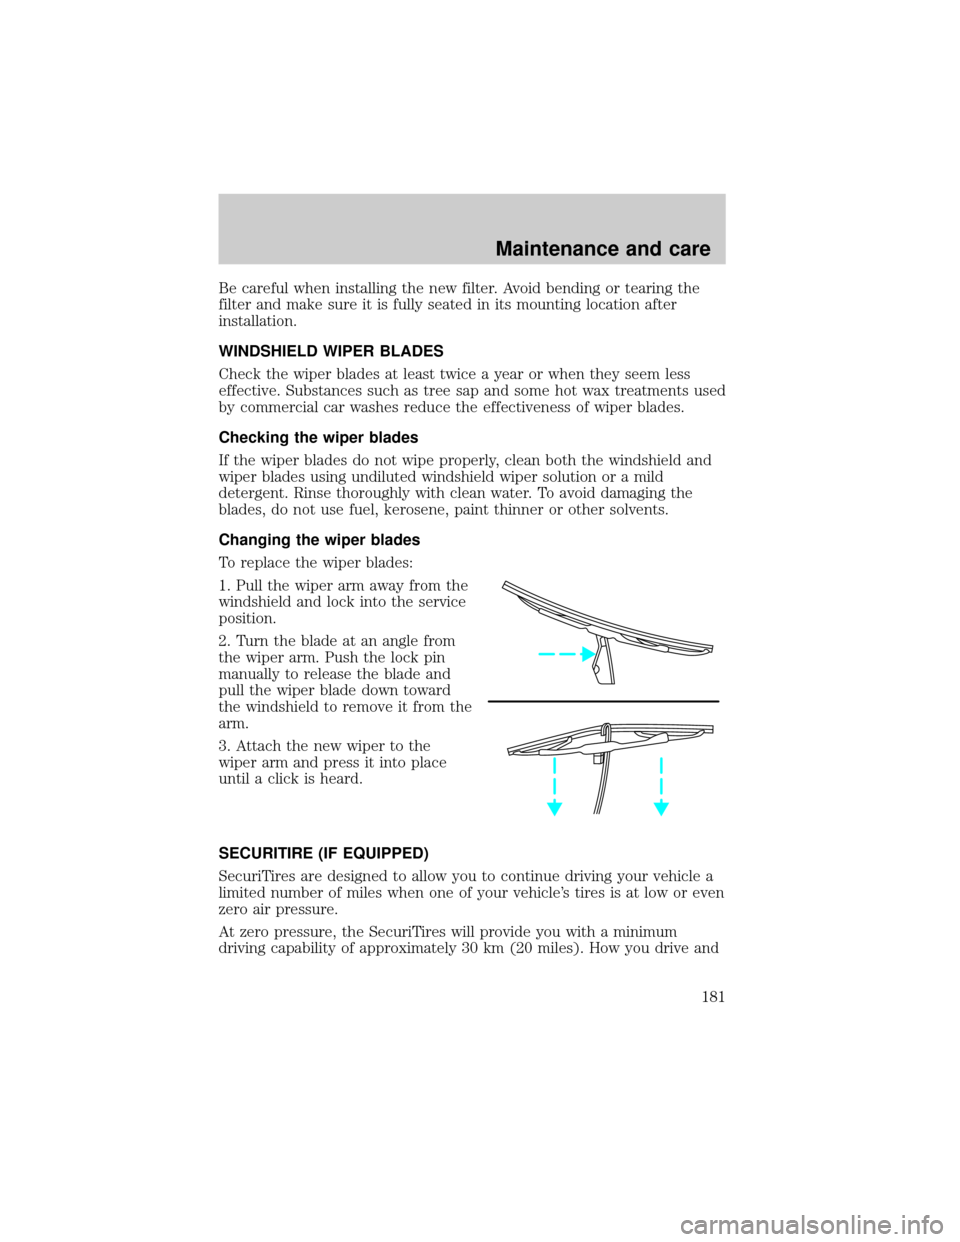
1. Pull the wiper arm away from the
windshield and lock into the service
position.
2. Turn the blade at an angle from
the wiper arm. Push the lock pin
manually to release the blade and
pull the wiper blade down toward
the windshield to remove it from the
arm.
3. Attach the new wiper to the
wiper arm and press it into place
until a click is heard.
SECURITIRE (IF EQUIPPED)
SecuriTires are designed to allow you to continue driving your vehicle a
limited number of miles when one of your vehicle's tires is at low or even
zero air pressure.
At zero pressure, the SecuriTires will provide you with a minimum
driving capability of approximately 30 km (20 miles). How you drive and
Maintenance and care
181
Page 189 of 232
The flow of fuel through a fuel pump nozzle can produce static
electricity, which can cause a fire if fuel is pumped into an
ungrounded fuel container.
Use the following guidelines to avoid static build-up when filling an
ungrounded fuel container:
²Place approved fuel container on the ground.
²DO NOT fill a fuel container while it is in the vehicle.
²Keep the fuel pump nozzle in contact with the fuel container while
filling.
²DO NOT use a device that would hold the fuel pump handle in the fill
position.
Fuel Filler Cap
Your fuel tank filler cap has an indexed design with a 1/8 turn on/off
feature.
When fueling your vehicle:
1. Turn the engine off.
2. Carefully turn the filler cap counterclockwise 1/8 of a turn until it
stops.
3. Pull to remove the cap from the fuel filler pipe.
4. To install the cap, align the tabs on the cap with the notches on the
filler pipe.
5. Turn the filler cap clockwise 1/8 of a turn until it stops.
If the ªService Engine Soon/Check Engineº indicator comes on and stays
on when you start the engine, the fuel filler cap may not be properly
installed. Turn off the engine, remove the fuel filler cap, align the cap
properly and reinstall it.
If you must replace the fuel filler cap, replace it with a fuel filler
cap that is designed for your vehicle. The customer warranty may
be void for any damage to the fuel tank or fuel system if the
correct genuine Ford or Motorcraft fuel filler cap is not used.
Maintenance and care
189
Page 197 of 232
²Brakelamps
²High-mount brakelamp
²Turn signals
²Backup lamps
²License plate lamp
Do not remove lamp bulbs unless they will be replaced immediately. If a
bulb is removed for an extended period of time, contaminants may enter
the lamp housings and affect performance.
Replacing headlamp bulbs
To remove the headlamp bulb:
1. Make sure headlamp switch is in OFF position.
2. Lift the hood and remove the protective cover from the top of the
headlamps by lifting up on the rear corners and release the velcro
attachments. Lift the cover and pull towards the windshield.
3. At the back of the headlamp, pull
back slightly and up on the two
retainer pins to release the
headlamp assembly from the vehicle
and pull headlamp forward.
4. Remove the protective dust shield
from the housing by turning the
dust shield counterclockwise (when
viewed from the rear).
Maintenance and care
197
Page 198 of 232
5. Disconnect the electrical
connector from the bulb by pulling
rearward.
6. Remove the bulb retaining ring by
rotating it counterclockwise.
7. Remove the old bulb from the
lamp assembly by pulling it straight
out of the lamp assembly.
To install the new bulb:
Handle a halogen headlamp bulb carefully and keep out of
children's reach. Grasp the bulb only by its plastic base and do
not touch the glass. The oil from your hand could cause the bulb to
break the next time the headlamps are operated.
1. Install the new bulb in lamp assembly by pushing straight in with the
bulb's plastic base facing upward. You may need to turn the bulb slightly
to align the grooves in the plastic base with the tabs in the lamp
assembly.
Maintenance and care
198
Page 199 of 232
2. Install the bulb retaining ring over the plastic base and lock the ring
by rotating clockwise until it snaps into place.
3. Connect the electrical connector to the bulb.
4. Install the protective dust shield and lock the shield by rotating it
clockwise until it locks into position.
5. Carefully position the headlamp assembly onto the vehicle making sure
the alignment pins are inserted into the proper holes.
6. Hold the headlamp assembly snugly against the vehicle and push down
on the retainer pins to lock the lamp into place.
7. Before reinstalling the protective cover, make sure the cover tabs are
fully seated under the grille molding.
8. Turn the headlamps on and make sure they work properly. If the
headlamp was correctly aligned before you changed the bulb, you should
not need to align it again.
Replacing front parking lamp/turn signal/cornering lamp bulbs
1. Make sure the headlamp control is in the OFF position.
2. Open the hood and remove the protective cover from the top of the
headlamps by lifting up on the rear corners and release the velcro
attachments. Lift the cover and pull towards the windshield.
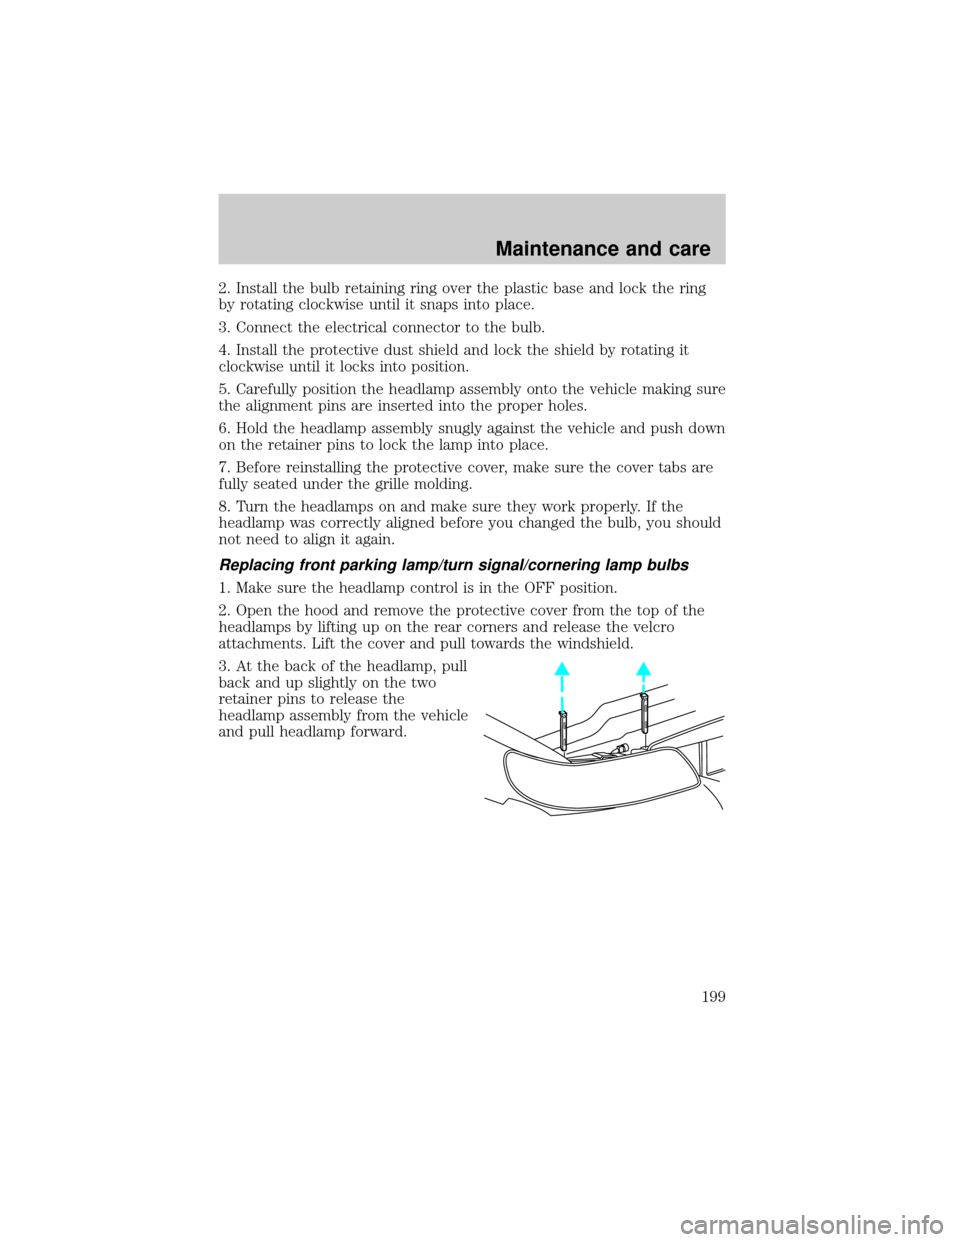
3. At the back of the headlamp, pull
back and up slightly on the two
retainer pins to release the
headlamp assembly from the vehicle
and pull headlamp forward.
Maintenance and care
199
Page 200 of 232
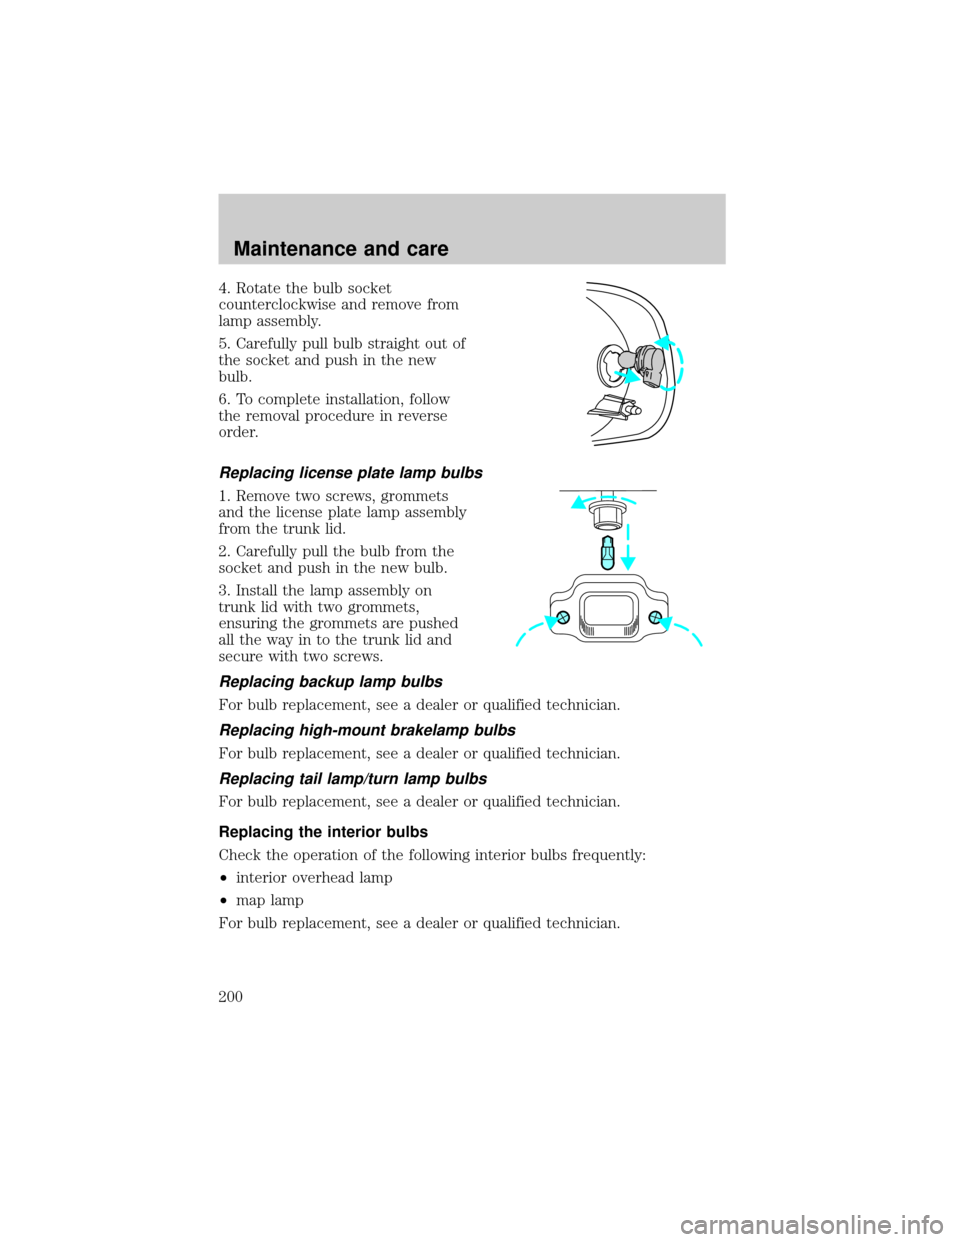
4. Rotate the bulb socket
counterclockwise and remove from
lamp assembly.
5. Carefully pull bulb straight out of
the socket and push in the new
bulb.
6. To complete installation, follow
the removal procedure in reverse
order.
Replacing license plate lamp bulbs
1. Remove two screws, grommets
and the license plate lamp assembly
from the trunk lid.
2. Carefully pull the bulb from the
socket and push in the new bulb.
3. Install the lamp assembly on
trunk lid with two grommets,
ensuring the grommets are pushed
all the way in to the trunk lid and
secure with two screws.
Replacing backup lamp bulbs
For bulb replacement, see a dealer or qualified technician.
Replacing high-mount brakelamp bulbs
For bulb replacement, see a dealer or qualified technician.
Replacing tail lamp/turn lamp bulbs
For bulb replacement, see a dealer or qualified technician.
Replacing the interior bulbs
Check the operation of the following interior bulbs frequently:
²interior overhead lamp
²map lamp
For bulb replacement, see a dealer or qualified technician.
Maintenance and care
200
Page 206 of 232
Cleaning the exterior lamps
Wash with the same detergent as the exterior of your vehicle. If
necessary, use a tar remover such as Ford Extra Strength Tar and Road
Oil Remover (B7A-19520±AA).
To avoid scratching the lamps, do not use a dry paper towel, chemical
solvents or abrasive cleaners.
Cleaning the wiper blades, windshield and rear window
If the wiper blades do not wipe properly, clean the wiper blade rubber
element with undiluted windshield washer solution or a mild detergent.
To avoid damaging the blades, do not use fuel, kerosene, paint thinner or
other solvents.
If the wiper still does not wipe properly, this could be caused by
substances on the windshield or rear window such as tree sap and some
hot wax treatments used by commercial car washes. Clean the outside of
the windshield or rear window with a non-abrasive cleaner such as Ford
Ultra-Clear Spray Glass Cleaner, (E4AZ-19C507±AA), available from your
Ford Dealer.Do notuse abrasive cleansers on glass as they may cause
scratches. The windshield or rear window is clean if beads do not form
when you rinse it with water. The windshield, rear window and wiper
blades should be cleaned on a regular basis, and blades or rubber
elements replaced when worn.
Cleaning the engine
Engines are more efficient when they are clean because grease and dirt
buildup keep the engine warmer than normal. When washing:
²Take care when using a power washer to clean the engine. The high
pressure fluid could penetrate the sealed parts and cause damage.
²Do not spray with cold water to avoid cracking the engine block or
other engine components.
²Never apply anything to the drive belt (including belt dressing).
Maintenance and care
206