Page 180 of 232
2. Release and open the hood.
3. Pull the rubber cowl seal
(number 1 in figure) away from the
cowl vent screen. Remove the right
half of the cowl vent screen
(number 2 in figure) by placing your
hand underneath the cowl vent
screen and lifting straight up to
release the four spring clips.
4. Remove the water shield (number
3 in figure) by disengaging the two
water shield locking tabs (number 4
in figure), then sliding the water
shield toward the front of the
vehicle. After the locking tabs are
disengaged from the water shield,
lift the water shield up and away
from the vehicle.
5. Remove the filter. Reverse the
procedure to install the new filter.BRAKE RELEASEHOOD
2
1
34
Maintenance and care
180
Page 194 of 232
²Using the air conditioner or defroster may reduce fuel economy.
²You may want to turn off the speed control in hilly terrain if
unnecessary shifting between third and fourth gear occurs.
Unnecessary shifting of this type could result in reduced fuel
economy.
²Warming up a vehicle on cold mornings is not required and may
reduce fuel economy.
²Resting your foot on the brake pedal while driving may reduce fuel
economy.
²Combine errands and minimize stop-and-go driving.
Maintenance
²Keep tires properly inflated and use only recommended size.
²Operating a vehicle with the wheels out of alignment will reduce fuel
economy.
²Use recommended engine oil. Refer toLubricant Specifications.
²Perform all regularly scheduled maintenance items. Follow the
recommended maintenance schedule and owner maintenance checks
found in your vehicle Scheduled Maintenance Guide.
Conditions
²Heavily loading a vehicle or towing a trailer may reduce fuel economy
at any speed.
²Carrying unnecessary weight may reduce fuel economy (approximately
0.4 km/L [1 mpg] is lost for every 180 kg [400 lb] of weight carried).
²Adding certain accessories to your vehicle (for example bug
deflectors, rollbars/light bars, running boards, ski/luggage racks) may
reduce fuel economy.
²Using fuel blended with alcohol may lower fuel economy.
²Fuel economy may decrease with lower temperatures during the first
12±16 km (8±10 miles) of driving.
²Driving on flat terrain offers improved fuel economy as compared to
driving on hilly terrain.
²Transmissions give their best fuel economy when operated in the top
cruise gear and with steady pressure on the gas pedal.
²Close windows for high speed driving.
Maintenance and care
194
Page 197 of 232
²Brakelamps
²High-mount brakelamp
²Turn signals
²Backup lamps
²License plate lamp
Do not remove lamp bulbs unless they will be replaced immediately. If a
bulb is removed for an extended period of time, contaminants may enter
the lamp housings and affect performance.
Replacing headlamp bulbs
To remove the headlamp bulb:
1. Make sure headlamp switch is in OFF position.
2. Lift the hood and remove the protective cover from the top of the
headlamps by lifting up on the rear corners and release the velcro
attachments. Lift the cover and pull towards the windshield.
3. At the back of the headlamp, pull
back slightly and up on the two
retainer pins to release the
headlamp assembly from the vehicle
and pull headlamp forward.
4. Remove the protective dust shield
from the housing by turning the
dust shield counterclockwise (when
viewed from the rear).
Maintenance and care
197
Page 200 of 232
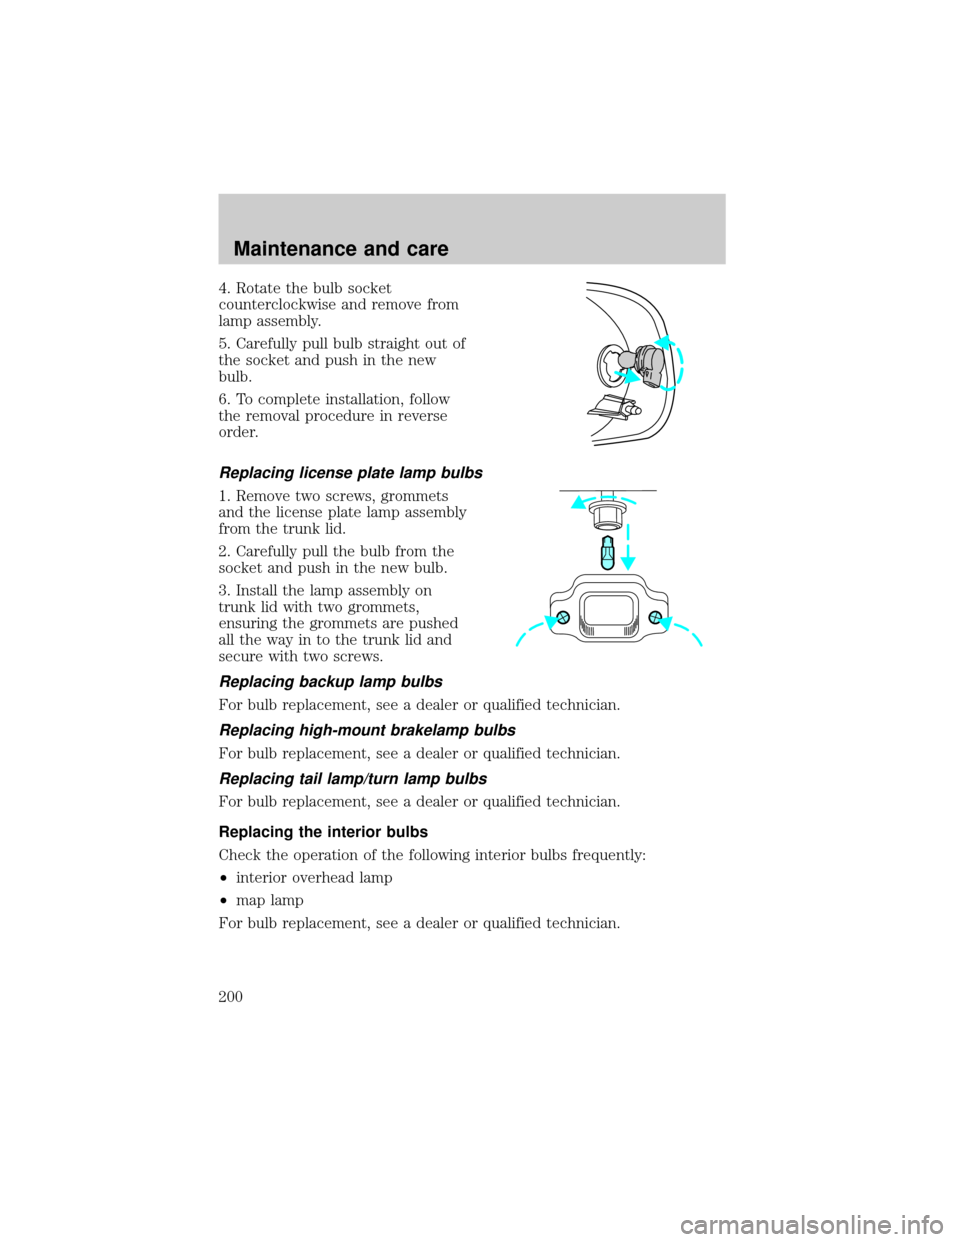
4. Rotate the bulb socket
counterclockwise and remove from
lamp assembly.
5. Carefully pull bulb straight out of
the socket and push in the new
bulb.
6. To complete installation, follow
the removal procedure in reverse
order.
Replacing license plate lamp bulbs
1. Remove two screws, grommets
and the license plate lamp assembly
from the trunk lid.
2. Carefully pull the bulb from the
socket and push in the new bulb.
3. Install the lamp assembly on
trunk lid with two grommets,
ensuring the grommets are pushed
all the way in to the trunk lid and
secure with two screws.
Replacing backup lamp bulbs
For bulb replacement, see a dealer or qualified technician.
Replacing high-mount brakelamp bulbs
For bulb replacement, see a dealer or qualified technician.
Replacing tail lamp/turn lamp bulbs
For bulb replacement, see a dealer or qualified technician.
Replacing the interior bulbs
Check the operation of the following interior bulbs frequently:
²interior overhead lamp
²map lamp
For bulb replacement, see a dealer or qualified technician.
Maintenance and care
200
Page 201 of 232
Using the right bulbs
Replacement bulbs are specified in the chart below. Headlamp bulbs must
be marked with an authorized ªD.O.T.º for North America and an ªEº for
Europe to assure lamp performance, light brightness and pattern and safe
visibility. The correct bulbs will not damage the lamp assembly or void the
lamp assembly warranty and will provide quality bulb burn time.
Function Trade Number
Headlamp 9007
Cornering lamp (front) 3156K
Backup lamp 3457K
High-mount brakelamp 912
Park/turn lamp (front) 3157K
License plate lamp 168
Luggage compartment lamp (decklid ajar) 912
Side marker (front) 194NA (amber)
Side marker (rear) 916
Stoplamp and tail lamp 3157K
Redundant turn lamp (rear) 3157K
Glovebox lamp 194
Ash receptacle 1445
Ash tray (rear) 37
Cigar lighter (console) 1893
Door mounted lamp (front) 214-2
Illuminated visor mirror 74
Overhead console reading lamp (without moon roof) 912
Passenger assist handle (rear seat) 211-2
All replacement bulbs are clear in color except where noted.
To replace all instrument panel lights - see your dealer.
AIMING THE HEADLAMPS
Your vehicle is equipped with a Vehicle Headlamp Aim Device (VHAD)
on each headlamp. Each headlamp may be properly aimed in the vertical
(up/down) and the horizontal (left/right) directions using your VHAD
system. The headlamps on your vehicle are properly aimed at the
assembly plant.
Maintenance and care
201
Page 204 of 232
CLEANING AND CARING FOR YOUR VEHICLE
Refer to the Customer Assistance chapter for a list of Ford-approved
cleaners, polishes and waxes.
Washing your vehicle
Wash your vehicle regularly with
cold or lukewarm water. Never use
strong detergents or soap. If your
vehicle is particularly dirty, use a
quality car wash detergent. Always
use a clean sponge, washing glove
or similar device and plenty of water
for best results. To avoid spots,
avoid washing when the hood is still
warm, immediately after or during
exposure to strong sunlight.
During winter months, it is especially important to wash the vehicle on a
regular basis. Large quantities of dirt and road salt are difficult to
remove and also cause damage to the vehicle.
Any gasoline spilled on the vehicle or deposits such as bird droppings
should be washed and sponged off as soon as possible. Deposits not
removed promptly can cause damage to the vehicle's paintwork.
Remove any exterior accessories, such as antennas, before entering a car
wash. If you have wax applied to the vehicle at a commercial car wash, it
is recommended that you clean the wiper blades and windshield as
described inCleaning the wiper blades and windshield.
After washing, apply the brakes several times to dry them.
Waxing your vehicle
Waxing your vehicle on a regular basis will reduce minor scratches and
paint damage.
Wax when water stops beading on the surface. This could be every three
or four months, depending on operating conditions.
Use only carnauba or synthetic-based waxes. Use a cleaning fluid with a
clean cloth to remove any bugs before waxing your vehicle. Use tar
remover to remove any tar spots.
Avoid getting wax on the windshield, or on any surfaces which appear
coarse or bumpy. If you have wax applied at a commercial car wash, it is
Maintenance and care
204
Page 209 of 232
MOTORCRAFT PART NUMBERS
Component 4.6L DOHC V8 engine
Engine air filter element FA-1615
Cabin Air filter element FP-5
Fuel filter FG-800A
Battery BXT-65-750
Oil filter FL-820-S
PCV valve EV-111
Spark plugs* AWSF-32E
* Refer to Vehicle Emissions Control Information (VECI) decal for spark
plug gap information.
REFILL CAPACITIES
Fluid Ford Part
NameApplication Capacity
Engine oil
(includes filter
change)Motorcraft SAE
5W-30 Super
Premium
Motor OilAll 5.7L (6.0 quarts)
Engine
coolant
1Premium
Engine CoolantAll 15.0L
(15.8 quarts)
Brake fluid
2All Fill to line on
reservoir
Power steering
fluidMotorcraft
MERCONt
AT FAll Fill to line on
reservoir
Fuel tank N/A All 75.7L
(20.0 gallons)
Automatic
transaxleMotorcraft
MERCONtV
AT FAll 13.0L
(13.7 quarts)
Windshield
washer fluidUltra-Clear
Windshield
Washer
ConcentrateAll 3.4L (3.6 quarts)
Capacities and specifications
209
Page 210 of 232
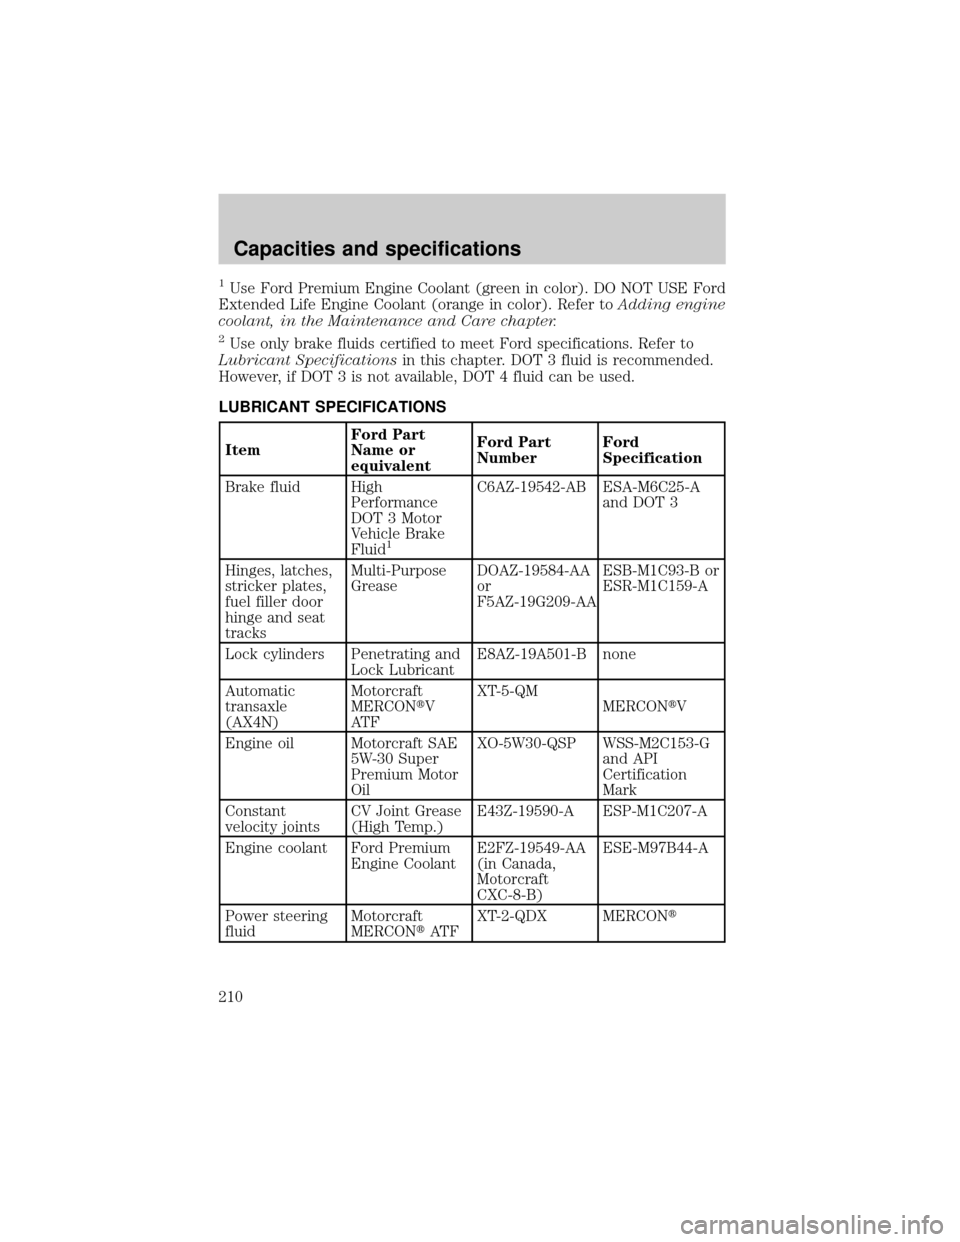
1Use Ford Premium Engine Coolant (green in color). DO NOT USE Ford
Extended Life Engine Coolant (orange in color). Refer toAdding engine
coolant, in the Maintenance and Care chapter.
2Use only brake fluids certified to meet Ford specifications. Refer to
Lubricant Specificationsin this chapter. DOT 3 fluid is recommended.
However, if DOT 3 is not available, DOT 4 fluid can be used.
LUBRICANT SPECIFICATIONS
ItemFord Part
Name or
equivalentFord Part
NumberFord
Specification
Brake fluid High
Performance
DOT 3 Motor
Vehicle Brake
Fluid
1
C6AZ-19542-AB ESA-M6C25-A
and DOT 3
Hinges, latches,
stricker plates,
fuel filler door
hinge and seat
tracksMulti-Purpose
GreaseDOAZ-19584-AA
or
F5AZ-19G209-AAESB-M1C93-B or
ESR-M1C159-A
Lock cylinders Penetrating and
Lock LubricantE8AZ-19A501-B none
Automatic
transaxle
(AX4N)Motorcraft
MERCONtV
AT FXT-5-QM
MERCONtV
Engine oil Motorcraft SAE
5W-30 Super
Premium Motor
OilXO-5W30-QSP WSS-M2C153-G
and API
Certification
Mark
Constant
velocity jointsCV Joint Grease
(High Temp.)E43Z-19590-A ESP-M1C207-A
Engine coolant Ford Premium
Engine CoolantE2FZ-19549-AA
(in Canada,
Motorcraft
CXC-8-B)ESE-M97B44-A
Power steering
fluidMotorcraft
MERCONtAT FXT-2-QDX MERCONt
Capacities and specifications
210