2000 HONDA S2000 cruise control
[x] Cancel search: cruise controlPage 44 of 273

This section gives information about
the controls and displays
that
contribute to the daily operation of
your Honda.
All the essential
controls are within easy reach.
Control Locations ............................ 42
Indicator Lights ................................ 43
Gauges .............................................. 47
Speedometer ................................ 4 7
Select Button ................................ 4 7
Tachometer .................................. 4 7
Temperature Gauge ....................
47
Fuel Gauge ................................... 48
Odometer ...................................... 48
Trip Meter .................................... 48
Maintenance Required
Indicator ....................................
49
Controls Near the Steering
Wheel ........................................
50
Headlights .................................... 51
Daytime Running Lights ............. 52
Instrument Panel Brightness ..... 52
Turn Signals ................................. 53
Windshield Wipers ...................... 53
Windshield Washers ................... 54
Steering Wheel Controls ................ 55
Cruise Control .............................. 55
Keys and Locks ................................ 58
Keys ............................................... 58
Immobilizer System ..................... 59
Ignition Switch ............................. 60
Instruments and Controls
Power Door Locks ....................... 62
Remote Transmitter .................... 63
Trunk ............................................ 66
Console Compartments .............. 67
Seat Adjustments ............................. 68
Power Windows ............................... 69
Convertible Top ............................... 71
Opening the Convertible Top ..... 71
Closing the Convertible Top ...... 7 4
Convertible Top
Cover.. .............. 76
Maintenance ................................. 77
Hazard Warning ............................... 79
Mirrors .............................................. 79
Adjusting the Power Mirrors ..... 79
Parking Brake .................................. 80
Beverage Holder .............................. 81
Accessory Power Socket ................ 81
Audio Panel. ...................................... 82
Interior Lights .................................. 83
Instruments and Controls 41
Page 49 of 273

Indicator Lights
lA! I Q I Tum Signal a!ld ~ Hazard Wammg
Indicators
The left or right turn signal light
blinks when you signal a lane change
or turn. If the light does not blink or
blinks rapidly, it usually means one
of the turn signal bulbs is burned out
(see page
192 ) . Replace the bulb as
soon as possible, since other drivers
cannot see that you are signalling.
When you turn on the Hazard
Warning switch, both turn signal
lights blink.
All turn signals on the
outside of the car should flash.
I § D I High Beam Indicator
This light comes on with the high
beam headlights.
See page 51 for
information on the headlight
controls.
46 Instruments and Controls
~ "Daytime Running
~ Lights" Indicator
Canadian models only
This indicator lights when you turn
the ignition switch to
ON (ID with
the headlight switch off and the
parking brake set.
It should go off if
you turn on the headlights or release
the parking brake.
If it comes on at
any other time, it means there is a
problem with the DRL.
There may
also be a problem with the high
beam headlights.
~ Immobilizer System
~ Indicator
This indicator comes on for a few
seconds when you turn the ignition
switch
0 N (ID. It will then go off if
you have inserted a properly-coded
ignition key.
If it is not a properly
coded key, the indicator will blink
and
the engine will not start (see
page
59 ). This
indicator also blinks several
times when you turn the ignition
switch from
ON (II) to ACCESSORY
(I) or LOCK (0).
Cruise Control Indicator
This lights when you set the cruise
control.
See page 55 for information
on operating the cruise control.
[ji] Low Fuel Indicator
This light comes on as a reminder
that you must refuel soon.
Page 53 of 273

Controls Near the Steering Wheel I
The two levers on the steering
column contain controls for driving
features you use most often.
The left
lever controls the turn signals,
headlights, and high beams.
The
right lever controls the windshield
washers and wipers.
The engine start button and the
remote audio controls are under the
left air vent.
The instrument panel brightness
control is
in the lower left corner of
the speedometer.
The cruise control master switch is
to the left
of the steering column.
50 Instruments and Controls
Page 58 of 273

Cruise Control
Cruise control allows you to maintain
a
set speed above 25 mph ( 40 km/h)
without keeping your foot on the
accelerator pedal. It should be used
for cruising on straight, open
highways.
It is not recommended for
conditions such as city driving,
winding roads, slippery roads, heavy
rain, or bad weather. You should
have full control of
the car under
those conditions.
Improper use of the cruise
control can lead to a crash.
Use the cruise
control only
when traveling on open
highways
in good weather.
NOTICE
The cruise control, as it operates,
moves the accelerator pedal. You can
damage your vehicle's accelerator
mechanism by resting your
foot under
the pedal and blocking the movement.
Steering Wheel Controls
Using the Cruise Control
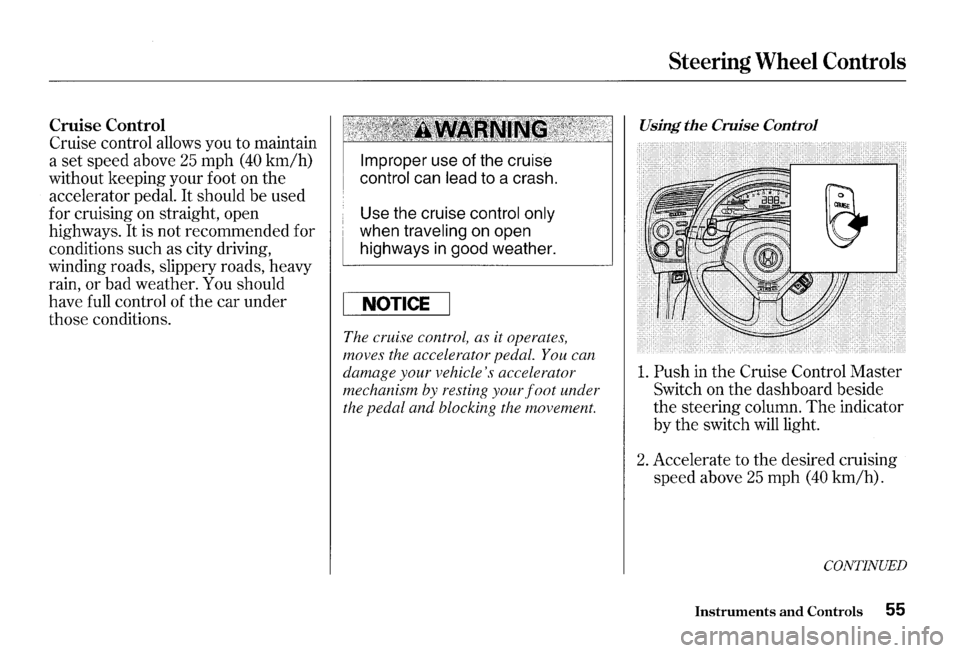
1. Push in the Cruise Control Master
Switch on the dashboard beside
the steering column. The indicator
by
the switch will light.
2. Accelerate to the desired cruising
speed above
25 mph (40 km/h).
CONTINUED
Instruments and Controls 55
Page 59 of 273

Steering Wheel Controls
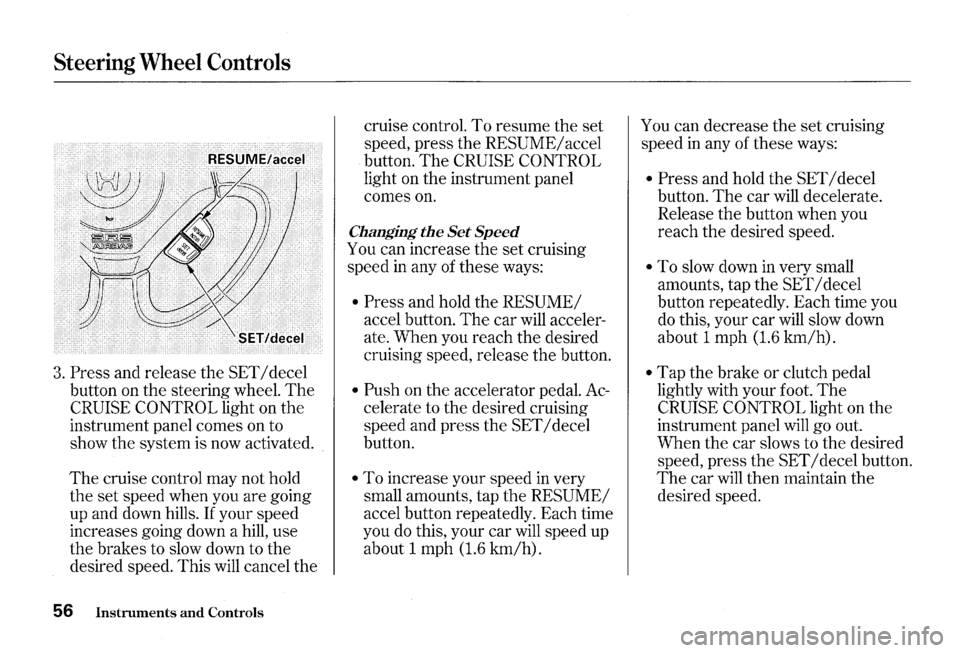
3. Press and release the SET I decel
button on the steering wheel.
The
CRUISE CONTROL light on the
instrument panel comes on to
show the system is now activated.
The cruise control may not hold
the set speed when you are going
up and down hills.
If your speed
increases going down a hill, use
the brakes to slow down to the
desired speed. This
will cancel the
56 Instruments and Controls
cruise control. To resume the set
speed, press the
RESUME/ accel
button.
The CRUISE CONTROL
light on the instrument panel
comes
on.
Changing the Set Speed
You can increase the set cruising
speed
in any of these ways:
• Press and hold the RESUME/
accel button. The car will acceler
ate. When you reach the desired
cruising speed, release the button.
• Push on the accelerator pedal. Ac
celerate to the desired cruising
speed and press the
SET I decel
button.
• To increase your speed in very
small amounts, tap the
RESUME/
accel button repeatedly. Each time
you
do this, your car will speed up
about 1 mph
(1.6 km/h).
You can decrease the set cruising
speed
in any of these ways:
• Press and hold the SET I decel
button.
The car will decelerate.
Release the button when you
reach the desired speed.
• To slow down in very small
amounts, tap the
SET I decel
button repeatedly. Each time you
do this, your car will slow down
about 1 mph
(1.6 km/h).
• Tap the brake or clutch pedal
lightly with your foot.
The
CRUISE CONTROL light on the
instrument panel
will go out.
When the car slows to the desired
speed, press
the SET I decel button.
The car will then maintain the
desired speed.
Page 60 of 273

Even with the cruise control turned
on, you can still use the accelerator
pedal to speed up for passing. After
completing the pass, take your foot
off the accelerator pedal.
The car
will return to the set cruising speed.
Resting your foot on the brake or
clutch pedal
will cause the cruise
control to cancel.
Cancelling the Cruise Control
You can cancel the cruise control in
any
of these ways:
• Tap the brake or clutch pedal.
• Press the SET I decel and RE
SUME/ accel buttons at the same
time.
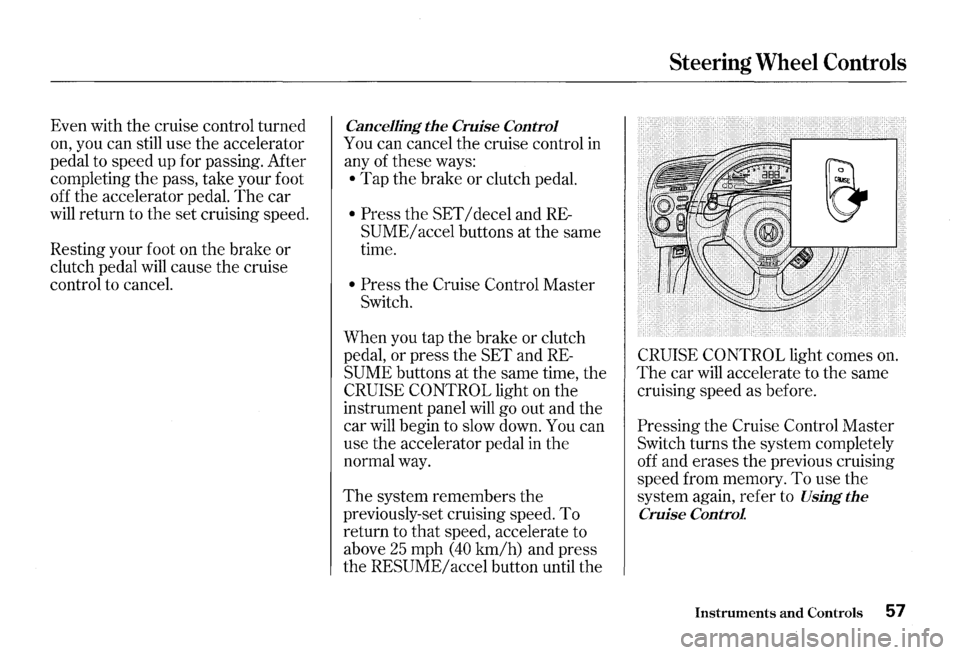
• Press the Cruise Control Master
Switch.
When you tap the brake or clutch
pedal, or press the SET and
RE
SUME buttons at the same time, the
CRUISE CONTROL light on the
instrument panel will
go out and the
car
will begin to slow down. You can
use the accelerator pedal in the
normal way.
The system remembers the
previously-set cruising speed. To
return to that speed, accelerate to
above
25 mph (40 km/h) and press
the
RESUME/ accel button until the
Steering Wheel Controls
CRUISE CONTROL light comes on.
The car will accelerate to the same
cruising speed as before.
Pressing the Cruise Control Master
Switch turns the system completely
off and erases the previous cruising
speed from memory.
To use the
system again, refer to
Using the
Cruise Control
Instruments and Controls 57
Page 124 of 273

The condition of your car and your
driving habits are the two most
important things
that affect the fuel
mileage you get.
Car Condition
Always maintain your car according
to the maintenance schedule. This
will keep it in top operating condition.
An important part of that mainte
nance is the
Owner Maintenance
Checks
(see page 155 ). For
example, an underinflated tire
causes more
"rolling resistance,"
which uses fuel. It also wears out
faster, so check the tire pressure
at
least monthly.
In winter, the build-up of snow on
your car's underside adds weight and
rolling resistance. Frequent cleaning
helps your fuel mileage and reduces
the chance of corrosion.
Driving Habits
You can improve fuel economy by
driving moderately. Rapid acceler
ation, abrupt cornering, and hard
braking use more fuel.
Always drive
in the highest gear that
allows the engine to run and acceler
ate smoothly.
Depending on traffic conditions, try
to maintain a constant speed. Every
time you slow down and speed up,
your car uses extra fuel.
Use the
cruise control, when appropriate, to
increase fuel economy.
A cold engine uses more fuel than a
warm engine.
It is not necessary to
"warm-up" a cold engine by letting it
idle for a long time. You can drive
away
in about a minute, no matter
how cold it is outside.
The engine
will warm up faster, and you get
better fuel economy. To cut down on
the number of
"cold starts," try to
Fuel Economy
combine several short trips into one.
The air conditioning puts an extra
load on the engine which makes it
use more fuel.
Turn off the A/C to
cut down on air conditioning use.
Use the flow-through ventilation
when the outside air temperature is
moderate.
Before Driving 121
Page 143 of 273

Driving in Bad Weather
Rain, fog, and snow conditions re
quire a different driving technique
because of reduced traction and
visibility. Keep your car well
maintained and exercise greater
caution when you need to drive in
bad weather.
The cruise control
should not be used in these condi
tions.
140 Driving
Driving Technique -Always drive
slower than you would
in dry
weather.
It takes your car longer to
react, even
in conditions that may
seem just barely damp. Apply
smooth, even pressure to
all the
controls. Abrupt steering wheel
movements or sudden, hard appli
cation of the brakes can cause loss of
control in wet weather. Be extra
cautious for the first few miles
(kilometers) of driving while you
adjust to the change in driving
conditions.
This is especially true in
snow. A person can forget some
snow-driving techniques during the
summer months.
Practice is needed
to relearn those skills.
Exercise extra caution when driving
in rain after a long dry spell. After
months of dry weather, the first
rains bring
oil to the surface of the
roadway, making it slippery.
Visibility -Being able to see
clearly in
all directions and being
visible to other drivers are important
in all weather conditions. This is
more difficult
in bad weather. To be
seen more clearly during daylight
hours, turn on your headlights.
Inspect your windshield wipers and
washers frequently. Keep the wind
shield washer reservoir full of the
proper fluid. Have the windshield
wiper blades replaced
if they start to
streak the windshield or leave parts
unwiped.
Use the defrosters and air
conditioning to keep the windows
from fogging up on
the inside (see
page
91 ).