2000 HONDA S2000 engine oil
[x] Cancel search: engine oilPage 153 of 273

Service at the indicated miles x 1,000 15 30 45 60 75 90 105 120 distance or time -whichever km x 1,000 24 48 72 96 120 144 168 192 --~-~ comes first. months 12 24
36 48 60 72 84
96 Replace engine oil and oil filter Replace every 3,750 miles (6,000 km) or 6 months
Check engine oil and coolant Check oil and coolant at each fuel stop Replace air cleaner element • • r-·-. . . ·~ • • Use normal schedule except in dusty
conditions Inspect valve clearance Adjust only if noisy • Replace spark plugs • -·~-~-·-· ~~-~ f-----Inspect drive belt •
• • • Inspect idle speed I • --Replace engine coolant • • • -----Replace transmission fluid • •
• • Replace rear differential fluid • • • •
• •
• • Inspect front and rear brakes Inspect every 7,500 miles. (12,000 km) or 6 months
Replace brake fluid • -+-• Check parking brake adjustment • •
• • • • • • Replace air conditioning filter 1
" 1 •
•
• • i -~I-Lubricate al_~!lir1J:JeS, locks and latches • • • • • • • • Check tire inflation and condition Every 7,500 miles (12,000 km) Visually inspect the following items:
Tie rod ends, steering gear box, and boots Every 7,500 miles (12,000 km) or 6 months Suspension components, Drives haft boots -----r----~~ Brake hoses and lines (including ABS)
All fluid levels and condition of fluids
Cooling system hoses and connections • • • • • • • • Exhaust system", Fuel lines and connections'
1 Lights and controls, Vehicle underbody
* 1: Refer to page183 for replacement information under special driving conditions.
150 Maintenance
U.S. Owners
Follow the Severe Conditions
Maintenance Schedule if you
drive your vehicle
MAINLY
under one or more of the
following conditions:
• Driving less than 5 miles (8
km) per trip or, in freezing
temperatures, driving less
than
10 miles (16 km) per trip.
• Driving in extremely hot
[over
90° F (32° C)] conditions.
• Extensive idling or long
periods of stop-and-go driving.
• Driving in mountainous
conditions.
• Driving on muddy, dusty, or
de-iced roads.
Canadian Owners
Follow the Maintenance
Schedule for Severe Conditions.
#: See information on maintenance and
emissions warranty, last column, page 147.
Page 154 of 273

Use this schedule if your vehicle is MAINLY driven in any of the following Severe Conditions, or normally driven in Canada; otherwise use the Normal Schedule. Service at the indicated distance or time, whichever comes first. Do the items in A, B, C, D as required for each distance/time.
3,750 mi/6,000 km/6 mos Do items in A. 7,500 mi/12,000 km/- Do items in A, B. 11,250 mi/18,000 km/-
Do items in A. 15,000 mi/24,000 km/1 yr Do items in A, B, C. 18,750 mi/30,000 km/- Do items in A. 22,500 mi/36,000 km/1% yrs Do items_in_A,Jt .. ~--------· ---~~---26,250 mi/42,000 km/-Do items in A. 30,000 mi/48,000 km/2 vrs Do items in A, B, C, D. 33,750 mi/54,000 km/-
Do items in A. 37,500 mi/60,000 km/2'/z vrs
Do items in A, B. 41,250 mi/66,000 km/-
Do items in A. 45,000 mi/72,000 km/3 yrs DReplace brake fluid. DReplace coolant. Do items in A, B, C. 48,750 mi/78,000 km/- Do items in A. 52,500 mi/84,000 km/3'/z vrs Do items in A, B. 56,250 mi/90,000 km/-
Do items in A. 60,000 mi/96,000 km/4 vrs _Do items in A, B, C, D. 63,750 mi/102,000 km/-
Do items in A. 67,500 mi/108,000 km/41!2 yrs Do items in A, B. 71,250 mi/114,000 km/-
Do items in A. 75,000 mi/120,000 km/5 yrs ']Replace coolant. Do itefY!S_lll_ A,_B_,_(:, -~--~--78,750 mi/126,000 km/-
Do items in A.
Note: • Check engine oil and coolant at each fuel stop. • Check and adjust valve clearance, cold engine, if noisy.
·--~
··-
Severe Conditions:
A
B
c
Driving less than 5 mi (8 km) per trip or, in freezing
temperatures, driving less than 10 mi (16 km) per trip.
Driving in extremely hot (over 90°F/32°C) conditions.
Extensive idling or long periods of stop-and-go driving. Driving in mountainous conditions.
Drivin_gon muddy, dusty, or de-iced roads.
[]Replace enqine oil and filter. Dlnspect front and rear brakes. DC heck tire inflation and condition. Dlnspect tie rod ends, steering gear box and boots. Dlnspect suspension components. Dlnspect driveshaft boots. ORe place air cleaner element. ']Check parking brake adjustment. ']Lubricate all hinges, locks and latches. ']Replace rear differential fluid.
CONTINUED
Maintenance 151
Page 158 of 273

You should check the following
items at the specified intervals.
If
you are unsure of how to perform
any check, turn to the page given.
• Engine oil level -Check every
time you
fill the fuel tank. See
page 119.
• Engine coolant level -Check the
radiator reserve tank every time
you
fill the fuel tank. See page 120 .
• Windshield washer fluid -Check
the level in the reservoir monthly.
If weather conditions cause you to
use the washers frequently, check
the reservoir each time you stop
forfuel. See page 167.
• Brakes and clutch -Check the
fluid level monthly. See page
170 .
Owner Maintenance Checks
• Tires -Check the tire pressure
monthly. Examine the tread for
wear and foreign objects. See page
186.
• Lights -Check the operation of
the headlights, parking lights,
taillights, high-mount brake light,
turn signals, brake lights, and
license plate lights monthly. See
page 192.
Maintenance 155
Page 160 of 273

Adding Oil
To add oil, unscrew and remove the
engine oil fill cap on top of the left
valve cover.
Pour in the oil, and
replace
the engine oil fill cap.
Tighten it securely. Wait a few
minutes and
recheck the oil level. Do
not
fill above the upper mark; you
could damage the engine.
Recommended Oil
Oil is a major contributor to your
engine's performance and longevity.
Always use a premium-grade deter
gent
oil. It is highly recommended
that you use Genuine Honda Motor
oil in your vehicle for as long as you
own it.
You can determine an oil's
SAE
viscosity and Service Classification
from
the API Service label on the oil
container.
A fuel-efficient oil is recommended
for your Honda.
This is shown on the
API Service label by the words
"Energy Conserving." This oil is
formulated to help your engine use
less fuel.
Engine Oil
The API Service label also tells you
the service classification of the oil.
Always use an oil that is labeled "API
Service SJ." This service rating may
include other classifications, such as
CD. These additional classifications
are not a problem, as long as the
label also carries
the SJ classification.
CONTINUED
Maintenance 15 7
Page 161 of 273

Engine Oil
The oil container may also display
the
API Certification seal. Make sure
it says
"For Gasoline Engines."
158 Maintenance
The SAE numbers tell you the oil's
viscosity or weight. Select the
oil for
your car according to this chart.
60
. 10 20
" ~ c" ' -c '
AnlbielltTertlperature
An oil with a viscosity of lOW-30 is
preferred for improved fuel economy
and year-round protection in your
Honda.
You may use a 5W-40 oil if
the temperature in your area goes
below oaF (
-20°C).
Synthetic Oil
You may use a synthetic motor oil if
it meets the same requirements
given for conventional motor
oil:
energy conserving, a service
classification of
SJ, and the proper
weight as shown on the chart. When
using synthetic
oil, you must follow
the
oil and filter change intervals
given
in the maintenance schedule.
Additives
Your Honda does not need any oil
additives. Purchasing additives for
the engine or transmission will not
increase your car's performance or
longevity.
It only increases the cost
of operating your car.
Page 162 of 273

Changing the Oil and Filter
Always change the oil and filter
according to the time and distance
(miles/kilometers) recommenda
tions
in the maintenance schedule.
The oil and filter collect contami
nants that can damage your engine
if
they are not removed regularly.
Changing the
oil and filter requires
special tools and access from
underneath
the car. The car should
be raised on a service station-type
hydraulic lift for this service.
Unless
you have the knowledge and proper
equipment, you should have this
maintenance done by a skilled
mechanic.
1. Run the engine until it reaches
normal operating temperature,
then shut it off.
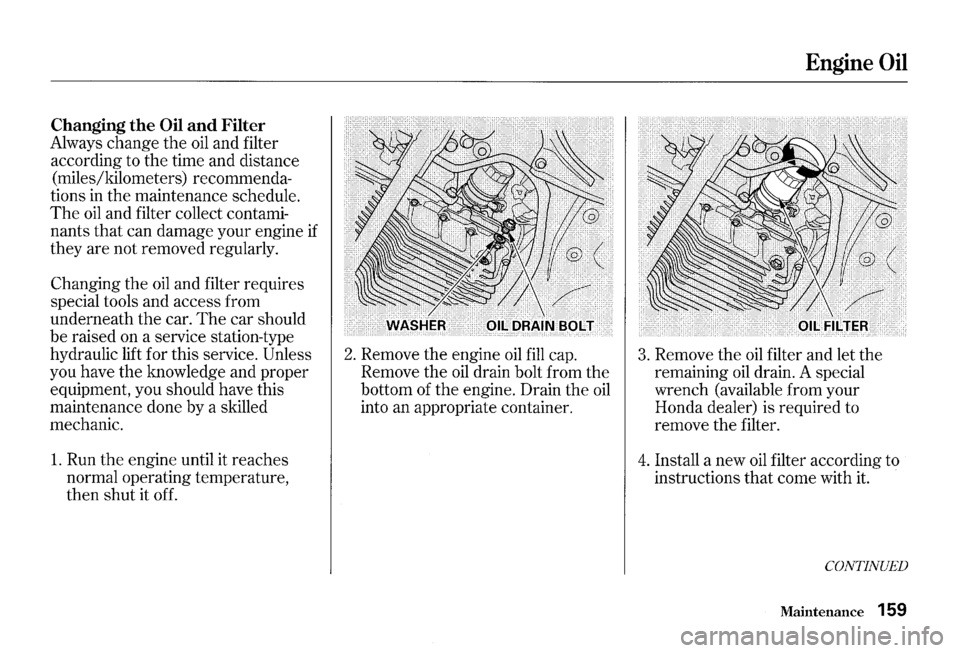
2. Remove the engine oil fill cap.
Remove the
oil drain bolt from the
bottom of
the engine. Drain the oil
into an appropriate container.
Engine Oil
3. Remove the oil filter and let the
remaining
oil drain. A special
wrench (available from your
Honda dealer) is required to
remove the filter.
4. Install a new oil filter according to
instructions that come with it.
CONTINUED
Maintenance 159
Page 163 of 273

Engine Oil
5. Put a new washer on the drain bolt,
then reinstall the drain bolt.
Tighten it to:
33 lbf.ft (45 N·m, 4.6 kgf·m)
6. Refill the engine with the recom
mended
oil.
Engine oil change capacity
(including filter):
5.1 US qt (4.8 Q, 4.2 Imp qt)
7. Install the engine oil fill cap. Start
the engine. The oil pressure
indicator light should go out within
five seconds. If it does not, turn off
the engine and reinspect your
work.
8. Let the engine run for several
minutes and check the drain bolt
and
oil filter for leaks.
160 Maintenance
9. Turn off the engine, let it sit for
several minutes, then check the
oil
level. If necessary, add oil to bring
the level to the upper mark on the
dipstick.
NOTICE
Improper disposal of engine oil can be
harmful
to the environment. If you
change your own oil, please dispose
of
the used oil properly. Put it in a sealed
container and take it
to a recycling
center. Do not discard it
in a trash bin
or dump it on the ground.
Page 167 of 273

Cooling System
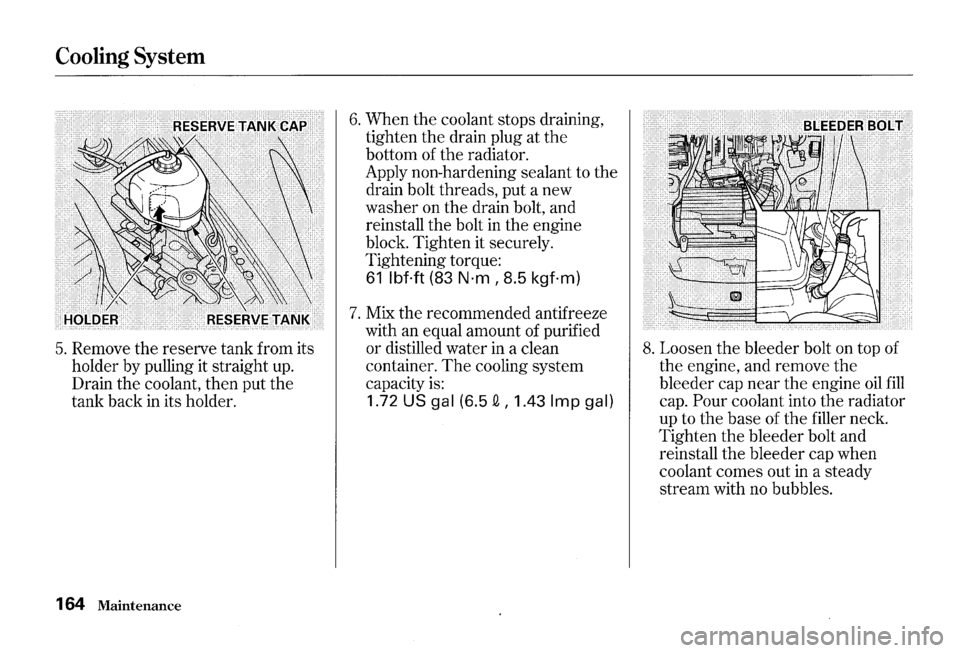
5. Remove the reserve tank from its
holder by pulling it straight
up.
Drain the coolant, then put the
tank back
in its holder.
164
Maintenance
6. When the coolant stops draining,
tighten the drain plug at
the
bottom of the radiator.
Apply non-hardening sealant to the
drain bolt threads, put a new
washer on the drain bolt, and
reinstall
the bolt in the engine
block. Tighten it securely.
Tightening torque:
61 lbf.ft (83 N·m I 8.5 kgf·m)
7. Mix the recommended antifreeze
with an equal amount of purified
or distilled water
in a clean
container.
The cooling system
capacity
is:
1.72 US gal (6.5 Q I 1.43 Imp gal)
8. Loosen the bleeder bolt on top of
the engine, and remove
the
bleeder cap near the engine oil fill
cap. Pour coolant into the radiator
up to the base of
the filler neck.
Tighten the bleeder bolt and
reinstall the bleeder cap when
coolant comes out in a steady
stream with no bubbles.