2000 HONDA ODYSSEY rear door
[x] Cancel search: rear doorPage 10 of 352
Your Vehicle's Safety Features
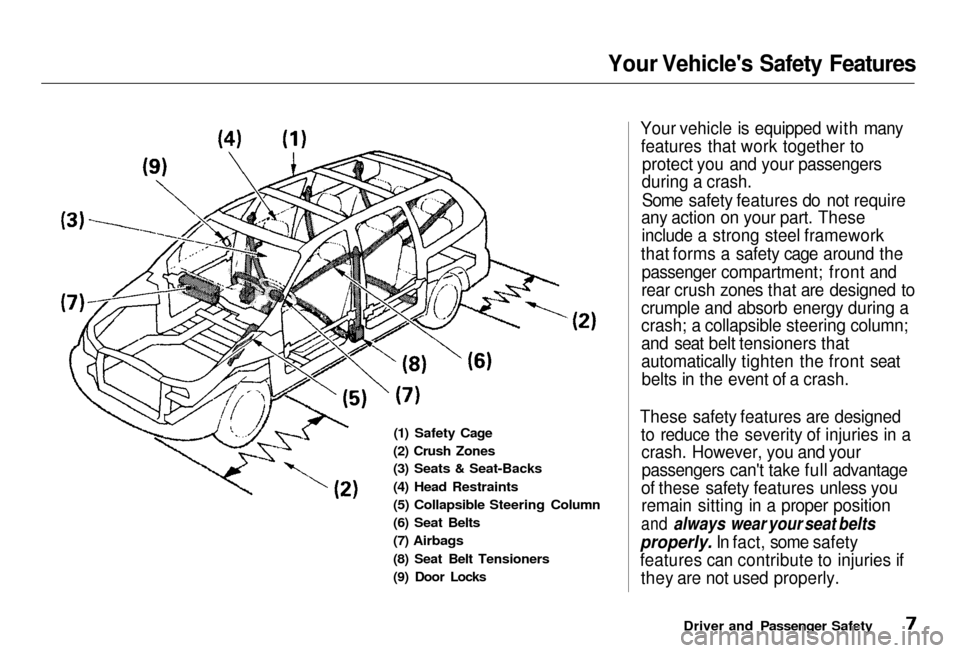
(1) Safety Cage
(2) Crush Zones
(3
) Seats & Seat-Backs
(4) Head Restraints
(5)
Collapsible Steering Column
(6) Seat Belts
(7)
Airbags
(8)
Seat Belt Tensioners
(9)
Door Locks
Your vehicle is equipped with many
features that work together to protect
you and your passengers
during a crash.
Some safety features do not require
any action on your part. These
include
a strong steel framework
that
forms a safety cage around the
passenger
compartment; front and
rear crush zones that are designed to
crumple and absorb energy during a
crash;
a collapsible steering column;
and seat belt tensioners that
automatically tighten the front seat belts in the event of a crash.
These safety features are designed to reduce the severity of injuries in acrash.
However, you and your
passengers
can't take full advantage
of these safety features unless you
remain
sitting in a proper position
and always wear your seat belts
properly. I
n fact, some safety
features can contribute to injuries if they
are not used properly.
Driver and Passenger Safety
Page 28 of 352
Protecting Childre n
If Yo u Mus t Driv e wit h Severa l
Childre n
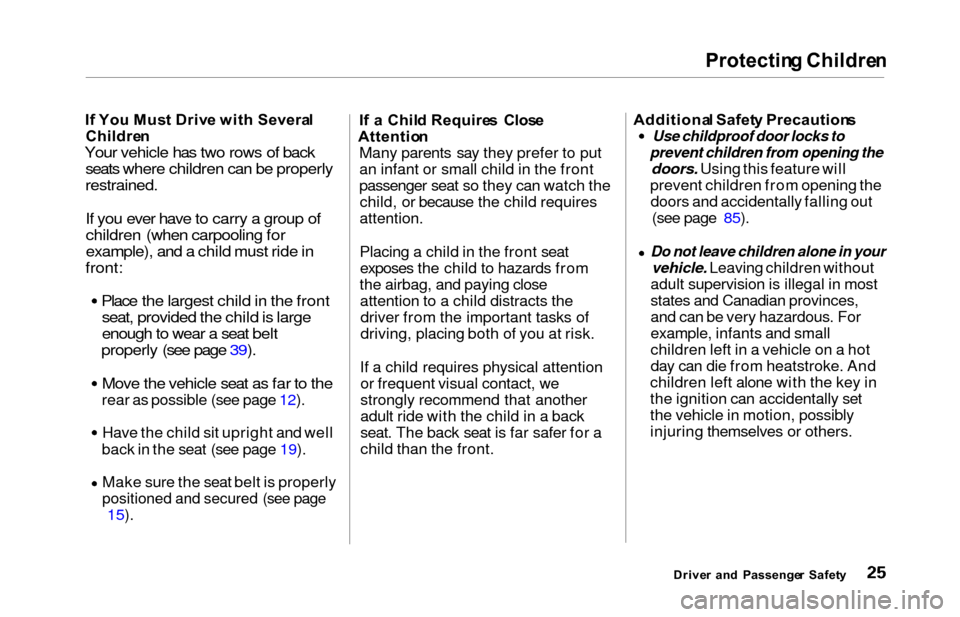
Your vehicle has two rows of back
seats where children can be properly
restrained.
If you ever have to carry a group ofchildren (when carpooling for
example), and a child must ride in
front:
Place the largest child in the frontseat, provided the child is large
enough to wear a seat belt
properly (see page 39).
Move the vehicle seat as far to the
rear as possible (see page 12). Have the child sit upright and well
back in the seat (see page 19).
Make sure the seat belt is properly
positioned and secured (see page
15). I
f a Chil d Require s Clos e
Attentio n
Many parents say they prefer to put
an infant or small child in the front
passenger seat so they can watch the child, or because the child requires
attention.
Placing a child in the front seatexposes the child to hazards from
the airbag, and paying close attention to a child distracts thedriver from the important tasks of
driving, placing both of you at risk.
If a child requires physical attention or frequent visual contact, we
strongly recommend that another
adult ride with the child in a back
seat. The back seat is far safer for a
child than the front. Additiona
l Safet y Precaution s
Use childproof door locks to
prevent children from opening the
doors. Using this feature will
prevent children from opening the doors and accidentally falling out (see page 85).
Do not leave children alone in your
vehicle. Leaving children without
adult supervision is illegal in most
states and Canadian provinces,
and can be very hazardous. For
example, infants and small
children left in a vehicle on a hot
day can die from heatstroke. And
children left alone with the key in
the ignition can accidentally set
the vehicle in motion, possibly
injuring themselves or others.
Drive r an d Passenge r Safet y
Page 58 of 352

Instrument
s an d Control s
This section gives information about
the controls and displays that
contribute to the daily operation of
your Honda. All the essential
controls are within easy reach.
Control Locations............................
56
Indicator Lights...............................
. 57
Gauges.............................................. 62
Controls Near the Steering
Wheel........................................ 65
Headlights.................................... 66
Automatic Lighting Off
Feature......................................
67
Daytime Runnin
g Lights.............
67
Instrument
Pane
l Brightness.....
67
Turn
Signals................................
.
68
Windshield
Wipers.....................
. 68
Windshield Washers................... 70
Rear Window Wiper and Washer...................................... 70
Hazard Warning........................ 70
Rear Windo
w Defogger.............. 71
Steering Wheel Adjustment....... 72
Steering Wheel Controls................ 73
Cruise Control.............................. 73
Remote Audio Controls .............. 76
Keys and Locks................................ 76
Keys............................................... 76
Immobilizer System..................... 77
Ignition Switch............................. 78
Power Door Locks....................... 79
Remote Transmitter.................... 81
Childproof Door Locks............... 85
Tailgate......................................... 85
Glove Box..................................... 87
Manual Sliding Doors...................... 88
Power Sliding Doors........................ 89
HomeLink Universal Transmitter.................................. 95
Seats.................................................. 99
Passenger Seating....................... 99
Seat Adjustments....................... 100
Driver's Seat Power
Adjustments........................... 102
Armrests..................................... 103
Head Restraints......................... 104
Third Seat Access...................... 105 Moving the Second Row Bucket Seat............................ 106
Removing the Bucket Seats in the Second Row................. 108
Folding the Third Seat.............. 109
Power Windows............................. 112
Mirrors............................................ 115
Parking Brake................................ 116
Digital Clock................................... 117 Center Table................................... 117
Beverage Holder............................ 118
Sunglasses Holder......................... 120
Sun Visor......................................... 121
Vanity Mirror................................. 121 Rear Compartment........................ 122
Center Pocket................................ 122Coin Holder.................................... 122
Storage Box.................................... 123
Coat Hook....................................... 123
Accessory Power Sockets............. 124 Interior Lights................................ 125
Instrument s an d Control s
Page 68 of 352
Controls Nea r th e Steerin g Whee l
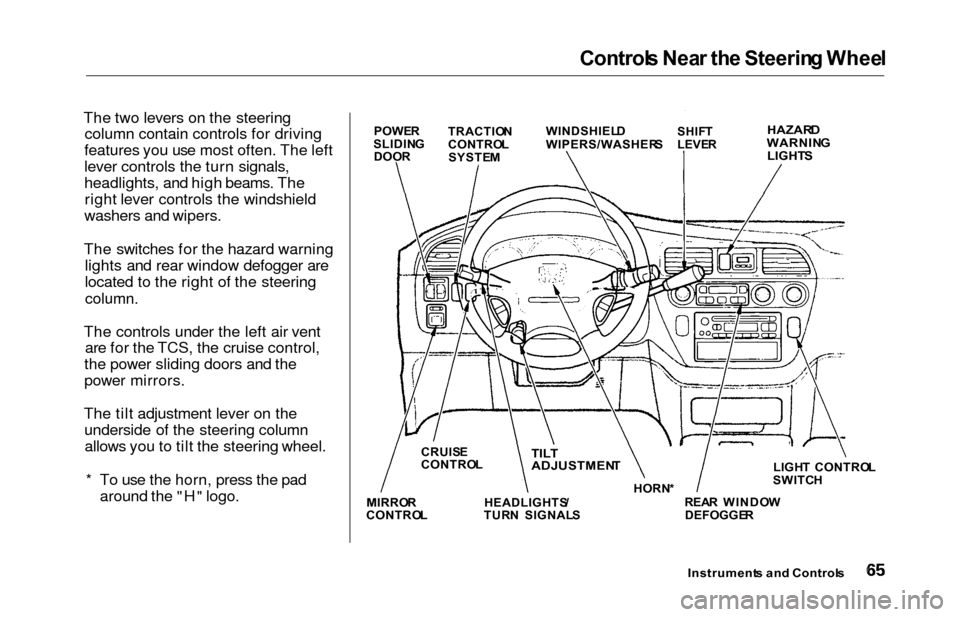
The two levers on the steering
column contain controls for driving
features you use most often. The left
lever controls the turn signals,
headlights, and high beams. The right lever controls the windshield
washers and wipers.
The switches for the hazard warning lights and rear window defogger are
located to the right of the steering
column.
The controls under the left air vent are for the TCS, the cruise control,
the power sliding doors and the
power mirrors.
The tilt adjustment lever on the underside of the steering columnallows you to tilt the steering wheel.
* To use the horn, press the pad around the "H" logo.
Instrument s an d Control s
POWER
SLIDIN G
DOO R TRACTIO
N
CONTRO L
SYSTE M WINDSHIEL
D
WIPERS/WASHER SSHIFT
LEVE RHAZAR DWARNIN G
LIGHT S
LIGHT CONTRO L
SWITC H
REA R WINDO W
DEFOGGE R
HORN
*TILT
ADJUSTMEN T
HEADLIGHTS /
TUR N SIGNAL S
CRUIS
E
CONTRO L
MIRRO R
CONTRO L
Page 69 of 352
Control
s Nea r th e Steerin g Whee l
Headlight s
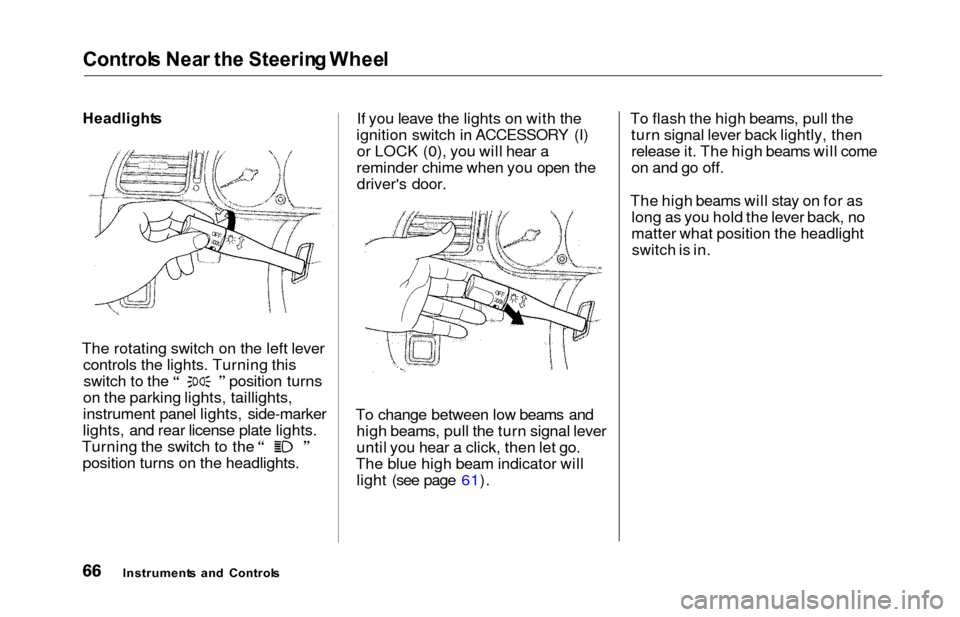
The rotating switch on the left lever controls the lights. Turning this switch to the position turns
on the parking lights, taillights,
instrument panel lights, side-marker
lights, and rear license plate lights. Turning the switch to the
position turns on the headlights. If you leave the lights on with the
ignition switch in ACCESSORY (I) or LOCK (0), you will hear a
reminder chime when you open the driver's door.
To change between low beams and high beams, pull the turn signal lever
until you hear a click, then let go.
The blue high beam indicator will light (see page 61). To flash the high beams, pull the
turn signal lever back lightly, thenrelease it. The high beams will come
on and go off.
The high beams will stay on for as long as you hold the lever back, no
matter what position the headlightswitch is in.
Instrument s an d Control s
Page 83 of 352
Keys and Locks
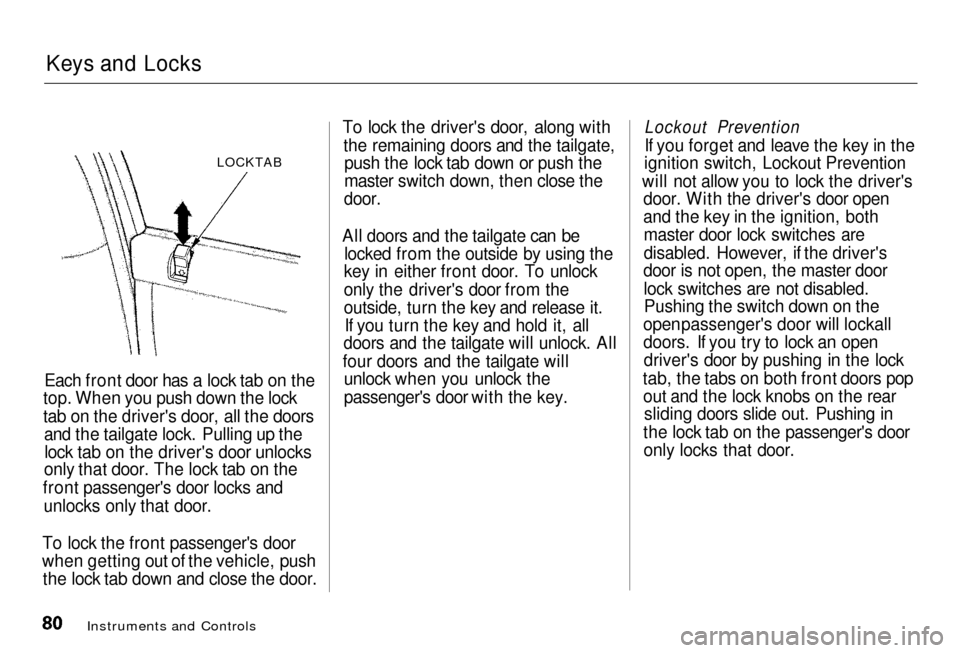
LOCKTAB
Each front door has a lock tab on the
top.
When you push down the lock
tab on the driver's door, all the doors and the tailgate lock. Pulling up the
lock tab on the driver's door unlocks
only
that door. The lock tab on the
front
passenger's door locks and
unlocks only that door.
To lock the front passenger's door
when getting out of the vehicle, push
the
lock tab down and close the door. To lock the driver's door, along with
the
remaining doors and the tailgate,
push the lock tab down or push the
master
switch down, then close the
door.
All doors and the tailgate can be locked from the outside by using the
key
in either front door. To unlock
only
the driver's door from the
outside,
turn the key and release it.
If you turn the key and hold it, all
doors
and the tailgate will unlock. All
four doors and the tailgate will unloc
k when you unlock the
passenger's door with the key.
Instruments and Controls
Lockout Prevention
I
f you forget and leave the key in the
ignition
switch, Lockout Prevention
will
not allow you to lock the driver's
door.
With the driver's door open
and
the key in the ignition, both
master
door lock switches are
disabled. However, if the driver's
door is not open, the master door
lock switches are not disabled.Pushin
g the switch down on the
open
passenger's door will lockall
doors. If you try to lock an open driver's
door by pushing in the lock
tab, the tabs on both front doors pop out
and the lock knobs on the rear
sliding doors slide out. Pushing in
the lock tab on the passenger's door only
locks that door.
Page 84 of 352
Keys an d Lock s
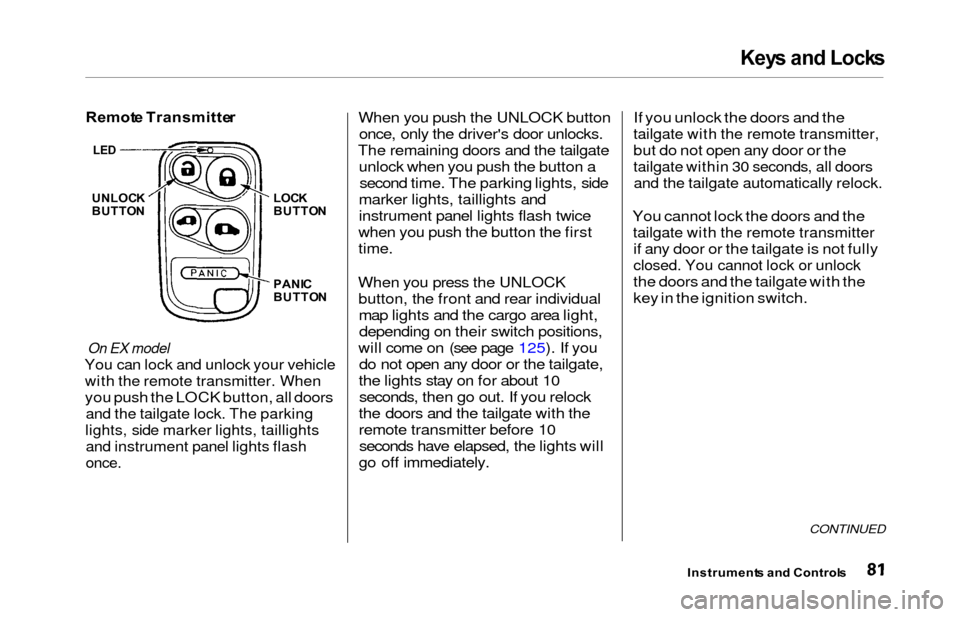
Remot e Transmitte r
On EX model
You can lock and unlock your vehicle
with the remote transmitter. When
you push the LOCK button, all doors
and the tailgate lock. The parking
lights, side marker lights, taillights
and instrument panel lights flash
once.
When you push the UNLOCK button
once, only the driver's door unlocks.
The remaining doors and the tailgate unlock when you push the button asecond time. The parking lights, side
marker lights, taillights and
instrument panel lights flash twice
when you push the button the first
time.
When you press the UNLOCK button, the front and rear individualmap lights and the cargo area light,depending on their switch positions,
will come on (see page 125). If you do not open any door or the tailgate,
the lights stay on for about 10 seconds, then go out. If you relock
the doors and the tailgate with the
remote transmitter before 10 seconds have elapsed, the lights will
go off immediately. If you unlock the doors and the
tailgate with the remote transmitter,
but do not open any door or the
tailgate within 30 seconds, all doors
and the tailgate automatically relock.
You cannot lock the doors and the
tailgate with the remote transmitter
if any door or the tailgate is not fully
closed. You cannot lock or unlock
the doors and the tailgate with the
key in the ignition switch.
CONTINUED
Instrument
s an d Control s
UNLOCK
BUTTO N LOC
K
BUTTO N
PANI C
BUTTO N
LED
Page 85 of 352
Keys an d Lock s
Opening or Closing the Power Sliding
Doors
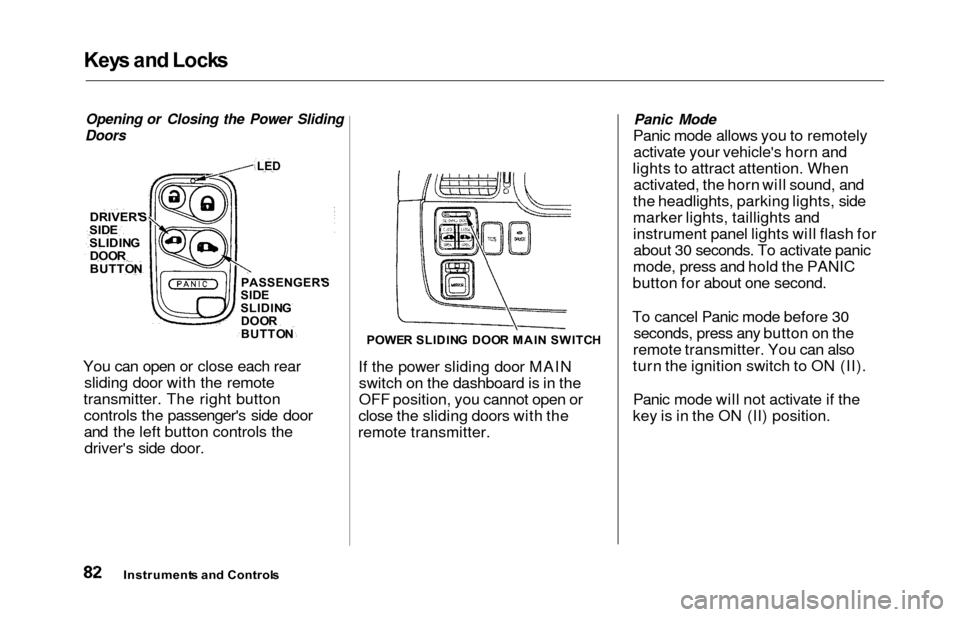
You can open or close each rear sliding door with the remote
transmitter. The right button controls the passenger's side door
and the left button controls thedriver's side door.
POWE R SLIDIN G DOO R MAI N SWITC H
If the power sliding door MAIN
switch on the dashboard is in the
OFF position, you cannot open or
close the sliding doors with the
remote transmitter.
Panic Mode
Panic mode allows you to remotely activate your vehicle's horn and
lights to attract attention. When activated, the horn will sound, and
the headlights, parking lights, side
marker lights, taillights and
instrument panel lights will flash for about 30 seconds. To activate panic
mode, press and hold the PANIC
button for about one second.
To cancel Panic mode before 30 seconds, press any button on the
remote transmitter. You can also
turn the ignition switch to ON (II).
Panic mode will not activate if the
key is in the ON (II) position.
Instrument s an d Control s
DRIVER'
S
SIDESLIDIN G
DOO R
BUTTO NPASSENGER' S
SID E
SLIDIN G
DOO R
BUTTO N
LED