Page 1295 of 1395
-
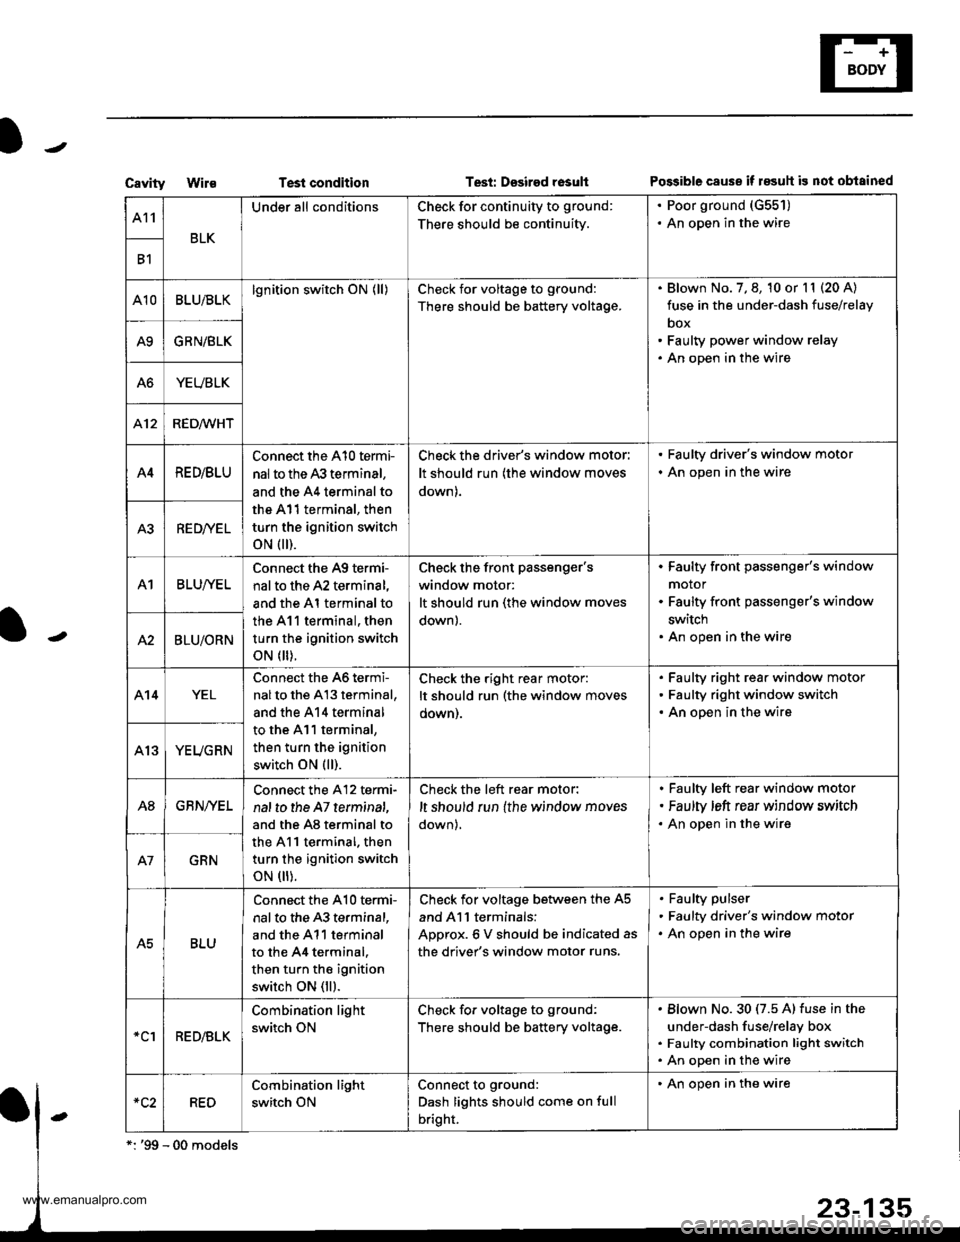
CavityWi1€Test conditionTesi: Dssired rosultPo$ible cause if 183uh is not obtained
A11
BLK
Under all conditionsCheck for continuity to ground:
There should be continuity.
. Poor ground (G551)
. An open in the wire
B1
A10BLU/BLKlgnition switch ON (ll)Check for voltage to ground:
There should be battery voltage.
Blown No. 7, 8, 10 or l1 (20 A)
fuse in the under-dash fuse/relay
box
Faulty power window relay
An open in the wire
A9GRN/BLK
A6YEUBLK
412RED/WHT
A4RE D/BLU
Connect the A10 termi-
nal to the 43 terminal,
and the A4 terminal to
the A11 terminal, then
turn the ignition switch
oN flr).
Check the driver's window motor:
It should run (the window moves
down).
. Faulty driver's window motor
. An open in the wire
A3RED/YEL
A1BLUI/EL
Connect the A9 termi-
nal to the A2 terminal,
and the Al terminal to
the 411 terminal, then
turn the ignition switch
oN flr).
Check the front Passenger'swindow motor:
It should run (the window moves
down).
Faulty front passenger's window
motor
Faulty front passenger's window
switch
An open in the wireA2BLU/ORN
A14YEL
Connect the 46 termi-
nalto the A13 terminal,
and the 414 terminal
to the A11 terminal,
then turn the ignition
switch ON (ll).
Check the right rear motor:
It should run (the window moves
oown).
Faulty right rear window motor
Faulty right window switch
An open in the wire
YEUGRN
A8GBN/YEL
Connect the A12 termi-
nal to the A7 terminat,
and the A8 terminal to
the A11 terminal. then
turn the ignition switch
oN flr).
Check the left rear motor:
,t should run {the window moves
down),
Faulty left rear window motor
Faulty ,eft rear window srrvitch
An open in the wire
GRN
A5BLU
Connect the A10 te.mi-
nal to the 43 terminal,
and the A11 terminal
to the 44 terminal.
then turn the ignition
switch ON (ll).
Check for voltage between the A5
and Al l terminals:
ADorox.6 V should be indicated as
the driver's window motor runs.
Faulty pulser
Faulty driver's window motor
An open in the wire
*clRED/BLK
Combination light
switch ON
Check fo. voltage to ground:
There should be battery voltage.
Blown No.30 (7.5 A) fuse in the
under-dash fuse/relay box
Faulty combination light switch
An open in the wire
RED
Combination light
switch ON
Connect to ground:
Dash lights should come on full
bright.
' An open in the wire
www.emanualpro.com
Page 1313 of 1395
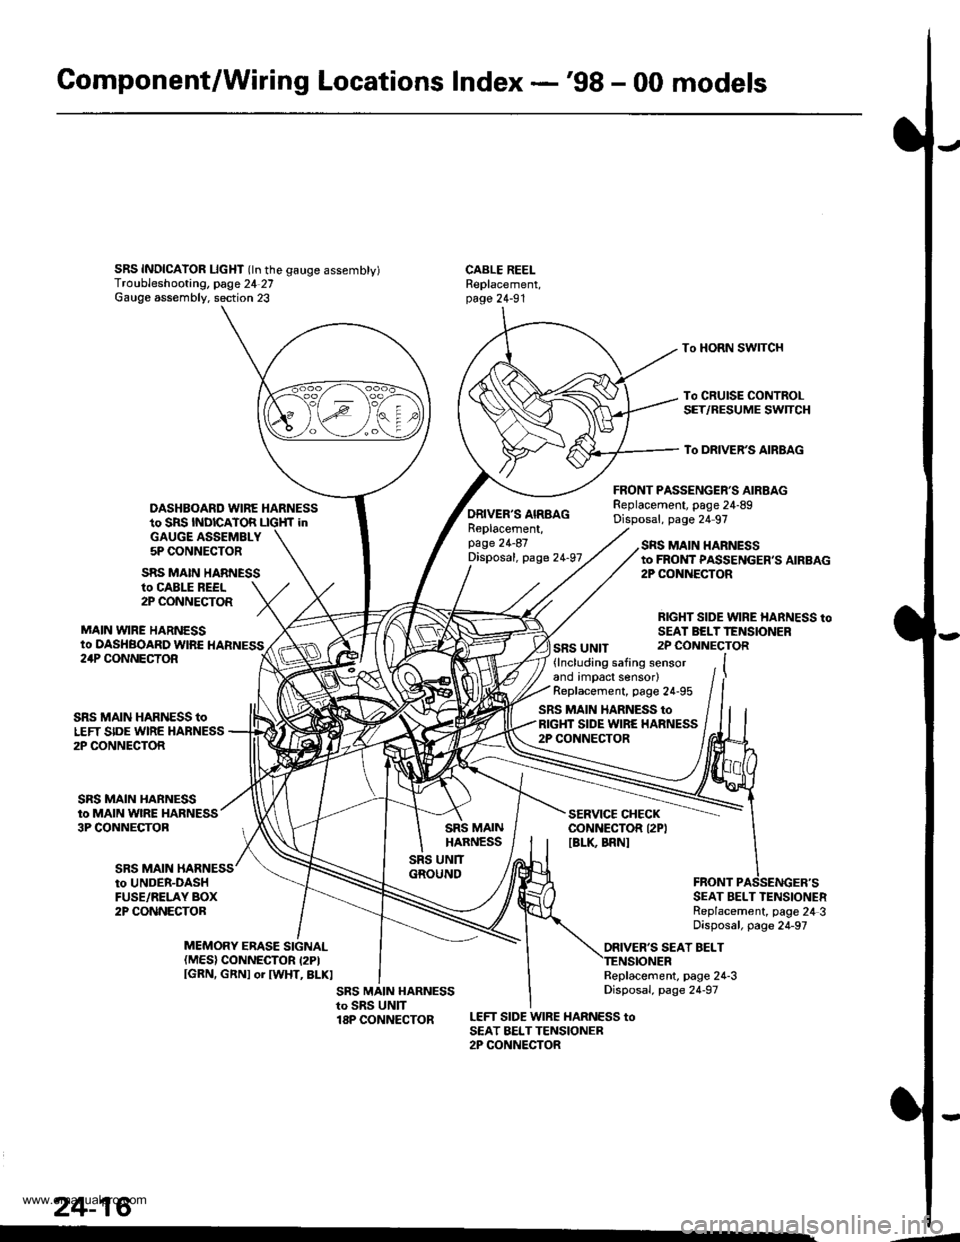
Gomponent/Wiring Locations Index -'98 - 00 models
SRS INDICAIOR LIcHT (ln the gauge assembty)Troubleshooting, page 24 27Gauge assembly. section 23
DASHBOARD WIRE HARNESSto SRS INDICATOR LIGHf inGAUGE ASSEMBLY5P CONNECTOR
FRONT PASSENGER'S AIRBAGReplacement, page 24-89Disposal, page 24 97
CABLE REELReplacement,page 24-91
To HORN SWITCH
To CRUISE CONTROLSET/RESUME SWTCH
To DRIVER'S AIRBAG
ro CABLE REEL2P CONNECTOR
MAIN VYIRE HARNESSto DASHBOARD WIRE HARNESS
SRS MAIN HARNESS
ORIVER'S AIRBAGReplacement,page 24-87Disposal, page 24-97
SRS UNIT
SRS MAIN HARNESSto FROI{T PASSENGER,S AIRBAG2P CONiIECTOR
RIGHT SIDE WIRE HARNESS toSEAI BELTTENSIONER2P CONNECTOR24P CONNECTOR
SRS MAIN
SRS MAIN HARNESS toLEFT SIDE WIRE HARNESS2P CONNECTOR
SRS MAIN HARNESSto MAIN WIRE HARNESS3P CONNECTOB
(lncluding safing sensorand impact sensor)Replacement, page 24-95
SRS MAIN HARNESS toRIGHT SIDE WIRE HARNESS2P CONNECTOR
SERVICE CHECKCONNECTOR I2PIIBLK BRNI
to UNDER-DASHFUSE/RELAY BOX2P CONNECTORSEAT BELT TENSIONERReplacement, page 24 3Disposal, page 24-97
ORIVER'S SEAT BELTMEMORY ERASE SIGNAL(MES) CONNECTOR I2PIIGRN, GRNI or IWHT, BLKIReplacement, page 24-3Disposal, page 24-97
LEFT SIDE WIRE HARNESS toSEAT BELTTENSIONER2P CONNECTOR
24-16
.4
www.emanualpro.com
Page 1322 of 1395
)Steering-related Precautions
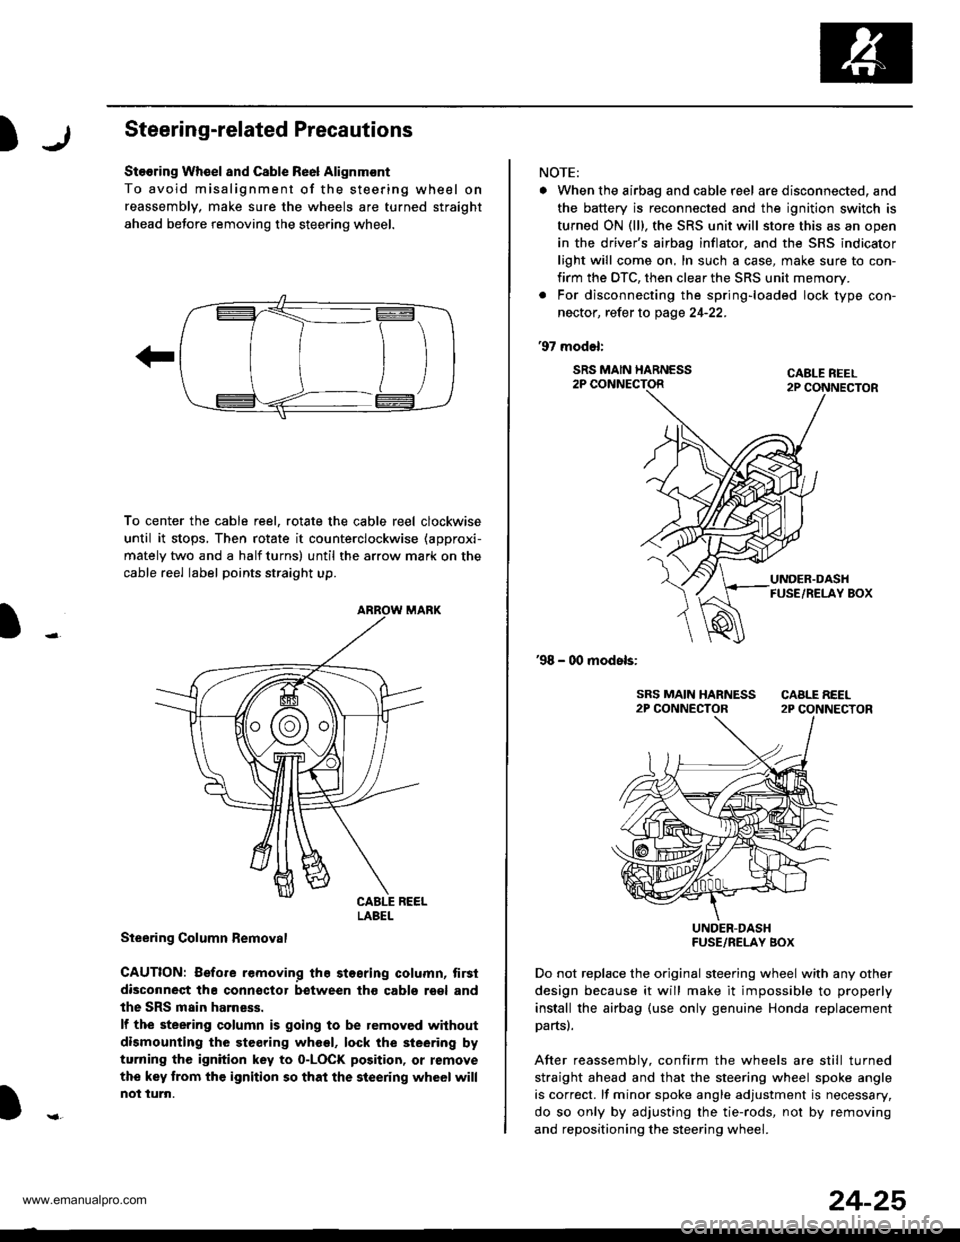
Stooring Wh€el and Csble Re6l Alignm€nt
To avoid misalignment of the steering wheel on
reassembly, make sure the wheels are turned straight
ahead beJore removing the steering wheel.
To center the cable reel, rotate the cable reel clockwise
until it stops, Then rotate it counterclockwise (approxi-
mately two and a half turns) until the arrow mark on the
cable reel label points straight up.
Steering Column Bemoval
CAUTION: Before removing the stosring column, tirsi
disconneqt tha connsctor between tho cabls roel and
the SRS main harness.
lf the steering column is going to be removed without
dismounting the steering wheel, lock the sieering by
turning the ignition key to o-LOCK position, or remove
the key trom the ignition so that the steering wheel will
not turn.
LABEL
NOTE:
. When the airbag and cable r6el are disconnected, and
the battery is reconnected and the ignition switch is
turned ON (ll), the SRS unit will store this as an open
in the driver's airbag inflator, and the SRS indicator
light will come on, In such a case, make sure to con-
firm the DTC, then clear the SRS unit memory.
. For disconnecting the spring-loaded lock type con-
nector, refer to page 24-22.
'97 model:
SRS MAIN HARNESS2P CONNECTORCABLE REEL2P CONNECTOR
'98 - 00 models:
UNDER-DASHFUSE/RELAY BOX
Do not replace the original steering wheel with any other
design because it will make it impossible to properly
install the airbag (use only genuine Honda replacement
partsl.
After reassemblv, confirm the wheels are still turned
straight ahead and that the steering wheel spoke angle
is correct. lf minor spoke angle adjustment is necessary,
do so only by adjusting the tie-rods, not by removing
and repositioning the steering whee .
24-25
www.emanualpro.com
Page 1330 of 1395
SRS Indicator Light Wire Connections
SRS Indicator Light Power Circuit
DASHBOARD WIRE HARNESS
YEL
BLK
To UNDER-DASHFUSE/RELAY BOX <_
20P CONNECTOR
To GAUGEcsog + assEMBLy
SRS Indicator Light Control Circuit
SRS MAIN HARNESS
)-MAIN WIRE HARNESS
VAIVBIt
To UNDER-DASHFUSE/BELAY BOX2P CONNECTOR
c414MAIN WIRE HARNESS 3P CONNECTORTerminal side of msle t€rminals
c415MAIN wlRE HARNESS 24P CONNECTORTerminal aide of male terminals
c502DASHBOARD WIRE HARNESS 2OP CONNECTORWire side of lemslo terminsls
c503OASHBOARD WIRE HARNESS 24P CONNECTORWire side of female t€rminal3
c509DASHBOABD WIRE HARNESS 5P CONNECTORWire sid€ ot lemale te.minals
c801SRS MAIN HARNESS 2P CONNECTORwire side ol f.male terminals
c803SRS MAIN HARNESS 3P CONNECTORWire side ol female terminals
c806SRS MAIN HARNESS T8P CONNECTORWire side of lomrle terminals
)
24-33
www.emanualpro.com
Page 1331 of 1395
Troubleshooting
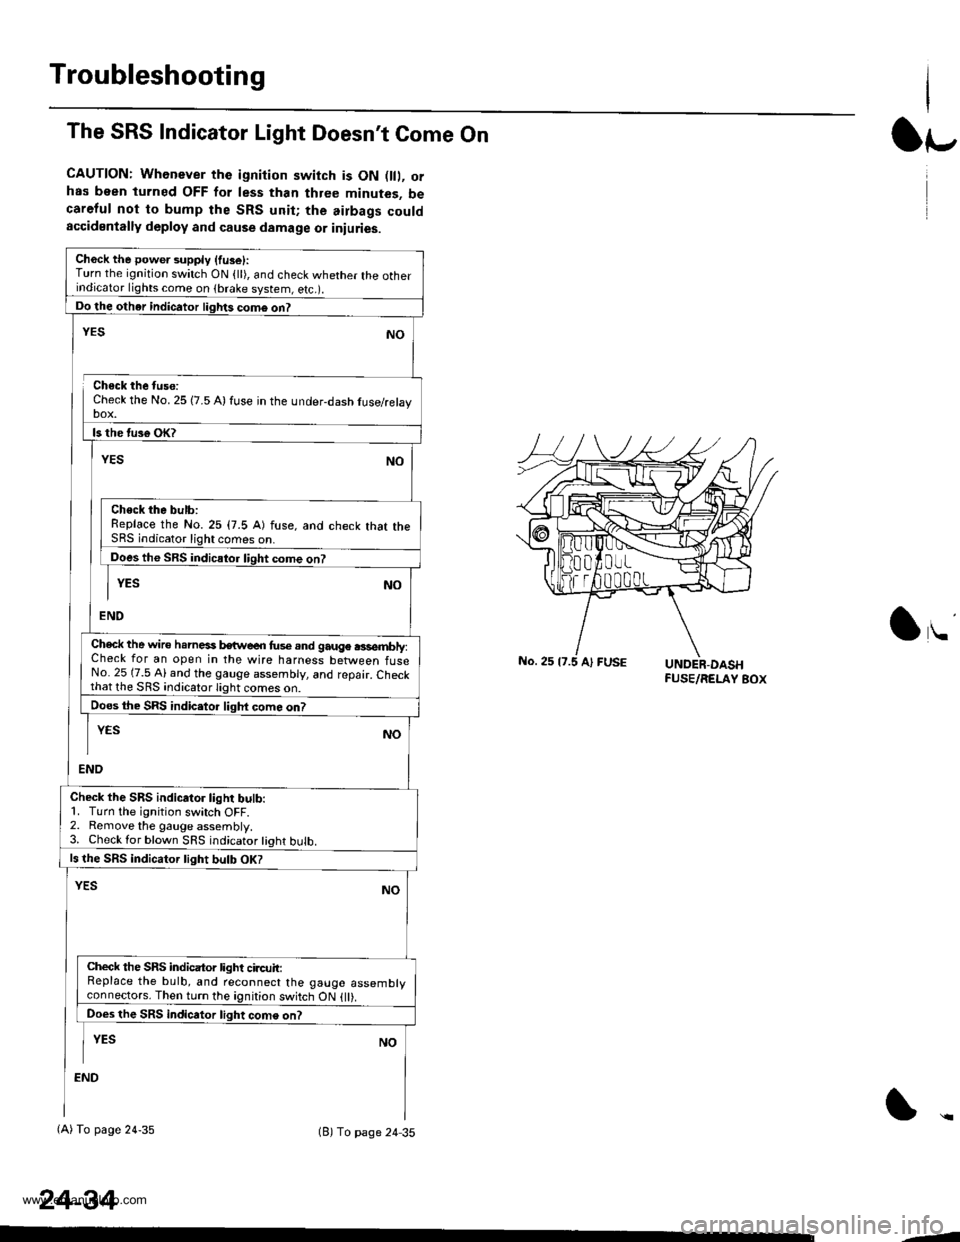
The SRS Indicator Light Doesn't Come On
CAUTION: Whenever the ignition switch is ON D, orhas been turned OFF for less than three minutes, becareful not to bump the SRS unit; the airbags couldaccidentally deploy and cause damage or iniuries.
Ch6ck the power supply (fuse):Turn the ignition switch ON {ll), and check whether the otherindicator lights come on (brake system, e(c.r.
Do the other indicator liglrts com6 on?
Check the No. 25 (7.5 A) fuse in the under-dash tuse/relayDOX.
ls the tus€ oK?
NO
Check the bulb:Replace the No.25 (7.5 A) fuse, and check that theSRS indicator light comes on.
Does the SRS indicator liqht come on?
YESNO
END
YES
Check the wire h.rnesi kwe€n fus€.nd gauge .3sembly:Check for an open in the wire harness between fuseNo. 25 (7.5 Al and the gauge assembly, and repair. Checkthat lhe SRS indicato.lighi
Does the SRS indic.tor liqht com6 on?
END
YESNO
Check the SRS indicator light bulb:1. Turn the ignition switch OFF.2. Remove the gauge assembly.3. Check lor blown SRS indicator tight bulb.
ls the SRS indicator tight bulb OK?
YESNO
Check the SRS indicator light circuit:Replace the bulb, and reconnect the gauge assemblyconneclors. Then turn the ignition switch ON {ll).
Does the SRS indicator light come on?
I YEs No
:ND
(A) To page 24-35(B) To page 24 35
24-34
lr-
lu
-J
www.emanualpro.com
Page 1344 of 1395
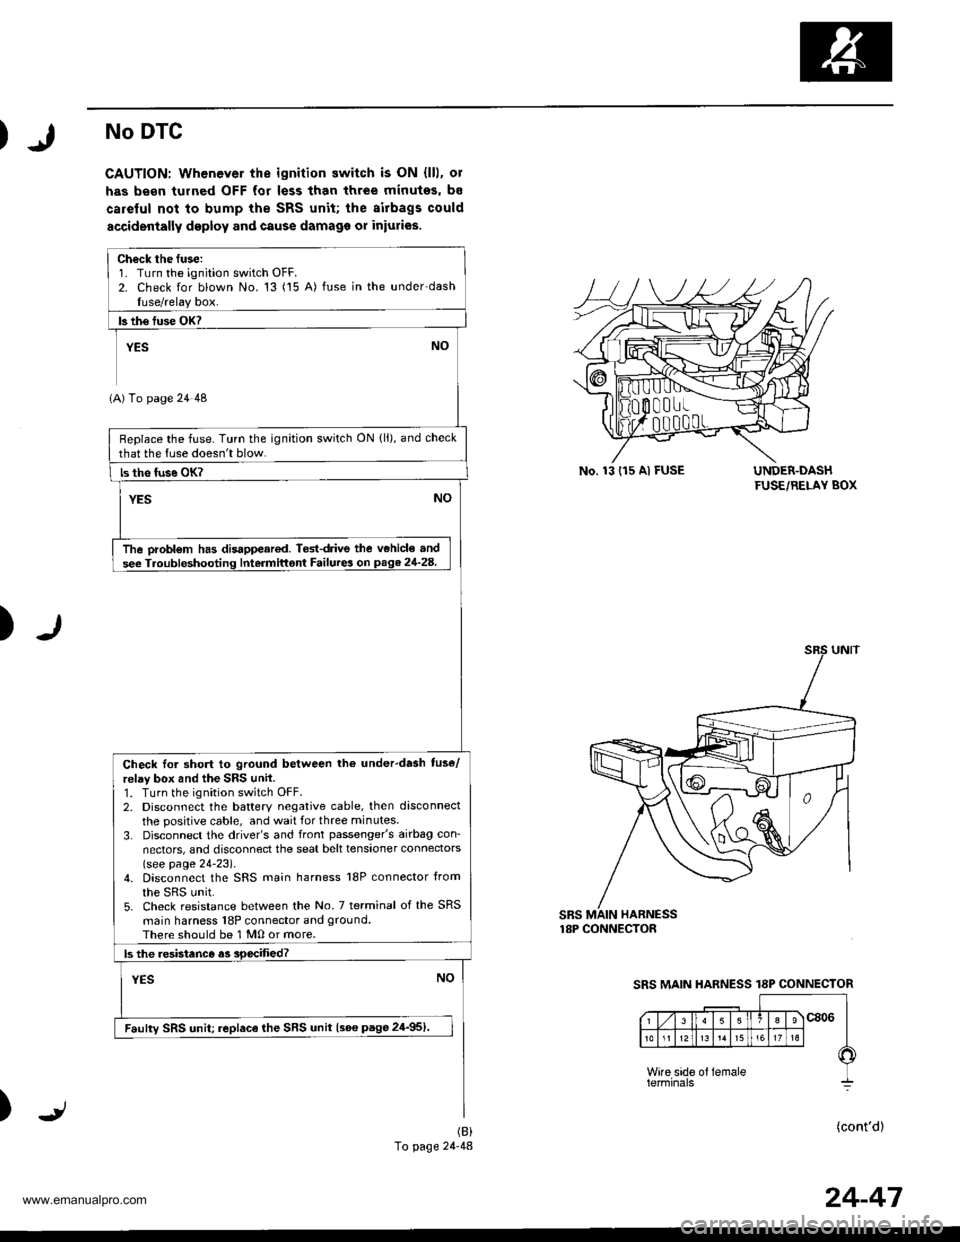
No DTC
CAUTION: Whenever the ignition switch is ON {lll, ol
has been tulned OFF for less than three minutes, bs
careful not to bump the SRS unit; the airbags could
accidenially deploy and cause damago or iniuries.
UNDER-DASHFUSE/RELAY BOX
)
SBS MAIN HARNESS18P CONNECTOR
)(cont'd)(B)
To page 24-48
Ch€ck the fuse:1. Turn the ignition switch OFF.2. Check for blown No. 13 ('15 A) fuse in the under-dashIuse/relay box.
b th€ fuse OK?
YEs NO
1A) To page 24 48
Replace the fuse. Turn the ignition switch ON {ll), and check
that the luse doesn't blow.
ls the fuse OK?
YESNO
The probl€m has disappeared. Ted{rive the v€hicle and
see Troubfeshooting Intermittont Failurea on page 21-28.
Check Ior short to ground between tho underdash tuse/
relay box and the SRS unil.1. Turn the ignition switch OFF.2. Disconnect the battery negative cable, then disconnect
the positive cable, and wait for three min utes.
3. Disconnect the driver's and front passenger's airbag con-
nectors, and disconnect the seat belt tensioner connectors(see page 24-23).4. Disconnect the SRS main harness l8P connector from
the sRs unit.5. Check resistance between the No. 7 terminal of the SRS
main harness 18P connector and ground.
There should be 1 M0 or more.
ls the .esistanco as soecified?
YESNO
Faulty SRS unit; replace lhe SRS unit {see page 24-951.
No. 13 (r5 Al FUSE
SRS MAIN HARNESS 18P CONNECTOR
24-47
www.emanualpro.com
Page 1345 of 1395
Troubleshooting
No DTC (cont'dl
ltofi page 24-47(B)
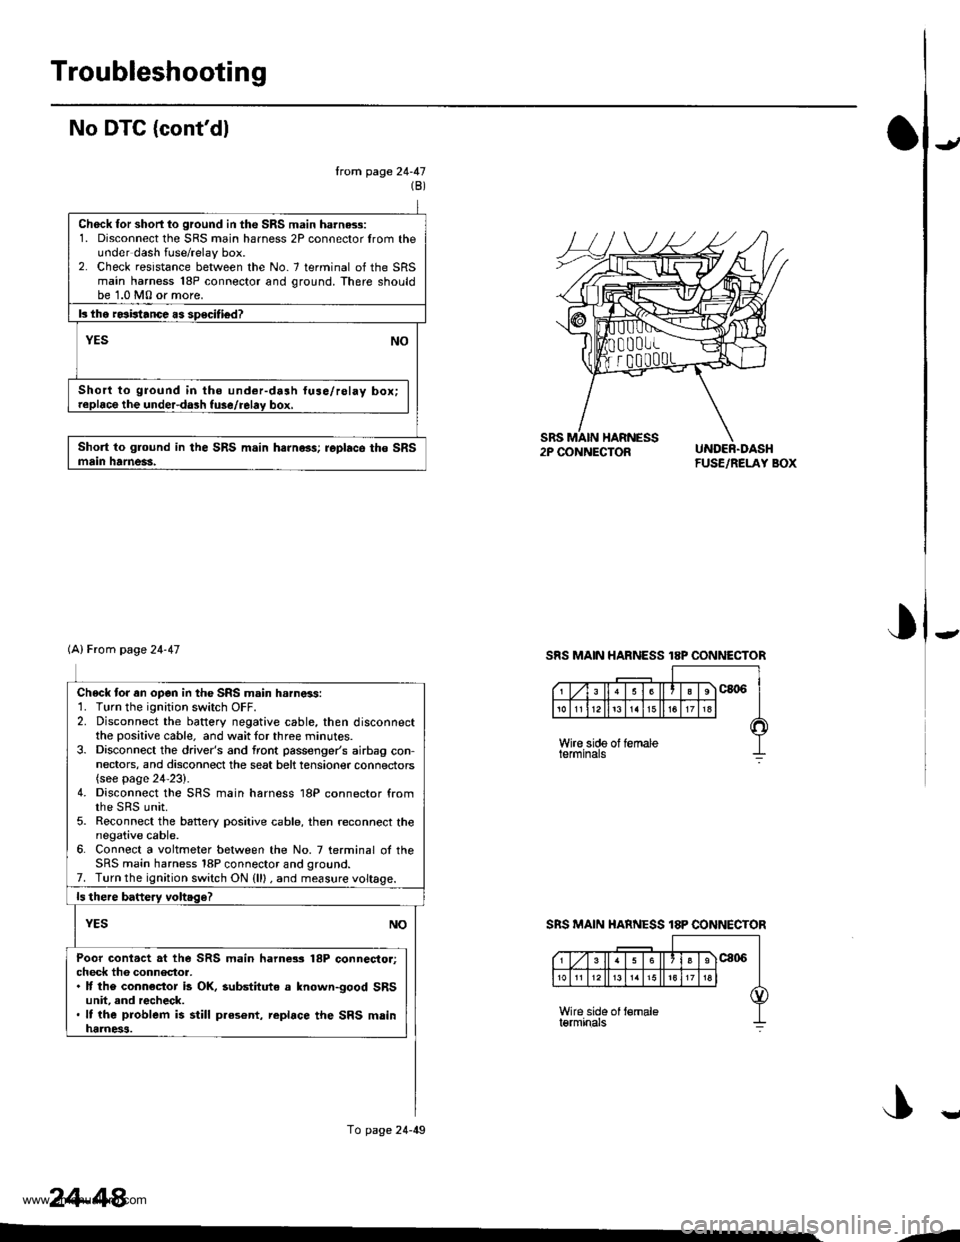
Chock for short to ground in the SRS main harne3s:1. Disconnect the SRS main harness 2P connector lrom theunder dash fuse/relay box.2. Check resrstance betwoen the No.7 terminal of the SRSmain harness 18P connector and ground. There shouldbe 1.0 M0 or more.
k the ro3irtancc as specifi€d?
YESNO
Short to ground in tho under-da3h lus6/rolay box;replace the under-dash fuse/relav box,
Short to glound in the SRS m.in hernoss; roplace tho SRSmain hatnei3.FUSE/RELAY BOX
Check tor an op€n in the SRS main harness:1. Turn the ignition switch OFF.2. Disconnect the battery negative cable, then disconnectthe positive cable. and wait for th ree minutes.3. Disconnect the driver's and front passenge/s airbag con,nectors, and disconnect the seat belt tension€r connectors{see page 24-23}.4. Disconnect the SRS main harness 18P connector fromthe SRS unit.5. Reconnect the battery positive cable, then reconnect thenegative cable.6. Connect a voltmeter between the No. 7 terminal oI theSRS main harness 18P connector and ground.7. Turn the ignition switch ON (lll , and measure voltage.
Poor conlact .t the SRS main harness l8P connesto.:check th6 connector,. It the connector is OK, substitute a known-good SRSunit, and rgcheck.. It lhe problem ii still p.es6nt, rcplace the SRS mlinhamess.
(A) From page 24-47
To page 24-49
SRS MAIN HARNESS 18P CONNECTOR
SRS MAIN HARNESS 18P CONNECTOR
J3
24-48
-a
1
J
www.emanualpro.com
Page 1346 of 1395
)
UNDER-DASHFUSE/RELAY BOX
)c801
SRS MAIN HARNESS2P CONNECTOR
)
From page 24-48
Check tor an open in the SRS main harne$:1. Turn the ignition switch OFF.2. Disconnect the SRS main harness 2P connector lrom theundeFdash fuse/relay box.3. Check resistance between the No. 1 terminal of the SRSmain harness 2P connector and the No. 7 terminal of theSRS main harness l8P connector.There should be 0 - 0.5 O.
ls the re3istanc€ as soecitiod?
YESNO
Poor contact at iho SRS main harnoss 2P connoctor;check thg connocior.. lf the connector is OK. substitute a known-good under-da3h fuse/rolav box, and .echeck.'lf tho probl€m is still present. replace tho SRS mainharne3s.
Opon in the SRS main ha.ness; replace the SRS main harness.
SRS MAIN HARNESS lEP CONNECTOR
24-49
www.emanualpro.com