Page 1312 of 2189
Rear Seat
Seat-back Latch Replacement
2Dl4Dl
Remove the lock cylinder trim, then remove the rear
shelf (see pages 20 59, 61).
NOTE: Take care not to bend each lock rod.
>: Boh, screw locationsA>,4
6x1.0mm9.8 N.m (1.0 kgt.m,7.2 rbf.ftl
LOCK CYLINOERTRIM
.i.-::
LOCKRODS
LEFT SEAT-EACK I-ATCH
Installation is the reverse of the removal procedure.
NOTE:
. Make sure each lock rod is connected securely.. [/ake sure each seat-back locks securely and
opens properly.
. lf necessary, adjust the seat-back latch.
B >,2
/+j
V
LOCKCYLINDER
20-8�2
3D:
Pull the trunk mat away from the seat'back (see page 20-
80).
>: Boll, screw locationsa>,2
6x1.0mm9.8 N.m (1.0 kgf.m,7.2 tbl.ft)
B>, 1
@
LATCH COVEB
Installation is the reverse ofthe removal procedure.
NOTE:
. Replace the released clips with new ones.. lvlake sure the seat-back locks securely and opensproperly.
SEAT"BACK
Page 1318 of 2189

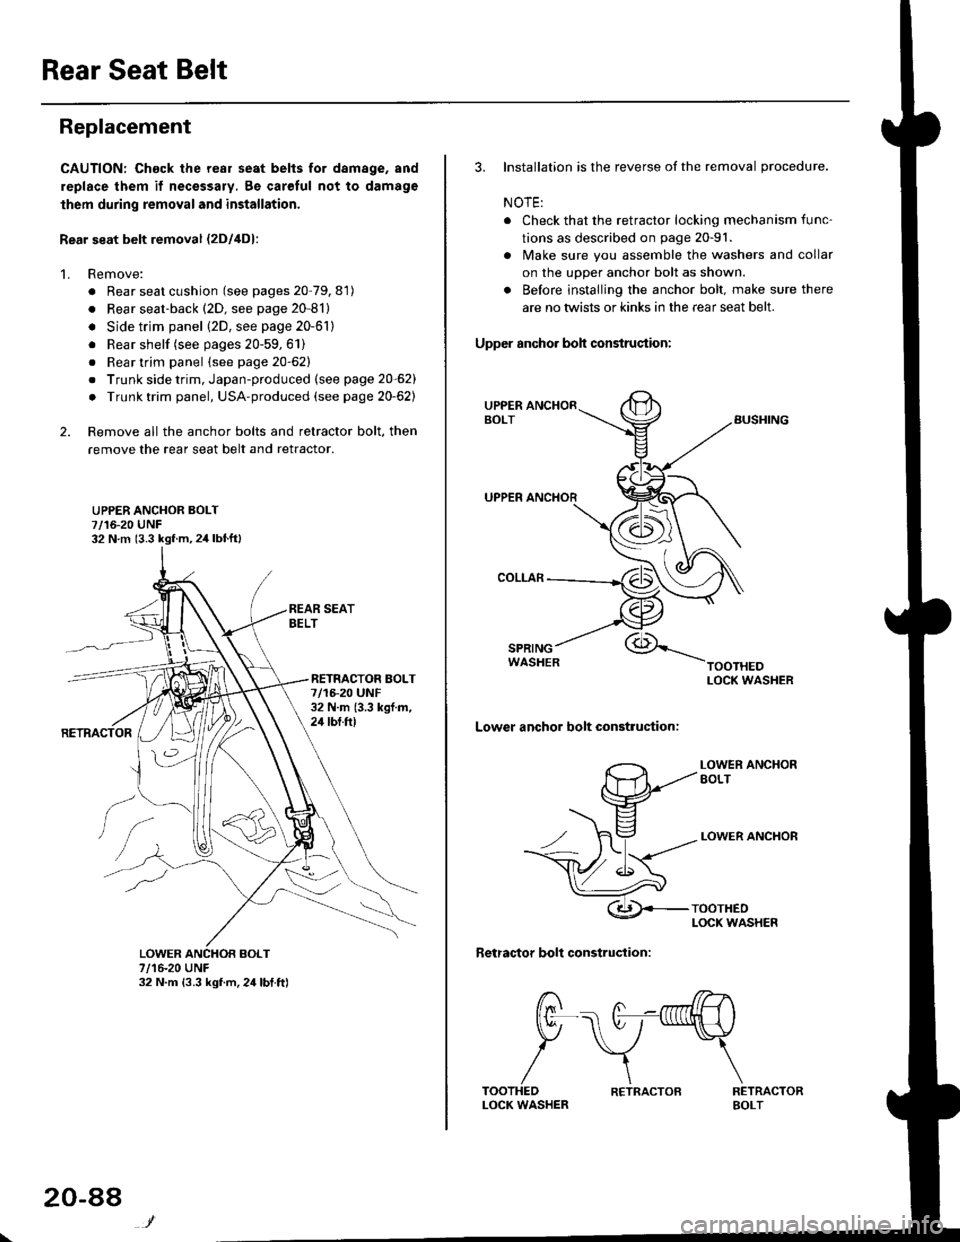
Rear Seat Belt
Replacement
CAUTION: Chack the rear seat belts for damage, and
replace them if necessary, 8e carolul not to damage
lhem during removal and installation.
Rear seat belt removal {2Dl4D}:
1. Remove:
. Rear seat cushion (see pages 20-79, 81)
. Rear seat-back (2D, see page 20-81)
. Side trim panel (2D, see page 20-61)
. Rear shelf (see pages 20-59,61)
. Rear trim panel {see page 20-62}
. Trunk side trim, Japan-produced (see page 20-62)
. Trunk trim panel, USA-produced (see page 20-62)
2. Remove all the anchor bolts and retractor bolt, then
remove the rear seat belt and retractor.
UPPER ANCHOR BOLT7/16-20 UNF32 N.m (3.3 kgf.m,2,1 lbtft)
RETNACTOR BOLT7/1F20 UNF32 N.m {3.3 kgf.m,24 tbt.ft)
7/16-20 UNF32 N.m {3.3 kgf.m,24lbt.ft)
20-88
R€TRACTOB
3. Installation is the reverse of the removal procedure.
NOTE:
. Check that the retractor locking mechanism func-
tions as described on page 20-91.
. lvlake sure you assemble the washers and collar
on the upper anchor bolt as shown.
. Before installing the anchor bolt. make sure there
are no twists or kinks in the rear seat belt.
Upper anchor boh condruqtion:
SPRINGWASHER
Lower anchor bolt construction:
LOWER ANCXOREOLT
LOWER ANCHOR
Retractor bolt construction:
RETRACTORBOLT
t7 /7--^,l/rn .----. A -nrfi|lH \
tr\7-\
/\TOOTHEDLOCK WASHER
Page 1323 of 2189
Exterior
Component Location Index
NOTE: Refer to the Civic BodV Repair Manual, '1996 Model Series, P/N.6150330,forthe hood, trunk lid and hatch removal.
2Dl30llDl
LICENSE PLATETRIM TRUNK LIDROOF MOLOINGReplacement,
SIDE WINDOWMOLDINGSReplacement,page 20-102Replacement,page 20-100Adjustment, page 20-97Tolsion Bar Removal,page 20-10220 99
HOODAdiustment, page 20 96Hood Edge protector
Replacement, page 20 99
TRUNK LIDWEATHERSTRIPReplacement,page 20-100
REAR BUMPERReplacement,page 2O-95
SILL PANELReplacement, page 20 105
REAR AIR OUTLETReplacement,page 20-106
FUEL PIPEPROTEfiORReplacement,page 20-106
FENDERWELL TRIMReplacement, page 20-106
Replacement,page 20-106
3D:
HATCH
HATCHAdjustment,page 20-98
WEATHERSTRIP
20-93
Page 1327 of 2189
Trunk Lid
Adjustment
NOTE; Before adjusting the trunk lid, loosen each bolt slightly.
1. Adjust the trunk lid hinges right and left, as well as fore and aft, by using the elongated holes'
2. Turn the trunk lid edge cushions, as necessary, to make the trunk lid fit flush with the body at the rear and side edges.
3. Adiust the fit between the trunk lid and the trunk lid opening by moving the striker'
4. After adjustment, tighten each bolt securely
TRUNK LIO EDGE
CUSHION
TRUNK LID
NOTE: Take care notto hit the rear windowwhen loosening thebolts.
NOTE: Move the striker right or left until it's centered in
the trunk lid latch as shown.
TRUNK LIO
9.8 N.m {1.0 kgf.m,7 .2lbl.ltlSTRIKER
20-97
Page 1329 of 2189
Front Grille/Hood Edge
Protector
Trunk Lid Torsion
Bars
Replacement
Front grille:
NOTE: Take care not to scratch the front bumper'
Remove the front bumper (see page 20-94) Bemove the
clips and screws, then slide the front grille forward by
detaching the hooks.
>: Screw locations, 4
"qL
A +lt /
Hood edge Ploteetor:
NOTE:
. When removing the clips, use a cllp remover.
. lf necessary, replace any damaged clips.
>:Clip locations, 18
FRONT BUMPER
HOOD EDGE
/A.- -----,_ ,,, \-'-l
o[_]
20-99
Removal
CAUTION: Pui on gloves to protect your hands.
NOTE: Take care not to damage the body
Remove the torsion bars with the torsion bar assembly
tool while holding the trunk lid as shown.
CENTER CLIP
E
lnstallation is the reverse of the removal procedure'
NOTE:
. Adjust the torsion bars fore or aft with the
sion bar assemblY tool as shown
ll = Normal Posrtlona = Higher tensron
. Make sure the trunk lid opens properly.
tor-
Page 1330 of 2189
Trunk Lid/Hatch
WeatherstripLicense Plate Trim
Replacement
When installing the trunk lid/hatch weatherstrip. align it
with the alignment mark on the trunk lid/hatch opening.
NOTE:
. Make sure there are no wrinkles in the weatherstrip.
. Check for water leaks.
2DllDi
STEEI.CORE
3D:
ALIGNMENTMARK (2Dl4D)
ALIGNMENT MARK
WEATHERSTRIP
ALIGNMENT MARK
BODY
\
20-100
Replacement
CAUTION: Put on glov€s to plotest your hands.
NOTE: Take care not to scratch the trunk lid/hatch.
1. Remove the license plate.
2, 3D: Remove the hatch trim panel (see page 20-63).
3. Remove the nuts and clips, and detach the clip, then
remove the license plate trim.
NOTE: Take care not to drop the nuts inside the trunk
lid/hatch.
a: Nut locations,2
6fi\5x0.8mm Irvr?// 1,8 N.m {0.18 kst.m,l- j llrftl ,/
>: Clip locations,
InA
aa# )
-,/
Installation is the reverse of the removal orocedure.
NOTE: lf necessary, replace any damaged clips.
Page 1337 of 2189
Opener Cable/Opener and Latch/Wiper and Washer
Component Location Index
2Dt3DItD'
y"Tl,"nll,ib?*'r.* o*t"
Replacement, Page 20_1 13
Adiustment, Page 20'1 17
WINDSHIELDWASHER NOZZLESAdjustment, Page 20_1 17
HOOD LATCH
{see page 20-110)
REAR WINDOW WIPER
ARM and MOTORReplacement, Page 20-1 15
Adjustment, page 20 117
LOCK CYLINDER(see page 20 113)
LOCK CYLINDER
TRUNK LIO LATCH
{see page 20 112)
FUEL LID OPENERCABLE(see page 20-108i
LID OPENERCABLE(see page 20 108)
LID/FUELLID OPENER(see page 20 111)
RELEASE HANDLE(see page 20-110)
3D:
REAR WINDOWWASHER NOZZLEAdiustment, page 20-1 17
REAR WINDOWWASHER TUBE(see page 20-116)
HATCH OPENERCABLE(see page 20 110)
WASHER RESERVOIRReplacement, Page 20-1 15
HATCH/FUEL LID OPENER(see page 20 1'11)
FUEL LID OPENERCABLE(see page 20 110)
(see page 20 111)
20-107
Page 1338 of 2189

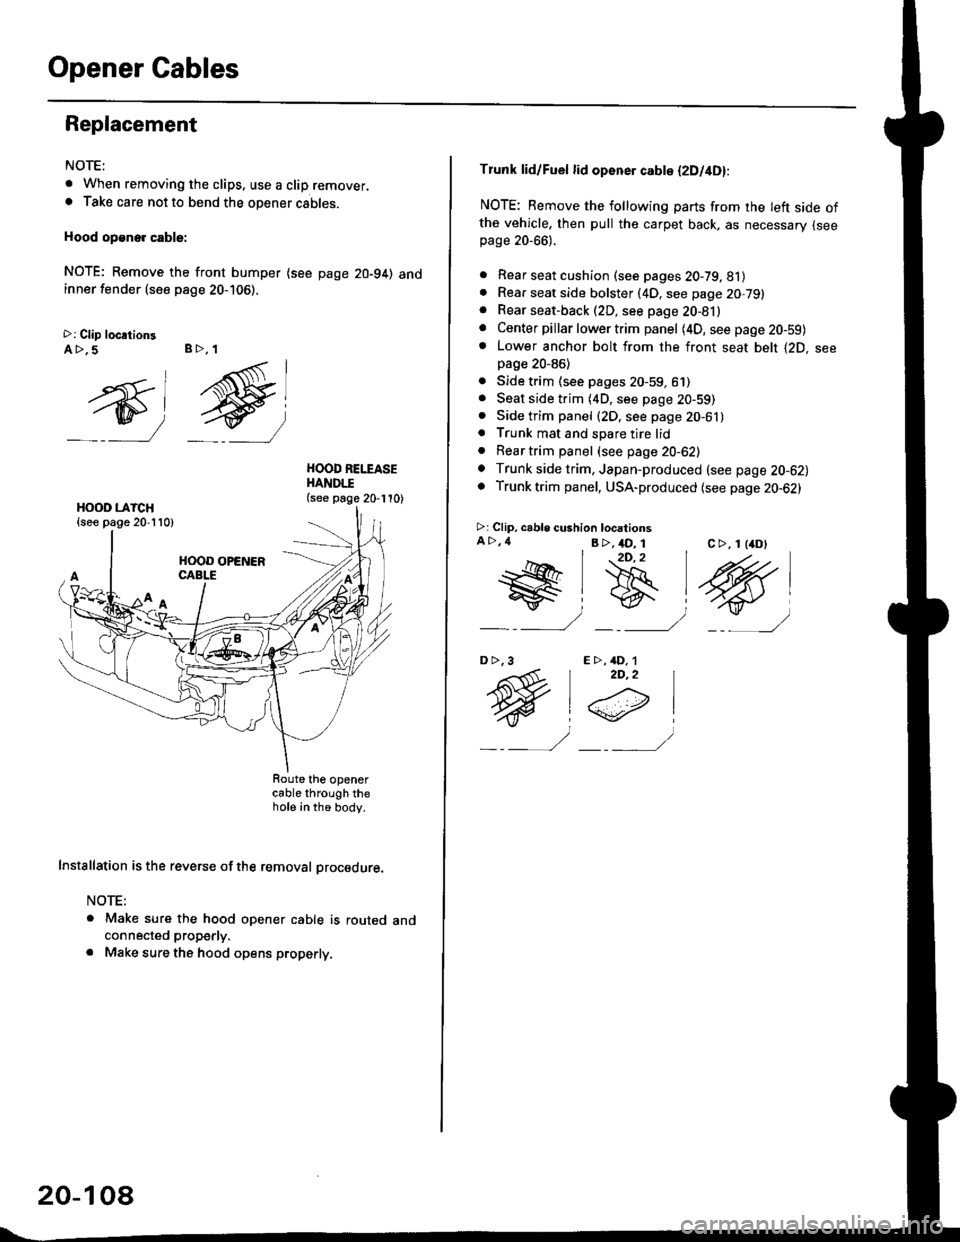
Opener Cables
Replacement
NOTE:
t When removing the clips. use a clip remover.. Take care not to bend the opener cables.
Hood op€ne. cable:
NOTE; Remove the front bumper (see page 20-94) andinner fender (see page 20-106).
>: Clip loc.tionsA >,5 B>, 1
ry)
g
HOOD REI.TASEHANDI.I(see page 20-110)
cable through thehote in th6 body.
Installation is the reverse of the removal procedure.
NOTE:
a Make sure the hood opener cable is routed andconnected properly.
. Make sure the hood opens properly.
20-10a
Tlunk lid/Fuel lid opener cabte (2Dl4D):
NOTE: Remove the following parts from rhe Ieft side ofthe vehicle, then pull the carpet back, as necessary {seepage 20-66).
. Rear seat cushion (see pages 20-79, 81). Rear seat side bolster (4D, see page 20,79). Rear seat-back (2D, see page 20-81). Center pillar lower trim panel (4D, seepage20-59)o Lower anchor bolt from the front seat belt {2D. seepage 20-86)
. Side trim (see pages 20-59, 61). Seat side trim (4D, see page 20-59). Side trim panel (2D, see page 20-61). Trunk mat and spare tire lid. Reartrim panel (see page 20-62). Trunk side trim, Japan-produced (see page 20-62). Trunk trim panel, USA-produced (see page 20-62)
>r Clip, cable cushion locationsA >,4 B >,4D_ 1c >, 1 l4D)2D,2
t@#lB
_ : _/ _-___)
E >,4D, 12D,2
@i
_ _,, -/
D>,3